Owner's Manual
Page 59
Key cover Top portion CLP-130/120 CLP-120: Keyboard Stand Assembly 59 Rotate the adjuster until it is set firmly against the floor. • Are the pedal and power cords inserted ... firm contact with the floor surface. ENGLISH 7. After completing the assembly, please check the following. • Are there any parts left over? ➝ Review the assembly procedure and correct any errors. • Is the Clavinova clear of the main unit.
Key cover Top portion CLP-130/120 CLP-120: Keyboard Stand Assembly 59 Rotate the adjuster until it is set firmly against the floor. • Are the pedal and power cords inserted ... firm contact with the floor surface. ENGLISH 7. After completing the assembly, please check the following. • Are there any parts left over? ➝ Review the assembly procedure and correct any errors. • Is the Clavinova clear of the main unit.

Owner's Manual
Page 62
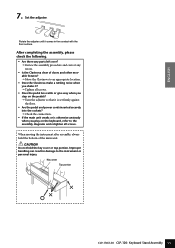
Set the adjuster. After completing the assembly, please check the following. • Are there any parts left over? ➝ Review the assembly procedure and correct any errors. • Is the Clavinova clear of the main unit. Rotate the adjuster until it is set firmly ... pedal box rattle or give way when you play on the keyboard, refer to the instrument or personal injury. ENGLISH 7. Key cover Top portion 62 CLP-130/120 CLP-130: Keyboard Stand Assembly When moving the instrument after assembly, always hold the key cover or top portion.
Set the adjuster. After completing the assembly, please check the following. • Are there any parts left over? ➝ Review the assembly procedure and correct any errors. • Is the Clavinova clear of the main unit. Rotate the adjuster until it is set firmly ... pedal box rattle or give way when you play on the keyboard, refer to the instrument or personal injury. ENGLISH 7. Key cover Top portion 62 CLP-130/120 CLP-130: Keyboard Stand Assembly When moving the instrument after assembly, always hold the key cover or top portion.
