

Owner's Manual
Page 5
INTRODUCTION PREPARATION OPERATION ADDITIONAL INFORMATION CONTENTS INTRODUCTION FEATURES 2 SUPPLIED ACCESSORIES 2 CONTROLS AND FUNCTIONS 3 Front panel 3 Remote control 5 Installing batteries in the remote control 6 Using the remote control 6 Rear panel 7 PREPARATION CONNECTIONS 8 Connecting speakers and other components 8 Connecting the power supply cord 10 OPERATION PLAYING AND RECORDING 11 Playing a source 11 Adjusting the tonal quality 13 Recording a source to a tape or an MD 14 ADDITIONAL INFORMATION TROUBLESHOOTING 16 SPECIFICATIONS 18 1
INTRODUCTION PREPARATION OPERATION ADDITIONAL INFORMATION CONTENTS INTRODUCTION FEATURES 2 SUPPLIED ACCESSORIES 2 CONTROLS AND FUNCTIONS 3 Front panel 3 Remote control 5 Installing batteries in the remote control 6 Using the remote control 6 Rear panel 7 PREPARATION CONNECTIONS 8 Connecting speakers and other components 8 Connecting the power supply cord 10 OPERATION PLAYING AND RECORDING 11 Playing a source 11 Adjusting the tonal quality 13 Recording a source to a tape or an MD 14 ADDITIONAL INFORMATION TROUBLESHOOTING 16 SPECIFICATIONS 18 1
Owner's Manual
Page 6
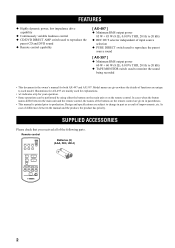
... document is the owner's manual for both AX-497 and AX-397. In cases when the button names differ between the manual and the product, the product has priority. In case of differences between the main unit and the remote control, the names of the buttons on the remote control. A/B DISPLAY w e f DISPLAY DIR A DIR B REC b s a DISC p CD...
... document is the owner's manual for both AX-497 and AX-397. In cases when the button names differ between the manual and the product, the product has priority. In case of differences between the main unit and the remote control, the names of the buttons on the remote control. A/B DISPLAY w e f DISPLAY DIR A DIR B REC b s a DISC p CD...
Owner's Manual
Page 7
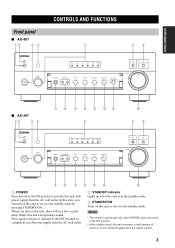
... LOUDNESS DISPLAY 1 FLAT -30dB 2 10 REC OUT TAPE CD/DVD TUNER MD PHONO 3 9 AUX 4 8 567 VOLUME 16 20 12 26 8 40 4 60 ∞ -dB 2 0 ■ AX-397 12 34 9 0 A B C DE 5 F 78 STANDBY POWER ON OFF STANDBY /ON INPUT AUX MD TAPE CD/DVD TUNER PHONO PHONES SPEAKERS A B ON OFF BASS 1 2 3 4 -5 1 2 3 4 5+... 4 60 ∞ -dB 2 0 90 ABC D F 1 POWER Press inward to the ON position to receive infrared-signals from the remote control. 3 When you can turn on this unit, there will be a few second delay before this unit can reproduce sound. Notes • ...
... LOUDNESS DISPLAY 1 FLAT -30dB 2 10 REC OUT TAPE CD/DVD TUNER MD PHONO 3 9 AUX 4 8 567 VOLUME 16 20 12 26 8 40 4 60 ∞ -dB 2 0 ■ AX-397 12 34 9 0 A B C DE 5 F 78 STANDBY POWER ON OFF STANDBY /ON INPUT AUX MD TAPE CD/DVD TUNER PHONO PHONES SPEAKERS A B ON OFF BASS 1 2 3 4 -5 1 2 3 4 5+... 4 60 ∞ -dB 2 0 90 ABC D F 1 POWER Press inward to the ON position to receive infrared-signals from the remote control. 3 When you can turn on this unit, there will be a few second delay before this unit can reproduce sound. Notes • ...
Owner's Manual
Page 8
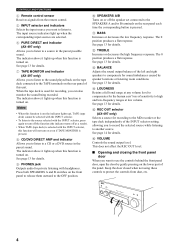
.... 7 TAPE MONITOR and indicator (AX-397 only) Allows you to listen to use the controls behind the front panel door, open the door by speaker locations or listening room conditions. The 0 position produces a flat response. Keep the door closed when not using these controls to protect the controls from the remote control. 5 INPUT selector and indicators Selects...
.... 7 TAPE MONITOR and indicator (AX-397 only) Allows you to listen to use the controls behind the front panel door, open the door by speaker locations or listening room conditions. The 0 position produces a flat response. Keep the door closed when not using these controls to protect the controls from the remote control. 5 INPUT selector and indicators Selects...

Owner's Manual
Page 9
..., this unit consumes a small amount of power in order to receive infrared-signals from the remote control. 4 Input selector buttons Select the input source you want to listen to this unit. 2 POWER Turns on this unit or a YAMAHA CD player, tuner, tape deck, etc. Notes • This button is operational only when POWER...
..., this unit consumes a small amount of power in order to receive infrared-signals from the remote control. 4 Input selector buttons Select the input source you want to listen to this unit. 2 POWER Turns on this unit or a YAMAHA CD player, tuner, tape deck, etc. Notes • This button is operational only when POWER...

Owner's Manual
Page 10
...DIR A DIR B REC b s a DISC p CD TAPE Approximately 6 m (19.7 ft) ■ Handling the remote control • The area between the remote control and this unit must be clear of large obstacles. • Do not spill water or other liquids on the front panel ... aim the remote control directly at the remote control sensor on the remote control. • Do not drop the remote control. • Do not leave or store the remote control in the remote control 13 Using the remote control The remote control transmits a directional infrared beam. otherwise, the remote control may have the...
...DIR A DIR B REC b s a DISC p CD TAPE Approximately 6 m (19.7 ft) ■ Handling the remote control • The area between the remote control and this unit must be clear of large obstacles. • Do not spill water or other liquids on the front panel ... aim the remote control directly at the remote control sensor on the remote control. • Do not drop the remote control. • Do not leave or store the remote control in the remote control 13 Using the remote control The remote control transmits a directional infrared beam. otherwise, the remote control may have the...

Owner's Manual
Page 14
The outlet(s) supply power to any connected component whenever the power of this unit is controlled by POWER or STANDBY/ON on the front panel of this unit. TOTAL ■ Connecting the AC power supply cord Plug the power supply cord... your local main voltage BEFORE plugging the power supply cord into the AC wall outlet after all other components to this unit (or on the remote control). Voltages are complete. ■ AC OUTLET(S) (SWITCHED) U.K. CONNECTIONS Connecting the power supply cord VOLTAGE SELECTOR IMPEDANCE SELECTOR A OR B: 4ΩMIN / SPEAKER A+B: 8ΩMIN / SPEAKER A OR...
The outlet(s) supply power to any connected component whenever the power of this unit is controlled by POWER or STANDBY/ON on the front panel of this unit. TOTAL ■ Connecting the AC power supply cord Plug the power supply cord... your local main voltage BEFORE plugging the power supply cord into the AC wall outlet after all other components to this unit (or on the remote control). Voltages are complete. ■ AC OUTLET(S) (SWITCHED) U.K. CONNECTIONS Connecting the power supply cord VOLTAGE SELECTOR IMPEDANCE SELECTOR A OR B: 4ΩMIN / SPEAKER A+B: 8ΩMIN / SPEAKER A OR...
Owner's Manual
Page 15
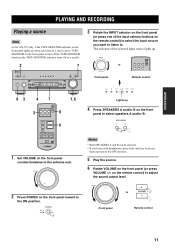
... DIR A DIR B REC b s a DISC p CD TAPE 6 1,6 1 Set VOLUME on the front panel (or press VOLUME +/- Remote control 11 OPERATION PLAYING AND RECORDING PLAYING AND RECORDING Playing a source Note As for AX-397 only, if the TAPE MONITOR indicator on the front panel lights up when you listen to a source, press TAPE...SPEAKERS A and/or B on the front panel inward to the ON position. The indicator of the input selector buttons on the remote control) to adjust the sound output level. 16 20 12 VOLUME 26 8 40 4 60 ∞ -dB 2 0 Front panel + or VOLUME -...
... DIR A DIR B REC b s a DISC p CD TAPE 6 1,6 1 Set VOLUME on the front panel (or press VOLUME +/- Remote control 11 OPERATION PLAYING AND RECORDING PLAYING AND RECORDING Playing a source Note As for AX-397 only, if the TAPE MONITOR indicator on the front panel lights up when you listen to a source, press TAPE...SPEAKERS A and/or B on the front panel inward to the ON position. The indicator of the input selector buttons on the remote control) to adjust the sound output level. 16 20 12 VOLUME 26 8 40 4 60 ∞ -dB 2 0 Front panel + or VOLUME -...
Owner's Manual
Page 16
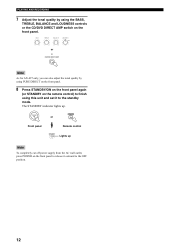
... the front panel. 8 Press STANDBY/ON on the front panel again (or STANDBY on the remote control) to finish using the BASS, TREBLE, BALANCE and LOUDNESS controls or the CD/DVD DIRECT AMP switch on the front panel to release it to the OFF ... 1 2 3 4 5+ TREBLE 1 2 3 4 -5 1 2 3 4 5+ BALANCE 1 2 3 4 L5 1 2 3 4 5R or LOUDNESS 1 FLAT -30dB 2 10 3 9 4 8 567 CD/DVD DIRECT AMP Note As for AX-497 only, you can also adjust the tonal quality by using this unit and set it outward to the standby mode. STANDBY /ON or STANDBY Front panel Remote control STANDBY Lights up .
... the front panel. 8 Press STANDBY/ON on the front panel again (or STANDBY on the remote control) to finish using the BASS, TREBLE, BALANCE and LOUDNESS controls or the CD/DVD DIRECT AMP switch on the front panel to release it to the OFF ... 1 2 3 4 5+ TREBLE 1 2 3 4 -5 1 2 3 4 5+ BALANCE 1 2 3 4 L5 1 2 3 4 5R or LOUDNESS 1 FLAT -30dB 2 10 3 9 4 8 567 CD/DVD DIRECT AMP Note As for AX-497 only, you can also adjust the tonal quality by using this unit and set it outward to the standby mode. STANDBY /ON or STANDBY Front panel Remote control STANDBY Lights up .

Owner's Manual
Page 17
...CAUTION If the CD/DVD DIRECT AMP switch (or the PURE DIRECT switch for AX-497 only, if both the CD/DVD DIRECT AMP and the PURE DIRECT switches are turned on the remote control) to set the sound output level to the loudest listening level that the LOUDNESS...AX-397 only) and then sent to the power amplifier, thus eliminating any volume level, thus compensating for AX-497 only) AFTER lowering the sound output level or AFTER checking that you would listen to. 16 20 12 VOLUME 26 8 40 4 60 ∞ -dB 2 0 Front panel + or VOLUME - Remote control 3 Rotate the LOUDNESS control...
...CAUTION If the CD/DVD DIRECT AMP switch (or the PURE DIRECT switch for AX-497 only, if both the CD/DVD DIRECT AMP and the PURE DIRECT switches are turned on the remote control) to set the sound output level to the loudest listening level that the LOUDNESS...AX-397 only) and then sent to the power amplifier, thus eliminating any volume level, thus compensating for AX-497 only) AFTER lowering the sound output level or AFTER checking that you would listen to. 16 20 12 VOLUME 26 8 40 4 60 ∞ -dB 2 0 Front panel + or VOLUME - Remote control 3 Rotate the LOUDNESS control...
Owner's Manual
Page 18
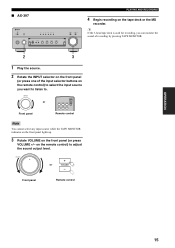
... the CD/DVD DIRECT AMP switch (and the PURE DIRECT switch for AX-497 only) have no effect on the source being recorded. • Check the copyright laws in progress will not affect the recording. on the remote control) to select the input source you want to listen to adjust the... 3 Rotate the INPUT selector on the front panel (or press one of the input selector buttons on the remote control) to . Recording copyright-protected material may infringe on copyright laws. ■ AX-497 STANDBY POWER ON OFF STANDBY /ON INPUT AUX MD TAPE CD/DVD TUNER PHONO PURE DIRECT CD/DVD ...
... the CD/DVD DIRECT AMP switch (and the PURE DIRECT switch for AX-497 only) have no effect on the source being recorded. • Check the copyright laws in progress will not affect the recording. on the remote control) to select the input source you want to listen to adjust the... 3 Rotate the INPUT selector on the front panel (or press one of the input selector buttons on the remote control) to . Recording copyright-protected material may infringe on copyright laws. ■ AX-497 STANDBY POWER ON OFF STANDBY /ON INPUT AUX MD TAPE CD/DVD TUNER PHONO PURE DIRECT CD/DVD ...
Owner's Manual
Page 19
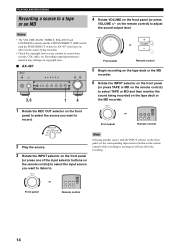
...panel Remote control Note You cannot select any input source while the TAPE MONITOR indicator on the front panel lights up. 3 Rotate VOLUME on the tape deck or the MD recorder. VOLUME 16 20 12 26 8 40 4 60 ∞ -dB 2 0 Front panel + or VOLUME - OPERATION ■ AX-397 ...or press VOLUME +/- y If the 3-head tape deck is used for recording, you want to listen to adjust the sound output level. Remote control 15 on the remote control) to select the input source you can monitor the sound of recording by pressing TAPE MONITOR. 2 3 1 Play the source. 2 Rotate...
...panel Remote control Note You cannot select any input source while the TAPE MONITOR indicator on the front panel lights up. 3 Rotate VOLUME on the tape deck or the MD recorder. VOLUME 16 20 12 26 8 40 4 60 ∞ -dB 2 0 Front panel + or VOLUME - OPERATION ■ AX-397 ...or press VOLUME +/- y If the 3-head tape deck is used for recording, you want to listen to adjust the sound output level. Remote control 15 on the remote control) to select the input source you can monitor the sound of recording by pressing TAPE MONITOR. 2 3 1 Play the source. 2 Rotate...
Owner's Manual
Page 20
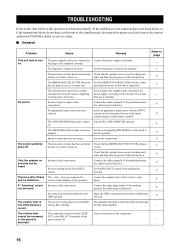
...not set to either end. Connect the audio plugs firmly. the MC head amplifier. - The impedance setting is turned Turn off . - on the remote control). the ON position. 11 Speaker connections are not touching each other and then turn the power of the input 11 selector buttons on . 4 The ... to the chart below do not help, set this unit to the standby mode, disconnect the power cord, and contact the nearest authorized YAMAHA dealer or service center. ■ General Problem Cause Remedy Refer to page This unit fails to turn The power supply cord is not ...
...not set to either end. Connect the audio plugs firmly. the MC head amplifier. - The impedance setting is turned Turn off . - on the remote control). the ON position. 11 Speaker connections are not touching each other and then turn the power of the input 11 selector buttons on . 4 The ... to the chart below do not help, set this unit to the standby mode, disconnect the power cord, and contact the nearest authorized YAMAHA dealer or service center. ■ General Problem Cause Remedy Refer to page This unit fails to turn The power supply cord is not ...

Owner's Manual
Page 21
...mode. Reposition this unit. The TAPE MONITOR function is functioning. degraded when unit is set to use those controls. 13 affect the tonal quality. ■ Remote control Problem The remote control does not work nor function properly. on. 4 Using the BASS, The CD/DVD DIRECT AMP switch (or... The CD/DVD DIRECT AMP switch (or the PURE TREBLE, BALANCE the PURE DIRECT switch for AX-497 DIRECT switch for AX-497 only)...
...mode. Reposition this unit. The TAPE MONITOR function is functioning. degraded when unit is set to use those controls. 13 affect the tonal quality. ■ Remote control Problem The remote control does not work nor function properly. on. 4 Using the BASS, The CD/DVD DIRECT AMP switch (or... The CD/DVD DIRECT AMP switch (or the PURE TREBLE, BALANCE the PURE DIRECT switch for AX-497 DIRECT switch for AX-497 only)...


