

Owners Manual
Page 1
A II A NS-AW190/NS-AW390 INDOOR / OUTDOOR SPEAKER SYSTEM I Ilf CONTENTS CONSUMER PRECAUTIONS 2 UNPACKING 3 MOUNTING THE SPEAKERS 4 CONNECTIONS TO YOUR AMPLIFIER 6 SETTING UP THE SPEAKERS 7 SPECIFICATIONS 8 OWNER'S MANUAL
A II A NS-AW190/NS-AW390 INDOOR / OUTDOOR SPEAKER SYSTEM I Ilf CONTENTS CONSUMER PRECAUTIONS 2 UNPACKING 3 MOUNTING THE SPEAKERS 4 CONNECTIONS TO YOUR AMPLIFIER 6 SETTING UP THE SPEAKERS 7 SPECIFICATIONS 8 OWNER'S MANUAL
Owners Manual
Page 2
...bent, the sound will be distorted. • Lower the power amplifier / receiver volume control before setting up your NS-AW190/NS-AW390 speakers. • When installing these speakers outdoors, try to minimize their exposure to rain and snow by improper placement or installation of hanger for your power... carefully before changing input sources. Never change input sources (for any accident caused by mounting the speaker in corners or under eaves. • Since these speakers are firmly secured. YAMAHA shall not be liable for example, FM to walls with a dry, soft cloth. •...
...bent, the sound will be distorted. • Lower the power amplifier / receiver volume control before setting up your NS-AW190/NS-AW390 speakers. • When installing these speakers outdoors, try to minimize their exposure to rain and snow by improper placement or installation of hanger for your power... carefully before changing input sources. Never change input sources (for any accident caused by mounting the speaker in corners or under eaves. • Since these speakers are firmly secured. YAMAHA shall not be liable for example, FM to walls with a dry, soft cloth. •...
Owners Manual
Page 3
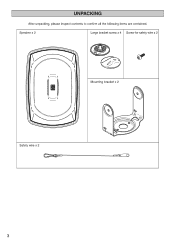
UNPACKING After unpacking, please inspect contents to confirm all the following items are contained. Mounting bracket x 2 Safety wire x 2 .---- - O 0 3 Speaker x 2 Large bracket screw x 4 Screw for safety wire x 2 _______, i --------- ( AD) %O ----i - t,i. -
UNPACKING After unpacking, please inspect contents to confirm all the following items are contained. Mounting bracket x 2 Safety wire x 2 .---- - O 0 3 Speaker x 2 Large bracket screw x 4 Screw for safety wire x 2 _______, i --------- ( AD) %O ----i - t,i. -
Owners Manual
Page 4
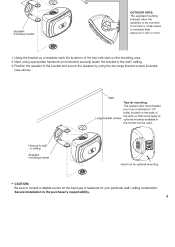
... have threded insrt nuts (matched for your particular wall / ceiling construction. • 0 C Supplied mounting bracket OUTDOOR NOTE: The supplied mounting I brackets allow the speakers to be used. 114 • • Insert nut for optional mounting. * CAUTION: Be sure to consult a reliable source for the best type of fasteners ...a template mark the locations of Large bracket screws optional brackets available in the market can be mounted in the bracket and secure the speaker by using appropriate hardware (not included) securely fasten the bracket to the wall / ceiling. 3.
... have threded insrt nuts (matched for your particular wall / ceiling construction. • 0 C Supplied mounting bracket OUTDOOR NOTE: The supplied mounting I brackets allow the speakers to be used. 114 • • Insert nut for optional mounting. * CAUTION: Be sure to consult a reliable source for the best type of fasteners ...a template mark the locations of Large bracket screws optional brackets available in the market can be mounted in the bracket and secure the speaker by using appropriate hardware (not included) securely fasten the bracket to the wall / ceiling. 3.
Owners Manual
Page 5
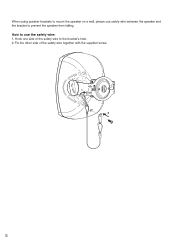
Fix the other side of the safety wire to prevent the speaker from falling. When using speaker brackets to mount the speaker on a wall, please use the safety wire: 1. Hook one side of the safety wire together with the supplied screw. 5 How to use safety wire between the speaker and the bracket to the bracket's hole. 2.
Fix the other side of the safety wire to prevent the speaker from falling. When using speaker brackets to mount the speaker on a wall, please use the safety wire: 1. Hook one side of the safety wire together with the supplied screw. 5 How to use safety wire between the speaker and the bracket to the bracket's hole. 2.
Owners Manual
Page 6
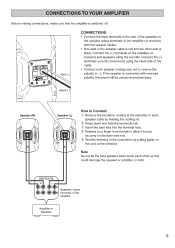
... amplifier, or both components using the red side. Connect the (+) terminals on the amplifier (or receiver) and speakers using the black side of the cable. • Connect each speaker cable by pulling lightly on the cord at the terminal. Aro I I e (w)) Red (+) Black (-) CONNECTIONS • ...Connect the input terminals at the extremity of each speaker making connections, make sure that the amplifier is switched off . © Press down and hold the terminal's tab. ® Insert the bare ...
... amplifier, or both components using the red side. Connect the (+) terminals on the amplifier (or receiver) and speakers using the black side of the cable. • Connect each speaker cable by pulling lightly on the cord at the terminal. Aro I I e (w)) Red (+) Black (-) CONNECTIONS • ...Connect the input terminals at the extremity of each speaker making connections, make sure that the amplifier is switched off . © Press down and hold the terminal's tab. ® Insert the bare ...
Owners Manual
Page 7
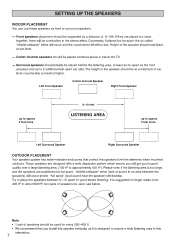
...over a large listening area. (100 ft2 to place the speakers between the speakers) will occur and/or "hot spots" (loud sound near the speaker) will be separated by a distance of 6-10ft. It is too large, and the speakers are positioned too far apart, "middle-omission" effect (lack...placed too close together, there will develop. SETTING UP THE SPEAKERS INDOOR PLACEMENT You can use these speakers as the front speakers and up to approx 2 feet more Left Surround Speaker Right Surround Speaker OUTDOOR PLACEMENT Your speaker system has water-resistant enclosures that you will get good ...
...over a large listening area. (100 ft2 to place the speakers between the speakers) will occur and/or "hot spots" (loud sound near the speaker) will be separated by a distance of 6-10ft. It is too large, and the speakers are positioned too far apart, "middle-omission" effect (lack...placed too close together, there will develop. SETTING UP THE SPEAKERS INDOOR PLACEMENT You can use these speakers as the front speakers and up to approx 2 feet more Left Surround Speaker Right Surround Speaker OUTDOOR PLACEMENT Your speaker system has water-resistant enclosures that you will get good ...
Owners Manual
Page 8
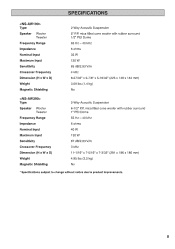
... x 186 x 180 mm) 4.85 lbs (2.2 kg) No * Specifications subject to change without notice due to product improvements. 8 SPECIFICATIONS Type Speaker Woofer Tweeter Frequency Range Impedance Nominal Input Maximum Input Sensitivity Crossover Frequency Dimension (H x W x D) Weight Magnetic Shielding 2-Way Acoustic Suspension 5" P.P....rubber surround 1/2" PEI Dome 65 Hz - 40 kHz 6 ohms 35 W 120 W 85 dB/2.83 V/m 4 kHz 8-27/32" x 5-7/8" x 5-19/32" (225 x 149 x 142 mm) 3.09 lbs (1.4 kg) No Type Speaker Woofer Tweeter Frequency Range Impedance Nominal Input Maximum Input Sensitivity Crossover ...
... x 186 x 180 mm) 4.85 lbs (2.2 kg) No * Specifications subject to change without notice due to product improvements. 8 SPECIFICATIONS Type Speaker Woofer Tweeter Frequency Range Impedance Nominal Input Maximum Input Sensitivity Crossover Frequency Dimension (H x W x D) Weight Magnetic Shielding 2-Way Acoustic Suspension 5" P.P....rubber surround 1/2" PEI Dome 65 Hz - 40 kHz 6 ohms 35 W 120 W 85 dB/2.83 V/m 4 kHz 8-27/32" x 5-7/8" x 5-19/32" (225 x 149 x 142 mm) 3.09 lbs (1.4 kg) No Type Speaker Woofer Tweeter Frequency Range Impedance Nominal Input Maximum Input Sensitivity Crossover ...

Owners Manual
Page 9
We suggest that goes into each and every Yamaha Loudspeaker. LIMITED WARRANTY INDOOR / OUTDOOR SPEAKER SYSTEM Duration of Warranty: This Speaker System is covered by the original purchaser. Accident, negligence, misuse, abuse, improper installation or operation or failure to provide a .... YOU ARE RESPONSIBLE FOR ANY INSTALLATION OR REMOVAL CHARGES AND FOR ANY INITIAL SHIPPING CHARGES. How you can get Warranty Service: (1) YAMAHA Speaker Systems requiring service must pay the return shipping charges to contact your Owner's manual. Warranty service is enforceable only by this warranty for...
We suggest that goes into each and every Yamaha Loudspeaker. LIMITED WARRANTY INDOOR / OUTDOOR SPEAKER SYSTEM Duration of Warranty: This Speaker System is covered by the original purchaser. Accident, negligence, misuse, abuse, improper installation or operation or failure to provide a .... YOU ARE RESPONSIBLE FOR ANY INSTALLATION OR REMOVAL CHARGES AND FOR ANY INITIAL SHIPPING CHARGES. How you can get Warranty Service: (1) YAMAHA Speaker Systems requiring service must pay the return shipping charges to contact your Owner's manual. Warranty service is enforceable only by this warranty for...


