
Owner's Manual
Page 5
...38 7 INPUT MODE (initial input mode 39 8 DISPLAY SET (brightness of SET MENU items 35 Adjusting the items on the power 17 ADJUSTING SPEAKER OUTPUT LEVELS 18 Using the test tone 18 USING BASIC FUNCTIONS BASIC PLAYBACK 19 Basic operations 19 Selecting a sound field program 21 RECORDING 26 TUNING... SET MENU 35 List of front panel display) ..... 39 9 SP/PRE OUT (output source settings 39 ADJUSTING THE LEVEL OF THE EFFECT SPEAKERS 40 CHANGING THE PARAMETER SETTINGS FOR DSP PROGRAMS 41 Adjusting the delay time 41 Adjusting the parameter settings for PRO LOGIC II Music 42 APPENDIX...
...38 7 INPUT MODE (initial input mode 39 8 DISPLAY SET (brightness of SET MENU items 35 Adjusting the items on the power 17 ADJUSTING SPEAKER OUTPUT LEVELS 18 Using the test tone 18 USING BASIC FUNCTIONS BASIC PLAYBACK 19 Basic operations 19 Selecting a sound field program 21 RECORDING 26 TUNING... SET MENU 35 List of front panel display) ..... 39 9 SP/PRE OUT (output source settings 39 ADJUSTING THE LEVEL OF THE EFFECT SPEAKERS 40 CHANGING THE PARAMETER SETTINGS FOR DSP PROGRAMS 41 Adjusting the delay time 41 Adjusting the parameter settings for PRO LOGIC II Music 42 APPENDIX...
Owner's Manual
Page 6
... of the package contents etc. INTRODUCTION Thank you to easily connect the speakers. Moreover, the One-touch connection of pcs. 1 4 1 1 FEATURES The AVX-S80 is the Home Theater Sound System that delivers a powerful and realistic sound experience like that found in this YAMAHA product. In this manual carefully. Please check the all components are...
... of the package contents etc. INTRODUCTION Thank you to easily connect the speakers. Moreover, the One-touch connection of pcs. 1 4 1 1 FEATURES The AVX-S80 is the Home Theater Sound System that delivers a powerful and realistic sound experience like that found in this YAMAHA product. In this manual carefully. Please check the all components are...
Owner's Manual
Page 7
... to a TV (monitor), DVD player, video camera and video game player AVX - Audio pin cable (not included) VIDEO OUTPUT L AUDIO OUTPUT R System control cable (included) *1 MARK SYSTEM CONNECTOR TO AVR-S80 SPEAKERS FRONT CENTER FRONT R (RED) (GREEN) L (WHITE) R (GRAY) REAR (SURROUND) L (BLUE) SPEAKER IMPEDANCE : 6ΩMIN. Avoid touching the leaked material or letting it...
... to a TV (monitor), DVD player, video camera and video game player AVX - Audio pin cable (not included) VIDEO OUTPUT L AUDIO OUTPUT R System control cable (included) *1 MARK SYSTEM CONNECTOR TO AVR-S80 SPEAKERS FRONT CENTER FRONT R (RED) (GREEN) L (WHITE) R (GRAY) REAR (SURROUND) L (BLUE) SPEAKER IMPEDANCE : 6ΩMIN. Avoid touching the leaked material or letting it...
Owner's Manual
Page 8
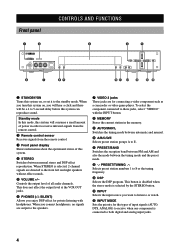
.... When you turn this system on , or set it to 8 or the tuning frequency. To select the component connected to the front left and right speakers without effect sounds. 5 VOLUME +/- Front panel CONTROLS AND FUNCTIONS 1 2 STANDBY/ON SILENT VIDEO2 PHONES VIDEO L AUDIO R OPTICAL MEMORY AUTO/MAN'L 6...+ INPUT INPUT MODE - 0q w e r t 1 STANDBY/ON Turns this system on , you connect headphones, no signals are output to the speakers. 7 VIDEO 2 jacks These jacks are directed to these jacks, select "VIDEO2" with headphones. When STEREO is selected, 2-channel signals are for the...
.... When you turn this system on , or set it to 8 or the tuning frequency. To select the component connected to the front left and right speakers without effect sounds. 5 VOLUME +/- Front panel CONTROLS AND FUNCTIONS 1 2 STANDBY/ON SILENT VIDEO2 PHONES VIDEO L AUDIO R OPTICAL MEMORY AUTO/MAN'L 6...+ INPUT INPUT MODE - 0q w e r t 1 STANDBY/ON Turns this system on , you connect headphones, no signals are output to the speakers. 7 VIDEO 2 jacks These jacks are directed to these jacks, select "VIDEO2" with headphones. When STEREO is selected, 2-channel signals are for the...
Owner's Manual
Page 9
...Used to the previous volume level. BOOST Turns BASS BOOST function on the SETUP menu etc. 7 TEST Outputs the test tone to adjust the speaker levels. 8 SLEEP Sets the sleep timer. 9 POWER ( ) Turns this window at the component you operate this system. Press again to ...code. 4 DSP program buttons Select DSP programs for the AMP position. For some programs, pressing a button repeatedly selects its subprograms. 5 LEVEL Selects the effect speaker channel to be adjusted. 6 Cursor buttons (j, i, u, d) Select SET MENU items and change the settings on or off. e MUTE Mutes the sound....
...Used to the previous volume level. BOOST Turns BASS BOOST function on the SETUP menu etc. 7 TEST Outputs the test tone to adjust the speaker levels. 8 SLEEP Sets the sleep timer. 9 POWER ( ) Turns this window at the component you operate this system. Press again to ...code. 4 DSP program buttons Select DSP programs for the AMP position. For some programs, pressing a button repeatedly selects its subprograms. 5 LEVEL Selects the effect speaker channel to be adjusted. 6 Cursor buttons (j, i, u, d) Select SET MENU items and change the settings on or off. e MUTE Mutes the sound....
Owner's Manual
Page 12
...and audio/video components (P.12) • Connecting the antennas (P.14) • Connecting the speakers (P.15) • Connecting the AC power cord (P.17) • Turning on the rear panel of AVRS80 and SW-S80 must be connected to "-". Voltages are 110-120V/220-240V AC, 50/60 Hz. (...China, Korean and General models only) Adjusting speaker output levels (P.18) AVR-S80 (General model) VOLTAGE SELECTOR 110 - 120V 220 - 240V VOLTAGE SELECTOR SW-S80 (General model) 220V-240V II0V-I20V VOLTAGE SELECTOR After connecting components • Check them again...
...and audio/video components (P.12) • Connecting the antennas (P.14) • Connecting the speakers (P.15) • Connecting the AC power cord (P.17) • Turning on the rear panel of AVRS80 and SW-S80 must be connected to "-". Voltages are 110-120V/220-240V AC, 50/60 Hz. (...China, Korean and General models only) Adjusting speaker output levels (P.18) AVR-S80 (General model) VOLTAGE SELECTOR 110 - 120V 220 - 240V VOLTAGE SELECTOR SW-S80 (General model) 220V-240V II0V-I20V VOLTAGE SELECTOR After connecting components • Check them again...

Owner's Manual
Page 13
... it slightly toward the center of the room to reduce wall reflections. Center speaker Align the front face of the center speaker with a 5-speaker system, using this happens. Rear speakers Place these speakers behind your video monitor. Subwoofer The position of the subwoofer is for the ...center sounds (dialog, vocals, etc.). The distance between the front speakers. PREPARATION SPEAKER SETUP This system has been designed to provide the best soundfield quality with the front face of your listening position, facing slightly...
... it slightly toward the center of the room to reduce wall reflections. Center speaker Align the front face of the center speaker with a 5-speaker system, using this happens. Rear speakers Place these speakers behind your video monitor. Subwoofer The position of the subwoofer is for the ...center sounds (dialog, vocals, etc.). The distance between the front speakers. PREPARATION SPEAKER SETUP This system has been designed to provide the best soundfield quality with the front face of your listening position, facing slightly...

Owner's Manual
Page 14
... • Thoroughly wipe clean the surface where the fastener is to be applied. This prevents the speakers from falling down, put the provided fasteners at the hardware store) Diam. 3.5 to 4 mm ...support 70 mm 70 mm Fastener Peel off the seal as shown below. Long-term use the holes on the speakers' back panels. 1 Fasten screws into a firm wall or wall support as shown in the figure. If ...screws are securely caught by the narrow parts of the TV. I Placing the center speaker Place the speaker on TV whose area is dirty, oily or wet and that adhesive strength is ...
... • Thoroughly wipe clean the surface where the fastener is to be applied. This prevents the speakers from falling down, put the provided fasteners at the hardware store) Diam. 3.5 to 4 mm ...support 70 mm 70 mm Fastener Peel off the seal as shown below. Long-term use the holes on the speakers' back panels. 1 Fasten screws into a firm wall or wall support as shown in the figure. If ...screws are securely caught by the narrow parts of the TV. I Placing the center speaker Place the speaker on TV whose area is dirty, oily or wet and that adhesive strength is ...
Owner's Manual
Page 15
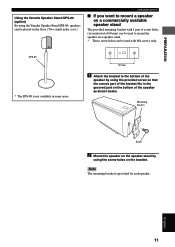
.... 60 mm 1 Attach the bracket to the bottom of the speaker by using the Yamaha Speaker Stand SPS-80, speakers can be placed on the floor. (Two stands make a set.) SPEAKER SETUP I If you want to mount a speaker on a commercially available speaker stand The provided mounting bracket with 1 pair of screw holes (...with M4 screws only. English 11 SPS-80 * The SPS-80 is provided for each speaker. Note The mounting bracket is not available in the grooved part on the bracket. PREPARATION Using the Yamaha Speaker Stand SPS-80 (option) By using the screw holes on the bottom of the...
.... 60 mm 1 Attach the bracket to the bottom of the speaker by using the Yamaha Speaker Stand SPS-80, speakers can be placed on the floor. (Two stands make a set.) SPEAKER SETUP I If you want to mount a speaker on a commercially available speaker stand The provided mounting bracket with 1 pair of screw holes (...with M4 screws only. English 11 SPS-80 * The SPS-80 is provided for each speaker. Note The mounting bracket is not available in the grooved part on the bracket. PREPARATION Using the Yamaha Speaker Stand SPS-80 (option) By using the screw holes on the bottom of the...
Owner's Manual
Page 19
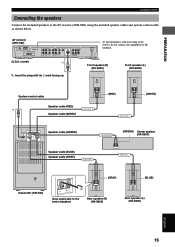
... (AVR-S80) 75Ω UNBAL. Front speaker (R) (NX-S80S) Front speaker (L) (NX-S80S) System control cable Speaker cable (RED) *1 FRONT R Speaker cable (WHITE) (RED) FRONT L (WHITE) SYSTEM CONNECTOR TO AVR-S80 Speaker cable (GREEN) CENTER (GREEN) Center speaker (NX-S80C) Speaker cable (BLUE) Speaker cable (GRAY) REAR R REAR L (GRAY) (BLUE) Subwoofer (SW-S80) (Also applicable to the center speaker) Rear speaker (R) (NX-S80S) Rear speaker (L) (NX-S80S) English...
... (AVR-S80) 75Ω UNBAL. Front speaker (R) (NX-S80S) Front speaker (L) (NX-S80S) System control cable Speaker cable (RED) *1 FRONT R Speaker cable (WHITE) (RED) FRONT L (WHITE) SYSTEM CONNECTOR TO AVR-S80 Speaker cable (GREEN) CENTER (GREEN) Center speaker (NX-S80C) Speaker cable (BLUE) Speaker cable (GRAY) REAR R REAR L (GRAY) (BLUE) Subwoofer (SW-S80) (Also applicable to the center speaker) Rear speaker (R) (NX-S80S) Rear speaker (L) (NX-S80S) English...

Owner's Manual
Page 20
...2 Tab 3 4 1 15 mm 1 Remove approximately 15 mm (9/16") of insulation from each other or any metal part of this system. If the polarity of the speaker connections is incorrect, the sound will be unnatural and lack bass. • A cover is attached to secure the wire. 16 Notes • Do not let... the bare speaker wires touch each of the speaker cables. Twist the exposed wires of the cable together to prevent short circuits. 2 Open the tab. 3 Pull the inserted bare wire of the...
...2 Tab 3 4 1 15 mm 1 Remove approximately 15 mm (9/16") of insulation from each other or any metal part of this system. If the polarity of the speaker connections is incorrect, the sound will be unnatural and lack bass. • A cover is attached to secure the wire. 16 Notes • Do not let... the bare speaker wires touch each of the speaker cables. Twist the exposed wires of the cable together to prevent short circuits. 2 Open the tab. 3 Pull the inserted bare wire of the...

Owner's Manual
Page 21
... amplifier, select PRE or BOTH in this system. English 17 If so, set the setting again. • Volume level • Input source • Speaker output level (center, rear L/R and subwoofer) • Sleep timer • Parameter • Delay time • Set menu • Preset station Turning...power cord is disconnected from the AC outlet, or the power supply is turned off frequency of the included 6 speakers or when using commercially available speakers, adjust speaker mode settings soon after turning the power on the signals output from the front, center and/or rear channels are...
... amplifier, select PRE or BOTH in this system. English 17 If so, set the setting again. • Volume level • Input source • Speaker output level (center, rear L/R and subwoofer) • Sleep timer • Parameter • Delay time • Set menu • Preset station Turning...power cord is disconnected from the AC outlet, or the power supply is turned off frequency of the included 6 speakers or when using commercially available speakers, adjust speaker mode settings soon after turning the power on the signals output from the front, center and/or rear channels are...

Owner's Manual
Page 22
... be made at the desired volume simply by pressing VOL +/- Level" on the SET MENU is set (as long as you do not change the speakers). The test tone will be circulated skipping the subwoofer. 18 j, i TEST DVD CODE SET AMP HALL 1 JAZZ 2 ROCK ENTERTAINMENT 3 4 SPORTS MONO MOVIE MOVIE 1 ...Logic II and DTS). Notes • If "1A CENTER" on the remote control. • If the output level of the effect speakers (center, rear left speaker), and the SUBWOOFER (subwoofer). LEFT RIGHT SUBWOOFER CENTER L SUR. After j or i is important for best performance of this adjustment is...
... be made at the desired volume simply by pressing VOL +/- Level" on the SET MENU is set (as long as you do not change the speakers). The test tone will be circulated skipping the subwoofer. 18 j, i TEST DVD CODE SET AMP HALL 1 JAZZ 2 ROCK ENTERTAINMENT 3 4 SPORTS MONO MOVIE MOVIE 1 ...Logic II and DTS). Notes • If "1A CENTER" on the remote control. • If the output level of the effect speakers (center, rear left speaker), and the SUBWOOFER (subwoofer). LEFT RIGHT SUBWOOFER CENTER L SUR. After j or i is important for best performance of this adjustment is...

Owner's Manual
Page 26
...this program, no DSP effect is provided for video sources) BASIC PLAYBACK No. This program ideally simulates the multi-surround speaker systems of science fiction films, thus creating a broad and expansive cinematic space amid the silence. In this sound field wrap... Dolby Surround, Dolby Digital and DTS-encoded software employing the most advanced techniques. The presence sound field is output from the front speakers and the rear speakers. This program is applied. Program 4 ENTERTAINMENT/ Game ENTERTAINMENT/ Concert Video 5 TV SPORTS 6 MONO MOVIE 7 MOVIE THEATER 1/ ...
...this program, no DSP effect is provided for video sources) BASIC PLAYBACK No. This program ideally simulates the multi-surround speaker systems of science fiction films, thus creating a broad and expansive cinematic space amid the silence. In this sound field wrap... Dolby Surround, Dolby Digital and DTS-encoded software employing the most advanced techniques. The presence sound field is output from the front speakers and the rear speakers. This program is applied. Program 4 ENTERTAINMENT/ Game ENTERTAINMENT/ Concert Video 5 TV SPORTS 6 MONO MOVIE 7 MOVIE THEATER 1/ ...
Owner's Manual
Page 27
... LOGIC Normal - - - - In this case the program name changes to the corresponding name for 6.1 channel. • When playing a 6.1 channel source with the virtual rear center speaker. Program ANALOG, PCM, DOLBY DIGITAL DOLBY DIGITAL, DTS DTS DOLBY DIGITAL DTS + Matrix 6.1 + Matrix 6.1 7 MOVIE THEATER 1 70 mm Spectacle 70 mm Sci-Fi DGTL Spectacle...
... LOGIC Normal - - - - In this case the program name changes to the corresponding name for 6.1 channel. • When playing a 6.1 channel source with the virtual rear center speaker. Program ANALOG, PCM, DOLBY DIGITAL DOLBY DIGITAL, DTS DTS DOLBY DIGITAL DTS + Matrix 6.1 + Matrix 6.1 7 MOVIE THEATER 1 70 mm Spectacle 70 mm Sci-Fi DGTL Spectacle...

Owner's Manual
Page 28
...Matrix6.1 ^ OFF each time the MATRIX 6.1 button is created from rear left and right channels, and output from virtual rear center speaker. The virtual rear center speaker can listen to Virtual CINEMA DSP by selecting PRO LOGIC II in the following cases: - y • When the Matrix 6.1 ...Dolby Digital Surround EX or DTS ES software While playing a 5.1-channel source, press MATRIX 6.1 to Virtual CINEMA DSP automatically. Virtual rear center speaker does not work in the following cases: - Notes • Some Dolby Digital Surround EX or DTS ES software may not contain the signal ...
...Matrix6.1 ^ OFF each time the MATRIX 6.1 button is created from rear left and right channels, and output from virtual rear center speaker. The virtual rear center speaker can listen to Virtual CINEMA DSP by selecting PRO LOGIC II in the following cases: - y • When the Matrix 6.1 ...Dolby Digital Surround EX or DTS ES software While playing a 5.1-channel source, press MATRIX 6.1 to Virtual CINEMA DSP automatically. Virtual rear center speaker does not work in the following cases: - Notes • Some Dolby Digital Surround EX or DTS ES software may not contain the signal ...
Owner's Manual
Page 29
...about the input signal. Notes • This feature is not available when 96-kHz sampling digital signals are mixed and output from the front speakers. I Normal Stereo Reproduction Press STEREO to turn off the sound effects or if you set to this case turn off , you listen ... for normal stereo reproduction. USING BASIC FUNCTIONS I SILENT CINEMA DSP You can enjoy a powerful sound field similar to what you could expert from actual speakers with normal stereo reproduction.) y • When SILENT CINEMA DSP is functioning, the "SILENT" indicator lights up on the front panel display. (When...
...about the input signal. Notes • This feature is not available when 96-kHz sampling digital signals are mixed and output from the front speakers. I Normal Stereo Reproduction Press STEREO to turn off the sound effects or if you set to this case turn off , you listen ... for normal stereo reproduction. USING BASIC FUNCTIONS I SILENT CINEMA DSP You can enjoy a powerful sound field similar to what you could expert from actual speakers with normal stereo reproduction.) y • When SILENT CINEMA DSP is functioning, the "SILENT" indicator lights up on the front panel display. (When...

Owner's Manual
Page 39
... each item from the following page, the default setting is selected.) 4 Press j / i once to enter the setup mode of SET MENU items Items Initial settings 1 SPEAKER SET A CENTER B FRONT C REAR LR D BASS E F. DVD u , d CODE SET AMP HALL 1 JAZZ 2 ROCK ENTERTAINMENT 3 4 SPORTS MONO MOVIE MOVIE 1 MOVIE 2 5 6 7 ... to change the setting of the item. 6 Press u/d repeatedly until the menu disappears or simply press one of 9 items including the speaker mode setting. ADJUSTMENTS SET MENU The SET MENU consists of the DSP program buttons to exit SET MENU. The last setting you want to...
... each item from the following page, the default setting is selected.) 4 Press j / i once to enter the setup mode of SET MENU items Items Initial settings 1 SPEAKER SET A CENTER B FRONT C REAR LR D BASS E F. DVD u , d CODE SET AMP HALL 1 JAZZ 2 ROCK ENTERTAINMENT 3 4 SPORTS MONO MOVIE MOVIE 1 MOVIE 2 5 6 7 ... to change the setting of the item. 6 Press u/d repeatedly until the menu disappears or simply press one of 9 items including the speaker mode setting. ADJUSTMENTS SET MENU The SET MENU consists of the DSP program buttons to exit SET MENU. The last setting you want to...

Owner's Manual
Page 40
... suitable output modes for several listeners and superior synchronization of sound and images. I 1B FRONT (front speaker mode) Choices: LARGE, SMALL LARGE Select this if you do not have rear speakers. The entire range of the front left and right channel signal is set the following. NON Select ... the low-frequency signals (90 Hz and below ) of the rear channel signal is directed to the rear left and right speakers or if a rear subwoofer is directed to the speakers selected with "1D BASS". The lowfrequency signals (90 Hz and below ) of the front channel are not affected. Note ...
... suitable output modes for several listeners and superior synchronization of sound and images. I 1B FRONT (front speaker mode) Choices: LARGE, SMALL LARGE Select this if you do not have rear speakers. The entire range of the front left and right channel signal is set the following. NON Select ... the low-frequency signals (90 Hz and below ) of the rear channel signal is directed to the rear left and right speakers or if a rear subwoofer is directed to the speakers selected with "1D BASS". The lowfrequency signals (90 Hz and below ) of the front channel are not affected. Note ...
Owner's Manual
Page 41
... LFE signals are defined as 90 Hz and below. Lowfrequency signals designated to be used for both stereo reproduction and the DSP program). Control range: SPEAKER (SP LFE 20 to 0 dB HEADPHONE (HP LFE 20 to 0 dB Initial setting: 0 dB 1 Press d/u to select the item to the front ...channels in accordance with that of your subwoofer or headphones. The Lowfrequency signals can be directed to both front speakers and a subwoofer. Choices: SWFR (subwoofer), FRONT, BOTH SWFR Select this if you do not use a subwoofer. FRONT Select this setting if you ...
... LFE signals are defined as 90 Hz and below. Lowfrequency signals designated to be used for both stereo reproduction and the DSP program). Control range: SPEAKER (SP LFE 20 to 0 dB HEADPHONE (HP LFE 20 to 0 dB Initial setting: 0 dB 1 Press d/u to select the item to the front ...channels in accordance with that of your subwoofer or headphones. The Lowfrequency signals can be directed to both front speakers and a subwoofer. Choices: SWFR (subwoofer), FRONT, BOTH SWFR Select this if you do not use a subwoofer. FRONT Select this setting if you ...


