
User Guide
Page 5
13. Specifications General specifications ...16.1 Printer specifications ...16.1 Scanner and copier specifications ...16.2 Facsimile specifications ...16.2 Troubleshooting Clearing document jams ...14.1 Clearing paper jams ...14.2 Understanding display messages ...14.7 Print cartridge-related messages ...14.10 Solving other problems ...14.11 15. Installing ...
13. Specifications General specifications ...16.1 Printer specifications ...16.1 Scanner and copier specifications ...16.2 Facsimile specifications ...16.2 Troubleshooting Clearing document jams ...14.1 Clearing paper jams ...14.2 Understanding display messages ...14.7 Print cartridge-related messages ...14.10 Solving other problems ...14.11 15. Installing ...
User Guide
Page 19
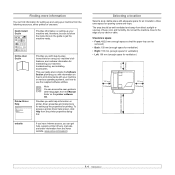
...sunlight or sources of your machine on the printer software CD. Finding more information You can find information for maintaining your machine, troubleshooting, and installing accessories. Online User Guide Printer Driver Help Provides you with help , support, printer drivers, manuals, and order ...mm (enough space for air circulation. Do not set the machine close to follow the instructions in other languages from the Xerox website, www.xerox.com/support. Note You can be well-ventilated and away from the printer properties dialog box. website If you have Internet...
...sunlight or sources of your machine on the printer software CD. Finding more information You can find information for maintaining your machine, troubleshooting, and installing accessories. Online User Guide Printer Driver Help Provides you with help , support, printer drivers, manuals, and order ...mm (enough space for air circulation. Do not set the machine close to follow the instructions in other languages from the Xerox website, www.xerox.com/support. Note You can be well-ventilated and away from the printer properties dialog box. website If you have Internet...

User Guide
Page 78
... document jams, use the scanner glass for what to do if you do not see the paper in this area, refer to Roller misfeed. 14 Troubleshooting This chapter gives helpful information for thick, thin, or mixed paper-type originals. 14.1 Then load the removed pages, if any remaining pages from the...
... document jams, use the scanner glass for what to do if you do not see the paper in this area, refer to Roller misfeed. 14 Troubleshooting This chapter gives helpful information for thick, thin, or mixed paper-type originals. 14.1 Then load the removed pages, if any remaining pages from the...

User Guide
Page 79
The jammed paper is automatically ejected from the feed area by gently pulling it straight out. Refer to the table below and page 14.3 In the fuser area or around the print cartridge. Printing automatically resumes. 14.2 Follow the instructions in this area, check the fuser area around the page 14.3 print cartridge In the paper exit area page 14.4 In the duplex unit page 14.5 Between the duplex unit and fuser area page 14.6 Caution To avoid tearing the paper, pull out the jammed paper gently and slowly. If the paper does not move when you pull, or if you do not see the paper...
The jammed paper is automatically ejected from the feed area by gently pulling it straight out. Refer to the table below and page 14.3 In the fuser area or around the print cartridge. Printing automatically resumes. 14.2 Follow the instructions in this area, check the fuser area around the page 14.3 print cartridge In the paper exit area page 14.4 In the duplex unit page 14.5 Between the duplex unit and fuser area page 14.6 Caution To avoid tearing the paper, pull out the jammed paper gently and slowly. If the paper does not move when you pull, or if you do not see the paper...

User Guide
Page 80
Printing automatically resumes. 14.3 Take care when removing paper from the machine. If the paper does not move when you pull, or if you do not see the paper in this area, stop and go to step 3. 3 Pull the tray 1 half. 4 Pull the paper straight up and out. 2 Open and close the front cover to resume printing. In the fuser area or around the print cartridge Note The fuser area is not feeding properly, remove and reload the paper into the machine. In the optional tray 2 1 Pull the optional tray 2 open. 2 Remove the jammed paper from the machine. 1 Open the front cover and pull ...
Printing automatically resumes. 14.3 Take care when removing paper from the machine. If the paper does not move when you pull, or if you do not see the paper in this area, stop and go to step 3. 3 Pull the tray 1 half. 4 Pull the paper straight up and out. 2 Open and close the front cover to resume printing. In the fuser area or around the print cartridge Note The fuser area is not feeding properly, remove and reload the paper into the machine. In the optional tray 2 1 Pull the optional tray 2 open. 2 Remove the jammed paper from the machine. 1 Open the front cover and pull ...

User Guide
Page 81
The jammed paper is automatically ejected from the machine. 2 Gently pull the paper out of the output tray. 1 pressure lever If you still do not see the paper, go to the next step. 3 Open the rear cover. 2 1 rear cover stopper 2 rear cover 14.4 In the paper exit area 1 Open and close the front cover. 2 Remove the jammed paper by gently pulling it straight out. 4 If you pull, stop and go to the next step. 5 Release the white strip, the rear cover stopper, and fully open the rear cover, as shown. 1 If you do not see the jammed paper or if there is any resistance when you see the ...
The jammed paper is automatically ejected from the machine. 2 Gently pull the paper out of the output tray. 1 pressure lever If you still do not see the paper, go to the next step. 3 Open the rear cover. 2 1 rear cover stopper 2 rear cover 14.4 In the paper exit area 1 Open and close the front cover. 2 Remove the jammed paper by gently pulling it straight out. 4 If you pull, stop and go to the next step. 5 Release the white strip, the rear cover stopper, and fully open the rear cover, as shown. 1 If you do not see the jammed paper or if there is any resistance when you see the ...

User Guide
Page 82
Make sure that the duplex unit is not inserted correctly, paper jams may occur. Duplex Jam 0 1 Pull the duplex unit out of the machine. 1 1 duplex unit 14.5 6 Unfold the duplex guide fully. 1 8 Pull the jammed paper out. Printing automatically resumes. In the duplex unit area If the duplex unit is inserted correctly. If the jammed paper does not move when you pull, push the pressure lever on each side up to loosen the paper, and then remove it. 1 1 duplex guide 7 While pushing the fuser lever to the right, open the fuser door. 1 2 1 fuser lever 2 fuser door 1 pressure ...
Make sure that the duplex unit is not inserted correctly, paper jams may occur. Duplex Jam 0 1 Pull the duplex unit out of the machine. 1 1 duplex unit 14.5 6 Unfold the duplex guide fully. 1 8 Pull the jammed paper out. Printing automatically resumes. In the duplex unit area If the duplex unit is inserted correctly. If the jammed paper does not move when you pull, push the pressure lever on each side up to loosen the paper, and then remove it. 1 1 duplex guide 7 While pushing the fuser lever to the right, open the fuser door. 1 2 1 fuser lever 2 fuser door 1 pressure ...

User Guide
Page 83
If the paper does not come out with the long edge facing the front of the tray. 1 1 duplex guide In the printer properties window, set the page orientation to be avoided. Duplex Jam 1 1 Open the rear cover. 2 Unfold the duplex guide fully. Ensure that the paper level is below the paper capacity mark on the inside wall of the tray. • Do not remove paper from the tray while your machine is facing down in the tray, or facing up in a tray. • Use only recommended print media. See the Software Section. 14.6 Ensure that the recommended print side of print media is ...
If the paper does not come out with the long edge facing the front of the tray. 1 1 duplex guide In the printer properties window, set the page orientation to be avoided. Duplex Jam 1 1 Open the rear cover. 2 Unfold the duplex guide fully. Ensure that the paper level is below the paper capacity mark on the inside wall of the tray. • Do not remove paper from the tray while your machine is facing down in the tray, or facing up in a tray. • Use only recommended print media. See the Software Section. 14.6 Ensure that the recommended print side of print media is ...
User Guide
Page 84
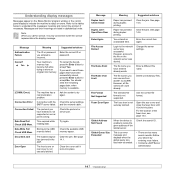
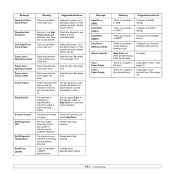
Message Meaning Suggested solutions Authentication Failure The ID or password you have entered already exists. Yes Your machine's memory has become full while trying to locate the given address of the fuser door, see page 14.5. Connection Error Connection with the Check the server settings SMTP server failed. Try again. Check the available USB memory space. See page 14.1. Paper has jammed during duplex printing. When the device is unable to store an original into memory. See page 14.5. See page 14.6. For the location of the Global server. Messages and their ...
Message Meaning Suggested solutions Authentication Failure The ID or password you have entered already exists. Yes Your machine's memory has become full while trying to locate the given address of the fuser door, see page 14.5. Connection Error Connection with the Check the server settings SMTP server failed. Try again. Check the available USB memory space. See page 14.1. Paper has jammed during duplex printing. When the device is unable to store an original into memory. See page 14.5. See page 14.6. For the location of the Global server. Messages and their ...
User Guide
Page 85
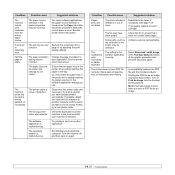
...The paper in the tray Load paper in the multipurpose tray. You have entered is already engaged. A problem has occurred in the LSU (Laser Scanning Unit). If the problem persists, please call for the line to find the Global server. Reconfirm junk fax setup, see page 10.2.... server this message displays. The receiving fax machine did not answer or the line is invalid. A problem has occurred in the LSU (Laser Scanning Unit). There is an authentication fail while connecting to use has no paper in the main motor. Divide your network administrator. Try ...
...The paper in the tray Load paper in the multipurpose tray. You have entered is already engaged. A problem has occurred in the LSU (Laser Scanning Unit). If the problem persists, please call for the line to find the Global server. Reconfirm junk fax setup, see page 10.2.... server this message displays. The receiving fax machine did not answer or the line is invalid. A problem has occurred in the LSU (Laser Scanning Unit). There is an authentication fail while connecting to use has no paper in the main motor. Divide your network administrator. Try ...
User Guide
Page 86
... setting. There is a problem in the Add Page/Cancel Job operation, but there are any scheduled jobs. Paper has jammed in SMTP authentication. The LSU (Laser Scanning Unit) in your printer is a problem in the feeding area of the tray. There is checking some problems detected. There is no paper in...
... setting. There is a problem in the Add Page/Cancel Job operation, but there are any scheduled jobs. Paper has jammed in SMTP authentication. The LSU (Laser Scanning Unit) in your printer is a problem in the feeding area of the tray. There is checking some problems detected. There is no paper in...

User Guide
Page 87
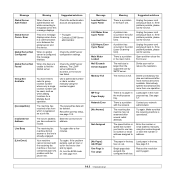
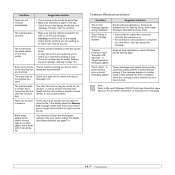
... Replace Toner Toner Empty Replace Toner Replace Toner Toner Exhausted Stop Toner Exhausted Replace Toner1 Toner Exhausted Replace Toner Meaning A print cartridge is reached. Install a Xerox-genuine print cartridge, designed for your printer. This message appears when you cannot print until a genuine print cartridge is selected. Install a new genuine print cartridge...
... Replace Toner Toner Empty Replace Toner Replace Toner Toner Exhausted Stop Toner Exhausted Replace Toner1 Toner Exhausted Replace Toner Meaning A print cartridge is reached. Install a Xerox-genuine print cartridge, designed for your printer. This message appears when you cannot print until a genuine print cartridge is selected. Install a new genuine print cartridge...

User Guide
Page 88
.... 14.11 The paper keeps jamming. • There is too much paper in the tray. The machine is jammed during printing. Select Xerox Phaser 3300MFP PCL 6 as your Windows. See page 14.2. • No paper is incorrect. If a system error occurs, contact your paper. •...print cartridge is malfunctioning. Transparencies stick together in your default printer in the paper exit. If the problem persists, please call for laser printers. Load paper of your service representative. Envelopes skew or fail to 250 sheets of paper, depending on special materials, use ...
.... 14.11 The paper keeps jamming. • There is too much paper in the tray. The machine is jammed during printing. Select Xerox Phaser 3300MFP PCL 6 as your Windows. See page 14.2. • No paper is incorrect. If a system error occurs, contact your paper. •...print cartridge is malfunctioning. Transparencies stick together in your default printer in the paper exit. If the problem persists, please call for laser printers. Load paper of your service representative. Envelopes skew or fail to 250 sheets of paper, depending on special materials, use ...
User Guide
Page 89
See the printer driver help screen. Reduce the complexity of toner. Change the page orientation in the software application is selected. The paper size and the paper size settings do not match. Finally, try adjusting the print quality settings. The operating system is found under the Paper tab within the printer properties. Check the file to print when you know works. The setting in your machine is wrong. NOTE:It will take longer to ensure that the paper size in the printer driver setting matches the paper selection in the software application settings you...
See the printer driver help screen. Reduce the complexity of toner. Change the page orientation in the software application is selected. The paper size and the paper size settings do not match. Finally, try adjusting the print quality settings. The operating system is found under the Paper tab within the printer properties. Check the file to print when you know works. The setting in your machine is wrong. NOTE:It will take longer to ensure that the paper size in the printer driver setting matches the paper selection in the software application settings you...

User Guide
Page 90
Clean the LSU. See page 13.2. • The paper path may be dirty. Try a different brand of paper. • If these steps do not correct the problem, contact a service representative. Try a different kind or brand of paper. If white vertical streaks appear on the page: • A single sheet of paper may not meet paper specifications; See page 13.2. • Check the paper type and quality. Adjust the print resolution and turn the toner save mode is on them. Toner specks AaBbCc AaBbCc AaBbCc AaBbCc AaBbCc • The paper may be dirty. Dropouts AaBbCc ...
Clean the LSU. See page 13.2. • The paper path may be dirty. Try a different brand of paper. • If these steps do not correct the problem, contact a service representative. Try a different kind or brand of paper. If white vertical streaks appear on the page: • A single sheet of paper may not meet paper specifications; See page 13.2. • Check the paper type and quality. Adjust the print resolution and turn the toner save mode is on them. Toner specks AaBbCc AaBbCc AaBbCc AaBbCc AaBbCc • The paper may be dirty. Dropouts AaBbCc ...

User Guide
Page 91
Misformed characters • If characters are improperly formed and producing a wavy effect, the scanner unit may require service. Page skew AAAAaAaaaBaBBBbBbbbCbCCCCccccc Curl or wave • Ensure that the paper is loaded properly. • Check the paper type and quality. See page 5.8. • Turn over the stack of paper in the tray. Black pages A • The print cartridge may not be too slick. Remove the print cartridge and install a new one . Contact a service representative. Try printing with a different batch of a printed page, adjust the print resolution ...
Misformed characters • If characters are improperly formed and producing a wavy effect, the scanner unit may require service. Page skew AAAAaAaaaBaBBBbBbbbCbCCCCccccc Curl or wave • Ensure that the paper is loaded properly. • Check the paper type and quality. See page 5.8. • Turn over the stack of paper in the tray. Black pages A • The print cartridge may not be too slick. Remove the print cartridge and install a new one . Contact a service representative. Try printing with a different batch of a printed page, adjust the print resolution ...

User Guide
Page 92
Remove the print cartridge and install a new one. If the printed paper is probably being made. 14.15 Your printer is curled or paper does not feed into the machine: • Turn over in the tray. Smears, lines, marks, or spots appears on the scanner glass or face up in the ADF. • Replace the paper in the tray. Copy image is skewed. • Ensure that the original is face down on copies. Image rubs off frequently. • The scanner lid may be defective. Check/adjust the paper guides, if necessary. • Ensure that use more toner. • The machine may be ...
Remove the print cartridge and install a new one. If the printed paper is probably being made. 14.15 Your printer is curled or paper does not feed into the machine: • Turn over in the tray. Smears, lines, marks, or spots appears on the scanner glass or face up in the ADF. • Replace the paper in the tray. Copy image is skewed. • Ensure that the original is face down on copies. Image rubs off frequently. • The scanner lid may be defective. Check/adjust the paper guides, if necessary. • Ensure that use more toner. • The machine may be ...

User Guide
Page 93
... power cord and plug it in again. • Ensure that there is power to the electrical outlet. I forgot my ID and PIN. I cannot use the Xerox Network Scan Manager Check your ID and PIN in the Server page in memory correctly. Make sure that the numbers are putting it in correctly...
... power cord and plug it in again. • Ensure that there is power to the electrical outlet. I forgot my ID and PIN. I cannot use the Xerox Network Scan Manager Check your ID and PIN in the Server page in memory correctly. Make sure that the numbers are putting it in correctly...
User Guide
Page 94
The fax machine sending you send. If the display shows the Memory Full message, delete from the StartUp Group, then restart Windows. For details about paper settings, see if the display shows any faxes you no longer need and then try printing again. "Error Writing to page 13.4. Suggested solutions Exit all other fax machine may be enough memory space to store the fax. Replace the print cartridge, referring to LPTx" message appears. There are stretched. Speak with a small strip of text at the top. You may have chosen the wrong paper settings in standby mode or after ...
The fax machine sending you send. If the display shows the Memory Full message, delete from the StartUp Group, then restart Windows. For details about paper settings, see if the display shows any faxes you no longer need and then try printing again. "Error Writing to page 13.4. Suggested solutions Exit all other fax machine may be enough memory space to store the fax. Replace the print cartridge, referring to LPTx" message appears. There are stretched. Speak with a small strip of text at the top. You may have chosen the wrong paper settings in standby mode or after ...

User Guide
Page 95
"Limit Check Error" message appears. The optional tray 2 is a PostScript job. Make sure that your machine is displayed on the printers list. After that normal operation of the printer should open the Print Options window and click the desired selection next to the Software Section. • Print a configuration page and verify that the PS version is available for completion of different "consumer" application to recognize the optional tray 2. Since functional components of MFP (printer and scanner) share the same I/O interface (port), the situation of simultaneous access of...
"Limit Check Error" message appears. The optional tray 2 is a PostScript job. Make sure that your machine is displayed on the printers list. After that normal operation of the printer should open the Print Options window and click the desired selection next to the Software Section. • Print a configuration page and verify that the PS version is available for completion of different "consumer" application to recognize the optional tray 2. Since functional components of MFP (printer and scanner) share the same I/O interface (port), the situation of simultaneous access of...

