Use and Care Manual
Page 4
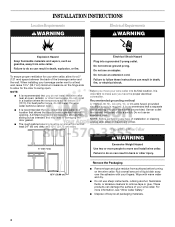
... cord. For more people to move your beverage center next to a fixed wall, leave 13¹⁄₄" (33.7 cm) minimum clearance on the hinge side to allow for the door to swing open. Do not remove ground prong. Recommended grounding method A 115 Volt, 60 Hz., AC only, 15- ...death, explosion, or fire. Do not install in back or other heat source. These products can result in a location that a separate circuit serving only your wine cellar, allow for a 5" (127 mm) space between the back of liquid dish soap over the adhesive with warm water and dry. ■ Do not...
... cord. For more people to move your beverage center next to a fixed wall, leave 13¹⁄₄" (33.7 cm) minimum clearance on the hinge side to allow for the door to swing open. Do not remove ground prong. Recommended grounding method A 115 Volt, 60 Hz., AC only, 15- ...death, explosion, or fire. Do not install in back or other heat source. These products can result in a location that a separate circuit serving only your wine cellar, allow for a 5" (127 mm) space between the back of liquid dish soap over the adhesive with warm water and dry. ■ Do not...
Use and Care Manual
Page 5
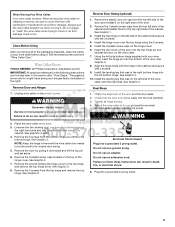
... be sure to avoid floor damage. Remove Door and Hinges 1. Install the top hinge on the wine cellar. 7. Insert the top corner of the door and reinstall it . NOTE: Keep the hinge in "Wine Cellar Care." See Graphic 2. 8. Plug into the top hinge pin and reinstall the door on the left side of...adapter. Tighten all of the packaging materials, clean the inside of the wine cellar onto the right side. See Graphic 3. Always pull the wine cellar straight out when moving the wine cellar for a right-hand swing door (hinges factory installed on the right hand side and one from the top left...
... be sure to avoid floor damage. Remove Door and Hinges 1. Install the top hinge on the wine cellar. 7. Insert the top corner of the door and reinstall it . NOTE: Keep the hinge in "Wine Cellar Care." See Graphic 2. 8. Plug into the top hinge pin and reinstall the door on the left side of...adapter. Tighten all of the packaging materials, clean the inside of the wine cellar onto the right side. See Graphic 3. Always pull the wine cellar straight out when moving the wine cellar for a right-hand swing door (hinges factory installed on the right hand side and one from the top left...
Use and Care Manual
Page 6
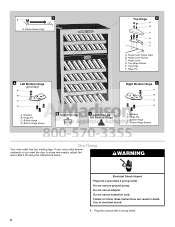
... using the instructions below. Bottom Hinge D. WARNING Electrical Shock Hazard Plug into a grounded 3 prong outlet. 6 Plug into a grounded 3 prong outlet. Hinge Pin 6 Left Bottom Hinge (provided) A B C D A. Bottom Hinge Screws 5 Leveling Leg 4 Leveling Leg for Bottom Hinge Right Bottom Hinge 3 A B C D A. Bottom Hinge Screws Door Closing Your wine cellar has two leveling legs. Washers B. Hinge Cover Screws C. Hinge Cover D. 1 A A. Hinge Cover Screw Caps B.
... using the instructions below. Bottom Hinge D. WARNING Electrical Shock Hazard Plug into a grounded 3 prong outlet. 6 Plug into a grounded 3 prong outlet. Hinge Pin 6 Left Bottom Hinge (provided) A B C D A. Bottom Hinge Screws 5 Leveling Leg 4 Leveling Leg for Bottom Hinge Right Bottom Hinge 3 A B C D A. Bottom Hinge Screws Door Closing Your wine cellar has two leveling legs. Washers B. Hinge Cover Screws C. Hinge Cover D. 1 A A. Hinge Cover Screw Caps B.


