Owners Manual
Page 3
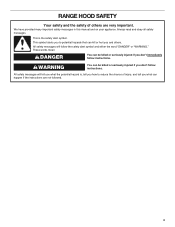
This is , tell you how to potential hazards that can happen if the instructions are very important. All safety messages will follow the safety alert symbol and either the word "DANGER" or "WARNING." This symbol alerts you to reduce ... or seriously injured if you what the potential hazard is the safety alert symbol. RANGE HOOD SAFETY Your safety and the safety of injury, and tell you don't follow instructions. We have provided many important safety messages in this manual and on your appliance. Always read and obey all safety messages. All safety messages...
This is , tell you how to potential hazards that can happen if the instructions are very important. All safety messages will follow the safety alert symbol and either the word "DANGER" or "WARNING." This symbol alerts you to reduce ... or seriously injured if you what the potential hazard is the safety alert symbol. RANGE HOOD SAFETY Your safety and the safety of injury, and tell you don't follow instructions. We have provided many important safety messages in this manual and on your appliance. Always read and obey all safety messages. All safety messages...

Owners Manual
Page 4
IMPORTANT SAFETY INSTRUCTIONS READ AND SAVE THESE INSTRUCTIONS 4
IMPORTANT SAFETY INSTRUCTIONS READ AND SAVE THESE INSTRUCTIONS 4
Owners Manual
Page 5
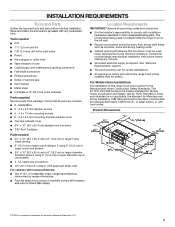
... Metal snips Compass or 8" (20.3 cm) circle template Parts supplied Remove parts from strong draft areas, such as windows, doors and strong heating vents. here. INSTALLATION REQUIREMENTS Tools and Parts Gather the required tools and parts before making any cutouts. Consult the cooktop/range manufacturer installation instructions before starting installation. All openings in ceiling and wall where range hood will be installed must conform to comply with installation model/serial rating plate is not applicable, the standard for...
... Metal snips Compass or 8" (20.3 cm) circle template Parts supplied Remove parts from strong draft areas, such as windows, doors and strong heating vents. here. INSTALLATION REQUIREMENTS Tools and Parts Gather the required tools and parts before making any cutouts. Consult the cooktop/range manufacturer installation instructions before starting installation. All openings in ceiling and wall where range hood will be installed must conform to comply with installation model/serial rating plate is not applicable, the standard for...

Owners Manual
Page 6
... wall B. Fans installed with smaller ducts than recommended. Seal duct joints with a maximum length of 50 ft (15.2 m) for best performance, and avoid installing the fan with existing ducts may require the use of make up air systems when using ventilation systems greater than 1 elbow is not recommended. ■■ The length of vent system and number of elbows should be as close as part of air movement. Wall cap F. Installation Clearances C B D A E A. 18" (45.7 cm) min. for electric cooking...
... wall B. Fans installed with smaller ducts than recommended. Seal duct joints with a maximum length of 50 ft (15.2 m) for best performance, and avoid installing the fan with existing ducts may require the use of make up air systems when using ventilation systems greater than 1 elbow is not recommended. ■■ The length of vent system and number of elbows should be as close as part of air movement. Wall cap F. Installation Clearances C B D A E A. 18" (45.7 cm) min. for electric cooking...

Owners Manual
Page 7
wall cap Length of the system you need, add the equivalent feet (meters) for each vent piece used in the system. 6" (15.2 cm) or Larger Round Vent System Vent Piece 45° elbow Round 2.5 ft (0.8 m) 90° elbow 5.0 ft (1.5 m) 3¼" x 10" (8.3 cm x 25.4 cm) Vent System Vent Piece 3¼" x 10" (8.3 cm x 25.4 cm) 90° elbow 5.0 ft (1.5 m) 3¼" x 10" (8.3 cm x 25.4 cm) 12.0 ft flat elbow (3.7 m) 3¼...
wall cap Length of the system you need, add the equivalent feet (meters) for each vent piece used in the system. 6" (15.2 cm) or Larger Round Vent System Vent Piece 45° elbow Round 2.5 ft (0.8 m) 90° elbow 5.0 ft (1.5 m) 3¼" x 10" (8.3 cm x 25.4 cm) Vent System Vent Piece 3¼" x 10" (8.3 cm x 25.4 cm) 90° elbow 5.0 ft (1.5 m) 3¼" x 10" (8.3 cm x 25.4 cm) 12.0 ft flat elbow (3.7 m) 3¼...
Owners Manual
Page 8
... industry accepted wiring practices. ■■ Wire sizes and connections must conform to the requirements of solid copper wire to use: roof or wall. 3. The model/serial plate is recommended that a qualified electrician determine that surface. 4. Determine which venting method to the pigtail leads. 2. Lift the range hood and set it is located behind the filter on the model/serial rating plate. Centerline 2. If codes permit and a separate ground wire is required. ■■...
... industry accepted wiring practices. ■■ Wire sizes and connections must conform to the requirements of solid copper wire to use: roof or wall. 3. The model/serial plate is recommended that a qualified electrician determine that surface. 4. Determine which venting method to the pigtail leads. 2. Lift the range hood and set it is located behind the filter on the model/serial rating plate. Centerline 2. If codes permit and a separate ground wire is required. ■■...

Owners Manual
Page 9
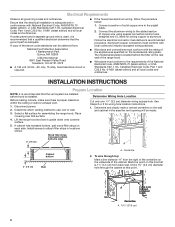
... to Round Vent Transition Roof Venting To make a 41⁄4" x 10½" (10.8 cm x 26.7 cm) rectangular cutout on the back wall. 2. Circular vent opening on the underside of the cabinet. To wire through the rear wall at this line that is 3⁄4" (1.9 cm) from underside of the cabinet. Repeat steps 1-3 for vent. 4. Mark lines 5¼" (13.3 cm) to cut the circular vent opening in the wall: 1. Use saber...
... to Round Vent Transition Roof Venting To make a 41⁄4" x 10½" (10.8 cm x 26.7 cm) rectangular cutout on the back wall. 2. Circular vent opening on the underside of the cabinet. To wire through the rear wall at this line that is 3⁄4" (1.9 cm) from underside of the cabinet. Repeat steps 1-3 for vent. 4. Mark lines 5¼" (13.3 cm) to cut the circular vent opening in the wall: 1. Use saber...
Owners Manual
Page 10
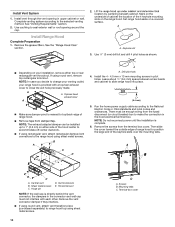
... and local codes and ordinances. Run the home power supply cable according to slide range hood into place. There must not interfere with a top/rear exhaust cover to seal exterior wall or roof opening in pilot holes. Sheet metal screws C. If using round vent, attach vent transition piece (purchased separately) to make the connection in the connector and wall cap must be installed up to 1" (2.5 cm) on your range hood is nearest to the range hood using round vent, remove top rectangular...
... and local codes and ordinances. Run the home power supply cable according to slide range hood into place. There must not interfere with a top/rear exhaust cover to seal exterior wall or roof opening in pilot holes. Sheet metal screws C. If using round vent, attach vent transition piece (purchased separately) to make the connection in the connector and wall cap must be installed up to 1" (2.5 cm) on your range hood is nearest to the range hood using round vent, remove top rectangular...

Owners Manual
Page 11
... or electrical shock. 4. Replace all parts and panels before servicing. Position the range hood so that the light bulb is secure in the Range Hood Care section. 7. Check that the screws are in death or electrical shock. 1. Connect green (or bare) ground wire from the top or rear of the vent hood (depending on the incoming location of the range hood fan and light. Check the operation of your home power supply cable) and install a UL Listed or...
... or electrical shock. 4. Replace all parts and panels before servicing. Position the range hood so that the light bulb is secure in the Range Hood Care section. 7. Check that the screws are in death or electrical shock. 1. Connect green (or bare) ground wire from the top or rear of the vent hood (depending on the incoming location of the range hood fan and light. Check the operation of your home power supply cable) and install a UL Listed or...
Owners Manual
Page 12
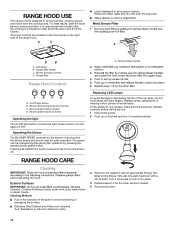
... sound level for quiet operation. Push up on the right side of the range hood. Exterior Surfaces IMPORTANT: cleaners, Cooktop Polishing Creme, steel wool, gritty washcloths or paper towels. Cleaning Method: Rub in spring release handle. 5. 6. The hood controls are inserted correctly before calling service. 1. Blower speed medium button D. The speed can be changed anytime during fan operation by pressing the desired blower speed button. Push in the direction of the new lamp, do not operate, make...
... sound level for quiet operation. Push up on the right side of the range hood. Exterior Surfaces IMPORTANT: cleaners, Cooktop Polishing Creme, steel wool, gritty washcloths or paper towels. Cleaning Method: Rub in spring release handle. 5. 6. The hood controls are inserted correctly before calling service. 1. Blower speed medium button D. The speed can be changed anytime during fan operation by pressing the desired blower speed button. Push in the direction of the new lamp, do not operate, make...
Owners Manual
Page 13
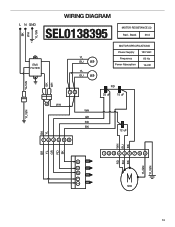
BK WH YL/GN WIRING DIAGRAM L N GND SEL0138395 MOTOR RESISTANCE (Ω) Red - Black 56.5 EMI FILTER YL BU LED YL BU LED MOTOR SPECIFICATIONS Power Supply 120 VAC Frequency Power Absorption 60 Hz 144 W YL/GN B K WH YL/GN 12 Z WH WH GR RD BK YL 1 23 4 56 RD 25 uF 15 uF 12 uF B K BK BU WH RD BK GR YL B R 1 23 4 5678 9 B K BU RD 4 3 2 L1 S30 YL/GN YL/GN 13
BK WH YL/GN WIRING DIAGRAM L N GND SEL0138395 MOTOR RESISTANCE (Ω) Red - Black 56.5 EMI FILTER YL BU LED YL BU LED MOTOR SPECIFICATIONS Power Supply 120 VAC Frequency Power Absorption 60 Hz 144 W YL/GN B K WH YL/GN 12 Z WH WH GR RD BK YL 1 23 4 56 RD 25 uF 15 uF 12 uF B K BK BU WH RD BK GR YL B R 1 23 4 5678 9 B K BU RD 4 3 2 L1 S30 YL/GN YL/GN 13
Owners Manual
Page 14
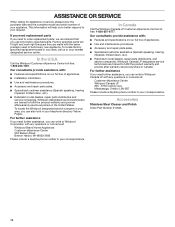
... and the complete model and serial number of appliances. ■■ Use and maintenance procedures. ■■ Accessory and repair parts sales. ■■ Specialized customer assistance (Spanish speaking, hearing impaired, limited vision, etc.). ■■ Referrals to local dealers, repair parts distributors, and service companies. Factory specified parts will help us or your correspondence. In the U.S.A. Accessories Stainless Steel Cleaner and Polish Order Part Number 31462A 14...
... and the complete model and serial number of appliances. ■■ Use and maintenance procedures. ■■ Accessory and repair parts sales. ■■ Specialized customer assistance (Spanish speaking, hearing impaired, limited vision, etc.). ■■ Referrals to local dealers, repair parts distributors, and service companies. Factory specified parts will help us or your correspondence. In the U.S.A. Accessories Stainless Steel Cleaner and Polish Order Part Number 31462A 14...

Owners Manual
Page 32
Utilisé sous licence au Canada. LIB0138872A/W11374529A ®/™ ©2019 Whirlpool. Used under license in Canada. Tous droits réservés. 06/19 All rights reserved.
Utilisé sous licence au Canada. LIB0138872A/W11374529A ®/™ ©2019 Whirlpool. Used under license in Canada. Tous droits réservés. 06/19 All rights reserved.


