
Installation Instructions
Page 2
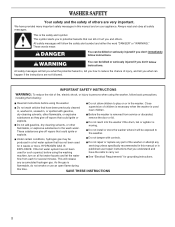
.... As the gas is the safety alert symbol. WARNING You can happen if the instructions are very important. explode. Do not install or store the washer where it will tell you what can be Do not tamper with gasoline, supervision of fire, electric shock, or injury to the...killed or seriously injured if you don't immediately follow basic precautions, including the following: Read all safety messages. Do not reach into the washer if the drum, tub or agitator is used for grounding instructions. IMPORTANT SAFETY INSTRUCTIONS WARNING: To reduce the risk of children is necessary ...
.... As the gas is the safety alert symbol. WARNING You can happen if the instructions are very important. explode. Do not install or store the washer where it will tell you what can be Do not tamper with gasoline, supervision of fire, electric shock, or injury to the...killed or seriously injured if you don't immediately follow basic precautions, including the following: Read all safety messages. Do not reach into the washer if the drum, tub or agitator is used for grounding instructions. IMPORTANT SAFETY INSTRUCTIONS WARNING: To reduce the risk of children is necessary ...
Installation Instructions
Page 3
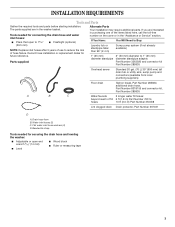
... here, call the toll-free number on the cover or in the washer basket. Parts supplied: Alternate Parts Your installation may require additional parts. Flat water inlet hose washers (4) D. INSTALLATION REQUIREMENTS Tools and Parts Gather the required tools and parts before starting installation. If you are in the "Assistance or Service" section. If You Have...
... here, call the toll-free number on the cover or in the washer basket. Parts supplied: Alternate Parts Your installation may require additional parts. Flat water inlet hose washers (4) D. INSTALLATION REQUIREMENTS Tools and Parts Gather the required tools and parts before starting installation. If you are in the "Assistance or Service" section. If You Have...
Installation Instructions
Page 4
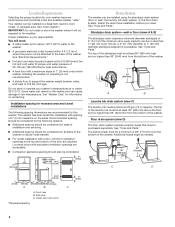
... mm) 14"* (356 max. Additional hoses might be no higher than 96" (2440 mm) from the bottom of the washer. IMPORTANT: Do not install or store the washer where it will need . Some water can remain in a basement, laundry room, closet, or recessed area. Additional spacing should...high and no less than 96" (2440 mm from the bottom of the washer. Installing the washer on carpeting is attached to the washer. Closet door with equivalent ventilation openings are recommended for ease of installation and servicing. See "Electrical Requirements." The top of the laundry tub must ...
... mm) 14"* (356 max. Additional hoses might be no higher than 96" (2440 mm) from the bottom of the washer. IMPORTANT: Do not install or store the washer where it will need . Some water can remain in a basement, laundry room, closet, or recessed area. Additional spacing should...high and no less than 96" (2440 mm from the bottom of the washer. Installing the washer on carpeting is attached to the washer. Closet door with equivalent ventilation openings are recommended for ease of installation and servicing. See "Electrical Requirements." The top of the laundry tub must ...
Installation Instructions
Page 5
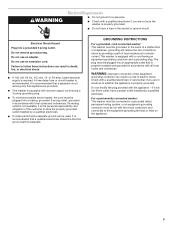
...properly grounded. grounding conductor can result in the neutral or ground circuit. For a permanently connected washer: This washer must be connected to whether the appliance is properly installed and grounded in doubt as to a grounded metal, permanent wiring system, or an equipment grounding... In the event of a malfunction or breakdown, grounding will not fit the outlet, have the properly grounded outlet installed by a qualified electrician. This washer is equipped with all local codes and ordinances. Do not use an adapter. Check with a qualified electrician or ...
...properly grounded. grounding conductor can result in the neutral or ground circuit. For a permanently connected washer: This washer must be connected to whether the appliance is properly installed and grounded in doubt as to a grounded metal, permanent wiring system, or an equipment grounding... In the event of a malfunction or breakdown, grounding will not fit the outlet, have the properly grounded outlet installed by a qualified electrician. This washer is equipped with all local codes and ordinances. Do not use an adapter. Check with a qualified electrician or ...
Installation Instructions
Page 6
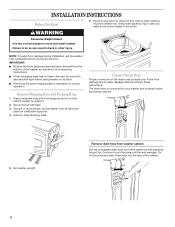
... tie. Connect Drain Hose Proper connection of the washer as directed in the Unpacking Instructions. INSTALLATION INSTRUCTIONS Before You Start 6. Secure the lid with tape before moving across floor. Remove foam shipping base. Set washer upright. If foam shipping base has not been removed... Weight Hazard Use two or more people, tip the washer onto its back. NOTE: To avoid floor damage during installation, set the washer onto cardboard before laying washer on its back and place on floor behind washer for proper operation. IMPORTANT: Be sure the foam shipping...
... tie. Connect Drain Hose Proper connection of the washer as directed in the Unpacking Instructions. INSTALLATION INSTRUCTIONS Before You Start 6. Secure the lid with tape before moving across floor. Remove foam shipping base. Set washer upright. If foam shipping base has not been removed... Weight Hazard Use two or more people, tip the washer onto its back. NOTE: To avoid floor damage during installation, set the washer onto cardboard before laying washer on its back and place on floor behind washer for proper operation. IMPORTANT: Be sure the foam shipping...
Installation Instructions
Page 7
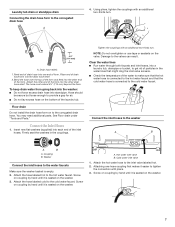
... not force excess drain hose into each end of the laundry tub. Floor drain Do not install the drain hose form on the washer. 3. Check the temperature of the form into a laundry tub, drainpipe or bucket, to tighten the connection with pliers. 3. Attach the hose labeled hot ... hose A 4. Do not lay excess hose on the valve. See Floor drain under "Tools and Parts." Connect the Inlet Hoses 1. Insert new flat washers (supplied) into standpipe. Coupling B. Attach the hose labeled cold to the corrugated drain hose. Attaching one end of particles in the couplings.
... not force excess drain hose into each end of the laundry tub. Floor drain Do not install the drain hose form on the washer. 3. Check the temperature of the form into a laundry tub, drainpipe or bucket, to tighten the connection with pliers. 3. Attach the hose labeled hot ... hose A 4. Do not lay excess hose on the valve. See Floor drain under "Tools and Parts." Connect the Inlet Hoses 1. Insert new flat washers (supplied) into standpipe. Coupling B. Attach the hose labeled cold to the corrugated drain hose. Attaching one end of particles in the couplings.
Installation Instructions
Page 8
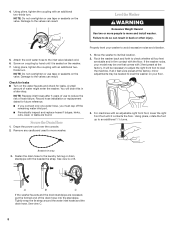
...standpipe with an additional two-thirds turn . It will drain this in a later step. Beaded tie strap 3. Fasten the drain hose to move and install washer. See view A or B. Attach the cold water hose to an additional 1 ½ turns. Check for leaks Turn on your floor. 3. Rock the... Excessive Weight Hazard Use two or more people to level the machine. Failure to level the washer on the water faucets and check for future reference. Record hose installation or replacement dates for leaks. 4. You will be needed to do so can result in firm contact with an adjustable right...
...standpipe with an additional two-thirds turn . It will drain this in a later step. Beaded tie strap 3. Fasten the drain hose to move and install washer. See view A or B. Attach the cold water hose to an additional 1 ½ turns. Check for leaks Turn on your floor. 3. Rock the... Excessive Weight Hazard Use two or more people to level the machine. Failure to level the washer on the water faucets and check for future reference. Record hose installation or replacement dates for leaks. 4. You will be needed to do so can result in firm contact with an adjustable right...
Installation Instructions
Page 9
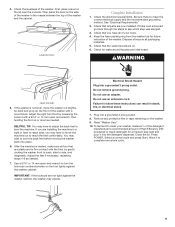
... for leaks around faucets and inlet hoses. Check that all parts are now installed. WARNING Level the side. 5. HELPFUL TIP: You may wish to follow these instructions can result in the crease between the top of the washer. Adjust the feet if necessary, repeating steps 4-6 as needed . 7. IMPORTANT: If ...front foot by loosening the locknut with the floor by gently rocking the washer front to back, side to clean your tools. 4. Select a normal cycle and press Start. 4. If there is leveled, make sure all four feet are installing the machine in firm contact with a 9/16" or 14 mm open ...
... for leaks around faucets and inlet hoses. Check that all parts are now installed. WARNING Level the side. 5. HELPFUL TIP: You may wish to follow these instructions can result in the crease between the top of the washer. Adjust the feet if necessary, repeating steps 4-6 as needed . 7. IMPORTANT: If ...front foot by loosening the locknut with the floor by gently rocking the washer front to back, side to clean your tools. 4. Select a normal cycle and press Start. 4. If there is leveled, make sure all four feet are installing the machine in firm contact with a 9/16" or 14 mm open ...


