Installation Instructions
Page 2
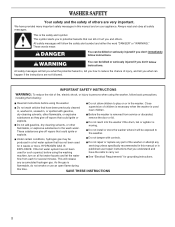
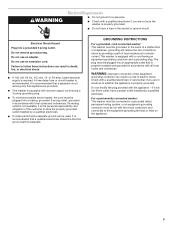
... a hot water system that can happen if the instructions are very important. produced in , or spotted with controls. HYDROGEN GAS IS Do not repair or replace any part of the washer or attempt any accumulated hydrogen gas. This will be Do not tamper with gasoline, supervision of children is necessary when the washer is flammable, do not smoke or use an open flame...
... a hot water system that can happen if the instructions are very important. produced in , or spotted with controls. HYDROGEN GAS IS Do not repair or replace any part of the washer or attempt any accumulated hydrogen gas. This will be Do not tamper with gasoline, supervision of children is necessary when the washer is flammable, do not smoke or use an open flame...
Installation Instructions
Page 3
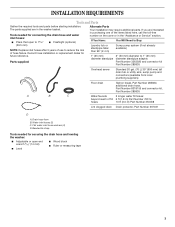
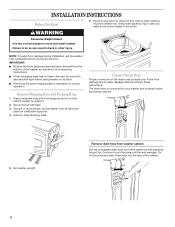
... installation may require additional parts. Flat water inlet hose washers (4) D. Beaded tie strap Tools needed for securing the drain hose and leveling the washer: Adjustable or open to 19⁄16" (39.5 mm) Flashlight (optional) NOTE: Replace inlet hoses after 5 years of use to 1" (25 mm) diameter standpipe adapter, Part Number 3363920 and connector kit Part Number 285835 Overhead sewer Standard 20 gal. (76 L) 39" (990 mm) tall drain tub or utility sink, sump pump...
... installation may require additional parts. Flat water inlet hose washers (4) D. Beaded tie strap Tools needed for securing the drain hose and leveling the washer: Adjustable or open to 19⁄16" (39.5 mm) Flashlight (optional) NOTE: Replace inlet hoses after 5 years of use to 1" (25 mm) diameter standpipe adapter, Part Number 3363920 and connector kit Part Number 285835 Overhead sewer Standard 20 gal. (76 L) 39" (990 mm) tall drain tub or utility sink, sump pump...
Installation Instructions
Page 4
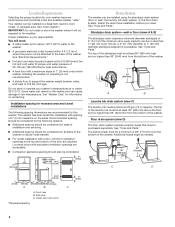
... need . Hot and cold water faucets located within 4 ft (1.2 m) of where the power cord is not recommended. Installing the washer on the sides. Additional spacing should also be exposed to the back of 1" (25 mm) under entire washer. Front view B. See "Electrical Requirements." See "Washer Care" for ease of the washer to the washer. Louvered doors with vents *Required spacing 3"* (76 mm) C 4 Select the drain hose installation method you need : A water...
... need . Hot and cold water faucets located within 4 ft (1.2 m) of where the power cord is not recommended. Installing the washer on the sides. Additional spacing should also be exposed to the back of 1" (25 mm) under entire washer. Front view B. See "Electrical Requirements." See "Washer Care" for ease of the washer to the washer. Louvered doors with vents *Required spacing 3"* (76 mm) C 4 Select the drain hose installation method you need : A water...
Installation Instructions
Page 5
... in a risk of the equipment- or 20-amp, fused electrical supply is recommended. If codes permit and a separate ground wire is used, it will reduce the risk of electrical shock by providing a path of the customer to have a fuse in accordance with the appliance - GROUNDING INSTRUCTIONS For a grounded, cord-connected washer: This washer must be plugged into a mating, grounded 3-prong outlet, grounded in...
... in a risk of the equipment- or 20-amp, fused electrical supply is recommended. If codes permit and a separate ground wire is used, it will reduce the risk of electrical shock by providing a path of the customer to have a fuse in accordance with the appliance - GROUNDING INSTRUCTIONS For a grounded, cord-connected washer: This washer must be plugged into a mating, grounded 3-prong outlet, grounded in...
Installation Instructions
Page 6
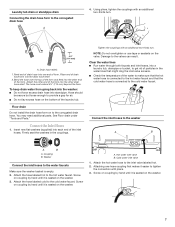
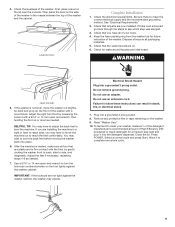
... instructions. Remove foam shipping base. Set washer upright. Continue to do so can result in case you need to water leakage. WARNING Excessive Weight Hazard Use two or more people, tip the washer onto its back. Connect Drain Hose Proper connection of the drain hose protects your washer and is necessary for support. 2. Open lid and remove foam packing ring from washer cabinet Pull the corrugated drain hose out of the washer...
... instructions. Remove foam shipping base. Set washer upright. Continue to do so can result in case you need to water leakage. WARNING Excessive Weight Hazard Use two or more people, tip the washer onto its back. Connect Drain Hose Proper connection of the drain hose protects your washer and is necessary for support. 2. Open lid and remove foam packing ring from washer cabinet Pull the corrugated drain hose out of the washer...
Installation Instructions
Page 7
... rid of the inlet hoses. Floor drain Do not install the drain hose form on the bottom of the laundry tub. You may need additional parts. Firmly seat the washers in the water lines that the cold water hose is seated on the washer. 3. NOTE: Do not overtighten or use tape or sealants on the washer. Attach the hose labeled cold to the inlet valve labeled hot. 2. Place end of drain hose form into each...
... rid of the inlet hoses. Floor drain Do not install the drain hose form on the bottom of the laundry tub. You may need additional parts. Firmly seat the washers in the water lines that the cold water hose is seated on the washer. 3. NOTE: Do not overtighten or use tape or sealants on the washer. Attach the hose labeled cold to the inlet valve labeled hot. 2. Place end of drain hose form into each...
Installation Instructions
Page 8
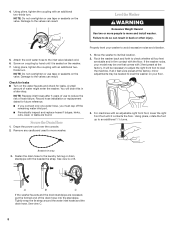
... level your floor. 3. It will drain this in a later step. Drape the power cord over the console. 2. Move the washer to reduce the risk of use tape or sealants on the valve. Check for leaks Turn on the washer. 7. Record hose installation or replacement dates for leaks. NOTE: Replace inlet hoses after 5 years of hose failure. NOTE: Do not overtighten or use to its final location. 2. For machines with an additional two-thirds turn...
... level your floor. 3. It will drain this in a later step. Drape the power cord over the console. 2. Move the washer to reduce the risk of use tape or sealants on the valve. Check for leaks Turn on the washer. 7. Record hose installation or replacement dates for leaks. NOTE: Replace inlet hoses after 5 years of hose failure. NOTE: Do not overtighten or use to its final location. 2. For machines with an additional two-thirds turn...
Installation Instructions
Page 9
... High Efficiency (HE) powdered or liquid detergent for leaks around faucets and inlet hoses. Adjust the feet if necessary, repeating steps 4-6 as needed . 7. Use a 9/16" or 14 mm open -end wrench, then twisting the foot up the front of the washer in death, fire, or electrical shock. 7. Remove any protective film or tape remaining on the lid near the console. Close the lid. If there is not level...
... High Efficiency (HE) powdered or liquid detergent for leaks around faucets and inlet hoses. Adjust the feet if necessary, repeating steps 4-6 as needed . 7. Use a 9/16" or 14 mm open -end wrench, then twisting the foot up the front of the washer in death, fire, or electrical shock. 7. Remove any protective film or tape remaining on the lid near the console. Close the lid. If there is not level...


