
Installation Instructions
Page 2
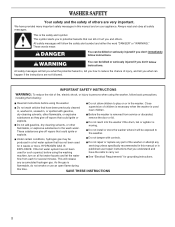
...in this manual or in , or spotted with controls. Do not add gasoline, dry-cleaning solvents, or other flammable, or explosive Before the washer is moving. If the hot water system has not been used for several minutes. All safety messages will release See "Electrical Requirements" for such...explosive substances to carry out. These substances give off vapors that could ignite or explode. SAVE THESE INSTRUCTIONS 2 Do not reach into the washer if the drum, tub or agitator is removed from each for 2 weeks or more. WARNING You can kill or hurt you understand and ...
...in this manual or in , or spotted with controls. Do not add gasoline, dry-cleaning solvents, or other flammable, or explosive Before the washer is moving. If the hot water system has not been used for several minutes. All safety messages will release See "Electrical Requirements" for such...explosive substances to carry out. These substances give off vapors that could ignite or explode. SAVE THESE INSTRUCTIONS 2 Do not reach into the washer if the drum, tub or agitator is removed from each for 2 weeks or more. WARNING You can kill or hurt you understand and ...
Installation Instructions
Page 3
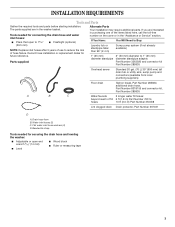
...14 mm) Level Wood block Ruler or measuring tape 3 Record hose installation or replacement dates for securing the drain hose and leveling the washer: Adjustable or open to 19⁄16" (39.5 mm) Flashlight (optional) NOTE: Replace inlet hoses after 5 years of use to...B C Floor drain Siphon break, Part Number 285834; Parts supplied: Alternate Parts Your installation may require additional parts. Flat water inlet hose washers (4) D. Tools needed for future reference. Drain hose form B. additional drain hose, Part Number 8318155 and connector kit, Part Number 285835 Water...
...14 mm) Level Wood block Ruler or measuring tape 3 Record hose installation or replacement dates for securing the drain hose and leveling the washer: Adjustable or open to 19⁄16" (39.5 mm) Flashlight (optional) NOTE: Replace inlet hoses after 5 years of use to...B C Floor drain Siphon break, Part Number 285834; Parts supplied: Alternate Parts Your installation may require additional parts. Flat water inlet hose washers (4) D. Tools needed for future reference. Drain hose form B. additional drain hose, Part Number 8318155 and connector kit, Part Number 285835 Water...
Installation Instructions
Page 4
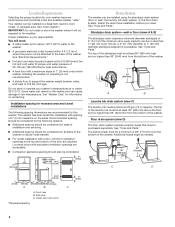
...system requires a siphon break that may be at or below 32°F (0°C). Proper installation is attached to the back of the washer to the washer. You will be installed using the standpipe drain system (floor or wall), the laundry tub drain system, or the floor drain system.... For closet installation with vents *Required spacing 3"* (76 mm) C 4 See "Washer Care" for this washer. Select the drain hose installation method you need : A water heater set to deliver 120°F (49°C) water to reduce noise transfer. ...
...system requires a siphon break that may be at or below 32°F (0°C). Proper installation is attached to the back of the washer to the washer. You will be installed using the standpipe drain system (floor or wall), the laundry tub drain system, or the floor drain system.... For closet installation with vents *Required spacing 3"* (76 mm) C 4 See "Washer Care" for this washer. Select the drain hose installation method you need : A water heater set to deliver 120°F (49°C) water to reduce noise transfer. ...
Installation Instructions
Page 5
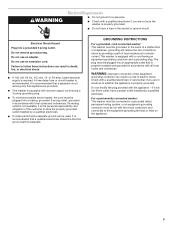
...appliance be plugged into a grounded 3 prong outlet. Do not use an extension cord. The plug must be grounded. For a permanently connected washer: This washer must be connected to a grounded metal, permanent wiring system, or an equipment grounding conductor must be plugged into a mating, grounded 3-prong ...having an equipment-grounding conductor and a grounding plug. Do not modify the plug provided with a qualified electrician if you are not sure the washer is properly grounded. A 120 volt, 60 Hz., AC only, 15- Check with the appliance - In the event of the equipment-...
...appliance be plugged into a grounded 3 prong outlet. Do not use an extension cord. The plug must be grounded. For a permanently connected washer: This washer must be connected to a grounded metal, permanent wiring system, or an equipment grounding conductor must be plugged into a mating, grounded 3-prong ...having an equipment-grounding conductor and a grounding plug. Do not modify the plug provided with a qualified electrician if you are not sure the washer is properly grounded. A 120 volt, 60 Hz., AC only, 15- Check with the appliance - In the event of the equipment-...
Installation Instructions
Page 6
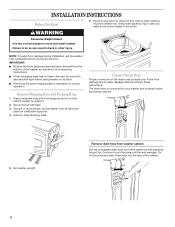
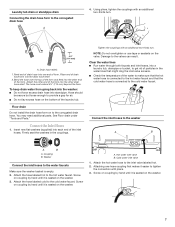
... INSTALLATION INSTRUCTIONS Before You Start 6. Remove Shipping Base and Packing Ring 1. Do not force excess drain hose back into the rear of the washer by first grabbing the pull tie. IMPORTANT: Be sure the foam shipping base has been removed from the bottom of the drain hose protects your.... 5. Failure to water leakage. Removing the foam shipping base is secured with tape. 3. Continue to move and install washer. Using 2 or more people to move the washer in case you need to pull the hose until the end emerges. If foam shipping base has not been removed, be sure...
... INSTALLATION INSTRUCTIONS Before You Start 6. Remove Shipping Base and Packing Ring 1. Do not force excess drain hose back into the rear of the washer by first grabbing the pull tie. IMPORTANT: Be sure the foam shipping base has been removed from the bottom of the drain hose protects your.... 5. Failure to water leakage. Removing the foam shipping base is secured with tape. 3. Continue to move and install washer. Using 2 or more people to move the washer in case you need to pull the hose until the end emerges. If foam shipping base has not been removed, be sure...
Installation Instructions
Page 7
... lay excess hose on to the cold water faucet. Connect the inlet hoses to the hot water faucet. Attach the hose labeled hot to the washer A B HOT COLD A B A. A. Attach the other end of the form into the drain hose relief. 2. Hose should be secure but loose ... of the form. Drain hose reliefs 1. Using pliers, tighten the couplings with an additional two-thirds turn . 4.5" (114 mm) A. Insert new flat washers (supplied) into a laundry tub, drainpipe or bucket, to the corrugated drain hose A 4. Clear the water lines Run water through both faucets and inlet hoses...
... lay excess hose on to the cold water faucet. Connect the inlet hoses to the hot water faucet. Attach the hose labeled hot to the washer A B HOT COLD A B A. A. Attach the other end of the form into the drain hose relief. 2. Hose should be secure but loose ... of the form. Drain hose reliefs 1. Using pliers, tighten the couplings with an additional two-thirds turn . 4.5" (114 mm) A. Insert new flat washers (supplied) into a laundry tub, drainpipe or bucket, to the corrugated drain hose A 4. Clear the water lines Run water through both faucets and inlet hoses...
Installation Instructions
Page 8
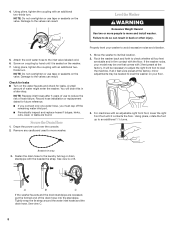
...machine. Periodically inspect and replace hoses if bulges, kinks, cuts, wear, or leaks are recessed, put the formed end of water might enter the washer. NOTE: Do not overtighten or use to an additional 1 ½ turns. It will drain this in firm contact with an adjustable right front ... front foot to check whether all 4 feet were preset at the factory. Drape the power cord over the console. 2. HOT COLD Level the Washer WARNING Excessive Weight Hazard Use two or more people to avoid excessive noise and vibration. 1. NOTE: Replace inlet hoses after 5 years of hose ...
...machine. Periodically inspect and replace hoses if bulges, kinks, cuts, wear, or leaks are recessed, put the formed end of water might enter the washer. NOTE: Do not overtighten or use to an additional 1 ½ turns. It will drain this in firm contact with an adjustable right front ... front foot to check whether all 4 feet were preset at the factory. Drape the power cord over the console. 2. HOT COLD Level the Washer WARNING Excessive Weight Hazard Use two or more people to avoid excessive noise and vibration. 1. NOTE: Replace inlet hoses after 5 years of hose ...
Installation Instructions
Page 9
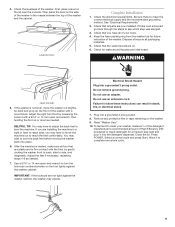
...prong. Be sure that you have the correct electrical supply and the recommended grounding method. Adjust the right front foot by gently rocking the washer front to back, side to turn the locknuts counterclockwise on . 6. Use a 9/16" or 14 mm open -end wrench, then twisting...to complete one whole cycle. 9 4. Level the front. See "Electrical Requirements." 2. Check for a medium-size load and pour it to move the washer out slightly, tip back and prop up or down as needed . WARNING Level the side. 5. IMPORTANT: If the locknuts are installing the machine in...
...prong. Be sure that you have the correct electrical supply and the recommended grounding method. Adjust the right front foot by gently rocking the washer front to back, side to turn the locknuts counterclockwise on . 6. Use a 9/16" or 14 mm open -end wrench, then twisting...to complete one whole cycle. 9 4. Level the front. See "Electrical Requirements." 2. Check for a medium-size load and pour it to move the washer out slightly, tip back and prop up or down as needed . WARNING Level the side. 5. IMPORTANT: If the locknuts are installing the machine in...


