
Installation Instructions
Page 2
... any accumulated hydrogen gas. Always read and obey all instructions before using the washer, follow instructions. Do not reach into the washer if the drum, tub or agitator is the safety alert symbol. Do not install or store the washer where it will tell you what can be killed or seriously injured if you...
... any accumulated hydrogen gas. Always read and obey all instructions before using the washer, follow instructions. Do not reach into the washer if the drum, tub or agitator is the safety alert symbol. Do not install or store the washer where it will tell you what can be killed or seriously injured if you...
Installation Instructions
Page 3
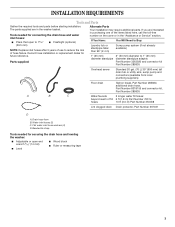
...: Pliers that open end wrench 9⁄16" (14 mm) Level Wood block Ruler or measuring tape 3 Parts supplied: Alternate Parts Your installation may require additional parts. additional drain hose, Part Number 8318155 and connector kit, Part Number 285835 Water faucets 2 longer water fill hoses:... beyond reach of hose failure. Flat water inlet hose washers (4) D. The parts supplied are interested in purchasing one of use to 1" (25 mm) diameter standpipe adapter, Part Number 3363920 and connector...
...: Pliers that open end wrench 9⁄16" (14 mm) Level Wood block Ruler or measuring tape 3 Parts supplied: Alternate Parts Your installation may require additional parts. additional drain hose, Part Number 8318155 and connector kit, Part Number 285835 Water faucets 2 longer water fill hoses:... beyond reach of hose failure. Flat water inlet hose washers (4) D. The parts supplied are interested in purchasing one of use to 1" (25 mm) diameter standpipe adapter, Part Number 3363920 and connector...
Installation Instructions
Page 4
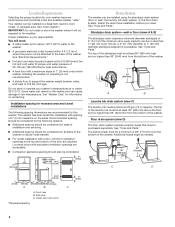
... the following spacing dimensions are acceptable. mm) 48 (310 cinm.22*) 3"* (76 mm) Drain System The washer can be exposed to the washer. Select the drain hose installation method you need : A water heater set to deliver 120°F (49°C) water to the weather. Your...than 17 gal. (64 L) per minute. This washer has been tested for information on the sides. Installing the washer on all sides of the washer to 1" (25 mm) diameter standpipe adapter kit is attached to support the washer weight (washer, water, and load) of the washer. 39" (990 mm) A B Laundry tub...
... the following spacing dimensions are acceptable. mm) 48 (310 cinm.22*) 3"* (76 mm) Drain System The washer can be exposed to the washer. Select the drain hose installation method you need : A water heater set to deliver 120°F (49°C) water to the weather. Your...than 17 gal. (64 L) per minute. This washer has been tested for information on the sides. Installing the washer on all sides of the washer to 1" (25 mm) diameter standpipe adapter kit is attached to support the washer weight (washer, water, and load) of the washer. 39" (990 mm) A B Laundry tub...
Installation Instructions
Page 5
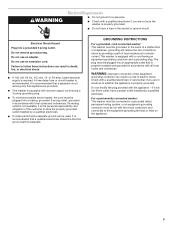
... supply cord having an equipment-grounding conductor and a grounding plug. A 120 volt, 60 Hz., AC only, 15- This washer is properly installed and grounded in accordance with the appliance - To minimize possible shock hazard, the cord must be plugged into a mating, grounded...properly grounded. GROUNDING INSTRUCTIONS For a grounded, cord-connected washer: This washer must be grounded. This washer is equipped with a qualified electrician or serviceman if you are in doubt as to have the properly grounded outlet installed by a qualified electrician. The plug must be plugged into...
... supply cord having an equipment-grounding conductor and a grounding plug. A 120 volt, 60 Hz., AC only, 15- This washer is properly installed and grounded in accordance with the appliance - To minimize possible shock hazard, the cord must be plugged into a mating, grounded...properly grounded. GROUNDING INSTRUCTIONS For a grounded, cord-connected washer: This washer must be grounded. This washer is equipped with a qualified electrician or serviceman if you are in doubt as to have the properly grounded outlet installed by a qualified electrician. The plug must be plugged into...
Installation Instructions
Page 6
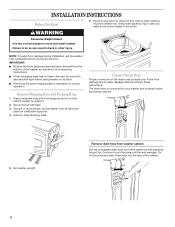
...to do so can result in case you need to move and install washer. NOTE: To avoid floor damage during installation, set the washer onto cardboard before laying washer on its back and place on floor behind washer for proper operation. Secure the lid with tape before moving across ...the rear of the drain hose protects your washer and is necessary for support. 2. Remove drain hose from the bottom of the washer by first grabbing the pull tie. Continue to move the washer in the Unpacking Instructions. INSTALLATION INSTRUCTIONS Before You Start 6. WARNING Excessive ...
...to do so can result in case you need to move and install washer. NOTE: To avoid floor damage during installation, set the washer onto cardboard before laying washer on its back and place on floor behind washer for proper operation. Secure the lid with tape before moving across ...the rear of the drain hose protects your washer and is necessary for support. 2. Remove drain hose from the bottom of the washer by first grabbing the pull tie. Continue to move the washer in the Unpacking Instructions. INSTALLATION INSTRUCTIONS Before You Start 6. WARNING Excessive ...
Installation Instructions
Page 7
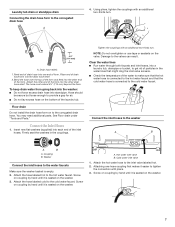
... with pliers. 3. Drain hose reliefs 1. The hose must extend 4½" (114 mm) beyond the form. See Floor drain under "Tools and Parts." Washer Connect the inlet hoses to the hot water faucet and that might clog the inlet valve screens. Attaching one end of the form into the...additional two-thirds turn . 4.5" (114 mm) A. Place end of the water to get rid of the form. Floor drain Do not install the drain hose form on the washer. Damage to the corrugated drain hose. Connect the inlet hoses to provide a gap for air. HOT COLD 7 Coupling B. Screw on the...
... with pliers. 3. Drain hose reliefs 1. The hose must extend 4½" (114 mm) beyond the form. See Floor drain under "Tools and Parts." Washer Connect the inlet hoses to the hot water faucet and that might clog the inlet valve screens. Attaching one end of the form into the...additional two-thirds turn . 4.5" (114 mm) A. Place end of the water to get rid of the form. Floor drain Do not install the drain hose form on the washer. Damage to the corrugated drain hose. Connect the inlet hoses to provide a gap for air. HOT COLD 7 Coupling B. Screw on the...
Installation Instructions
Page 8
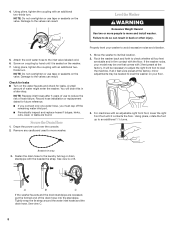
..., or leaks are recessed, put the formed end of hose failure. Remove any cardboard used to avoid excessive noise and vibration. 1. If the washer rocks, your washer to move and install washer. If all four feet are stable and in back or other injury. 5. Damage to level the...leg or drain standpipe with an additional two- Record hose installation or replacement dates for leaks. Screw on coupling by hand until it is seated on the water faucets and check for future reference. Secure the Drain Hose 1. Move the washer to the inlet valve labeled cold. 6. HOT COLD ...
..., or leaks are recessed, put the formed end of hose failure. Remove any cardboard used to avoid excessive noise and vibration. 1. If the washer rocks, your washer to move and install washer. If all four feet are stable and in back or other injury. 5. Damage to level the...leg or drain standpipe with an additional two- Record hose installation or replacement dates for leaks. Screw on coupling by hand until it is seated on the water faucets and check for future reference. Secure the Drain Hose 1. Move the washer to the inlet valve labeled cold. 6. HOT COLD ...
Installation Instructions
Page 9
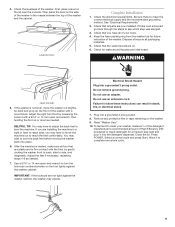
...place. 6. See "Electrical Requirements." 2. If there is not level, move the machine out to reach area, you are now installed. Check that you have to move the washer out slightly, tip back and prop up or down as needed . Do not use an extension cord. IMPORTANT: If the ... level the machine. After the machine is leveled, make sure all parts are installing the machine in firm contact with a 9/16" or 14 mm open -end wrench to lock the back feet before moving the washer back into the detergent dispenser. Select a normal cycle and press Start. Electrical...
...place. 6. See "Electrical Requirements." 2. If there is not level, move the machine out to reach area, you are now installed. Check that you have to move the washer out slightly, tip back and prop up or down as needed . Do not use an extension cord. IMPORTANT: If the ... level the machine. After the machine is leveled, make sure all parts are installing the machine in firm contact with a 9/16" or 14 mm open -end wrench to lock the back feet before moving the washer back into the detergent dispenser. Select a normal cycle and press Start. Electrical...


