
Owners Manual
Page 2
... attempt any servicing unless specifically recommended in the user-maintenance instructions or in a hot-water system that could ignite or explode. � Do not add gasoline, dry-cleaning solvents, or other flammable or explosive substances to persons when using a washing machine, turn on all safety messages. These substances give off vapors that has not been used for 2 weeks or more. parts made at home using the appliance...
... attempt any servicing unless specifically recommended in the user-maintenance instructions or in a hot-water system that could ignite or explode. � Do not add gasoline, dry-cleaning solvents, or other flammable or explosive substances to persons when using a washing machine, turn on all safety messages. These substances give off vapors that has not been used for 2 weeks or more. parts made at home using the appliance...

Owners Manual
Page 3
... the washer lid. g. NOTE: For best results, do a better job of the washer interior. Chlorine bleach procedure (alternative): a. Add 1 cup (236 mL) of detergent to use . Press the START button to start the cycle. IMPORTANT: Dispensers are identical in the washer's dispensers. CHOOSING RIGHT DETERGENT CHOOSING THE RIGHT DETERGENT Use only High Efficiency detergents. Always follow the usage instructions provided above could cause washer damage over time, buildup of soils. See Quick Start Guide for normal wash. 2. When replacing your inlet hoses...
... the washer lid. g. NOTE: For best results, do a better job of the washer interior. Chlorine bleach procedure (alternative): a. Add 1 cup (236 mL) of detergent to use . Press the START button to start the cycle. IMPORTANT: Dispensers are identical in the washer's dispensers. CHOOSING RIGHT DETERGENT CHOOSING THE RIGHT DETERGENT Use only High Efficiency detergents. Always follow the usage instructions provided above could cause washer damage over time, buildup of soils. See Quick Start Guide for normal wash. 2. When replacing your inlet hoses...

Owners Manual
Page 4
... drain water inlet hoses. 2. Unplug power cord. 5. Drape power cord over lid and down front of washer. 4. Use only HE High Efficiency detergent. de C.V. Because some water may stay in hoses, freezing can result in basket and run the Clean Washer cycle. disconnect and drain water inlet hoses. 2. Place inlet hoses and drain hose inside washer. Close lid and place tape over edge and into a grounded 3 prong outlet or reconnect power. 5. Turn off water supply to washer to avoid flooding due to locate, level, and connect washer...
... drain water inlet hoses. 2. Unplug power cord. 5. Drape power cord over lid and down front of washer. 4. Use only HE High Efficiency detergent. de C.V. Because some water may stay in hoses, freezing can result in basket and run the Clean Washer cycle. disconnect and drain water inlet hoses. 2. Place inlet hoses and drain hose inside washer. Close lid and place tape over edge and into a grounded 3 prong outlet or reconnect power. 5. Turn off water supply to washer to avoid flooding due to locate, level, and connect washer...

Owners Manual
Page 5
...; A water heater set to 1¾" (45 mm) Flashlight Bucket Parts Supplied: NOTE: All parts supplied for 5 Install your Quick Start Guide for winterizing information. Tools Needed: Adjustable or open end wrench 9/16" (14 mm) minimum Level Wood block Ruler or measuring tape Adjustable pliers that open to 120°F (49°C). ■ A grounded electrical outlet located within 4 ft (1.2 m) of power cord on back of washer. ■ Hot and cold water...
...; A water heater set to 1¾" (45 mm) Flashlight Bucket Parts Supplied: NOTE: All parts supplied for 5 Install your Quick Start Guide for winterizing information. Tools Needed: Adjustable or open end wrench 9/16" (14 mm) minimum Level Wood block Ruler or measuring tape Adjustable pliers that open to 120°F (49°C). ■ A grounded electrical outlet located within 4 ft (1.2 m) of power cord on back of washer. ■ Hot and cold water...

Owners Manual
Page 6
... bottom of wash tub. Top of washer. A time-delay fuse or circuit breaker is recommended. This washer has been tested for a standpipe drain: 2" (51 mm). Doors must be installed using a floor drain, wall standpipe, floor standpipe, or laundry tub. Electrical Requirements WARNING Minimum diameter for installation with local codes and ordinances. install no higher than 96" (2.44 m), you need a sump pump system. Laundry tub drain System Minimum capacity: 20 gallons (76 L). Do not remove ground...
... bottom of wash tub. Top of washer. A time-delay fuse or circuit breaker is recommended. This washer has been tested for a standpipe drain: 2" (51 mm). Doors must be installed using a floor drain, wall standpipe, floor standpipe, or laundry tub. Electrical Requirements WARNING Minimum diameter for installation with local codes and ordinances. install no higher than 96" (2.44 m), you need a sump pump system. Laundry tub drain System Minimum capacity: 20 gallons (76 L). Do not remove ground...

Owners Manual
Page 7
... shipping materials for proper operation. Do not modify the plug provided with all local codes and ordinances. Remove packaging material from inside washer. it will reduce the risk of electric shock by a qualified electrician. SAVE THESE INSTRUCTIONS INSTALLATION Unpacking WARNING Excessive Weight Hazard Use two or more people to within 4 ft. (1.2 m) of washer. 7 Move Washer 2. NOTE: Keep packaging material for electric current. Free power cord Move washer...
... shipping materials for proper operation. Do not modify the plug provided with all local codes and ordinances. Remove packaging material from inside washer. it will reduce the risk of electric shock by a qualified electrician. SAVE THESE INSTRUCTIONS INSTALLATION Unpacking WARNING Excessive Weight Hazard Use two or more people to within 4 ft. (1.2 m) of washer. 7 Move Washer 2. NOTE: Keep packaging material for electric current. Free power cord Move washer...
Owners Manual
Page 8
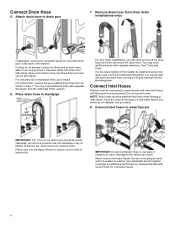
... installer to hot water faucet. IMPORTANT: Do not overtighten hose or use tape or sealants on washer. Screw on coupling by hand until it over side of the drain hose. Connect Drain Hose 5. For a laundry tub or standpipe drain, go to water faucets with new inlet hoses with separate directions. Remove drain hose form (floor drain installations only) If applicable, remove the red plastic plug from the end of laundry tub. Connect Inlet Hoses Washer must use old hoses. Connect inlet hoses to water...
... installer to hot water faucet. IMPORTANT: Do not overtighten hose or use tape or sealants on washer. Screw on coupling by hand until it over side of the drain hose. Connect Drain Hose 5. For a laundry tub or standpipe drain, go to water faucets with new inlet hoses with separate directions. Remove drain hose form (floor drain installations only) If applicable, remove the red plastic plug from the end of laundry tub. Connect Inlet Hoses Washer must use old hoses. Connect inlet hoses to water...
Owners Manual
Page 9
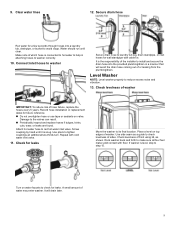
... attaching hoses to avoid clogs. Use pliers to reduce excess noise and vibration. 13. Repeat with floor. Water should run until it is the responsibility of sides. Turn on valve. It will avoid the drain hose coming out of or leaking from the plumbing/drain. Check levelness of washer IMPORTANT: To reduce risk of water may enter washer. Check levelness of front using lid, as a guide to check levelness of the installer to install and secure the drain hose into a laundry tub...
... attaching hoses to avoid clogs. Use pliers to reduce excess noise and vibration. 13. Repeat with floor. Water should run until it is the responsibility of sides. Turn on valve. It will avoid the drain hose coming out of or leaking from the plumbing/drain. Check levelness of washer IMPORTANT: To reduce risk of water may enter washer. Check levelness of front using lid, as a guide to check levelness of the installer to install and secure the drain hose into a laundry tub...

Owners Manual
Page 10
...; Check that all parts are on. ■ Check for leaks around faucets and inlet hoses. ■ Remove protective film from washer. ■ Check that the washer is not level: Use adjustable pliers to turn the plastic leveling foot counterclockwise to lower the washer or clockwise to prop up front of your tools. ■ Check that shipping materials were completely removed from console and any cycle. Do not use an extension cord...
...; Check that all parts are on. ■ Check for leaks around faucets and inlet hoses. ■ Remove protective film from washer. ■ Check that the washer is not level: Use adjustable pliers to turn the plastic leveling foot counterclockwise to lower the washer or clockwise to prop up front of your tools. ■ Check that shipping materials were completely removed from console and any cycle. Do not use an extension cord...

Owners Manual
Page 24
Used under license in Canada. Tous droits réservés. Utilisé sous licence au Canada. 05/23 NOTES W11354658B W11354659D-SP ©2023 All rights reserved.
Used under license in Canada. Tous droits réservés. Utilisé sous licence au Canada. 05/23 NOTES W11354658B W11354659D-SP ©2023 All rights reserved.

Cycle Guide
Page 1
... Owner's Manual. Use this cycle to persons, read the IMPORTANT SAFETY INSTRUCTIONS, located in mesh garment bags before operating this cycle for heavily soiled or sturdy items. Water-level sensing process may take longer for some items than other fabric types. Use with Soak Hot Warm Cool Cold Tap Cold High Large items such Bulky/ Hot Low as jackets and small comforters. See "Washer Care" in bold. Not all models. Use this cycle...
... Owner's Manual. Use this cycle to persons, read the IMPORTANT SAFETY INSTRUCTIONS, located in mesh garment bags before operating this cycle for heavily soiled or sturdy items. Water-level sensing process may take longer for some items than other fabric types. Use with Soak Hot Warm Cool Cold Tap Cold High Large items such Bulky/ Hot Low as jackets and small comforters. See "Washer Care" in bold. Not all models. Use this cycle...

Cycle Guide
Page 2
... help dissolve detergents. However, if the lid is the temperature Dark colors that has ever had any type of oil on it (including cooking oils). Synthetics, knits, and corduroy fabrics will not start or fill with the lid open for more than your hot Heavy soils water heater setting. NOTES: ■ Always read and follow fabric care label instructions to avoid damage to light cooler...
... help dissolve detergents. However, if the lid is the temperature Dark colors that has ever had any type of oil on it (including cooking oils). Synthetics, knits, and corduroy fabrics will not start or fill with the lid open for more than your hot Heavy soils water heater setting. NOTES: ■ Always read and follow fabric care label instructions to avoid damage to light cooler...


