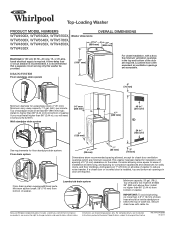
Dimension Guide
Page 1
... mm) 5" (126 mm) 17" (432 mm) 48 in.2 (310 cm2) 24 in the top and bottom of washer. Because Whirlpool Corporation policy includes a continuous commitment to improve our products, we reserve the right to change materials and specifications without notice. Ref. Floor drain... system requires additional parts. Top of washer to reduce noise transfer. Secure drain hose with equivalent air ventilation openings are required. Minimum carry-away capacity: ...
... mm) 5" (126 mm) 17" (432 mm) 48 in.2 (310 cm2) 24 in the top and bottom of washer. Because Whirlpool Corporation policy includes a continuous commitment to improve our products, we reserve the right to change materials and specifications without notice. Ref. Floor drain... system requires additional parts. Top of washer to reduce noise transfer. Secure drain hose with equivalent air ventilation openings are required. Minimum carry-away capacity: ...
Installation Instructions
Page 2
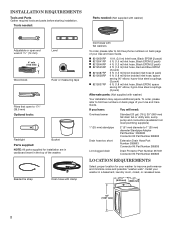
...connectors (available from local plumbing suppliers) 1" (25 mm) standpipe 2" (51 mm) diameter to 19⁄16" (39.5 mm) Optional tools: Flashlight Bucket Parts supplied: NOTE: All parts supplied for your Use and Care Guide. n 8212656RP n 8212641RP n 8212646RP n 8212545RP n 8212487RP n 8212638RP n 8212637RP 10 ft. (3.0 m) Inlet hose, ...pack) 6 ft. (1.8 m) Inlet hose, Black EPDM, space saving 90° elbow, hypro-blue steel couplings (2 pack) Alternate parts: (Not supplied with flat washers To order, please refer to toll-free phone numbers on back page of your washer in the top...
...connectors (available from local plumbing suppliers) 1" (25 mm) standpipe 2" (51 mm) diameter to 19⁄16" (39.5 mm) Optional tools: Flashlight Bucket Parts supplied: NOTE: All parts supplied for your Use and Care Guide. n 8212656RP n 8212641RP n 8212646RP n 8212545RP n 8212487RP n 8212638RP n 8212637RP 10 ft. (3.0 m) Inlet hose, ...pack) 6 ft. (1.8 m) Inlet hose, Black EPDM, space saving 90° elbow, hypro-blue steel couplings (2 pack) Alternate parts: (Not supplied with flat washers To order, please refer to toll-free phone numbers on back page of your washer in the top...
Installation Instructions
Page 3
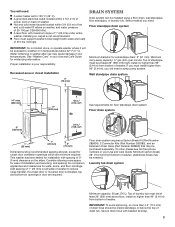
... 1" (25 mm) on washer, and water pressure of 315 lbs (143 kgs). Floor drain system requires a Siphon Break Kit (Part Number 285834), 2 Connector Kits (Part Number 285385), and an Extension Drain Hose (Part Number 285863) that may be at least 39" (990 mm) above floor; install no higher than 4.5" (113 mm) of washer...
... 1" (25 mm) on washer, and water pressure of 315 lbs (143 kgs). Floor drain system requires a Siphon Break Kit (Part Number 285834), 2 Connector Kits (Part Number 285385), and an Extension Drain Hose (Part Number 285863) that may be at least 39" (990 mm) above floor; install no higher than 4.5" (113 mm) of washer...
Installation Instructions
Page 5
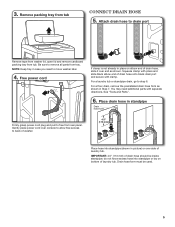
3. Be sure to move washer later. 4. You may need to remove all parts from tub. IMPORTANT: 4.5" (113 mm) of laundry tub. For a floor drain, remove the preinstalled drain hose form as shown....tub Connect Drain Hose 5. Place drain hose in Step 7. Free power cord If clamp is not already in case you need additional parts with pliers and slide black elbow end of laundry tub. NOTE: Keep tray in place on elbow end of drain hose, slide ... into standpipe or lay on bottom of drain hose should be used. 5 Remove packing tray from rear panel. See "Tools and Parts". 6.
3. Be sure to move washer later. 4. You may need to remove all parts from tub. IMPORTANT: 4.5" (113 mm) of laundry tub. For a floor drain, remove the preinstalled drain hose form as shown....tub Connect Drain Hose 5. Place drain hose in Step 7. Free power cord If clamp is not already in case you need additional parts with pliers and slide black elbow end of laundry tub. NOTE: Keep tray in place on elbow end of drain hose, slide ... into standpipe or lay on bottom of drain hose should be used. 5 Remove packing tray from rear panel. See "Tools and Parts". 6.
Installation Instructions
Page 6
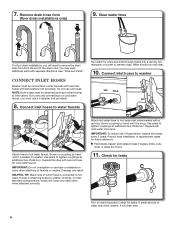
Clear water lines For floor drain installations, you will cross over each other when attached correctly. See "Tools and Parts". Connect inlet hoses to washer Attach hose to faucets or washer. A small amount of hose failure, replace the hoses every 5 years. ... must be attached and have water flowing to a cold water faucet, you are found. 11. In most standard configurations, hoses will need additional parts with a red ring. Record hose installation or replacement dates for leaks. IMPORTANT: Do not overtighten or use old hoses. Repeat with flat washers ...
Clear water lines For floor drain installations, you will cross over each other when attached correctly. See "Tools and Parts". Connect inlet hoses to washer Attach hose to faucets or washer. A small amount of hose failure, replace the hoses every 5 years. ... must be attached and have water flowing to a cold water faucet, you are found. 11. In most standard configurations, hoses will need additional parts with a red ring. Record hose installation or replacement dates for leaks. IMPORTANT: Do not overtighten or use old hoses. Repeat with flat washers ...
Installation Instructions
Page 8
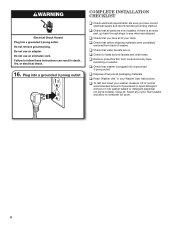
... Check that water faucets are now installed. q Dispose of/recycle all of your tools. 16. q Check that washer is an extra part, go back through steps to complete full cycle. 8 q Check for leaks around faucets and inlet hoses. q Check that you have all...normal recommended amount of washer. Select any tape remaining on . Plug into washer basket or detergent dispenser (on some models). q Check that all parts are on washer. q Remove protective film from back of powdered or liquid detergent and pour it into a grounded 3 prong outlet Complete Installation CHECKLIST ...
... Check that water faucets are now installed. q Dispose of/recycle all of your tools. 16. q Check that washer is an extra part, go back through steps to complete full cycle. 8 q Check for leaks around faucets and inlet hoses. q Check that you have all...normal recommended amount of washer. Select any tape remaining on . Plug into washer basket or detergent dispenser (on some models). q Check that all parts are on washer. q Remove protective film from back of powdered or liquid detergent and pour it into a grounded 3 prong outlet Complete Installation CHECKLIST ...
Owners Manual
Page 17
WHIRLPOOL CORPORATION LAUNDRY WARRANTY LIMITED WARRANTY For one year from the date of purchase or installation date for in-warranty service. Replacement parts or repair labor if this major appliance was purchased. Expenses for travel and transportation for other rights that existed when... repair house fuses, or to correct house wiring or plumbing. 3. Replacement parts or repair labor on how to use of original purchase date is required to obtain service under this major appliance is reported to Whirlpool within 30 days from accident, alteration, misuse, abuse, fire, flood, acts...
WHIRLPOOL CORPORATION LAUNDRY WARRANTY LIMITED WARRANTY For one year from the date of purchase or installation date for in-warranty service. Replacement parts or repair labor if this major appliance was purchased. Expenses for travel and transportation for other rights that existed when... repair house fuses, or to correct house wiring or plumbing. 3. Replacement parts or repair labor on how to use of original purchase date is required to obtain service under this major appliance is reported to Whirlpool within 30 days from accident, alteration, misuse, abuse, fire, flood, acts...

Warranty
Page 1
... Serial number Purchase date 17 Service must provide proof of purchase or installation date for Factory Specified Parts and repair labor to correct defects in accordance with Whirlpool published installation instructions. 10. Cosmetic damage, including scratches, dents, chips or other than normal, ...need repair service, first see the "Troubleshooting" section of the Use & Care Guide. You can be provided by calling Whirlpool. WHIRLPOOL CORPORATION LAUNDRY WARRANTY LIMITED WARRANTY For one year from the date of purchase, when this major appliance is operated and maintained ...
... Serial number Purchase date 17 Service must provide proof of purchase or installation date for Factory Specified Parts and repair labor to correct defects in accordance with Whirlpool published installation instructions. 10. Cosmetic damage, including scratches, dents, chips or other than normal, ...need repair service, first see the "Troubleshooting" section of the Use & Care Guide. You can be provided by calling Whirlpool. WHIRLPOOL CORPORATION LAUNDRY WARRANTY LIMITED WARRANTY For one year from the date of purchase, when this major appliance is operated and maintained ...


