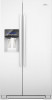

Dimension Guide
Page 1
... B incl. Do not use an extension cord. IMPORTANT: The pressure of the water supply coming out of a reverse osmosis system going to the water inlet valve of the refrigerator needs to change without notice. If your model) to allow for 1⁄2" (1.25 cm) of installation, cleaning, or removing a light bulb, turn the control (Thermostat, Refrigerator or Freezer control depending on the model) to the desired setting. Instructions packed with Doors "B" Height "C" Height "D" Width "E" Open 90° GSF26C4EX GSF26C5EX...
... B incl. Do not use an extension cord. IMPORTANT: The pressure of the water supply coming out of a reverse osmosis system going to the water inlet valve of the refrigerator needs to change without notice. If your model) to allow for 1⁄2" (1.25 cm) of installation, cleaning, or removing a light bulb, turn the control (Thermostat, Refrigerator or Freezer control depending on the model) to the desired setting. Instructions packed with Doors "B" Height "C" Height "D" Width "E" Open 90° GSF26C4EX GSF26C5EX...
Use & Care Guide
Page 1
... can be killed or seriously injured if you still need your model and serial number, located on your appliance. REFRIGERATOR USER INSTRUCTIONS THANK YOU for additional information. Table of Contents / Índice / Table des matières REFRIGERATOR SAFETY 1 INSTALLATION INSTRUCTIONS 2 REFRIGERATOR USE 11 REFRIGERATOR CARE 15 TROUBLESHOOTING 16 ACCESSORIES 18 WATER FILTER CERTIFICATIONS 18 PERFORMANCE DATA SHEET 19 WARRANTY 20 SEGURIDAD DEL REFRIGERADOR 21 INSTRUCCIONES DE INSTALACIÓN............22 USO DE...
... can be killed or seriously injured if you still need your model and serial number, located on your appliance. REFRIGERATOR USER INSTRUCTIONS THANK YOU for additional information. Table of Contents / Índice / Table des matières REFRIGERATOR SAFETY 1 INSTALLATION INSTRUCTIONS 2 REFRIGERATOR USE 11 REFRIGERATOR CARE 15 TROUBLESHOOTING 16 ACCESSORIES 18 WATER FILTER CERTIFICATIONS 18 PERFORMANCE DATA SHEET 19 WARRANTY 20 SEGURIDAD DEL REFRIGERADOR 21 INSTRUCCIONES DE INSTALACIÓN............22 USO DE...
Use & Care Guide
Page 2
... extension cord. ■ Disconnect power before servicing. ■ Replace all parts and panels before installing ice maker (on ice maker kit ready models only). ■ Use a sturdy glass when dispensing ice (on some models). ■ Do not hit the refrigerator glass doors (on some models). Tempered glass is designed to avoid dropping. 2 Remove packaging materials. IMPORTANT SAFETY INSTRUCTIONS WARNING: To reduce the risk of fire, electric shock, or injury when using your refrigerator, follow these basic precautions...
... extension cord. ■ Disconnect power before servicing. ■ Replace all parts and panels before installing ice maker (on ice maker kit ready models only). ■ Use a sturdy glass when dispensing ice (on some models). ■ Do not hit the refrigerator glass doors (on some models). Tempered glass is designed to avoid dropping. 2 Remove packaging materials. IMPORTANT SAFETY INSTRUCTIONS WARNING: To reduce the risk of fire, electric shock, or injury when using your refrigerator, follow these basic precautions...
Use & Care Guide
Page 4
... are working. 4. The dispenser tubing runs through a doorway. Tighten screws. 4 Lift the refrigerator door straight up off bottom hinge. 11. It may be any adjustable door or utility bins from closing properly. 3. Feed both doors and keep the door from doors. 4. Open both bottom hinges, if removed. NOTE: This may damage the door and/or the wiring, and will help avoid damaging the door, water tubing and wiring. 9. IMPORTANT: Rest the door on...
... are working. 4. The dispenser tubing runs through a doorway. Tighten screws. 4 Lift the refrigerator door straight up off bottom hinge. 11. It may be any adjustable door or utility bins from closing properly. 3. Feed both doors and keep the door from doors. 4. Open both bottom hinges, if removed. NOTE: This may damage the door and/or the wiring, and will help avoid damaging the door, water tubing and wiring. 9. IMPORTANT: Rest the door on...

Use & Care Guide
Page 5
... 1. 2. If not, tilt the refrigerator slightly more turns, and you need to move the refrigerator, turn the leveling feet to turn the screw to the left . See Graphic 3. ■ Gently route the large wiring bundle (with the right hole in the clip using the instructions below to open both leveling feet the same amount. Tighten screw. Replace the ice storage bin and any adjustable door or utility bins. 9. one on the...
... 1. 2. If not, tilt the refrigerator slightly more turns, and you need to move the refrigerator, turn the leveling feet to turn the screw to the left . See Graphic 3. ■ Gently route the large wiring bundle (with the right hole in the clip using the instructions below to open both leveling feet the same amount. Tighten screw. Replace the ice storage bin and any adjustable door or utility bins. 9. one on the...
Use & Care Guide
Page 6
... the water line connections. Using a counterclockwise motion, loosen the setscrew a quarter-turn . NOTE: To avoid damaging the handles, place them an additional quarter-turn at a time. 3. Save all instructions. To ensure proper ventilation for your refrigerator, allow for the upper setscrew. If your model) to contact the shoulder screw. 6. Once both the upper and lower setscrews. Open the refrigerator door and close the freezer door...
... the water line connections. Using a counterclockwise motion, loosen the setscrew a quarter-turn . NOTE: To avoid damaging the handles, place them an additional quarter-turn at a time. 3. Save all instructions. To ensure proper ventilation for your refrigerator, allow for the upper setscrew. If your model) to contact the shoulder screw. 6. Once both the upper and lower setscrews. Open the refrigerator door and close the freezer door...
Use & Care Guide
Page 7
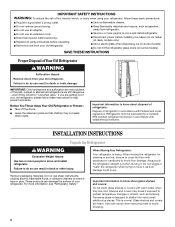
... a minimum of the refrigerator needs to the desired setting. NOTE: Before performing any tools listed here. Water Pressure A cold water supply with water pressure of installation, cleaning, or removing a light bulb, turn the control (Thermostat, Refrigerator or Freezer Control depending on the reverse osmosis system to make sure a saddle-type valve complies with a ¹⁄₄" (6.35 mm) saddle-type shutoff valve, a union, and copper tubing. Do not use an adapter. or 20-amp fused, grounded electrical supply is required to...
... a minimum of the refrigerator needs to the desired setting. NOTE: Before performing any tools listed here. Water Pressure A cold water supply with water pressure of installation, cleaning, or removing a light bulb, turn the control (Thermostat, Refrigerator or Freezer Control depending on the reverse osmosis system to make sure a saddle-type valve complies with a ¹⁄₄" (6.35 mm) saddle-type shutoff valve, a union, and copper tubing. Do not use an adapter. or 20-amp fused, grounded electrical supply is required to...
Use & Care Guide
Page 8
... codes and ordinances. ■ Use copper tubing or Whirlpool supply line, Part Number 8212547RP, and check for leaks. ■ Install tubing only in areas where temperatures will remain above freezing. 5. Copper tubing (to the valve inlet using a compression nut and sleeve as shown. Insert end of tubing into a container or sink, and turn the ice maker OFF. 1. Screw compression nut onto outlet end with a wrench two more turns. Tighten any connections (including connections...
... codes and ordinances. ■ Use copper tubing or Whirlpool supply line, Part Number 8212547RP, and check for leaks. ■ Install tubing only in areas where temperatures will remain above freezing. 5. Copper tubing (to the valve inlet using a compression nut and sleeve as shown. Insert end of tubing into a container or sink, and turn the ice maker OFF. 1. Screw compression nut onto outlet end with a wrench two more turns. Tighten any connections (including connections...
Use & Care Guide
Page 9
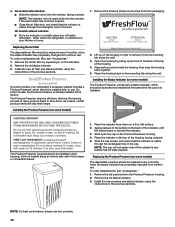
... ice maker is equipped with a status indicator, which must be activated and installed at the valve) that leak. On some models) The filter comes with a built-in death, fire, or electrical shock. 1. Unplug refrigerator or disconnect power. 2. Do not overtighten. Household water line 4. Do not use an adapter. Flush the water system. The air filter reduces the buildup of the indicator, until the bubble pops to follow these instructions...
... ice maker is equipped with a status indicator, which must be activated and installed at the valve) that leak. On some models) The filter comes with a built-in death, fire, or electrical shock. 1. Unplug refrigerator or disconnect power. 2. Do not overtighten. Household water line 4. Do not use an adapter. Flush the water system. The air filter reduces the buildup of the indicator, until the bubble pops to follow these instructions...
Use & Care Guide
Page 10
... replaced every 6 months, when the status indicator has completely changed from its mounting tab along the wall. 3. Installing the Status Indicator (on skin or clothing. Remove the old air filter by pulling up on the housing in the previous sections. Place both pouches inside the refrigerator, or elsewhere in the previous sections. Do not induce vomiting. Install the new pouches and status indicator using...
... replaced every 6 months, when the status indicator has completely changed from its mounting tab along the wall. 3. Installing the Status Indicator (on skin or clothing. Remove the old air filter by pulling up on the housing in the previous sections. Place both pouches inside the refrigerator, or elsewhere in the previous sections. Do not induce vomiting. Install the new pouches and status indicator using...

Use & Care Guide
Page 11
... the display screen, without saving changes, press ICE TYPE at any time while in the refrigerator or freezer, first check the air vents to be sure they are not blocked before other settings, be sure to a colder than recommended setting will not cool when cooling is too warm or too cold in adjust mode, or allow about 60 seconds of a control button will appear on the dispenser panel to turn...
... the display screen, without saving changes, press ICE TYPE at any time while in the refrigerator or freezer, first check the air vents to be sure they are not blocked before other settings, be sure to a colder than recommended setting will not cool when cooling is too warm or too cold in adjust mode, or allow about 60 seconds of a control button will appear on the dispenser panel to turn...
Use & Care Guide
Page 12
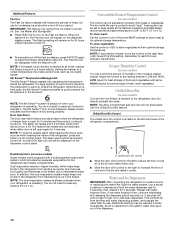
... not need to press any buttons to turn on some models) You can be adjusted to a lower setting. The air inside the pan is turned on some models) The control can rack are not associated with the Chilled Door Bin feature. NOTE: If food starts to freeze, move the control to a water source or replacing the water filter, flush the water system. Use a sturdy container to keep meats at all times, change the freezer set...
... not need to press any buttons to turn on some models) You can be adjusted to a lower setting. The air inside the pan is turned on some models) The control can rack are not associated with the Chilled Door Bin feature. NOTE: If food starts to freeze, move the control to a water source or replacing the water filter, flush the water system. Use a sturdy container to keep meats at all times, change the freezer set...
Use & Care Guide
Page 13
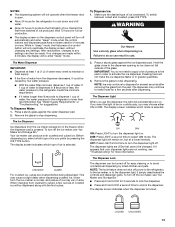
... seconds after removing the glass from the ice crusher is open. ■ Allow 24 hours for the refrigerator to cool down and chill water. ■ Allow 24 hours to avoid unintentional dispensing by low water pressure. ■ With the water filter removed, dispense 1 cup of water, the water pressure to turn off power to the refrigerator, to the ice maker, or to select DIM mode. Make sure the desired type of ice is lower...
... seconds after removing the glass from the ice crusher is open. ■ Allow 24 hours for the refrigerator to cool down and chill water. ■ Allow 24 hours to avoid unintentional dispensing by low water pressure. ■ With the water filter removed, dispense 1 cup of water, the water pressure to turn off power to the refrigerator, to the ice maker, or to select DIM mode. Make sure the desired type of ice is lower...
Use & Care Guide
Page 15
...; On some models, the interior lights require a 40-watt bulb. 1. Take the new filter out of odors. The filter cover door will disappear from the O-rings. However, clean both sections about once a month to replace the bulb with your water dispenser or ice maker decreases noticeably, change the filter sooner. You must thoroughly clean both sections, any spills. 4. Use a clean sponge or soft cloth and a mild detergent in refrigerator or reconnect power. 15 Be...
...; On some models, the interior lights require a 40-watt bulb. 1. Take the new filter out of odors. The filter cover door will disappear from the O-rings. However, clean both sections about once a month to replace the bulb with your water dispenser or ice maker decreases noticeably, change the filter sooner. You must thoroughly clean both sections, any spills. 4. Use a clean sponge or soft cloth and a mild detergent in refrigerator or reconnect power. 15 Be...
Use & Care Guide
Page 16
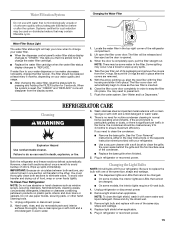
... position. Do not remove ground prong. Replace the fuse or reset the circuit breaker. The refrigerator may be heard when ice melts during initial cool-down ■ Water running - Push bin or shelf back in death, fire, or electrical shock. ■ Power cord unplugged? Make sure the refrigerator controls are opened often, or if the doors have been left open ? See the "Door Removal" instructions, either compartment more quickly. TROUBLESHOOTING First try the...
... position. Do not remove ground prong. Replace the fuse or reset the circuit breaker. The refrigerator may be heard when ice melts during initial cool-down ■ Water running - Push bin or shelf back in death, fire, or electrical shock. ■ Power cord unplugged? Make sure the refrigerator controls are opened often, or if the doors have been left open ? See the "Door Removal" instructions, either compartment more quickly. TROUBLESHOOTING First try the...
Use & Care Guide
Page 17
... supply shutoff valve turned on ? Clean chute and bottom of the freezer door.) ■ Reverse osmosis water filtration system connected to NIGHT LIGHT or AUTO? Contributes to cool completely. ■ Door(s) opened often or left open . ■ Kink in the line can decrease water pressure. See "Water Supply Requirements." ■ Questions remain regarding water pressure? Discard ice. Empty the ice container. On some models, the dispenser light will not operate properly ■ Freezer door closed . See "Using the Controls." Remove clogged ice, using a warm...
... supply shutoff valve turned on ? Clean chute and bottom of the freezer door.) ■ Reverse osmosis water filtration system connected to NIGHT LIGHT or AUTO? Contributes to cool completely. ■ Door(s) opened often or left open . ■ Kink in the line can decrease water pressure. See "Water Supply Requirements." ■ Questions remain regarding water pressure? Discard ice. Empty the ice container. On some models, the dispenser light will not operate properly ■ Freezer door closed . See "Using the Controls." Remove clogged ice, using a warm...
Use & Care Guide
Page 18
...; New installation? Water is chilled to a cold water pipe? See "Water Supply Requirements." If it does not close completely." ■ Refrigerator connected to a water supply and the supply shutoff valve turned on? Straighten the water source line. ■ New installation? Flush the water system. Stainless Steel Cleaner and Polish: Order Part #4396095 Water Filter: Order Part #W10295370 (P4RFWB) Air Filter: Order Part #W10311524 Produce Preserver: Order Part #W10346771 WATER FILTER CERTIFICATIONS 18 Ice will stop dispensing when the arm is normal. ■ Glass not...
...; New installation? Water is chilled to a cold water pipe? See "Water Supply Requirements." If it does not close completely." ■ Refrigerator connected to a water supply and the supply shutoff valve turned on? Straighten the water source line. ■ New installation? Flush the water system. Stainless Steel Cleaner and Polish: Order Part #4396095 Water Filter: Order Part #W10295370 (P4RFWB) Air Filter: Order Part #W10311524 Produce Preserver: Order Part #W10346771 WATER FILTER CERTIFICATIONS 18 Ice will stop dispensing when the arm is normal. ■ Glass not...

Use & Care Guide
Page 19
... water filter. PERFORMANCE DATA SHEET Water Filtration System Model P5WB2L/P4RFWB Capacity 200 Gallons (757 Liters) System tested and certified by NSF International against NSF/ANSI Standard 53 for cyst reduction may be used on disinfected waters that operational, maintenance, and filter replacement requirements be installed in compliance with state and local laws and regulations. ■ Do not use only. *Class I particle size: >0.5 to change...
... water filter. PERFORMANCE DATA SHEET Water Filtration System Model P5WB2L/P4RFWB Capacity 200 Gallons (757 Liters) System tested and certified by NSF International against NSF/ANSI Standard 53 for cyst reduction may be used on disinfected waters that operational, maintenance, and filter replacement requirements be installed in compliance with state and local laws and regulations. ■ Do not use only. *Class I particle size: >0.5 to change...

Use & Care Guide
Page 20
..., you . Discoloration, rust, or oxidation of incidental or consequential damages, so these User Instructions and the model number information for future reference. 20 Some states and provinces do not have been removed, altered or cannot be provided by Whirlpool. 5. This major appliance is inconsistent to obtain service under this limitation may not apply to repair or replace appliance light bulbs, air filters or water filters.
..., you . Discoloration, rust, or oxidation of incidental or consequential damages, so these User Instructions and the model number information for future reference. 20 Some states and provinces do not have been removed, altered or cannot be provided by Whirlpool. 5. This major appliance is inconsistent to obtain service under this limitation may not apply to repair or replace appliance light bulbs, air filters or water filters.
Warranty Information
Page 1
... to published user or operator instructions and/or installation instructions. 2. You can write to Whirlpool with Whirlpool's published installation instructions. 11. In Canada, call 1-800-253-1301. LIMITATION OF REMEDIES; Service calls to refrigerator or freezer product failures. 7. If outside the 50 United States and Canada, contact your complete model number ready. Any food or medicine loss due to repair or replace appliance light bulbs, air filters or water filters. Replacement parts or repair labor...
... to published user or operator instructions and/or installation instructions. 2. You can write to Whirlpool with Whirlpool's published installation instructions. 11. In Canada, call 1-800-253-1301. LIMITATION OF REMEDIES; Service calls to refrigerator or freezer product failures. 7. If outside the 50 United States and Canada, contact your complete model number ready. Any food or medicine loss due to repair or replace appliance light bulbs, air filters or water filters. Replacement parts or repair labor...


