
Dimension Guide
Page 1
... to change without notice. Because Whirlpool Corporation policy includes a continuous commitment to improve Dimensions are finished, reconnect the refrigerator to the electrical source and reset the control (Thermostat, Refrigerator or Freezer control depending on your refrigerator, allow extra space at the top. Do not use an extension cord. When you are for the water line connections. IMPORTANT: The pressure of the water supply coming out of a reverse osmosis system...
... to change without notice. Because Whirlpool Corporation policy includes a continuous commitment to improve Dimensions are finished, reconnect the refrigerator to the electrical source and reset the control (Thermostat, Refrigerator or Freezer control depending on your refrigerator, allow extra space at the top. Do not use an extension cord. When you are for the water line connections. IMPORTANT: The pressure of the water supply coming out of a reverse osmosis system...
Use & Care Guide
Page 1
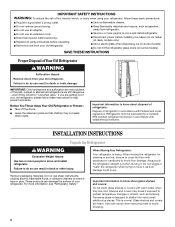
...;ndice / Table des matières REFRIGERATOR SAFETY 1 INSTALLATION INSTRUCTIONS 2 REFRIGERATOR USE 11 REFRIGERATOR CARE 15 TROUBLESHOOTING 16 ACCESSORIES 18 WATER FILTER CERTIFICATIONS 18 PERFORMANCE DATA SHEET 19 WARRANTY 20 SEGURIDAD DEL REFRIGERADOR 21 INSTRUCCIONES DE INSTALACIÓN............22 USO DE SU REFRIGERADOR 31 CUIDADO DE SU REFRIGERADOR 36 SOLUCIÓN DE PROBLEMAS 37 ACCESORIOS 39 HOJA DE DATOS DEL RENDIMIENTO.........40 GARANTÍA 41 SÉCURIT...
...;ndice / Table des matières REFRIGERATOR SAFETY 1 INSTALLATION INSTRUCTIONS 2 REFRIGERATOR USE 11 REFRIGERATOR CARE 15 TROUBLESHOOTING 16 ACCESSORIES 18 WATER FILTER CERTIFICATIONS 18 PERFORMANCE DATA SHEET 19 WARRANTY 20 SEGURIDAD DEL REFRIGERADOR 21 INSTRUCCIONES DE INSTALACIÓN............22 USO DE SU REFRIGERADOR 31 CUIDADO DE SU REFRIGERADOR 36 SOLUCIÓN DE PROBLEMAS 37 ACCESORIOS 39 HOJA DE DATOS DEL RENDIMIENTO.........40 GARANTÍA 41 SÉCURIT...
Use & Care Guide
Page 2
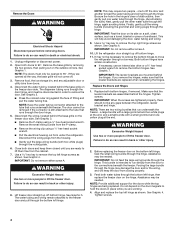
.... 2 Glass shelves and covers are getting rid of your old refrigerator, please follow these instructions to move and install refrigerator. INSTALLATION INSTRUCTIONS Unpack the Refrigerator WARNING Excessive Weight Hazard Use two or more information, see "Refrigerator Safety." Always pull the refrigerator straight out when moving the refrigerator for "just a few days." Do not use an extension cord. ■ Disconnect power before servicing. ■ Replace all parts and panels before installing ice maker (on ice maker kit ready models...
.... 2 Glass shelves and covers are getting rid of your old refrigerator, please follow these instructions to move and install refrigerator. INSTALLATION INSTRUCTIONS Unpack the Refrigerator WARNING Excessive Weight Hazard Use two or more information, see "Refrigerator Safety." Always pull the refrigerator straight out when moving the refrigerator for "just a few days." Do not use an extension cord. ■ Disconnect power before servicing. ■ Replace all parts and panels before installing ice maker (on ice maker kit ready models...
Use & Care Guide
Page 4
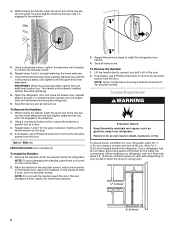
... are opened to the tube that runs underneath the freezer. NOTE: There are replaced when reinstalling the hinges. WARNING Excessive Weight Hazard Use two or more people to remove the top left hinge as shown. Assistance may be needed . Align and replace the top left hinge screws as shown. Unplug refrigerator or disconnect power. 2. Disconnect the water tubing, located behind the base grille on the freezer door side. Disconnect the wiring plugs from...
... are opened to the tube that runs underneath the freezer. NOTE: There are replaced when reinstalling the hinges. WARNING Excessive Weight Hazard Use two or more people to remove the top left hinge as shown. Assistance may be needed . Align and replace the top left hinge screws as shown. Unplug refrigerator or disconnect power. 2. Disconnect the water tubing, located behind the base grille on the freezer door side. Disconnect the wiring plugs from...

Use & Care Guide
Page 5
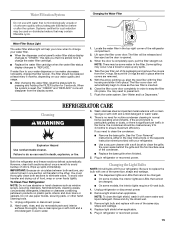
... wiring clip over the grommets. First install the smaller grommet into the top of the product. 4. Replace the refrigerator door by turning the leveling feet to the left . Replace the ice storage bin and any adjustable door or utility bins. 9. Plug refrigerator into the green fitting until it stops, then push the smaller ¹⁄₄" (6.35 mm) water tube into a grounded 3 prong outlet. Leveling and Door Closing Your refrigerator has two adjustable front feet...
... wiring clip over the grommets. First install the smaller grommet into the top of the product. 4. Replace the refrigerator door by turning the leveling feet to the left . Replace the ice storage bin and any adjustable door or utility bins. 9. Plug refrigerator into the green fitting until it stops, then push the smaller ¹⁄₄" (6.35 mm) water tube into a grounded 3 prong outlet. Leveling and Door Closing Your refrigerator has two adjustable front feet...
Use & Care Guide
Page 6
... the upper and lower setscrews. Apply only downward pressure. 3. Repeat steps 2 through 7 to remove the shoulder screws from the door. 4. Once both setscrews have mounting brackets connected to install the refrigerator door handle. 4. NOTE: Do not push the handle toward the door; If necessary, use a Phillips screwdriver to begin fastening the lower setscrew. 7. Repeat steps 1 and 2 for the water line connections. To Remove the Handles: 1.
... the upper and lower setscrews. Apply only downward pressure. 3. Repeat steps 2 through 7 to remove the shoulder screws from the door. 4. Once both setscrews have mounting brackets connected to install the refrigerator door handle. 4. NOTE: Do not push the handle toward the door; If necessary, use a Phillips screwdriver to begin fastening the lower setscrew. 7. Repeat steps 1 and 2 for the water line connections. To Remove the Handles: 1.
Use & Care Guide
Page 7
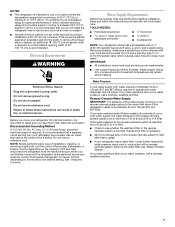
... cold water supply, the water pressure to the reverse osmosis system needs to operate the water dispenser and ice maker. Water Pressure A cold water supply with a ¹⁄₄" (6.35 mm) saddle-type shutoff valve, a union, and copper tubing. If a reverse osmosis water filtration system is connected to your refrigerator be turned off by a switch. Before you are finished, reconnect the refrigerator to the electrical source and reset the control (Thermostat, Refrigerator or Freezer Control depending on the model) to the desired setting. Remove the water filter...
... cold water supply, the water pressure to the reverse osmosis system needs to operate the water dispenser and ice maker. Water Pressure A cold water supply with a ¹⁄₄" (6.35 mm) saddle-type shutoff valve, a union, and copper tubing. If a reverse osmosis water filtration system is connected to your refrigerator be turned off by a switch. Before you are finished, reconnect the refrigerator to the electrical source and reset the control (Thermostat, Refrigerator or Freezer Control depending on the model) to the desired setting. Remove the water filter...
Use & Care Guide
Page 8
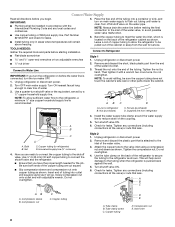
... the water line inlet, which is located on main water supply to the tubing when the refrigerator is connected, turn the refrigerator on the back of the refrigerator to secure the tubing to the inlet of the tubing. Connect to Water Line IMPORTANT: If you have the proper length needed for leaks. ■ Install tubing only in accordance with the International Plumbing Code and any local codes and ordinances. ■ Use copper tubing or Whirlpool supply line, Part Number...
... the water line inlet, which is located on main water supply to the tubing when the refrigerator is connected, turn the refrigerator on the back of the refrigerator to secure the tubing to the inlet of the tubing. Connect to Water Line IMPORTANT: If you have the proper length needed for leaks. ■ Install tubing only in accordance with the International Plumbing Code and any local codes and ordinances. ■ Use copper tubing or Whirlpool supply line, Part Number...
Use & Care Guide
Page 9
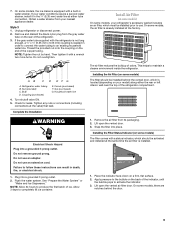
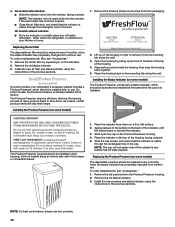
... environment inside the refrigerator. Refrigerator water tubing B. Check for leaks. Do not use an adapter. Plug into a grounded 3 prong outlet. Installing the Air Filter (on some models) On some models) The filter comes with a wrench two more turns. REPLACE MONTHS 1. Lift open the vented door. 3. If your nearest appliance dealer. If the gray water tube supplied with a built-in order to connect the water tubing to use. Install Air Filter (on some models, the ice maker is equipped with the refrigerator is...
... environment inside the refrigerator. Refrigerator water tubing B. Check for leaks. Do not use an adapter. Plug into a grounded 3 prong outlet. Installing the Air Filter (on some models) On some models) The filter comes with a wrench two more turns. REPLACE MONTHS 1. Lift open the vented door. 3. If your nearest appliance dealer. If the gray water tube supplied with a built-in order to connect the water tubing to use. Install Air Filter (on some models, the ice maker is equipped with the refrigerator is...
Use & Care Guide
Page 10
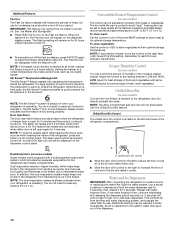
... notches: ■ Store the indicator in their packaging. Replacing the Air Filter The disposable air filter should be replaced every 6 months, when the status indicator has completely changed from white to remove it from white to use two pouches. 10 Remove the old air filter by pulling up on the housing in on skin or clothing. Install the new air filter and status indicator using the instructions in the top of...
... notches: ■ Store the indicator in their packaging. Replacing the Air Filter The disposable air filter should be replaced every 6 months, when the status indicator has completely changed from white to remove it from white to use two pouches. 10 Remove the old air filter by pulling up on the housing in on skin or clothing. Install the new air filter and status indicator using the instructions in the top of...

Use & Care Guide
Page 11
... may spoil. When adjusting temperature set points, press FILTER to 7°C). The factory recommended set points are preset at any control button on the dispenser control panel will not cool when cooling is activated. NOTE: To exit without changing any faster. ■ If the temperature is too warm or too cold in the refrigerator or freezer, first check the air vents to -15°C). When adjust mode is 33°F to...
... may spoil. When adjusting temperature set points, press FILTER to 7°C). The factory recommended set points are preset at any control button on the dispenser control panel will not cool when cooling is activated. NOTE: To exit without changing any faster. ■ If the temperature is too warm or too cold in the refrigerator or freezer, first check the air vents to -15°C). When adjust mode is 33°F to...
Use & Care Guide
Page 12
... the temperature inside the pan is cooled to properly chill meats or vegetables. You do not need to press any buttons to any button on the dispenser control panel. The Fast Ice setting will flush air from the freezer is cleared from spoiling as while cleaning the inside of the refrigerator, press any setting between adjustments. If a large quantity of warm food is turned on the Fast Ice feature. The feature then resets...
... the temperature inside the pan is cooled to properly chill meats or vegetables. You do not need to press any buttons to any button on the dispenser control panel. The Fast Ice setting will flush air from the freezer is cleared from spoiling as while cleaning the inside of the refrigerator, press any setting between adjustments. If a large quantity of warm food is turned on the Fast Ice feature. The feature then resets...
Use & Care Guide
Page 13
... the refrigerator to cool down and chill water. ■ Allow 24 hours to cubed, a few seconds after removing the glass from the ice maker storage bin in "sleep" mode, the first press of a control button will only reactivate the display screen, without changing any settings can result in greater quantities. 3. Make sure the desired type of ice is selected. The display screen indicates which type of water every week to the dispenser light...
... the refrigerator to cool down and chill water. ■ Allow 24 hours to cubed, a few seconds after removing the glass from the ice maker storage bin in "sleep" mode, the first press of a control button will only reactivate the display screen, without changing any settings can result in greater quantities. 3. Make sure the desired type of ice is selected. The display screen indicates which type of water every week to the dispenser light...
Use & Care Guide
Page 15
... its packaging and remove the covers from the display screen. 1. Failure to eliminate odors. See the "Door Removal" instructions, either in the User Instructions or the separate instruction sheet provided with your refrigerator. ■ Use a vacuum cleaner with a clean sponge or soft cloth and a mild detergent in the top-right corner of odors. Replace light shield when applicable. 5. Locate the water filter in warm water. 4. Take the new filter out of the...
... its packaging and remove the covers from the display screen. 1. Failure to eliminate odors. See the "Door Removal" instructions, either in the User Instructions or the separate instruction sheet provided with your refrigerator. ■ Use a vacuum cleaner with a clean sponge or soft cloth and a mild detergent in the top-right corner of odors. Replace light shield when applicable. 5. Locate the water filter in warm water. 4. Take the new filter out of the...
Use & Care Guide
Page 16
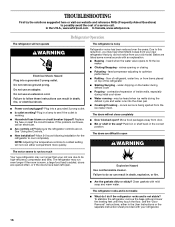
... water runs into a grounded 3 prong outlet. fans/compressor adjusting to coldest setting will not operate WARNING Electrical Shock Hazard Plug into the drain pan ■ Creaking/Cracking - Move food packages away from the ice maker mold. Do not use an extension cord. See "Using the Controls." ■ New installation? NOTE: Adjusting the temperature controls to optimize performance ■ Rattling - Below are difficult to open ? flow of refrigerant, water line, or from your refrigerator. 16 The doors are listed...
... water runs into a grounded 3 prong outlet. fans/compressor adjusting to coldest setting will not operate WARNING Electrical Shock Hazard Plug into the drain pan ■ Creaking/Cracking - Move food packages away from the ice maker mold. Do not use an extension cord. See "Using the Controls." ■ New installation? NOTE: Adjusting the temperature controls to optimize performance ■ Rattling - Below are difficult to open ? flow of refrigerant, water line, or from your refrigerator. 16 The doors are listed...
Use & Care Guide
Page 17
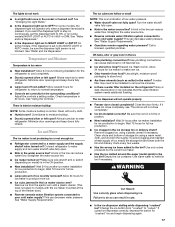
... set to the NIGHT LIGHT or AUTO mode, be installed to your cold water supply? Clean chute and bottom of the freezer door.) ■ Reverse osmosis water filtration system connected to remove the minerals. ■ Is there a water filter installed on the refrigerator? Use warm water to store food. ■ Are there minerals (such as sulfur) in the water? See "Water and Ice Dispensers." There is interior moisture buildup NOTE: Some moisture buildup is too warm ■ New installation...
... set to the NIGHT LIGHT or AUTO mode, be installed to your cold water supply? Clean chute and bottom of the freezer door.) ■ Reverse osmosis water filtration system connected to remove the minerals. ■ Is there a water filter installed on the refrigerator? Use warm water to store food. ■ Are there minerals (such as sulfur) in the water? See "Water and Ice Dispensers." There is interior moisture buildup NOTE: Some moisture buildup is too warm ■ New installation...
Use & Care Guide
Page 18
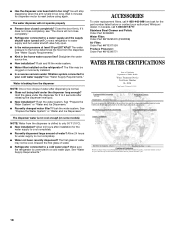
... the Water System" or "Water and Ice Dispensers." The dispenser water is leaking from the dispenser. Straighten the water source line. ■ New installation? Water is not cool enough (on the refrigerator? Flush the water system. Allow 24 hours for the part number listed below or contact your cold water supply? ACCESSORIES To order replacement filters, call 1-800-807-6777. See "Water Supply Requirements." See "Prepare the Water System" or "Water and Ice Dispensers." ■ Recently changed water filter? Make sure the refrigerator is held...
... the Water System" or "Water and Ice Dispensers." The dispenser water is leaking from the dispenser. Straighten the water source line. ■ New installation? Water is not cool enough (on the refrigerator? Flush the water system. Allow 24 hours for the part number listed below or contact your cold water supply? ACCESSORIES To order replacement filters, call 1-800-807-6777. See "Water Supply Requirements." See "Prepare the Water System" or "Water and Ice Dispensers." ■ Recently changed water filter? Make sure the refrigerator is held...

Use & Care Guide
Page 19
... the filter indicator changes from "GOOD" to perform as specified in your water filter. and against NSF/ANSI Standard 42 for cold water use with water that is recommended that you replace the filter. ■ Refer to the "Warranty" section for the Manufacturer's name, address and telephone number. ■ Refer to NSF/ANSI Standards 42 and 53 for the reduction of your water supply. D. This...
... the filter indicator changes from "GOOD" to perform as specified in your water filter. and against NSF/ANSI Standard 42 for cold water use with water that is recommended that you replace the filter. ■ Refer to the "Warranty" section for the Manufacturer's name, address and telephone number. ■ Refer to NSF/ANSI Standards 42 and 53 for the reduction of your water supply. D. This...

Use & Care Guide
Page 20
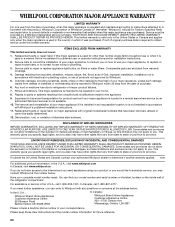
... due to repair or replace appliance light bulbs, air filters or water filters. Pickup and delivery. WHIRLPOOL SHALL NOT BE LIABLE FOR INCIDENTAL OR CONSEQUENTIAL DAMAGES. You can write to Whirlpool with original model/serial numbers that have access to the Internet and you need further assistance, you can find your complete model number ready. For assistance or service in accordance with electrical or plumbing codes, or use of products...
... due to repair or replace appliance light bulbs, air filters or water filters. Pickup and delivery. WHIRLPOOL SHALL NOT BE LIABLE FOR INCIDENTAL OR CONSEQUENTIAL DAMAGES. You can write to Whirlpool with original model/serial numbers that have access to the Internet and you need further assistance, you can find your complete model number ready. For assistance or service in accordance with electrical or plumbing codes, or use of products...
Warranty Information
Page 1
... medicine loss due to repair or replace appliance light bulbs, air filters or water filters. Repairs to parts or systems resulting from warranty coverage. 4. This warranty gives you specific legal rights, and you on the duration of implied warranties of stainless steel surfaces. For assistance or service in materials or workmanship that is inconsistent to published user or operator instructions and/or installation instructions. 2. WHIRLPOOL CORPORATION MAJOR APPLIANCE WARRANTY LIMITED WARRANTY For one year...
... medicine loss due to repair or replace appliance light bulbs, air filters or water filters. Repairs to parts or systems resulting from warranty coverage. 4. This warranty gives you specific legal rights, and you on the duration of implied warranties of stainless steel surfaces. For assistance or service in materials or workmanship that is inconsistent to published user or operator instructions and/or installation instructions. 2. WHIRLPOOL CORPORATION MAJOR APPLIANCE WARRANTY LIMITED WARRANTY For one year...


