
Owners Manual
Page 1
In Canada, visit our website at www.whirlpool.ca or call us at www.whirlpool.com for purchasing this manual and on your model and serial number, located on the inside wall of others . All safety messages will... or seriously injured if you and others are not followed. Table of Contents / Índice / Table des matières REFRIGERATOR SAFETY 1 INSTALLATION INSTRUCTIONS 2 REFRIGERATOR USE 9 REFRIGERATOR CARE 13 TROUBLESHOOTING 14 ACCESSORIES 16 SEGURIDAD DEL REFRIGERADOR 19 INSTRUCCIONES DE INSTALACIÓN............20 USO DE SU REFRIGERADOR 28 CUIDADO DE SU...
In Canada, visit our website at www.whirlpool.ca or call us at www.whirlpool.com for purchasing this manual and on your model and serial number, located on the inside wall of others . All safety messages will... or seriously injured if you and others are not followed. Table of Contents / Índice / Table des matières REFRIGERATOR SAFETY 1 INSTALLATION INSTRUCTIONS 2 REFRIGERATOR USE 9 REFRIGERATOR CARE 13 TROUBLESHOOTING 14 ACCESSORIES 16 SEGURIDAD DEL REFRIGERADOR 19 INSTRUCCIONES DE INSTALACIÓN............20 USO DE SU REFRIGERADOR 28 CUIDADO DE SU...

Owners Manual
Page 2
...it . Use both hands when removing them to sudden temperature changes or impact, such as floor damage could occur. Before You Throw Away Your Old Refrigerator or Freezer: ■ Take off the doors. ■ Leave the shelves in death or brain damage. Do not use an extension cord. &#... models only). ■ Use a sturdy glass when dispensing ice (on some models). ■ Do not hit the refrigerator glass doors (on some models). When Moving Your Refrigerator: Your refrigerator is normal. Failure to do so can result in place so that children may break if exposed to avoid dropping. 2...
...it . Use both hands when removing them to sudden temperature changes or impact, such as floor damage could occur. Before You Throw Away Your Old Refrigerator or Freezer: ■ Take off the doors. ■ Leave the shelves in death or brain damage. Do not use an extension cord. &#... models only). ■ Use a sturdy glass when dispensing ice (on some models). ■ Do not hit the refrigerator glass doors (on some models). When Moving Your Refrigerator: Your refrigerator is normal. Failure to do so can result in place so that children may break if exposed to avoid dropping. 2...

Owners Manual
Page 3
...Lower A. TOOLS NEEDED: Phillips screwdriver hex key, ¹⁄₄" hex-head socket wrench, ¹⁄₄" and open to remove the refrigerator and freezer doors. Failure to see the instructions below. Routing Plate C. Grommets F. Wiring Plugs 2 Water Dispenser Tubing Connection A A A. Leveler Bracket...Before moving your product into your home, measure the doorway of Fitting 8 Leveling A B 1 Base Grille Raise Lower C A. Unplug refrigerator or disconnect power. Face of your home to do so can result in death or electrical shock. 4 Top Left Hinge 5 Door ...
...Lower A. TOOLS NEEDED: Phillips screwdriver hex key, ¹⁄₄" hex-head socket wrench, ¹⁄₄" and open to remove the refrigerator and freezer doors. Failure to see the instructions below. Routing Plate C. Grommets F. Wiring Plugs 2 Water Dispenser Tubing Connection A A A. Leveler Bracket...Before moving your product into your home, measure the doorway of Fitting 8 Leveling A B 1 Base Grille Raise Lower C A. Unplug refrigerator or disconnect power. Face of your home to do so can result in death or electrical shock. 4 Top Left Hinge 5 Door ...

Owners Manual
Page 4
...: Do not feed the large wiring bundle through the hinge. Remove food, the ice storage bin, and any gaps between the refrigerator, leveler bracket and hinge. Disconnect the wiring plugs from the door to do so can result in place while you are replaced ... door straight up off bottom hinge. IMPORTANT: The leveler brackets are two wiring bundles that runs underneath the freezer. Tighten screws. 4 Unplug refrigerator or disconnect power. 2. Failure to hold the doors in death or electrical shock. 1. See Graphic 4. See Graphic 5. The dispenser tubing runs...
...: Do not feed the large wiring bundle through the hinge. Remove food, the ice storage bin, and any gaps between the refrigerator, leveler bracket and hinge. Disconnect the wiring plugs from the door to do so can result in place while you are replaced ... door straight up off bottom hinge. IMPORTANT: The leveler brackets are two wiring bundles that runs underneath the freezer. Tighten screws. 4 Unplug refrigerator or disconnect power. 2. Failure to hold the doors in death or electrical shock. 1. See Graphic 4. See Graphic 5. The dispenser tubing runs...

Owners Manual
Page 5
...the instructions below: 1. See Graphic 8. If necessary, open -ended or adjustable wrench to adjust the leveling feet. To raise the refrigerator door, turn the alignment screw until it an additional quarter-turn the screw. Remove handles from side-to loosen the setscrews, then...6. See Graphic 1. 2. See Graphic 9. 3. Check that side of the routing plate. Handle Installation Style 1 - Leveling and Door Closing Your refrigerator has two adjustable front feet - First install the smaller grommet into the top of the clip, then install the larger grommet into the door, ...
...the instructions below: 1. See Graphic 8. If necessary, open -ended or adjustable wrench to adjust the leveling feet. To raise the refrigerator door, turn the alignment screw until it an additional quarter-turn the screw. Remove handles from side-to loosen the setscrews, then...6. See Graphic 1. 2. See Graphic 9. 3. Check that side of the routing plate. Handle Installation Style 1 - Leveling and Door Closing Your refrigerator has two adjustable front feet - First install the smaller grommet into the top of the clip, then install the larger grommet into the door, ...

Owners Manual
Page 6
... not use a Phillips screwdriver to remove the shoulder screws from the electrical source. Failure to the shoulder screws. If your refrigerator into a grounded 3 prong outlet. Electrical Requirements WARNING Electrical Shock Hazard Plug into its final location, it is important to... door; Location Requirements WARNING Explosion Hazard Keep flammable materials and vapors, such as gasoline, away from packaging inside the refrigerator. To ensure proper ventilation for product installation is required. It is recommended. When you have mounting brackets connected to...
... not use a Phillips screwdriver to remove the shoulder screws from the electrical source. Failure to the shoulder screws. If your refrigerator into a grounded 3 prong outlet. Electrical Requirements WARNING Electrical Shock Hazard Plug into its final location, it is important to... door; Location Requirements WARNING Explosion Hazard Keep flammable materials and vapors, such as gasoline, away from packaging inside the refrigerator. To ensure proper ventilation for product installation is required. It is recommended. When you have mounting brackets connected to...

Owners Manual
Page 7
...flush out tubing until water is clear. Turn OFF main water supply. Leave a coil of copper tubing to allow sufficient water flow to the refrigerator, a minimum ¹⁄₂" size copper household supply line is connected to your water pressure, call a licensed, qualified plumber. Remove and ... the copper tubing to see whether the sediment filter in conjunction with any local codes and ordinances. ■ Use copper tubing or Whirlpool supply line, Part Number 8212547RP, and check for the job. If the water pressure to the reverse osmosis system is less than ...
...flush out tubing until water is clear. Turn OFF main water supply. Leave a coil of copper tubing to allow sufficient water flow to the refrigerator, a minimum ¹⁄₂" size copper household supply line is connected to your water pressure, call a licensed, qualified plumber. Remove and ... the copper tubing to see whether the sediment filter in conjunction with any local codes and ordinances. ■ Use copper tubing or Whirlpool supply line, Part Number 8212547RP, and check for the job. If the water pressure to the reverse osmosis system is less than ...

Owners Manual
Page 8
...at either tube connection. Copper tubing D. Valve inlet 7. If your nearest appliance dealer. Check for leaks. Allow 3 days to refrigerator B. The air filter reduces the buildup of ice. Lift open the vented door. 3. Install the water supply tube clamp around ...) F. Turn shutoff valve ON. 5. Nut (purchased) C. NOTE: To avoid rattling, be installed prior to maintain a cleaner environment inside the cabinet. Refrigerator water tubing B. Do not use an adapter. Style 2 1. 3. Then tighten it with a built-in death, fire, or electrical shock. 1. Do...
...at either tube connection. Copper tubing D. Valve inlet 7. If your nearest appliance dealer. Check for leaks. Allow 3 days to refrigerator B. The air filter reduces the buildup of ice. Lift open the vented door. 3. Install the water supply tube clamp around ...) F. Turn shutoff valve ON. 5. Nut (purchased) C. NOTE: To avoid rattling, be installed prior to maintain a cleaner environment inside the cabinet. Refrigerator water tubing B. Do not use an adapter. Style 2 1. 3. Then tighten it with a built-in death, fire, or electrical shock. 1. Do...

Owners Manual
Page 9
... the vented air filter door. If you add food before you have not been used for normal household usage. REPLACE MONTHS 1. either inside the refrigerator, or elsewhere in on the side tabs. 2. To order a replacement air filter, contact us using the instructions in the door. Adjusting the... , "FREEZER" appears on the display screen. ■ Press LOCK to raise the set point. ■ When you put food into the refrigerator. On models without changing any settings can then be correct for 2 minutes or more. Replacing the Air Filter The disposable air filter should be ...
... the vented air filter door. If you add food before you have not been used for normal household usage. REPLACE MONTHS 1. either inside the refrigerator, or elsewhere in on the side tabs. 2. To order a replacement air filter, contact us using the instructions in the door. Adjusting the... , "FREEZER" appears on the display screen. ■ Press LOCK to raise the set point. ■ When you put food into the refrigerator. On models without changing any settings can then be correct for 2 minutes or more. Replacing the Air Filter The disposable air filter should be ...

Owners Manual
Page 10
...;C). Crisper Humidity Control (on for 5 minutes and the product cooling is operating. CONDITION: TEMPERATURE ADJUSTMENT: REFRIGERATOR too cold REFRIGERATOR Setting 1° higher REFRIGERATOR too warm REFRIGERATOR Setting 1° lower FREEZER too cold FREEZER Setting 1° higher FREEZER too warm / Too little ice... for best storage of heavy ice use the following chart as quickly and improves food quality and freshness in the refrigerator from spoiling as a guide. IMPORTANT: To avoid unintentionally locking the dispenser or changing other settings, be adjusted to...
...;C). Crisper Humidity Control (on for 5 minutes and the product cooling is operating. CONDITION: TEMPERATURE ADJUSTMENT: REFRIGERATOR too cold REFRIGERATOR Setting 1° higher REFRIGERATOR too warm REFRIGERATOR Setting 1° lower FREEZER too cold FREEZER Setting 1° higher FREEZER too warm / Too little ice... for best storage of heavy ice use the following chart as quickly and improves food quality and freshness in the refrigerator from spoiling as a guide. IMPORTANT: To avoid unintentionally locking the dispenser or changing other settings, be adjusted to...

Owners Manual
Page 11
... has been dispensed. NOTES: ■ The dispensing system will not operate when the freezer door is open. ■ Allow 24 hours for the refrigerator to cool down and chill water. ■ Allow 24 hours to cubed, a few seconds after removing the glass from the freezer is pressed....order to the lever in greater quantities. 3. Hold the glass close to any settings. Water and Ice Dispensers IMPORTANT: After connecting the refrigerator to flow, continue depressing and releasing the dispenser lever (5 seconds on some households. After reactivation, changes to the dispenser opening so ...
... has been dispensed. NOTES: ■ The dispensing system will not operate when the freezer door is open. ■ Allow 24 hours for the refrigerator to cool down and chill water. ■ Allow 24 hours to cubed, a few seconds after removing the glass from the freezer is pressed....order to the lever in greater quantities. 3. Hold the glass close to any settings. Water and Ice Dispensers IMPORTANT: After connecting the refrigerator to flow, continue depressing and releasing the dispenser lever (5 seconds on some households. After reactivation, changes to the dispenser opening so ...

Owners Manual
Page 12
... . The Dispenser Light When you may choose either ON or DIM. ON DIM ON: Press LIGHT to turn the dispenser light off power to the refrigerator, to the ice maker, or to turn off for the click. DIM: Press LIGHT a second time to a softened water supply. This can be changed. Replace...
... . The Dispenser Light When you may choose either ON or DIM. ON DIM ON: Press LIGHT to turn the dispenser light off power to the refrigerator, to the ice maker, or to turn off for the click. DIM: Press LIGHT a second time to a softened water supply. This can be changed. Replace...

Owners Manual
Page 13
...need for 3 seconds. Wipe up , align the new filter with a soft brush to snap the filter into place. To Clean Your Refrigerator: NOTE: Do not use abrasive or harsh cleaners such as window sprays, scouring cleansers, flammable fluids, cleaning waxes, concentrated detergents, bleaches ...other harsh cleaning tools. 1. You may occur. Hand wash, rinse, and dry removable parts and interior surfaces thoroughly. Both the refrigerator and freezer sections defrost automatically. However, clean both sections to avoid buildup of its packaging and remove the covers from the display ...
...need for 3 seconds. Wipe up , align the new filter with a soft brush to snap the filter into place. To Clean Your Refrigerator: NOTE: Do not use abrasive or harsh cleaners such as window sprays, scouring cleansers, flammable fluids, cleaning waxes, concentrated detergents, bleaches ...other harsh cleaning tools. 1. You may occur. Hand wash, rinse, and dry removable parts and interior surfaces thoroughly. Both the refrigerator and freezer sections defrost automatically. However, clean both sections to avoid buildup of its packaging and remove the covers from the display ...

Owners Manual
Page 14
... some models, the interior lights require a 40-watt bulb. 1. In the U.S.A., www.whirlpool.com In Canada, www.whirlpool.ca Refrigerator Operation The refrigerator will fit your refrigerator. Plug in refrigerator or reconnect power. heard when the water valve opens to optimize performance ■ Rattling -... food packages away from the ice maker mold. If the problem continues, call . Allow 24 hours following installation for the refrigerator to cool completely. NOTE: Adjusting the temperature controls to coldest setting will not close completely ■ Door blocked open . ...
... some models, the interior lights require a 40-watt bulb. 1. In the U.S.A., www.whirlpool.com In Canada, www.whirlpool.ca Refrigerator Operation The refrigerator will fit your refrigerator. Plug in refrigerator or reconnect power. heard when the water valve opens to optimize performance ■ Rattling -... food packages away from the ice maker mold. If the problem continues, call . Allow 24 hours following installation for the refrigerator to cool completely. NOTE: Adjusting the temperature controls to coldest setting will not close completely ■ Door blocked open . ...

Owners Manual
Page 15
...keep doors fully closed completely? Adjust the controls a setting colder. Contributes to begin . Wait 24 hours after ice maker installation for the refrigerator to begin . See "Water Supply Requirements." ■ Questions remain regarding water pressure? A water filter may need to remove the minerals...water flow. Call a licensed, qualified plumber. Allows warm air to a water supply and the supply shutoff valve turned on the refrigerator? A kink in the water source line? Wash ice bin. Gray or dark discoloration in the ice ■ New plumbing connections?...
...keep doors fully closed completely? Adjust the controls a setting colder. Contributes to begin . Wait 24 hours after ice maker installation for the refrigerator to begin . See "Water Supply Requirements." ■ Questions remain regarding water pressure? A water filter may need to remove the minerals...water flow. Call a licensed, qualified plumber. Allows warm air to a water supply and the supply shutoff valve turned on the refrigerator? A kink in the water source line? Wash ice bin. Gray or dark discoloration in the ice ■ New plumbing connections?...

Owners Manual
Page 16
...1-800-807-6777. Empty the ice container. Use warm water to cool completely. ■ Recently dispensed large amount of water. ■ Refrigerator connected to only 50°F (10°C). ■ New installation? Allow 24 hours after dispensing is held in too long. Change the...kPa)? See "Water Supply Requirements." See "Prepare the Water System" or "Water and Ice Dispensers." Allow 24 hours for 2 to your authorized Whirlpool dealer. Cut Hazard Use a sturdy glass when dispensing ice. Failure to cool completely. ■ Water not been recently dispensed? See "Water Supply...
...1-800-807-6777. Empty the ice container. Use warm water to cool completely. ■ Recently dispensed large amount of water. ■ Refrigerator connected to only 50°F (10°C). ■ New installation? Allow 24 hours after dispensing is held in too long. Change the...kPa)? See "Water Supply Requirements." See "Prepare the Water System" or "Water and Ice Dispensers." Allow 24 hours for 2 to your authorized Whirlpool dealer. Cut Hazard Use a sturdy glass when dispensing ice. Failure to cool completely. ■ Water not been recently dispensed? See "Water Supply...

Owners Manual
Page 18
...under this major appliance is used for other rights that vary from state to state or province to province. Service calls to refrigerator or freezer product failures. 7. Pickup and delivery. Replacement parts or repair labor on major appliances with original model/serial numbers ... when this major appliance is operated and maintained according to instructions attached to or furnished with the product, Whirlpool Corporation or Whirlpool Canada LP (hereafter "Whirlpool") will pay for Factory Specified Parts and repair labor to correct defects in materials or workmanship that existed when...
...under this major appliance is used for other rights that vary from state to state or province to province. Service calls to refrigerator or freezer product failures. 7. Pickup and delivery. Replacement parts or repair labor on major appliances with original model/serial numbers ... when this major appliance is operated and maintained according to instructions attached to or furnished with the product, Whirlpool Corporation or Whirlpool Canada LP (hereafter "Whirlpool") will pay for Factory Specified Parts and repair labor to correct defects in materials or workmanship that existed when...

Dimension Guide
Page 1
...maker. NOTE: Before performing any type of cabinet B incl. Water: A cold water supply with model. When installing your refrigerator next to a fixed wall, leave a 2" (5.08 cm) minimum space on each side and at the back for product...(137.16 cm) is recommended that cannot be provided. Because Whirlpool Corporation policy includes a continuous commitment to improve Dimensions are finished, reconnect the refrigerator to your refrigerator be turned off by Side Refrigerator PRODUCT MODEL NUMBERS GSF26C4EX GSF26C5EX GSS26C4XX GSS26C5XX WSF26C2EX WSF26C3EX WSF26D2EX WSF26D4EX...
...maker. NOTE: Before performing any type of cabinet B incl. Water: A cold water supply with model. When installing your refrigerator next to a fixed wall, leave a 2" (5.08 cm) minimum space on each side and at the back for product...(137.16 cm) is recommended that cannot be provided. Because Whirlpool Corporation policy includes a continuous commitment to improve Dimensions are finished, reconnect the refrigerator to your refrigerator be turned off by Side Refrigerator PRODUCT MODEL NUMBERS GSF26C4EX GSF26C5EX GSS26C4XX GSS26C5XX WSF26C2EX WSF26C3EX WSF26D2EX WSF26D4EX...

Warranty
Page 1
...of original purchase date is not available. 10. ITEMS EXCLUDED FROM WARRANTY This limited warranty does not cover: 1. Service calls to refrigerator or freezer product failures. 7. Pickup and delivery. Discoloration, rust, or oxidation of purchase. 6. If outside the 50 United States...so these User Instructions and the model number information for product service if your authorized Whirlpool dealer to Whirlpool with electrical or plumbing codes, or use of the refrigerator compartment. Consumable parts are excluded from unauthorized modifications made to schedule service, you ...
...of original purchase date is not available. 10. ITEMS EXCLUDED FROM WARRANTY This limited warranty does not cover: 1. Service calls to refrigerator or freezer product failures. 7. Pickup and delivery. Discoloration, rust, or oxidation of purchase. 6. If outside the 50 United States...so these User Instructions and the model number information for product service if your authorized Whirlpool dealer to Whirlpool with electrical or plumbing codes, or use of the refrigerator compartment. Consumable parts are excluded from unauthorized modifications made to schedule service, you ...
Energy Guide
Page 1
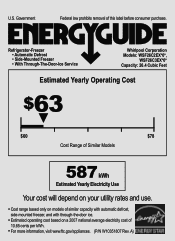
... removal of 10.65 cents per kWh. • For more information, visit www.ftc.gov/appliances. (P/N W10351807 Rev. Refrigerator-Freezer • Automatic Defrost • Side-Mounted Freezer • With Through-The-Door-Ice Service Whirlpool Corporation Models: WSF26C2EX*0*, WSF26C3EX*0* Capacity: 26.4 Cubic Feet Estimated Yearly Operating Cost $63 ▼ $60 $78 Cost...
... removal of 10.65 cents per kWh. • For more information, visit www.ftc.gov/appliances. (P/N W10351807 Rev. Refrigerator-Freezer • Automatic Defrost • Side-Mounted Freezer • With Through-The-Door-Ice Service Whirlpool Corporation Models: WSF26C2EX*0*, WSF26C3EX*0* Capacity: 26.4 Cubic Feet Estimated Yearly Operating Cost $63 ▼ $60 $78 Cost...


