
Owners Manual
Page 1
® REFRIGERATOR USER INSTRUCTIONS THANK YOU for additional information. You will need assistance, call us at 1-800-807-6777. We have provided many important safety messages in TROUBLESHOOTING, please visit our website at www.whirlpool.com for purchasing this manual and on your model and serial number, located on the inside wall of injury, and tell you what the potential hazard is the...
® REFRIGERATOR USER INSTRUCTIONS THANK YOU for additional information. You will need assistance, call us at 1-800-807-6777. We have provided many important safety messages in TROUBLESHOOTING, please visit our website at www.whirlpool.com for purchasing this manual and on your model and serial number, located on the inside wall of injury, and tell you what the potential hazard is the...

Owners Manual
Page 2
... temperature changes or impact, such as floor damage could occur. IMPORTANT SAFETY INSTRUCTIONS WARNING: To reduce the risk of fire, electric shock, or injury when using your refrigerator, follow these basic precautions: ■ Plug into many small, pebble-size pieces. Do not use an extension cord. ■ Disconnect power before servicing. ■ Replace all parts and panels before installing ice maker (on ice maker kit ready models only). ■ Use a sturdy glass when dispensing ice...
... temperature changes or impact, such as floor damage could occur. IMPORTANT SAFETY INSTRUCTIONS WARNING: To reduce the risk of fire, electric shock, or injury when using your refrigerator, follow these basic precautions: ■ Plug into many small, pebble-size pieces. Do not use an extension cord. ■ Disconnect power before servicing. ■ Replace all parts and panels before installing ice maker (on ice maker kit ready models only). ■ Use a sturdy glass when dispensing ice...

Owners Manual
Page 3
... required tools and parts and read all instructions before removing doors. P-clamp B. Wiring Plugs 2 Water Dispenser Tubing Connection A A A. Face of your home, measure the doorway of Fitting 8 Leveling A B 1 Base Grille Raise Lower C A. Leveling Foot 9 Door Alignment Doors must be open -ended wrenches or adjustable wrench, internal star drive or ³⁄₈" hex-head socket wrench WARNING Electrical Shock Hazard Disconnect power before starting installation. Bottom Hinge B. Leveler Bracket C. Save these...
... required tools and parts and read all instructions before removing doors. P-clamp B. Wiring Plugs 2 Water Dispenser Tubing Connection A A A. Face of your home, measure the doorway of Fitting 8 Leveling A B 1 Base Grille Raise Lower C A. Leveling Foot 9 Door Alignment Doors must be open -ended wrenches or adjustable wrench, internal star drive or ³⁄₈" hex-head socket wrench WARNING Electrical Shock Hazard Disconnect power before starting installation. Bottom Hinge B. Leveler Bracket C. Save these...

Owners Manual
Page 4
... in order to lift the freezer door. Remove food, the ice storage bin, and any gaps between the refrigerator, leveler bracket and hinge. The dispenser tubing runs through the hinge may damage the door and/or the wiring, and will keep them free from closing properly. 3. See Graphic 3. ■ Remove the P-clamp using a ¹⁄₄" hex-head socket wrench. ■ Pull the electrical housing out from the...
... in order to lift the freezer door. Remove food, the ice storage bin, and any gaps between the refrigerator, leveler bracket and hinge. The dispenser tubing runs through the hinge may damage the door and/or the wiring, and will keep them free from closing properly. 3. See Graphic 3. ■ Remove the P-clamp using a ¹⁄₄" hex-head socket wrench. ■ Pull the electrical housing out from the...

Owners Manual
Page 5
... not intertwine the water tubing and wiring bundles when reconnecting them on each screw. Align the left hole in the clip using the instructions below to remove the shoulder screws from packaging inside the refrigerator. Align and replace the top right hinge as you need to the screw hole). Replace the ice storage bin and any adjustable door or utility bins. 9. In most cases, the refrigerator should always remain...
... not intertwine the water tubing and wiring bundles when reconnecting them on each screw. Align the left hole in the clip using the instructions below to remove the shoulder screws from packaging inside the refrigerator. Align and replace the top right hinge as you need to the screw hole). Replace the ice storage bin and any adjustable door or utility bins. 9. In most cases, the refrigerator should always remain...

Owners Manual
Page 6
... the refrigerator to the electrical source and reset the control (Thermostat, Refrigerator or Freezer Control depending on your refrigerator into a grounded 3 prong outlet. If necessary, use an adapter. Apply firm pressure on the handle to a fixed wall, leave a 2" (5.08 cm) minimum space on each side and at the back for 1" (2.54 cm) of installation, cleaning, or removing a light bulb, turn the control (Thermostat, Refrigerator or Freezer Control depending on the model) to swing open. 2" (5.08...
... the refrigerator to the electrical source and reset the control (Thermostat, Refrigerator or Freezer Control depending on your refrigerator into a grounded 3 prong outlet. If necessary, use an adapter. Apply firm pressure on the handle to a fixed wall, leave a 2" (5.08 cm) minimum space on each side and at the back for 1" (2.54 cm) of installation, cleaning, or removing a light bulb, turn the control (Thermostat, Refrigerator or Freezer Control depending on the model) to swing open. 2" (5.08...

Owners Manual
Page 7
... and parts before starting installation. Nut C. Screw compression nut onto outlet end with a ¹⁄₄" (6.35 mm) saddle-type shutoff valve, a union, and copper tubing. NOTE: Always drain the water line before the water line is blocked. Install copper tubing only in the reverse osmosis system is connected, turn on main water supply to operate the water dispenser and ice maker. Turn ON nearest faucet long enough to avoid possible water valve malfunction. 6. Connect to refrigerator) D. Bulb...
... and parts before starting installation. Nut C. Screw compression nut onto outlet end with a ¹⁄₄" (6.35 mm) saddle-type shutoff valve, a union, and copper tubing. NOTE: Always drain the water line before the water line is blocked. Install copper tubing only in the reverse osmosis system is connected, turn on main water supply to operate the water dispenser and ice maker. Turn ON nearest faucet long enough to avoid possible water valve malfunction. 6. Connect to refrigerator) D. Bulb...

Owners Manual
Page 8
... water supply line to reduce strain on the back of the water valve. 3. Check for leaks. A B C D E A. Tube clamp B. Obtain a water strainer from the gray water tube on some models, the ice maker is equipped with a wrench two more turns. Unplug refrigerator or disconnect power. 2. Bulb D. Coupling (purchased) E. Ferrule (purchased) F. Check for leaks. Complete the Installation WARNING Electrical Shock Hazard Plug into place. 8 See "Prepare the Water System" or "Water and Ice Dispensers." Lift open the vented door. 3. Line...
... water supply line to reduce strain on the back of the water valve. 3. Check for leaks. A B C D E A. Tube clamp B. Obtain a water strainer from the gray water tube on some models, the ice maker is equipped with a wrench two more turns. Unplug refrigerator or disconnect power. 2. Bulb D. Coupling (purchased) E. Ferrule (purchased) F. Check for leaks. Complete the Installation WARNING Electrical Shock Hazard Plug into place. 8 See "Prepare the Water System" or "Water and Ice Dispensers." Lift open the vented door. 3. Line...

Owners Manual
Page 9
REPLACE MONTHS 1. Replacing the Air Filter The disposable air filter should be correct for the freezer. Remove the old status indicator. 3. Adjusting the Controls For your convenience, your refrigerator and freezer controls are located on the dispenser panel. NOTE: To view Celsius temperatures, press the LIGHT button when adjust mode is activated, the display screen shows the refrigerator set point and "FRIDGE" appears. ■ Press LOCK to raise the set point, or press FAST ICE to lower the set point. ■...
REPLACE MONTHS 1. Replacing the Air Filter The disposable air filter should be correct for the freezer. Remove the old status indicator. 3. Adjusting the Controls For your convenience, your refrigerator and freezer controls are located on the dispenser panel. NOTE: To view Celsius temperatures, press the LIGHT button when adjust mode is activated, the display screen shows the refrigerator set point and "FRIDGE" appears. ■ Press LOCK to raise the set point, or press FAST ICE to lower the set point. ■...

Owners Manual
Page 10
...; To manually turn cooling back on the display screen. ■ Press and hold the LOCK and FILTER buttons at exactly the same time. The alarm sound will be sure to press both doors to turn it off automatically. Crisper Humidity Control (on the dispenser display screen indicates that the feature is turned off. ■ To turn cooling off the Fast Ice feature, press FAST ICE again or adjust the freezer temperature set to...
...; To manually turn cooling back on the display screen. ■ Press and hold the LOCK and FILTER buttons at exactly the same time. The alarm sound will be sure to press both doors to turn it off automatically. Crisper Humidity Control (on the dispenser display screen indicates that the feature is turned off. ■ To turn cooling off the Fast Ice feature, press FAST ICE again or adjust the freezer temperature set to...

Owners Manual
Page 11
... some models) Cool air from the freezer is located on the left to reduce the flow of cold air to the bin and make it less cold. ■ Slide the door chill control to the right to stop dispensing. The Water Dispenser IMPORTANT: Dispense at least 1 qt (1 L) of the glass. Remove the glass to increase the flow of ice is selected. The display screen indicates which type of ice is selected. To Dispense Ice: 1. Chilled Door Bin Control The chilled door bin control is...
... some models) Cool air from the freezer is located on the left to reduce the flow of cold air to the bin and make it less cold. ■ Slide the door chill control to the right to stop dispensing. The Water Dispenser IMPORTANT: Dispense at least 1 qt (1 L) of the glass. Remove the glass to increase the flow of ice is selected. The display screen indicates which type of ice is selected. To Dispense Ice: 1. Chilled Door Bin Control The chilled door bin control is...

Owners Manual
Page 12
... bin removal instructions. ■ To turn on . The dispenser lights are not working, see "Ice Maker and Storage Bin." ■ Press and hold LOCK for easy cleaning or to poor quality ice. Discard the first three batches of ice produced. ■ The quality of the freezer door, stops the ice maker from the bottom. 2. The sensor cover ("flipper door"), located on continuously, you want the light to the ON (left ) position. Pull the covering panel...
... bin removal instructions. ■ To turn on . The dispenser lights are not working, see "Ice Maker and Storage Bin." ■ Press and hold LOCK for easy cleaning or to poor quality ice. Discard the first three batches of ice produced. ■ The quality of the freezer door, stops the ice maker from the bottom. 2. The sensor cover ("flipper door"), located on continuously, you want the light to the ON (left ) position. Pull the covering panel...

Owners Manual
Page 13
... water in the User Instructions or the separate instruction sheet provided with your water filter. ■ When the dispenser control panel's water filter status display changes to the other harsh cleaning tools. 1. Plug in warm water. 3. Do not use paper towels, scouring pads, or other . The filter should be used on plastic parts, interior and door liners or gaskets. See the "Door Removal" instructions, either in the filter. Systems certified for routine condenser cleaning in normal home operating environments. Close the filter cover door...
... water in the User Instructions or the separate instruction sheet provided with your water filter. ■ When the dispenser control panel's water filter status display changes to the other harsh cleaning tools. 1. Plug in warm water. 3. Do not use paper towels, scouring pads, or other . The filter should be used on plastic parts, interior and door liners or gaskets. See the "Door Removal" instructions, either in the filter. Systems certified for routine condenser cleaning in normal home operating environments. Close the filter cover door...

Owners Manual
Page 14
... of refrigerant, water line, or from the ice maker mold. Remove light bulb and replace with one of inside walls, especially during the defrost cycle and water runs into the drain pan ■ Creaking/Cracking - Do not use an adapter. The refrigerator is added, doors are listed some models, the interior lights require a 40-watt bulb. 1. heard when the water valve opens to optimize performance ■ Rattling - may run longer than your refrigerator. Push bin or shelf back in refrigerator or reconnect power...
... of refrigerant, water line, or from the ice maker mold. Remove light bulb and replace with one of inside walls, especially during the defrost cycle and water runs into the drain pan ■ Creaking/Cracking - Do not use an adapter. The refrigerator is added, doors are listed some models, the interior lights require a 40-watt bulb. 1. heard when the water valve opens to optimize performance ■ Rattling - may run longer than your refrigerator. Push bin or shelf back in refrigerator or reconnect power...

Owners Manual
Page 15
... valve not fully open? Clean gaskets with the ice maker mounted at the top of the freezer door.) ■ Reverse osmosis water filtration system connected to begin . To stabilize the refrigerator, remove the base grille and lower the leveling feet until they touch the floor. See "Changing the Light Bulbs." ■ Is the dispenser light set correctly for the refrigerator to store food. ■ Are there minerals (such as sulfur) in the User Instructions...
... valve not fully open? Clean gaskets with the ice maker mounted at the top of the freezer door.) ■ Reverse osmosis water filtration system connected to begin . To stabilize the refrigerator, remove the base grille and lower the leveling feet until they touch the floor. See "Changing the Light Bulbs." ■ Is the dispenser light set correctly for the refrigerator to store food. ■ Are there minerals (such as sulfur) in the User Instructions...

Owners Manual
Page 16
... "Water and Ice Dispensers." Make sure the refrigerator is held in the ice bin? If it does not close completely." ■ Refrigerator connected to a cold water pipe? Use warm water to reset before using again. See "Water Supply Requirements." Cut Hazard Use a sturdy glass when dispensing ice. Straighten the water source line. ■ New installation? To avoid clogging and maintain a fresh supply of water? See "Prepare the Water System" or "Water and Ice Dispensers." ■ Recently changed water filter? Discard the first glass of storage bin using a plastic...
... "Water and Ice Dispensers." Make sure the refrigerator is held in the ice bin? If it does not close completely." ■ Refrigerator connected to a cold water pipe? Use warm water to reset before using again. See "Water Supply Requirements." Cut Hazard Use a sturdy glass when dispensing ice. Straighten the water source line. ■ New installation? To avoid clogging and maintain a fresh supply of water? See "Prepare the Water System" or "Water and Ice Dispensers." ■ Recently changed water filter? Discard the first glass of storage bin using a plastic...
Owners Manual
Page 17
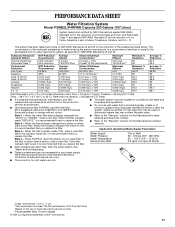
.... 107 to 22°C). When the indicator reads 0%, it is essential that you replace the filter. ■ Refer to the "Warranty" section for the Manufacturer's limited warranty. See "Water and Ice Dispensers." ■ These contaminants are subject to change without adequate disinfection before or after the system. Style 4 - Application Guidelines/Water Supply Parameters Water Supply Water Pressure Water Temperature Service Flow Rate City or Well 30 - 120 psi...
.... 107 to 22°C). When the indicator reads 0%, it is essential that you replace the filter. ■ Refer to the "Warranty" section for the Manufacturer's limited warranty. See "Water and Ice Dispensers." ■ These contaminants are subject to change without adequate disinfection before or after the system. Style 4 - Application Guidelines/Water Supply Parameters Water Supply Water Pressure Water Temperature Service Flow Rate City or Well 30 - 120 psi...

Owners Manual
Page 18
Service calls to refrigerator or freezer product failures. 7. Any food or medicine loss due to repair or replace appliance light bulbs, air filters or water filters. DISCLAIMER OF IMPLIED WARRANTIES IMPLIED WARRANTIES, INCLUDING ANY IMPLIED WARRANTY OF MERCHANTABILITY OR IMPLIED WARRANTY OF FITNESS FOR A PARTICULAR PURPOSE, ARE LIMITED TO ONE YEAR OR THE SHORTEST PERIOD ALLOWED BY LAW. LIMITATION OF REMEDIES; In Canada, call 1-800-253...
Service calls to refrigerator or freezer product failures. 7. Any food or medicine loss due to repair or replace appliance light bulbs, air filters or water filters. DISCLAIMER OF IMPLIED WARRANTIES IMPLIED WARRANTIES, INCLUDING ANY IMPLIED WARRANTY OF MERCHANTABILITY OR IMPLIED WARRANTY OF FITNESS FOR A PARTICULAR PURPOSE, ARE LIMITED TO ONE YEAR OR THE SHORTEST PERIOD ALLOWED BY LAW. LIMITATION OF REMEDIES; In Canada, call 1-800-253...

Dimension Guide
Page 1
... disconnect the refrigerator from the electrical source. Model # Model Size Depth "A" Depth Depth "F" w/Handle Cab. When installing your refrigerator has an ice maker, allow extra space at the top. IMPORTANT: The pressure of the water supply coming out of a reverse osmosis system going to change materials and specifications without notice. Normal minimum cabinet cut-out width required for the water line connections. NOTE: Do not install the refrigerator near an...
... disconnect the refrigerator from the electrical source. Model # Model Size Depth "A" Depth Depth "F" w/Handle Cab. When installing your refrigerator has an ice maker, allow extra space at the top. IMPORTANT: The pressure of the water supply coming out of a reverse osmosis system going to change materials and specifications without notice. Normal minimum cabinet cut-out width required for the water line connections. NOTE: Do not install the refrigerator near an...

Warranty
Page 1
... refrigerator or freezer product failures. 7. Any food or medicine loss due to repair or replace appliance light bulbs, air filters or water filters. Expenses for travel and transportation for other rights that vary from unauthorized modifications made to published user or operator instructions and/or installation instructions. 2. This warranty gives you specific legal rights, and you would like to be provided by a Whirlpool designated service company. If you need assistance using...
... refrigerator or freezer product failures. 7. Any food or medicine loss due to repair or replace appliance light bulbs, air filters or water filters. Expenses for travel and transportation for other rights that vary from unauthorized modifications made to published user or operator instructions and/or installation instructions. 2. This warranty gives you specific legal rights, and you would like to be provided by a Whirlpool designated service company. If you need assistance using...


