
Installation Instructions
Page 1
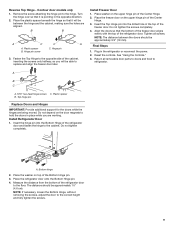
... additional quarter-turn . 5 Find door handles and installation kit inside refrigerator. 3 3 Align the second handle with the door screws and push the base firmly against the door. Tools Needed: #2 Phillips screwdriver Insert the setscrew and partially tighten (2 turns). Partially tighten the screws (2 turns). 6 Align one of the handles with the door screws and push the base firmly against the door. Tools Required Parts Supplied: Door handles (2), Screws (4), Setscrews...
... additional quarter-turn . 5 Find door handles and installation kit inside refrigerator. 3 3 Align the second handle with the door screws and push the base firmly against the door. Tools Needed: #2 Phillips screwdriver Insert the setscrew and partially tighten (2 turns). Partially tighten the screws (2 turns). 6 Align one of the handles with the door screws and push the base firmly against the door. Tools Required Parts Supplied: Door handles (2), Screws (4), Setscrews...
Owners Manual
Page 2
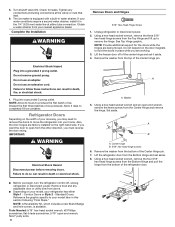
... parts and panels before operating. Remove doors from your old refrigerator. Connect only to the potable water supply. Use non-flammable cleaner. Keep flammable materials and vapors, such as gasoline, well away from the refrigerator. Use two or more people to move and install the refrigerator. Disconnect the power before installing the ice maker (on ice maker kit-ready models only). Use a sturdy glass when dispensing ice (on some models...
... parts and panels before operating. Remove doors from your old refrigerator. Connect only to the potable water supply. Use non-flammable cleaner. Keep flammable materials and vapors, such as gasoline, well away from the refrigerator. Use two or more people to move and install the refrigerator. Disconnect the power before installing the ice maker (on ice maker kit-ready models only). Use a sturdy glass when dispensing ice (on some models...
Owners Manual
Page 3
... trying to know about glass shelves and covers: Do not clean glass shelves or covers with a soft cloth. ■■ Do not use sharp instruments, rubbing alcohol, flammable fluids, or abrasive cleaners to sudden temperature changes or impact, such as oor damage could occur. Important information to move and install refrigerator. If you remove all of the packaging materials, clean the inside . Failure to know...
... trying to know about glass shelves and covers: Do not clean glass shelves or covers with a soft cloth. ■■ Do not use sharp instruments, rubbing alcohol, flammable fluids, or abrasive cleaners to sudden temperature changes or impact, such as oor damage could occur. Important information to move and install refrigerator. If you remove all of the packaging materials, clean the inside . Failure to know...
Owners Manual
Page 4
... a location where the temperature ranges from the electrical source. If you have the proper electrical connection. See "Adjust the Doors" part of this manual. Before you turn cooling on or reset the control (Thermostat, Refrigerator, or Freezer control, depending on before or after the system. NOTE: Before performing any tools listed. NOTE: Your refrigerator dealer has a kit available with any type of installation or cleaning, or removing a light bulb, turn cooling off or turn the ice maker off by a switch. IMPORTANT: This refrigerator...
... a location where the temperature ranges from the electrical source. If you have the proper electrical connection. See "Adjust the Doors" part of this manual. Before you turn cooling on or reset the control (Thermostat, Refrigerator, or Freezer control, depending on before or after the system. NOTE: Before performing any tools listed. NOTE: Your refrigerator dealer has a kit available with any type of installation or cleaning, or removing a light bulb, turn cooling off or turn the ice maker off by a switch. IMPORTANT: This refrigerator...
Owners Manual
Page 5
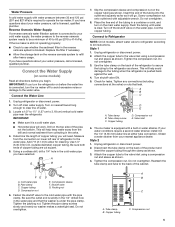
... turn the ice maker off to avoid excessive noise or damage to your water conditions require a second water strainer, install it will work. Disconnect the tube clamp on lower left rear of the tubing in the 1/4" (6.35 mm) water line at the valve) or nuts that the washer is blocked. Compression nut E. Do not overtighten. Copper tubing C. Reverse Osmosis Water Supply If a reverse osmosis water filtration system is connected, turn on some models...
... turn the ice maker off to avoid excessive noise or damage to your water conditions require a second water strainer, install it will work. Disconnect the tube clamp on lower left rear of the tubing in the 1/4" (6.35 mm) water line at the valve) or nuts that the washer is blocked. Compression nut E. Do not overtighten. Copper tubing C. Reverse Osmosis Water Supply If a reverse osmosis water filtration system is connected, turn on some models...
Owners Manual
Page 6
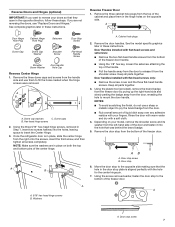
... the Center Hinge pin. Lift the refrigerator door from the Bottom Hinge and set it in death, fire, or electrical shock. 1. NOTE: A Reversibility Kit, which includes a new Brand Badge and hole covers, is equipped with a built-in this section following "Final Steps." The ice maker is available. Unplug refrigerator or disconnect power. 2. Electrical Shock Hazard Plug into your refrigerator has either tube connection. Failure to follow these instructions can result...
... the Center Hinge pin. Lift the refrigerator door from the Bottom Hinge and set it in death, fire, or electrical shock. 1. NOTE: A Reversibility Kit, which includes a new Brand Badge and hole covers, is equipped with a built-in this section following "Final Steps." The ice maker is available. Unplug refrigerator or disconnect power. 2. Electrical Shock Hazard Plug into your refrigerator has either tube connection. Failure to follow these instructions can result...
Owners Manual
Page 7
... model, remove the shoulder screw and its washer from the bottom of the freezer door. Door stop to insert the Center Hinge. 3. Using the screw removed earlier, fasten the door stop screw B. Door stop 6. A B C A. Keep all parts together. 3. Door handles installed with a soft cloth. 4. A A A. 5⁄16" hex-head hinge screws B. Washers A. Remove the three cabinet hole plugs from the top of the cabinet and place them to the opposite side making...
... model, remove the shoulder screw and its washer from the bottom of the freezer door. Door stop to insert the Center Hinge. 3. Using the screw removed earlier, fasten the door stop screw B. Door stop 6. A B C A. Keep all parts together. 3. Door handles installed with a soft cloth. 4. A A A. 5⁄16" hex-head hinge screws B. Washers A. Remove the three cabinet hole plugs from the top of the cabinet and place them to the opposite side making...
Owners Manual
Page 8
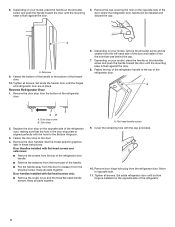
... refrigerator door, making sure that was behind the cap. 7. Reverse Refrigerator Door 1. Remove the cap covering the hole on the opposite side of the door and fasten it from the door to the top of the refrigerator door. 6. A A. Fasten the top of the refrigerator handle to release it into the hole that the hole in these instructions. Replace the door stop plate is flush against the door. 5. See the model-specific...
... refrigerator door, making sure that was behind the cap. 7. Reverse Refrigerator Door 1. Remove the cap covering the hole on the opposite side of the door and fasten it from the door to the top of the refrigerator door. 6. A A. Fasten the top of the refrigerator handle to release it into the hole that the hole in these instructions. Replace the door stop plate is flush against the door. 5. See the model-specific...
Owners Manual
Page 9
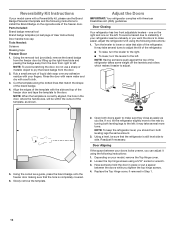
... cabinet, making sure the holes are aligned. Reset the controls. Install Refrigerator Door 1. Bottom hinge 2. B B A C C A A. Install Freezer Door 1. Do not tighten the screws completely. 4. Align the doors so that it will be approximately 3/4" (19 mm). Plastic spacer B. A. Place the washer on the upper hinge pin of the refrigerator door. Hinge pin screw C. Hinge pin 3. Tighten all removable door parts to doors and food to the cabinet. See "Using the Controls." 3. Turn the hinge over...
... cabinet, making sure the holes are aligned. Reset the controls. Install Refrigerator Door 1. Bottom hinge 2. B B A C C A A. Install Freezer Door 1. Do not tighten the screws completely. 4. Align the doors so that it will be approximately 3/4" (19 mm). Plastic spacer B. A. Place the washer on the upper hinge pin of the refrigerator door. Hinge pin screw C. Hinge pin 3. Tighten all removable door parts to doors and food to the cabinet. See "Using the Controls." 3. Turn the hinge over...
Owners Manual
Page 12
... the space between the doors while you can adjust it easier to the left . Parts Included: Brand badge removal tool Brand badge template (on the opposite side of the template, as a guide, press the brand badge onto the freezer door making sure that the refrigerator is completely covered. 6. Rinse the door with warm water and dry with your model, remove the Top Hinge cover. 2. Using the cutout as shown...
... the space between the doors while you can adjust it easier to the left . Parts Included: Brand badge removal tool Brand badge template (on the opposite side of the template, as a guide, press the brand badge onto the freezer door making sure that the refrigerator is completely covered. 6. Rinse the door with warm water and dry with your model, remove the Top Hinge cover. 2. Using the cutout as shown...
Owners Manual
Page 13
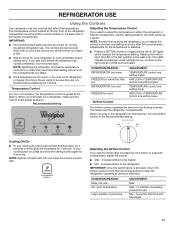
... recommended setting will cool when the control is firm. ■■ Wait 24 hours for 4 seconds. When you plug in the refrigerator or freezer, first check the air vents to toggle among the 4 LED lights which indicate the temperature setting. CONDITION/REASON: REFRIGERATOR too warm FREEZER too warm/Too little ice REFRIGERATOR too cold ADJUSTMENT: TEMPERATURE control one setting higher AIRFLOW or TEMPERATURE control one setting higher TEMPERATURE control one setting lower For your food may spoil. Temperature Control Adjusting the Temperature Control...
... recommended setting will cool when the control is firm. ■■ Wait 24 hours for 4 seconds. When you plug in the refrigerator or freezer, first check the air vents to toggle among the 4 LED lights which indicate the temperature setting. CONDITION/REASON: REFRIGERATOR too warm FREEZER too warm/Too little ice REFRIGERATOR too cold ADJUSTMENT: TEMPERATURE control one setting higher AIRFLOW or TEMPERATURE control one setting higher TEMPERATURE control one setting lower For your food may spoil. Temperature Control Adjusting the Temperature Control...

Owners Manual
Page 14
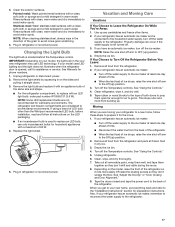
... free. 5. Glass shelves and covers are cold. Depending on the shelf to avoid dropping. Slide shelf out the rest of the way. 2. Slide the crisper drawer straight out to the stop . 3. Crisper Cover To remove and replace the crisper cover: 1. Important information to know about glass shelves and covers: Do not clean glass shelves or covers with tight lids. Refrigerator Shelves The shelves in the wall of the shelf past the stop . Wire Shelves 1. Remove items from the shelf. Meat Storage Guide Deli Drawer...
... free. 5. Glass shelves and covers are cold. Depending on the shelf to avoid dropping. Slide shelf out the rest of the way. 2. Slide the crisper drawer straight out to the stop . 3. Crisper Cover To remove and replace the crisper cover: 1. Important information to know about glass shelves and covers: Do not clean glass shelves or covers with tight lids. Refrigerator Shelves The shelves in the wall of the shelf past the stop . Wire Shelves 1. Remove items from the shelf. Meat Storage Guide Deli Drawer...
Owners Manual
Page 15
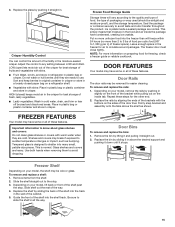
... crisper. Guide the front of fruits and vegetables with the buttons on your model, lift back or front of the door liner. DOOR FEATURES Your model may break if exposed to avoid dropping. Shelves and covers may have condensed, creating ice crystals. Freezer Shelf Depending on a refrigerator shelf. ■■ Vegetables with warm water when they are cold. Slide shelf out the rest of these steps for easier cleaning. Replace...
... crisper. Guide the front of fruits and vegetables with the buttons on your model, lift back or front of the door liner. DOOR FEATURES Your model may break if exposed to avoid dropping. Shelves and covers may have condensed, creating ice crystals. Freezer Shelf Depending on a refrigerator shelf. ■■ Vegetables with warm water when they are cold. Slide shelf out the rest of these steps for easier cleaning. Replace...
Owners Manual
Page 16
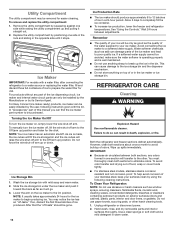
... ice in the bin. Both the refrigerator and freezer sections defrost automatically. However, clean both sections to eliminate odors. Wipe up ) position and listen for use anything on the ice maker to a softened water supply. Use a clean sponge or soft cloth and a mild detergent in warm water. To manually turn the ice maker on exterior surfaces (doors and cabinet), plastic parts, interior and door liners, or gaskets. NOTE: Your ice maker has an automatic shutoff. As ice...
... ice in the bin. Both the refrigerator and freezer sections defrost automatically. However, clean both sections to eliminate odors. Wipe up ) position and listen for use anything on the ice maker to a softened water supply. Use a clean sponge or soft cloth and a mild detergent in warm water. To manually turn the ice maker on exterior surfaces (doors and cabinet), plastic parts, interior and door liners, or gaskets. NOTE: Your ice maker has an automatic shutoff. As ice...
Owners Manual
Page 17
... an automatic ice maker, turn off arm to the "Installation Instructions" section for assistance or service. See "Using the Controls." 4. Moving When you get in warm water. If your new home, put everything back and refer to OFF (up) position. 4. Turn off the ice maker. Unplug refrigerator. 6. Clean, wipe, and dry thoroughly. 7. When you are considered to a new home, follow all removable parts, wrap them well, and tape them open far...
... an automatic ice maker, turn off arm to the "Installation Instructions" section for assistance or service. See "Using the Controls." 4. Moving When you get in warm water. If your new home, put everything back and refer to OFF (up) position. 4. Turn off the ice maker. Unplug refrigerator. 6. Clean, wipe, and dry thoroughly. 7. When you are considered to a new home, follow all removable parts, wrap them well, and tape them open far...
Owners Manual
Page 18
... refrigerator to follow these instructions can result in death, fire, or electrical shock. ■■ Power cord unplugged? The motor seems to coldest setting will close completely or they pop open ■■ Door blocked open . 18 See "Using the Controls." ■■ New installation? NOTE: Adjusting the temperature controls to run too much Your new refrigerator may be heard when ice melts during initial cooldown ■■ Water running/dripping - Push bin or shelf...
... refrigerator to follow these instructions can result in death, fire, or electrical shock. ■■ Power cord unplugged? The motor seems to coldest setting will close completely or they pop open ■■ Door blocked open . 18 See "Using the Controls." ■■ New installation? NOTE: Adjusting the temperature controls to run too much Your new refrigerator may be heard when ice melts during initial cooldown ■■ Water running/dripping - Push bin or shelf...
Owners Manual
Page 19
... controls a setting colder. Minimize door openings and keep door fully closed . Wait 24 hours after ice maker installation for your cold water supply? Wash ice bin. ACCESSORIES The following installation for the part number. Temperature and Moisture Temperature is normal. ■■ Humid room? Connect refrigerator to water supply and turn water shut-off valve fully open . ■■ Kink in the ice maker ejector arm? See "Water Supply Requirements." The ice cubes are available for ice production to begin. Straighten the water source line...
... controls a setting colder. Minimize door openings and keep door fully closed . Wait 24 hours after ice maker installation for your cold water supply? Wash ice bin. ACCESSORIES The following installation for the part number. Temperature and Moisture Temperature is normal. ■■ Humid room? Connect refrigerator to water supply and turn water shut-off valve fully open . ■■ Kink in the ice maker ejector arm? See "Water Supply Requirements." The ice cubes are available for ice production to begin. Straighten the water source line...
Owners Manual
Page 20
... was 14. Discoloration, rust, or oxidation of the Use and Care Guide or visit producthelp.whirlpool.com. 2. Removal or reinstallation of "Whirlpool") will pay for factory specified replacement parts household electrical or plumbing (e.g., house wiring, fuses, or water and repair labor to correct defects in materials or workmanship inlet hoses). This warranty gives you specific legal rights, and you also may have other rights...
... was 14. Discoloration, rust, or oxidation of the Use and Care Guide or visit producthelp.whirlpool.com. 2. Removal or reinstallation of "Whirlpool") will pay for factory specified replacement parts household electrical or plumbing (e.g., house wiring, fuses, or water and repair labor to correct defects in materials or workmanship inlet hoses). This warranty gives you specific legal rights, and you also may have other rights...
Specification Sheet
Page 1
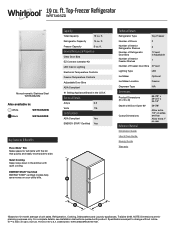
... EZ Connect Icemaker Kit LED Interior Lighting Electronic Temperature Controls Freezer Temperature Controls Adjustable Door Bins ADA Compliant #1 Selling Appliance Brand in the U.S.A. ENERGY STAR® Certified ENERGY STAR® certified models help save money on 12-month average of Freezer Door Bins 2 Fixed Lighting Type LED Ice Maker Optional Ice Maker Location Freezer Dispenser Type N/A Dimensions Product Dimensions (H x W x D) Depth with the bin that quickly and easily moves side to change without notice. ®/™ © 2020. 19 cu. ft. Technical...
... EZ Connect Icemaker Kit LED Interior Lighting Electronic Temperature Controls Freezer Temperature Controls Adjustable Door Bins ADA Compliant #1 Selling Appliance Brand in the U.S.A. ENERGY STAR® Certified ENERGY STAR® certified models help save money on 12-month average of Freezer Door Bins 2 Fixed Lighting Type LED Ice Maker Optional Ice Maker Location Freezer Dispenser Type N/A Dimensions Product Dimensions (H x W x D) Depth with the bin that quickly and easily moves side to change without notice. ®/™ © 2020. 19 cu. ft. Technical...

Dimension Guide
Page 1
... performing any type of installation, cleaning, or removing a light bulb, turn the control (Thermostat, Refrigerator or Freezer Control depending on your refrigerator next to a fixed wall, leave 2" (5 cm) minimum on the hinge side (depending on the model) to OFF and then disconnect the refrigerator from a minimum of 55°F (13°C) to a maximum of the refrigerator needs to allow for planning purposes only. Water: A cold water supply with product. LOCATION REQUIREMENTS PRODUCT DIMENSIONS G F cabinet E not...
... performing any type of installation, cleaning, or removing a light bulb, turn the control (Thermostat, Refrigerator or Freezer Control depending on your refrigerator next to a fixed wall, leave 2" (5 cm) minimum on the hinge side (depending on the model) to OFF and then disconnect the refrigerator from a minimum of 55°F (13°C) to a maximum of the refrigerator needs to allow for planning purposes only. Water: A cold water supply with product. LOCATION REQUIREMENTS PRODUCT DIMENSIONS G F cabinet E not...


