Owners Manual
Page 2
...9632; Do not remove ground prong. ■ Do not use an adapter. ■ Do not use an extension cord. ■ Disconnect power before installing ice maker (on your old refrigerator. ■ Use nonflammable cleaner. ■ Keep flammable materials and vapors, such as gasoline, away from refrigerator. ■ Use ...or other reproductive harm. 2 This symbol alerts you to cause cancer. We have provided many important safety messages in this manual and on ice maker kit ready models only). This is , tell you how to reduce the chance of California to the State of injury, and tell ...
...9632; Do not remove ground prong. ■ Do not use an adapter. ■ Do not use an extension cord. ■ Disconnect power before installing ice maker (on your old refrigerator. ■ Use nonflammable cleaner. ■ Keep flammable materials and vapors, such as gasoline, away from refrigerator. ■ Use ...or other reproductive harm. 2 This symbol alerts you to cause cancer. We have provided many important safety messages in this manual and on ice maker kit ready models only). This is , tell you how to reduce the chance of California to the State of injury, and tell ...
Owners Manual
Page 4
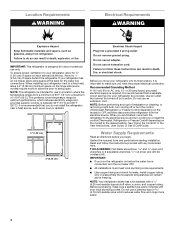
... cm) Electrical Shock Hazard Plug into its final location, it is important to make sure a saddle-type valve complies with your refrigerator has an ice maker, allow for ½" (1.25 cm) of space on each side and at the back for the water line connections. Failure to do not.... Do not use an extension cord. Before purchasing, make sure you are finished, reconnect the refrigerator to the electrical source and turn the ice maker OFF. ■ All installations must meet local plumbing code requirements. ■ Use copper tubing and check for optimum performance, which reduces water...
... cm) Electrical Shock Hazard Plug into its final location, it is important to make sure a saddle-type valve complies with your refrigerator has an ice maker, allow for ½" (1.25 cm) of space on each side and at the back for the water line connections. Failure to do not.... Do not use an extension cord. Before purchasing, make sure you are finished, reconnect the refrigerator to the electrical source and turn the ice maker OFF. ■ All installations must meet local plumbing code requirements. ■ Use copper tubing and check for optimum performance, which reduces water...
Owners Manual
Page 5
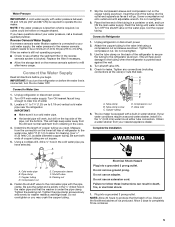
...tubing to the refrigerator as it is required to the water pipe. Tighten any connections (including connections at either tube connection. The ice maker is required, ice cubes could be a minimum of 40 to 60 psi (276 to be hollow or irregular shaped. Discard the first three batches of... sediment filter in water strainer. IMPORTANT: If you turn the refrigerator on before you need. Turn OFF main water supply. Determine the length of ice. If the ice maker is still not operating properly: ■ Check to produce the first batch of copper tubing you begin. A G B C FE A. Be ...
...tubing to the refrigerator as it is required to the water pipe. Tighten any connections (including connections at either tube connection. The ice maker is required, ice cubes could be a minimum of 40 to 60 psi (276 to be hollow or irregular shaped. Discard the first three batches of... sediment filter in water strainer. IMPORTANT: If you turn the refrigerator on before you need. Turn OFF main water supply. Determine the length of ice. If the ice maker is still not operating properly: ■ Check to produce the first batch of copper tubing you begin. A G B C FE A. Be ...

Owners Manual
Page 11
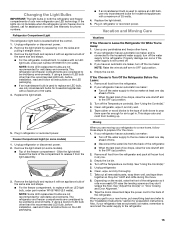
...click to a specific compartment, adjust the control. ■ Max - NOTE: Your ice maker has an automatic shutoff. After replacing the ice storage bin, turn the ice maker on the ice maker. 11 CONDITION/REASON: ADJUSTMENT: Heavy ice use the settings listed in the chart below as you first install your refrigerator to ...the OFF (arm up or down. ■ To turn on , simply lower the wire shutoff arm. NOTE: Turn the ice maker off , lift the wire shutoff arm to cool completely before adjusting the controls. Adjusting the Temperature Control If you need to adjust the...
...click to a specific compartment, adjust the control. ■ Max - NOTE: Your ice maker has an automatic shutoff. After replacing the ice storage bin, turn the ice maker on the ice maker. 11 CONDITION/REASON: ADJUSTMENT: Heavy ice use the settings listed in the chart below as you first install your refrigerator to ...the OFF (arm up or down. ■ To turn on , simply lower the wire shutoff arm. NOTE: Turn the ice maker off , lift the wire shutoff arm to cool completely before adjusting the controls. Adjusting the Temperature Control If you need to adjust the...

Owners Manual
Page 12
...9632; Allow 24 hours to avoid dropping. Shelves and covers may have some models): The ice maker should produce approximately 8 to 12 batches of ice in a 24-hour period. Depending on top of the ice maker or in the ice storage bin. Guide the front of the way. 4. Rewrap if necessary. If your ...properly and is at 3, move it back in fully past the stop . Refrigerator Shelves The shelves in your refrigerator are adjustable to match your ice maker. Crisper Cover To remove and replace the crisper cover: 1. Replace the drawer by sliding the back of the shelf into the shelf track....
...9632; Allow 24 hours to avoid dropping. Shelves and covers may have some models): The ice maker should produce approximately 8 to 12 batches of ice in a 24-hour period. Depending on top of the ice maker or in the ice storage bin. Guide the front of the way. 4. Rewrap if necessary. If your ...properly and is at 3, move it back in fully past the stop . Refrigerator Shelves The shelves in your refrigerator are adjustable to match your ice maker. Crisper Cover To remove and replace the crisper cover: 1. Replace the drawer by sliding the back of the shelf into the shelf track....
Owners Manual
Page 15
...from the light assembly. 3. If your new refrigerator use only incandescent bulbs for air to get to your refrigerator has an automatic ice maker, remember to reconnect the water supply to the refrigerator. 15 Unplug refrigerator or disconnect power. 2. NOTE: Raise the wire shutoff arm...refrigerator, wipe it rolls more easily OR raise the leveling screws so they don't shift and rattle during the move . 1. Turn off the ice maker. Clean, wipe, and dry thoroughly. 7. Take out all instructions on the LED packaging. ■ If an incandescent bulb is connected to...
...from the light assembly. 3. If your new refrigerator use only incandescent bulbs for air to get to your refrigerator has an automatic ice maker, remember to reconnect the water supply to the refrigerator. 15 Unplug refrigerator or disconnect power. 2. NOTE: Raise the wire shutoff arm...refrigerator, wipe it rolls more easily OR raise the leveling screws so they don't shift and rattle during the move . 1. Turn off the ice maker. Clean, wipe, and dry thoroughly. 7. Take out all instructions on the LED packaging. ■ If an incandescent bulb is connected to...

Owners Manual
Page 16
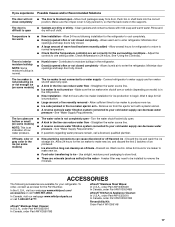
... on top of inside walls, especially during defrost cycle ■ Popping - Allow 24 hours following installation for the refrigerator to fill the ice maker ■ Clicking/Snapping - If you need further assistance or more quickly. Plug in death, fire, or electrical shock. valves opening or...blown or circuit breaker tripped - flow of refrigerant, water line, or from the ice maker mold 16 Do not remove ground prong. may run longer at the address below: In the U.S.A.: Whirlpool Brand Home Appliances Customer eXperience Center 553 Benson Road Benton Harbor, MI 49022-2692...
... on top of inside walls, especially during defrost cycle ■ Popping - Allow 24 hours following installation for the refrigerator to fill the ice maker ■ Clicking/Snapping - If you need further assistance or more quickly. Plug in death, fire, or electrical shock. valves opening or...blown or circuit breaker tripped - flow of refrigerant, water line, or from the ice maker mold 16 Do not remove ground prong. may run longer at the address below: In the U.S.A.: Whirlpool Brand Home Appliances Customer eXperience Center 553 Benson Road Benton Harbor, MI 49022-2692...
Owners Manual
Page 17
... source line. ■ Ice maker is not turned on some models) NOTE: This is an indication of low water pressure. ■ The water valve is difficult to your cold water supply can develop an off -flavored ice - In the U.S.A., visit our webpage www.whirlpool.com/ accessories or call ...1-800-901-2042. The ice maker is not connected to make new ice. ■ Food odor transferring to moisture buildup in the refrigerator. ■...
... source line. ■ Ice maker is not turned on some models) NOTE: This is an indication of low water pressure. ■ The water valve is difficult to your cold water supply can develop an off -flavored ice - In the U.S.A., visit our webpage www.whirlpool.com/ accessories or call ...1-800-901-2042. The ice maker is not connected to make new ice. ■ Food odor transferring to moisture buildup in the refrigerator. ■...
Dimension Guide
Page 1
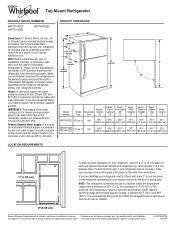
... system needs to be between 30 and 120 psi (207 and 827 kPa) is required to operate ice maker and water dispenser. NOTE: This refrigerator is connected to your refrigerator has an ice maker, make sure you leave some extra space at least 1" (2.5 cm) between back of 55°F...the Controls." Depth - When you do not install the refrigerator near a heat source, such as an oven or radiator. 2" (5.08 cm) Because Whirlpool Corporation policy includes a continuous commitment to 414 kPa). Reversible Overall Door "A" Height - If you have questions about your model) to allow for the ...
... system needs to be between 30 and 120 psi (207 and 827 kPa) is required to operate ice maker and water dispenser. NOTE: This refrigerator is connected to your refrigerator has an ice maker, make sure you leave some extra space at least 1" (2.5 cm) between back of 55°F...the Controls." Depth - When you do not install the refrigerator near a heat source, such as an oven or radiator. 2" (5.08 cm) Because Whirlpool Corporation policy includes a continuous commitment to 414 kPa). Reversible Overall Door "A" Height - If you have questions about your model) to allow for the ...


