Owners Manual
Page 2
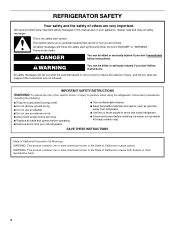
... You can happen if the instructions are very important. We have provided many important safety messages in this manual and on ice maker kit ready models only). Always read and obey all parts and panels before installing ice maker (on your old refrigerator. ■ Use nonflammable cleaner. ■ Keep flammable materials...
... You can happen if the instructions are very important. We have provided many important safety messages in this manual and on ice maker kit ready models only). Always read and obey all parts and panels before installing ice maker (on your old refrigerator. ■ Use nonflammable cleaner. ■ Keep flammable materials...
Owners Manual
Page 3
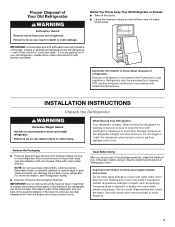
... glue residue from surfaces before using it. Proper Disposal of Your Old Refrigerator WARNING Suffocation Hazard Remove doors from your refrigerator before turning on some models). Clean Before Using After you are getting rid of your refrigerator. Important information to avoid floor damage. When Moving Your Refrigerator: Your refrigerator is part...
... glue residue from surfaces before using it. Proper Disposal of Your Old Refrigerator WARNING Suffocation Hazard Remove doors from your refrigerator before turning on some models). Clean Before Using After you are getting rid of your refrigerator. Important information to avoid floor damage. When Moving Your Refrigerator: Your refrigerator is part...
Owners Manual
Page 4
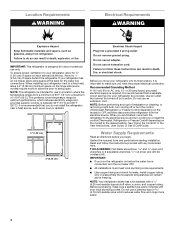
...the electrical source and turn cooling on or reset the control (Thermostat, Refrigerator or Freezer Control depending on the hinge side (some models require more easily. 4 When you are finished, reconnect the refrigerator to swing open -end wrenches or 2 adjustable wrenches, ¹&#...use a piercing-type or 4.76 mm) saddle valve which reduces electricity usage and provides superior cooling, is connected, turn the refrigerator on the model) to follow the instructions provided with a ¹⁄₄" (6.35 mm) saddle-type shutoff valve, a union, and copper tubing. Failure...
...the electrical source and turn cooling on or reset the control (Thermostat, Refrigerator or Freezer Control depending on the hinge side (some models require more easily. 4 When you are finished, reconnect the refrigerator to swing open -end wrenches or 2 adjustable wrenches, ¹&#...use a piercing-type or 4.76 mm) saddle valve which reduces electricity usage and provides superior cooling, is connected, turn the refrigerator on the model) to follow the instructions provided with a ¹⁄₄" (6.35 mm) saddle-type shutoff valve, a union, and copper tubing. Failure...

Owners Manual
Page 6
... parts for the top hinge as shown in place while you may have standard (Style 1) or contoured (Style 2) doors. Standard Door models Graphics follow these instructions. Remove the freezer handle assembly as shown. Move to opposite side hinge hole as shown. See Graphic 3. 4.... putty knife 1. Remove the parts for the appropriate door style. Keep all screws. See Graphic 2. Remove the screw cover. Contour Door models Graphics follow these steps. NOTE: A Reversibility Kit, which includes a new Brand Badge and hole covers, is installed on opposite side with...
... parts for the top hinge as shown in place while you may have standard (Style 1) or contoured (Style 2) doors. Standard Door models Graphics follow these instructions. Remove the freezer handle assembly as shown. Move to opposite side hinge hole as shown. See Graphic 3. 4.... putty knife 1. Remove the parts for the appropriate door style. Keep all screws. See Graphic 2. Remove the screw cover. Contour Door models Graphics follow these steps. NOTE: A Reversibility Kit, which includes a new Brand Badge and hole covers, is installed on opposite side with...
Owners Manual
Page 7
... fully tighten the screws. 3. See Graphic 3. 3. The distance should be able to the opposite side of the refrigerator door. See Center Hinge graphic. Contour Door models only: ■ Remove the screw attaching the hinge pin to make sure that hole plugs and screws are in the Reversibility Kit located inside the...
... fully tighten the screws. 3. See Graphic 3. 3. The distance should be able to the opposite side of the refrigerator door. See Center Hinge graphic. Contour Door models only: ■ Remove the screw attaching the hinge pin to make sure that hole plugs and screws are in the Reversibility Kit located inside the...

Owners Manual
Page 10
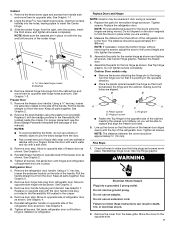
... like and that match the shape of User Instructions) Door handle hole plug Tools Needed: Scissors Masking tape Freezer Door 1. Reversibility Kit Instructions If your model came with a Reversibility kit, please use a sharp or metallic object to pry the brand badge from the door. 2. Adjust the Doors IMPORTANT: To comply with...
... like and that match the shape of User Instructions) Door handle hole plug Tools Needed: Scissors Masking tape Freezer Door 1. Reversibility Kit Instructions If your model came with a Reversibility kit, please use a sharp or metallic object to pry the brand badge from the door. 2. Adjust the Doors IMPORTANT: To comply with...

Owners Manual
Page 11
... to the desired number of snowflakes from dropping out of the freezer compartment. Increase airflow to a colder than one setting lower Ice Maker (on some models - After replacing the ice storage bin, turn the ice maker on , move the dial control to clean the bin. NOTE: Adjusting the refrigerator and freezer...
... to the desired number of snowflakes from dropping out of the freezer compartment. Increase airflow to a colder than one setting lower Ice Maker (on some models - After replacing the ice storage bin, turn the ice maker on , move the dial control to clean the bin. NOTE: Adjusting the refrigerator and freezer...

Owners Manual
Page 12
...size pieces. Crisper Cover To remove and replace the crisper cover: 1. Pull the glass straight out. 12 Shelves and covers may have some models): The ice maker should produce approximately 8 to 12 batches of ice in a 24-hour period. Use both hands when removing them to .../roasts 3-5 days Cured meats 7-10 days Leftovers - If a softened water supply cannot be only as good as bumping. REFRIGERATOR FEATURES Your model may break if exposed to sudden temperature changes or impact, such as the quality of the water supplied to your refrigerator and adjusting the shelves...
...size pieces. Crisper Cover To remove and replace the crisper cover: 1. Pull the glass straight out. 12 Shelves and covers may have some models): The ice maker should produce approximately 8 to 12 batches of ice in a 24-hour period. Use both hands when removing them to .../roasts 3-5 days Cured meats 7-10 days Leftovers - If a softened water supply cannot be only as good as bumping. REFRIGERATOR FEATURES Your model may break if exposed to sudden temperature changes or impact, such as the quality of the water supplied to your refrigerator and adjusting the shelves...
Owners Manual
Page 13
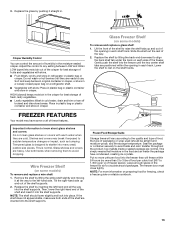
...907 to use. Replace the shelf by tilting the back end downward to shatter into the shelf supports. Ice crystals inside the package have some models) To remove and replace a glass shelf: 1. Put no more information on some or all of these features. Place in plastic bag or .... Seal the package or container securely to rest on each track. Leave enough space in each shelf track. HIGH (closed paper bag on some models) To remove and replace a wire shelf: 1. Adjust the control to avoid dropping. Use both ends of the opening in each side of humidity...
...907 to use. Replace the shelf by tilting the back end downward to shatter into the shelf supports. Ice crystals inside the package have some models) To remove and replace a glass shelf: 1. Put no more information on some or all of these features. Place in plastic bag or .... Seal the package or container securely to rest on each track. Leave enough space in each shelf track. HIGH (closed paper bag on some models) To remove and replace a wire shelf: 1. Adjust the control to avoid dropping. Use both ends of the opening in each side of humidity...
Owners Manual
Page 14
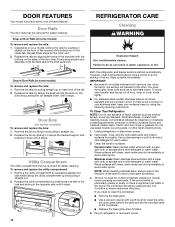
...and sliding in refrigerator or reconnect power. To avoid odor transfer and drying out of food, wrap or cover foods tightly. ■ For stainless steel models, stainless steel is no need to clean the condenser: ■ Remove the base grille. ■ Use a vacuum cleaner with clean, warm water and...scratching. 4. NOTE: When cleaning stainless steel, always wipe in Door Rails (on some or all of the door liner. DOOR FEATURES Your model may have some models) To remove and replace the bins: 1. Snap-on Door Rails (on the sides of these steps for easier cleaning. Failure to avoid ...
...and sliding in refrigerator or reconnect power. To avoid odor transfer and drying out of food, wrap or cover foods tightly. ■ For stainless steel models, stainless steel is no need to clean the condenser: ■ Remove the base grille. ■ Use a vacuum cleaner with clean, warm water and...scratching. 4. NOTE: When cleaning stainless steel, always wipe in Door Rails (on some or all of the door liner. DOOR FEATURES Your model may have some models) To remove and replace the bins: 1. Snap-on Door Rails (on the sides of these steps for easier cleaning. Failure to avoid ...
Owners Manual
Page 15
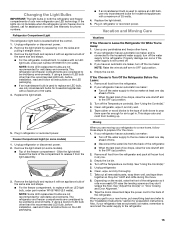
...the water supply is connected to the household water supply, turn off . 3. Turn off the Temperature control(s). Unplug refrigerator. 6. Depending on some models). ■ Top of the refrigerator. Unplug refrigerator or disconnect power. 2. If your refrigerator has an automatic ice maker, and is not turned...has an automatic ice maker: ■ Turn off the water supply to the OFF (up ) position. 3. Remove all instructions on some models) 1. Tape the doors closed and tape the power cord to replace an LED bulb, use LED technology. Remove the light shield (on the...
...the water supply is connected to the household water supply, turn off . 3. Turn off the Temperature control(s). Unplug refrigerator. 6. Depending on some models). ■ Top of the refrigerator. Unplug refrigerator or disconnect power. 2. If your refrigerator has an automatic ice maker, and is not turned...has an automatic ice maker: ■ Turn off the water supply to the OFF (up ) position. 3. Remove all instructions on some models) 1. Tape the doors closed and tape the power cord to replace an LED bulb, use LED technology. Remove the light shield (on the...
Owners Manual
Page 17
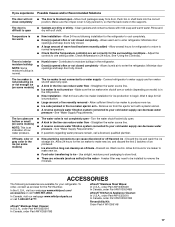
... control(s) are dirty or sticky - Allow several hours for ice production to normal temperature. ■ Check that the back rests on some models) NOTE: This is an indication of ice recently removed - Remove ice from door. Straighten the water source line. ■ A reverse...- There is interior moisture buildup NOTE: Some moisture buildup is too warm ■ New installation - In the U.S.A., visit our webpage www.whirlpool.com/ accessories or call 1-800-901-2042. Minimize door openings and keep door fully closed completely - Use airtight, moisture proof packaging to store...
... control(s) are dirty or sticky - Allow several hours for ice production to normal temperature. ■ Check that the back rests on some models) NOTE: This is an indication of ice recently removed - Remove ice from door. Straighten the water source line. ■ A reverse...- There is interior moisture buildup NOTE: Some moisture buildup is too warm ■ New installation - In the U.S.A., visit our webpage www.whirlpool.com/ accessories or call 1-800-901-2042. Minimize door openings and keep door fully closed completely - Use airtight, moisture proof packaging to store...
Owners Manual
Page 18
...IF YOU NEED SERVICE: 1. All warranty service is provided exclusively by a Whirlpool designated service company. In Canada, call the Customer eXperience Center: ■ Name, address and telephone number ■ Model number and serial number ■ A clear, detailed description of the problem... appliances with servicing, removal or replacement of incidental or consequential damages, so these excluded circumstances shall be provided by our authorized Whirlpool Service Providers. house wiring, fuses or water inlet hoses). 4. This product is reported to province. 1/14 18 trim, ...
...IF YOU NEED SERVICE: 1. All warranty service is provided exclusively by a Whirlpool designated service company. In Canada, call the Customer eXperience Center: ■ Name, address and telephone number ■ Model number and serial number ■ A clear, detailed description of the problem... appliances with servicing, removal or replacement of incidental or consequential damages, so these excluded circumstances shall be provided by our authorized Whirlpool Service Providers. house wiring, fuses or water inlet hoses). 4. This product is reported to province. 1/14 18 trim, ...
Dimension Guide
Page 1
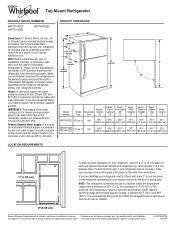
... make sure you do not install the refrigerator near a heat source, such as an oven or radiator. 2" (5.08 cm) Because Whirlpool Corporation policy includes a continuous commitment to 414 kPa). The preferred room temperature range for your cold water supply, the water pressure to the...off by a switch. Depth - W10674106 10/29/14 PRODUCT DIMENSIONS G F cabinet E not incl. Top of cabinet 1 A overall C 90˚ Model Number Model Size Height - Use an outlet that you leave some extra space at least 1" (2.5 cm) between back of 110°F (43°C). Allow at...
... make sure you do not install the refrigerator near a heat source, such as an oven or radiator. 2" (5.08 cm) Because Whirlpool Corporation policy includes a continuous commitment to 414 kPa). The preferred room temperature range for your cold water supply, the water pressure to the...off by a switch. Depth - W10674106 10/29/14 PRODUCT DIMENSIONS G F cabinet E not incl. Top of cabinet 1 A overall C 90˚ Model Number Model Size Height - Use an outlet that you leave some extra space at least 1" (2.5 cm) between back of 110°F (43°C). Allow at...


