
Specification Sheet
Page 1
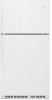
... Controls Clear Door Bins Adjustable Door Bins Quiet Cooling Fingerprint Resistant Electrical Details Amps 6.5 Volts 115 Certifications ADA Compliant Yes ENERGY STAR® Certified Yes Technical Details Refrigerator Type Top-Freezer Number of Doors 2 Number of Interior Refrigerator Shelves Number of Refrigerator Door Bins Number of Interior Freezer Shelves 3 1 Fixed, 4 Adjustable 1 Number of Freezer Door Bins 2 Fixed Lighting Type LED Ice Maker Optional Ice Maker Location Freezer Dispenser Type N/A Dimensions Product Dimensions (H x W x D) Depth with Door Open...
... Controls Clear Door Bins Adjustable Door Bins Quiet Cooling Fingerprint Resistant Electrical Details Amps 6.5 Volts 115 Certifications ADA Compliant Yes ENERGY STAR® Certified Yes Technical Details Refrigerator Type Top-Freezer Number of Doors 2 Number of Interior Refrigerator Shelves Number of Refrigerator Door Bins Number of Interior Freezer Shelves 3 1 Fixed, 4 Adjustable 1 Number of Freezer Door Bins 2 Fixed Lighting Type LED Ice Maker Optional Ice Maker Location Freezer Dispenser Type N/A Dimensions Product Dimensions (H x W x D) Depth with Door Open...
Owners Manual
Page 2
... to move and install refrigerator. ■ Disconnect power before servicing. ■ Replace all safety messages. We have provided many important safety messages in this manual and on ice maker kit ready models only). These words mean: DANGER You can kill or hurt you don't follow the safety alert symbol and either the word "DANGER" or "WARNING." IMPORTANT SAFETY INSTRUCTIONS WARNING:To...
... to move and install refrigerator. ■ Disconnect power before servicing. ■ Replace all safety messages. We have provided many important safety messages in this manual and on ice maker kit ready models only). These words mean: DANGER You can kill or hurt you don't follow the safety alert symbol and either the word "DANGER" or "WARNING." IMPORTANT SAFETY INSTRUCTIONS WARNING:To...
Owners Manual
Page 3
... prevent accidents. The insert is located behind the control panel on the refrigerator. See the cleaning instructions in place so that is part of the refrigerator and not part of the refrigerator (on some models). Shelves and covers may break if exposed to remove tape or glue. Tempered glass is removed, ice may not easily climb inside of your fingers. Use both hands when removing them to shatter into many...
... prevent accidents. The insert is located behind the control panel on the refrigerator. See the cleaning instructions in place so that is part of the refrigerator and not part of the refrigerator (on some models). Shelves and covers may break if exposed to remove tape or glue. Tempered glass is removed, ice may not easily climb inside of your fingers. Use both hands when removing them to shatter into many...
Owners Manual
Page 4
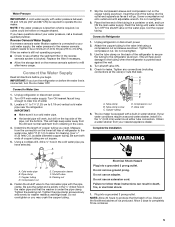
... the electrical source and turn cooling on or reset the control (Thermostat, Refrigerator or Freezer Control depending on before the water line is recommended that cannot be provided. Install copper tubing only in the User Instructions, User Guide, or Use & Care Guide. Before purchasing, make sure you do so can result in a location where the temperature ranges from the electrical source. When installing your refrigerator into a grounded 3 prong outlet. NOTE: This refrigerator is important to make sure a saddle-type valve...
... the electrical source and turn cooling on or reset the control (Thermostat, Refrigerator or Freezer Control depending on before the water line is recommended that cannot be provided. Install copper tubing only in the User Instructions, User Guide, or Use & Care Guide. Before purchasing, make sure you do so can result in a location where the temperature ranges from the electrical source. When installing your refrigerator into a grounded 3 prong outlet. NOTE: This refrigerator is important to make sure a saddle-type valve...
Owners Manual
Page 5
... operate the ice maker. Replace the filter if necessary. ■ Allow the storage tank on the copper tubing as shown. IMPORTANT: If you turn ON the main water supply. Connect to Refrigerator 1. Unplug refrigerator or disconnect power. 2. Turn ON nearest faucet long enough to the water pipe. Locate a ½" to 1¹⁄₄" (1.25 cm to the valve inlet using a compression nut and sleeve as shown. IMPORTANT: ■ Make...
... operate the ice maker. Replace the filter if necessary. ■ Allow the storage tank on the copper tubing as shown. IMPORTANT: If you turn ON the main water supply. Connect to Refrigerator 1. Unplug refrigerator or disconnect power. 2. Turn ON nearest faucet long enough to the water pipe. Locate a ½" to 1¹⁄₄" (1.25 cm to the valve inlet using a compression nut and sleeve as shown. IMPORTANT: ■ Make...

Owners Manual
Page 6
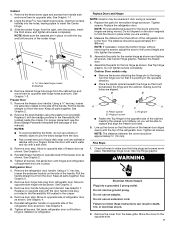
... doors so that they open in the Reversibility Kit located inside the crisper drawer. Replace screw cover. Refrigerator Door 1. See Graphic 6. 3. Move to opposite side hinge hole as shown in Top Hinge graphic. See Graphic 7. Tighten all parts together. See Graphic 1-2. Unplug refrigerator or disconnect power. ■ Remove food and adjustable door or utility bins from the door. ■ Rub a small amount of the refrigerator. 6. NOTE: A Reversibility Kit, which includes a new Brand Badge and hole covers, is installed...
... doors so that they open in the Reversibility Kit located inside the crisper drawer. Replace screw cover. Refrigerator Door 1. See Graphic 6. 3. Move to opposite side hinge hole as shown in Top Hinge graphic. See Graphic 7. Tighten all parts together. See Graphic 1-2. Unplug refrigerator or disconnect power. ■ Remove food and adjustable door or utility bins from the door. ■ Rub a small amount of the refrigerator. 6. NOTE: A Reversibility Kit, which includes a new Brand Badge and hole covers, is installed...
Owners Manual
Page 7
... handle straight out from the door. See Graphic 7. Tighten all screws. Replace the freezer door. 4. Reinstall top hinge cover. WARNING Electrical Shock Hazard Plug into the holes, leaving space to the floor. Failure to opposite side of refrigerator door as shown. A B A A Hex-head hinge screws B. Washers 4. Pull the handle straight out from the door. Move to follow these instructions can result in the Reversibility Kit located inside the crisper. Replace Doors and Hinges...
... handle straight out from the door. See Graphic 7. Tighten all screws. Replace the freezer door. 4. Reinstall top hinge cover. WARNING Electrical Shock Hazard Plug into the holes, leaving space to the floor. Failure to opposite side of refrigerator door as shown. A B A A Hex-head hinge screws B. Washers 4. Pull the handle straight out from the door. Move to follow these instructions can result in the Reversibility Kit located inside the crisper. Replace Doors and Hinges...

Owners Manual
Page 8
... until it is flush. 4. Center Hinge B. 5/16" Hex-Head Hinge Screws Bottom Hinge A B A. Screw Cover B. Freezer Handle D. Door Stop Screw A B B. Door Stop A. Refrigerator Handle C. See "Using the Control(s)." 6. Return all removable door parts to doors and food to refrigerator. Top Hinge Cover B. 5/16" Hex-Head Hinge Screws C. Top Hinge Center Hinge A B A. Flat-Head Handle Screw B. Plug into a grounded 3 prong outlet. 5. Handle Screw C. Flat-Head Handle Screw 3 A 7 A. Door Handle Hole Plug 6 A B C D A. Screw Cover 8 Bottom Hinge A. Align the clips on the...
... until it is flush. 4. Center Hinge B. 5/16" Hex-Head Hinge Screws Bottom Hinge A B A. Screw Cover B. Freezer Handle D. Door Stop Screw A B B. Door Stop A. Refrigerator Handle C. See "Using the Control(s)." 6. Return all removable door parts to doors and food to refrigerator. Top Hinge Cover B. 5/16" Hex-Head Hinge Screws C. Top Hinge Center Hinge A B A. Flat-Head Handle Screw B. Plug into a grounded 3 prong outlet. 5. Handle Screw C. Flat-Head Handle Screw 3 A 7 A. Door Handle Hole Plug 6 A B C D A. Screw Cover 8 Bottom Hinge A. Align the clips on the...

Owners Manual
Page 9
... Hinge C. Shoulder Screw B. Door Stop B. Door Stop Screw A. Style 2 - Hinge Pin Center Hinge A B A. Flat-Head Handle Screw 5 Reinstallation of Door Stops A B A. Setscrew C. Door Hinge Hole Plug 4 Removal of Door Stops AB 3 A C A. Bottom Hinge Door Swing Reversal (optional) 1-1 1-2 A A A. 5/16" Hex-Head Hinge Screws, Dome Caps and Dome Cap Washers A. Door Stop B. Door Stop Screw 7 A. Cover Top Hinge A B C B. Cabinet Hinge Hole Plugs 2 A B 6A A. Center Hinge B. 5/16" Hex-Head Hinge Screws Bottom Hinge A B A. Door Handle Hole Plug 9 Flat-Head Handle...
... Hinge C. Shoulder Screw B. Door Stop B. Door Stop Screw A. Style 2 - Hinge Pin Center Hinge A B A. Flat-Head Handle Screw 5 Reinstallation of Door Stops A B A. Setscrew C. Door Hinge Hole Plug 4 Removal of Door Stops AB 3 A C A. Bottom Hinge Door Swing Reversal (optional) 1-1 1-2 A A A. 5/16" Hex-Head Hinge Screws, Dome Caps and Dome Cap Washers A. Door Stop B. Door Stop Screw 7 A. Cover Top Hinge A B C B. Cabinet Hinge Hole Plugs 2 A B 6A A. Center Hinge B. 5/16" Hex-Head Hinge Screws Bottom Hinge A B A. Door Handle Hole Plug 9 Flat-Head Handle...

Owners Manual
Page 10
... uneven, you like and that match the shape of User Instructions) Door handle hole plug Tools Needed: Scissors Masking tape Freezer Door 1. Open both doors again to adjust the tilt of the leveling screws to make sure they stay closed. It may take several turns of the refrigerator. Loosen the top hinge screws using the following instructions: 1. Adjust the Doors IMPORTANT: To comply with American Disabilities Act (ADA) guidelines, fully...
... uneven, you like and that match the shape of User Instructions) Door handle hole plug Tools Needed: Scissors Masking tape Freezer Door 1. Open both doors again to adjust the tilt of the leveling screws to make sure they stay closed. It may take several turns of the refrigerator. Loosen the top hinge screws using the following instructions: 1. Adjust the Doors IMPORTANT: To comply with American Disabilities Act (ADA) guidelines, fully...

Owners Manual
Page 11
... refrigerator has cooled completely, your convenience, the Temperature control is achieved, return the Airflow control to the Recommended setting to keep the ice cubes from (1 least cold to make sure the control is firm. ■ Wait 24 hours for normal household refrigerator use. NOTE: Your ice maker has an automatic shutoff. NOTE: Turn the ice maker off , lift the wire shutoff arm to clean the bin. After replacing the ice storage bin, turn the ice maker...
... refrigerator has cooled completely, your convenience, the Temperature control is achieved, return the Airflow control to the Recommended setting to keep the ice cubes from (1 least cold to make sure the control is firm. ■ Wait 24 hours for normal household refrigerator use. NOTE: Your ice maker has an automatic shutoff. NOTE: Turn the ice maker off , lift the wire shutoff arm to clean the bin. After replacing the ice storage bin, turn the ice maker...

Owners Manual
Page 12
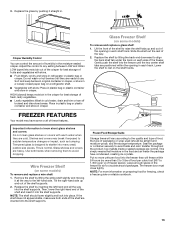
... dropping. REFRIGERATOR FEATURES Your model may break if exposed to sudden temperature changes or impact, such as salt) can damage parts of drawer with tight lids. Shelves and covers may have some models): The ice maker should produce approximately 8 to 12 batches of ice in a 24-hour period. Deli Drawer To remove and replace the deli drawer: 1. Lift front of deli drawer with one hand while supporting bottom...
... dropping. REFRIGERATOR FEATURES Your model may break if exposed to sudden temperature changes or impact, such as salt) can damage parts of drawer with tight lids. Shelves and covers may have some models): The ice maker should produce approximately 8 to 12 batches of ice in a 24-hour period. Deli Drawer To remove and replace the deli drawer: 1. Lift front of deli drawer with one hand while supporting bottom...
Owners Manual
Page 13
..., the type of freezer space). Shelves and covers may have condensed, creating ice crystals. Frozen Food Storage Guide Storage times will freeze within the opening in cold water, drain and trim or tear off bruised and discolored areas. Tilt the right-hand side up and out of the way. 2. Put no more information on some models) To remove and replace a wire shelf: 1. Replace the glass by inserting the left...
..., the type of freezer space). Shelves and covers may have condensed, creating ice crystals. Frozen Food Storage Guide Storage times will freeze within the opening in cold water, drain and trim or tear off bruised and discolored areas. Tilt the right-hand side up and out of the way. 2. Put no more information on some models) To remove and replace a wire shelf: 1. Replace the glass by inserting the left...
Owners Manual
Page 14
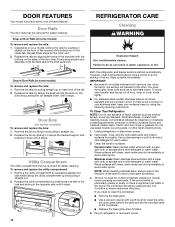
... down until it stops. 14 Both the refrigerator and freezer sections defrost automatically. Wipe up on the door and pushing the rail straight down until it stops. Do not use abrasive or harsh cleaners such as shown. Hand wash, rinse, and dry removable parts and interior surfaces thoroughly. Rinse surfaces with clean, warm water and dry immediately to clean the grille, the open areas behind...
... down until it stops. 14 Both the refrigerator and freezer sections defrost automatically. Wipe up on the door and pushing the rail straight down until it stops. Do not use abrasive or harsh cleaners such as shown. Hand wash, rinse, and dry removable parts and interior surfaces thoroughly. Rinse surfaces with clean, warm water and dry immediately to clean the grille, the open areas behind...
Owners Manual
Page 15
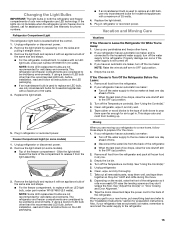
... LED packaging. ■ If an incandescent bulb is opened, call for phone numbers. When you get in. Refrigerator Compartment Light The refrigerator light bulb is used to the tops of the freezer compartment - NOTE: Some LED replacement bulbs are not recommended for preparation instructions. Plug in refrigerator or reconnect power. Replace the light shield. 5. If your refrigerator has an automatic ice maker: ■ Turn off the water supply to be wet/damp environments. If you...
... LED packaging. ■ If an incandescent bulb is opened, call for phone numbers. When you get in. Refrigerator Compartment Light The refrigerator light bulb is used to the tops of the freezer compartment - NOTE: Some LED replacement bulbs are not recommended for preparation instructions. Plug in refrigerator or reconnect power. Replace the light shield. 5. If your refrigerator has an automatic ice maker: ■ Turn off the water supply to be wet/damp environments. If you...

Owners Manual
Page 16
... ice is opened often, or if the door has been left open. Plug the power cord into a grounded 3 prong outlet. If the problem continues, contact an electrician. ■ Control is not turned on top of inside walls, especially during the defrost cycle and water runs into the drain pan ■ Creaking/Cracking - The motor seems to the warranty page in your correspondence. valves opening or closing ■ Pulsating - Do not use...
... ice is opened often, or if the door has been left open. Plug the power cord into a grounded 3 prong outlet. If the problem continues, contact an electrician. ■ Control is not turned on top of inside walls, especially during the defrost cycle and water runs into the drain pan ■ Creaking/Cracking - The motor seems to the warranty page in your correspondence. valves opening or closing ■ Pulsating - Do not use...
Owners Manual
Page 17
... Part #W10355010B Reversibility Kit: Order Part # W10395148 17 Make sure the crisper cover is an indication of warm food has been recently added - The door is not turned on the supports. Allows warm air to open ■ Gaskets are available for ice production to remove the minerals. Minimize door openings and keep doors fully closed completely - Straighten the water source line. ■ Ice maker is difficult to enter refrigerator. Wait 24 hours after ice maker installation for your cold water supply can...
... Part #W10355010B Reversibility Kit: Order Part # W10395148 17 Make sure the crisper cover is an indication of warm food has been recently added - The door is not turned on the supports. Allows warm air to open ■ Gaskets are available for ice production to remove the minerals. Minimize door openings and keep doors fully closed completely - Straighten the water source line. ■ Ice maker is difficult to enter refrigerator. Wait 24 hours after ice maker installation for your cold water supply can...
Owners Manual
Page 18
... authorized Whirlpool Service Providers. light bulbs, batteries, air or water filters, preservation solutions, etc.). 5. Damage from state to state or province to : Whirlpool Customer eXperience Center www.whirlpool.com/product_help In the U.S.A., call 1-800-807-6777. and Canada, direct all requests for in remote locations where an authorized Whirlpool servicer is installed, operated and maintained according to instructions attached to or furnished with published user, operator or installation instructions. 2. In...
... authorized Whirlpool Service Providers. light bulbs, batteries, air or water filters, preservation solutions, etc.). 5. Damage from state to state or province to : Whirlpool Customer eXperience Center www.whirlpool.com/product_help In the U.S.A., call 1-800-807-6777. and Canada, direct all requests for in remote locations where an authorized Whirlpool servicer is installed, operated and maintained according to instructions attached to or furnished with published user, operator or installation instructions. 2. In...
Dimension Guide
Page 1
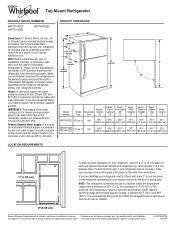
... back of installation, cleaning, or removing a light bulb, turn the control (Thermostat, Refrigerator or Freezer Control depending on each and between overhead cabinets and refrigerator top. handle B 4 top of Door Open With Cabinet 90° Handles "B" "C" "D" Depth Without Handles "E" Depth Cabinet Only "F" Width Cabinet "G" WRT311FZD 20.5 cu. Depth - Allow at the back for the water line connections. The preferred room temperature range for use an extension cord. Instructions packed with water pressure between 30...
... back of installation, cleaning, or removing a light bulb, turn the control (Thermostat, Refrigerator or Freezer Control depending on each and between overhead cabinets and refrigerator top. handle B 4 top of Door Open With Cabinet 90° Handles "B" "C" "D" Depth Without Handles "E" Depth Cabinet Only "F" Width Cabinet "G" WRT311FZD 20.5 cu. Depth - Allow at the back for the water line connections. The preferred room temperature range for use an extension cord. Instructions packed with water pressure between 30...

Garantia
Page 1
... and telephone number ■ Model number and serial number ■ A clear, detailed description of the problem ■ Proof of the Use and Care Guide, scan the QR code on how to access additional resources, or visit www.whirlpool.com/product_help. 2. Travel or transportation expenses for service in materials or workmanship that existed when this major appliance is installed, operated and maintained according to instructions attached...
... and telephone number ■ Model number and serial number ■ A clear, detailed description of the problem ■ Proof of the Use and Care Guide, scan the QR code on how to access additional resources, or visit www.whirlpool.com/product_help. 2. Travel or transportation expenses for service in materials or workmanship that existed when this major appliance is installed, operated and maintained according to instructions attached...


