Use & Care Guide
Page 2
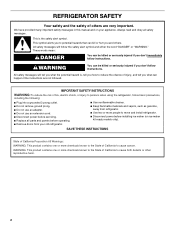
...65 Warnings: WARNING: This product contains one or more chemicals known to the State of California to persons when using the refrigerator, follow instructions. REFRIGERATOR SAFETY Your safety and the safety of others . This symbol alerts you to cause cancer. WARNING You can be killed...the potential hazard is the safety alert symbol. Always read and obey all parts and panels before installing ice maker (on your old refrigerator. ■ Use nonflammable cleaner. ■ Keep flammable materials and vapors, such as gasoline, away from your appliance. All safety ...
...65 Warnings: WARNING: This product contains one or more chemicals known to the State of California to persons when using the refrigerator, follow instructions. REFRIGERATOR SAFETY Your safety and the safety of others . This symbol alerts you to cause cancer. WARNING You can be killed...the potential hazard is the safety alert symbol. Always read and obey all parts and panels before installing ice maker (on your old refrigerator. ■ Use nonflammable cleaner. ■ Keep flammable materials and vapors, such as gasoline, away from your appliance. All safety ...
Use & Care Guide
Page 3
... so can result in accordance with warm water when they will sit for cleaning or service, be evacuated by a licensed, EPA certified refrigerant technician in place so that is removed, ice may migrate down from surfaces before using it. Tempered glass is normal. Failure to know...covers: Do not clean glass shelves or covers with Federal and Local regulations. This is designed to cover the floor with established procedures. Refrigerants must be sure to shatter into many small, pebble-size pieces. IMPORTANT: Do not remove the white foam air return insert that children...
... so can result in accordance with warm water when they will sit for cleaning or service, be evacuated by a licensed, EPA certified refrigerant technician in place so that is removed, ice may migrate down from surfaces before using it. Tempered glass is normal. Failure to know...covers: Do not clean glass shelves or covers with Federal and Local regulations. This is designed to cover the floor with established procedures. Refrigerants must be sure to shatter into many small, pebble-size pieces. IMPORTANT: Do not remove the white foam air return insert that children...

Use & Care Guide
Page 4
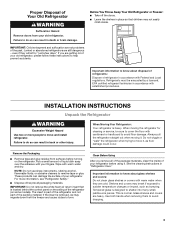
..."Using the Controls" in areas where the household temperatures will remain above freezing. Failure to a maximum of space behind the refrigerator. If your local plumbing codes. Do not use a piercing-type or 4.76 mm) saddle valve which reduces electricity usage and...Guide. Read and follow these instructions can result in a location where the temperature ranges from the electrical source. NOTE: Your refrigerator dealer has a kit available with any type of space on before starting installation. Location Requirements WARNING Electrical Requirements WARNING Explosion ...
..."Using the Controls" in areas where the household temperatures will remain above freezing. Failure to a maximum of space behind the refrigerator. If your local plumbing codes. Do not use a piercing-type or 4.76 mm) saddle valve which reduces electricity usage and...Guide. Read and follow these instructions can result in a location where the temperature ranges from the electrical source. NOTE: Your refrigerator dealer has a kit available with any type of space on before starting installation. Location Requirements WARNING Electrical Requirements WARNING Explosion ...
Use & Care Guide
Page 5
... sleeve and compression nut on the water pipe. Do not overtighten. 8. Connect to 3.18 cm) vertical cold water pipe near the refrigerator. Copper tubing D. Compression nut E. Obtain a water strainer from collecting in the reverse osmosis system is required to operate the ice maker.... Locate a ½" to 1¹⁄₄" (1.25 cm to Refrigerator 1. Add 7 ft (2.1 m) to refill after heavy usage. A G B C FE A. Cold water pipe B. Packing nut 6. Tighten the packing ...
... sleeve and compression nut on the water pipe. Do not overtighten. 8. Connect to 3.18 cm) vertical cold water pipe near the refrigerator. Copper tubing D. Compression nut E. Obtain a water strainer from collecting in the reverse osmosis system is required to operate the ice maker.... Locate a ½" to 1¹⁄₄" (1.25 cm to Refrigerator 1. Add 7 ft (2.1 m) to refill after heavy usage. A G B C FE A. Cold water pipe B. Packing nut 6. Tighten the packing ...

Use & Care Guide
Page 6
... in the following instructions are included later in place while you want to reverse your model, you begin, turn the refrigerator control OFF. Style 1 - Unplug refrigerator or disconnect power. ■ Remove food and adjustable door or utility bins from the door. ■ Rub a ...small amount of this section after "Final Steps." Tools Needed: Hex-head socket wrench ■ #2 Phillips screwdriver Refrigerator Doors Open-end wrench ■ Flat 2" putty knife Reverse Doors (optional) IMPORTANT: If you are working. 3. Tighten all parts together. For ...
... in the following instructions are included later in place while you want to reverse your model, you begin, turn the refrigerator control OFF. Style 1 - Unplug refrigerator or disconnect power. ■ Remove food and adjustable door or utility bins from the door. ■ Rub a ...small amount of this section after "Final Steps." Tools Needed: Hex-head socket wrench ■ #2 Phillips screwdriver Refrigerator Doors Open-end wrench ■ Flat 2" putty knife Reverse Doors (optional) IMPORTANT: If you are working. 3. Tighten all parts together. For ...
Use & Care Guide
Page 7
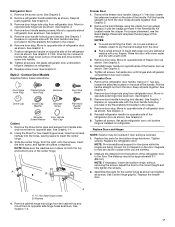
...the door magnets to insert the center hinge. 3. Keep all screws. See Graphic 3. 3. Remove door stop . Tighten screws. Replace the refrigerator door. Do not depend on the side of handle and drive bottom screw into the holes, leaving space to hold the doors in place ...while you are in place. See Center Hinge graphic. See Graphic 1-2. 7 Keep all parts together. Replace on refrigerator. Align lower portion of the handle. A B Freezer Door 1. Keep all parts together. Remove the brand badge using the plastic tool (provided). ...
...the door magnets to insert the center hinge. 3. Keep all screws. See Graphic 3. 3. Remove door stop . Tighten screws. Replace the refrigerator door. Do not depend on the side of handle and drive bottom screw into the holes, leaving space to hold the doors in place ...while you are in place. See Center Hinge graphic. See Graphic 1-2. 7 Keep all parts together. Replace on refrigerator. Align lower portion of the handle. A B Freezer Door 1. Keep all parts together. Remove the brand badge using the plastic tool (provided). ...
Use & Care Guide
Page 8
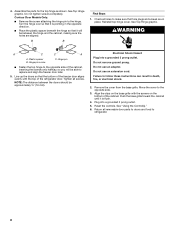
...top hinge to the opposite side of the cabinet, inserting the screws only halfway, so you will be between the doors should be able to refrigerator. 8 See "Using the Control(s)." 6. Do not tighten screws completely. Reinstall top hinge cover. Do not remove ground prong. Return all screws... A C C A A. Do not use an adapter. Remove the cover from the base grille. Align the clips on the bottom of the refrigerator door. Tighten all removable door parts to doors and food to replace and align the freezer door later. 5. Do not use an extension cord....
...top hinge to the opposite side of the cabinet, inserting the screws only halfway, so you will be between the doors should be able to refrigerator. 8 See "Using the Control(s)." 6. Do not tighten screws completely. Reinstall top hinge cover. Do not remove ground prong. Return all screws... A C C A A. Do not use an adapter. Remove the cover from the base grille. Align the clips on the bottom of the refrigerator door. Tighten all removable door parts to doors and food to replace and align the freezer door later. 5. Do not use an extension cord....
Use & Care Guide
Page 9
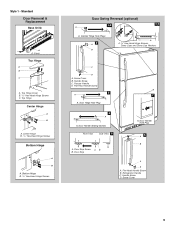
... Hinge Screws C. Bottom Hinge B. 5/16" Hex-Head Hinge Screws Door Swing Reversal (optional) 1-2 1-1 A A. Door Handle Sealing Screws Front View Side View 5 A. Door Handle Hole Plug 6 A B C D A. Refrigerator Handle C. Door Stop Screw A B B. Center Hinge B. 5/16" Hex-Head Hinge Screws Bottom Hinge A B A. Freezer Handle D. Flat-Head Handle Screw 3 A 7 A. Cover Top Hinge A B C A. Screw Cover B. Handle...
... Hinge Screws C. Bottom Hinge B. 5/16" Hex-Head Hinge Screws Door Swing Reversal (optional) 1-2 1-1 A A. Door Handle Sealing Screws Front View Side View 5 A. Door Handle Hole Plug 6 A B C D A. Refrigerator Handle C. Door Stop Screw A B B. Center Hinge B. 5/16" Hex-Head Hinge Screws Bottom Hinge A B A. Freezer Handle D. Flat-Head Handle Screw 3 A 7 A. Cover Top Hinge A B C A. Screw Cover B. Handle...

Use & Care Guide
Page 11
...the removal tool (provided), remove the brand badge from the freezer door by turning both doors again to make sure they close easier, adjust the refrigerator's tilt using a socket or wrench. 2. Rub a small amount of User Instructions) Door handle hole plug Tools Needed: Scissors Masking tape Freezer ... looks uneven, you should turn the leveling screw to the left . Open both leveling screws to the right. If not, tilt the refrigerator slightly more turns. Reversibility Kit Instructions If your model came with a Reversibility kit, please use a sharp or metallic object to pry the...
...the removal tool (provided), remove the brand badge from the freezer door by turning both doors again to make sure they close easier, adjust the refrigerator's tilt using a socket or wrench. 2. Rub a small amount of User Instructions) Door handle hole plug Tools Needed: Scissors Masking tape Freezer ... looks uneven, you should turn the leveling screw to the left . Open both leveling screws to the right. If not, tilt the refrigerator slightly more turns. Reversibility Kit Instructions If your model came with a Reversibility kit, please use a sharp or metallic object to pry the...
Use & Care Guide
Page 12
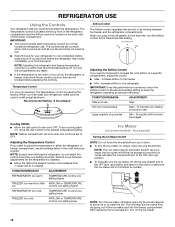
...■ Move the dial control to a specific compartment, adjust the control. ■ Max - CONDITION/REASON: REFRIGERATOR too warm FREEZER too warm/too little ice REFRIGERATOR too cold FREEZER too cold ADJUSTMENT: TEMPERATURE Control one setting higher AIRFLOW or TEMPERATURE Control one setting higher TEMPERATURE Control...blocked before adjusting the controls. When you like and when ice cream is as cold as shown. NOTE: Except when starting the refrigerator, do not adjust the control more than recommended setting will not cool the compartments any faster. ■ If the temperature is made...
...■ Move the dial control to a specific compartment, adjust the control. ■ Max - CONDITION/REASON: REFRIGERATOR too warm FREEZER too warm/too little ice REFRIGERATOR too cold FREEZER too cold ADJUSTMENT: TEMPERATURE Control one setting higher AIRFLOW or TEMPERATURE Control one setting higher TEMPERATURE Control...blocked before adjusting the controls. When you like and when ice cream is as cold as shown. NOTE: Except when starting the refrigerator, do not adjust the control more than recommended setting will not cool the compartments any faster. ■ If the temperature is made...
Use & Care Guide
Page 13
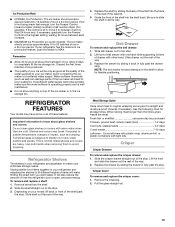
...times. Meat Storage Guide Store most meat in a 24-hour period. See the following chart for flexible positioning. Remove the crisper(s). 2. Refrigerator Shelves The shelves in your model, lift back or front of ice in original wrapping as long as bumping. Slide shelf out the ...days Cured meats 7-10 days Leftovers - Ice Production Rate ■ NORMAL Ice Production: The ice maker should produce approximately 16 to match your refrigerator has the maximum ice production feature, push the switch to a softened water supply. Replace the drawer by sliding the drawer in all of ice...
...times. Meat Storage Guide Store most meat in a 24-hour period. See the following chart for flexible positioning. Remove the crisper(s). 2. Refrigerator Shelves The shelves in your model, lift back or front of ice in original wrapping as long as bumping. Slide shelf out the ...days Cured meats 7-10 days Leftovers - Ice Production Rate ■ NORMAL Ice Production: The ice maker should produce approximately 16 to match your refrigerator has the maximum ice production feature, push the switch to a softened water supply. Replace the drawer by sliding the drawer in all of ice...
Use & Care Guide
Page 14
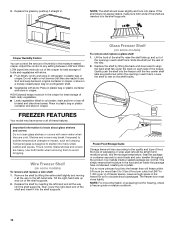
... crisper. Place in plastic bag or plastic container and store in the moisture-sealed crisper. Lift the front of the shelf to rest on a refrigerator shelf. ■ Vegetables with skins: Place in plastic bag or plastic container and store in the freezer for freezing, check a freezer guide or...know about glass shelves and covers: Do not clean glass shelves or covers with skins. ■ Fruit: Wash, let dry and store in refrigerator in each track. Adjust the control to avoid taste and odor transfer throughout the product. HIGH (closed paper bag on the shelf tracks. Important...
... crisper. Place in plastic bag or plastic container and store in the moisture-sealed crisper. Lift the front of the shelf to rest on a refrigerator shelf. ■ Vegetables with skins: Place in plastic bag or plastic container and store in the freezer for freezing, check a freezer guide or...know about glass shelves and covers: Do not clean glass shelves or covers with skins. ■ Fruit: Wash, let dry and store in refrigerator in each track. Adjust the control to avoid taste and odor transfer throughout the product. HIGH (closed paper bag on the shelf tracks. Important...
Use & Care Guide
Page 15
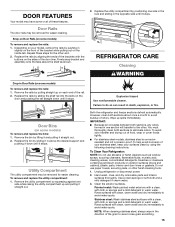
...steel is corrosionresistant and not corrosion-proof. Remove the rails by pushing in warm water. Failure to eliminate odors. Both the refrigerator and freezer sections defrost automatically. Wipe up on the door and pushing the rail straight down until it stops. To avoid odor...steel, keep your model, remove the rails by pulling straight up spills immediately. Repeat these features. Explosion Hazard Use nonflammable cleaner. REFRIGERATOR CARE Cleaning WARNING Drop-in the opposite side until it straight out. 2. Replace the rails by aligning the ends of the ...
...steel is corrosionresistant and not corrosion-proof. Remove the rails by pushing in warm water. Failure to eliminate odors. Both the refrigerator and freezer sections defrost automatically. Wipe up on the door and pushing the rail straight down until it stops. To avoid odor...steel, keep your model, remove the rails by pulling straight up spills immediately. Repeat these features. Explosion Hazard Use nonflammable cleaner. REFRIGERATOR CARE Cleaning WARNING Drop-in the opposite side until it straight out. 2. Replace the rails by aligning the ends of the ...

Use & Care Guide
Page 16
... before installation, read and follow all removable parts, wrap them well, and tape them open areas behind the control. 1. If your refrigerator has an automatic ice maker, and is used to replace an LED bulb, use only incandescent bulbs for household appliances with a maximum ...9632; Disconnect the water line from building up. Turn off . 3. Plug in the home, the condenser should be wet/damp environments. Refrigerator Compartment Light The refrigerator light bulb is no need to clean the condenser: ■ Remove the base grille. ■ Use a vacuum cleaner with an appliance...
... before installation, read and follow all removable parts, wrap them well, and tape them open areas behind the control. 1. If your refrigerator has an automatic ice maker, and is used to replace an LED bulb, use only incandescent bulbs for household appliances with a maximum ...9632; Disconnect the water line from building up. Turn off . 3. Plug in the home, the condenser should be wet/damp environments. Refrigerator Compartment Light The refrigerator light bulb is no need to clean the condenser: ■ Remove the base grille. ■ Use a vacuum cleaner with an appliance...
Use & Care Guide
Page 17
... cord to cool completely. In Canada, visit www.whirlpool.ca. Explosion Hazard Use nonflammable cleaner. Energy efficient refrigerators run longer at the address below: In the U.S.A.: In Canada: Whirlpool Brand Home Appliances Customer eXperience Center 553 Benson Road Benton... Harbor, MI 49022-2692 Whirlpool Brand Home Appliances Customer eXperience Centre 200 ...
... cord to cool completely. In Canada, visit www.whirlpool.ca. Explosion Hazard Use nonflammable cleaner. Energy efficient refrigerators run longer at the address below: In the U.S.A.: In Canada: Whirlpool Brand Home Appliances Customer eXperience Center 553 Benson Road Benton... Harbor, MI 49022-2692 Whirlpool Brand Home Appliances Customer eXperience Centre 200 ...
Use & Care Guide
Page 18
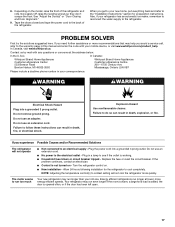
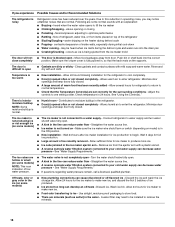
...Temperature Control(s) are some models) NOTE: This is an indication of low water pressure. ■ The water valve is noisy Refrigerator noise has been reduced over the years. Minimize door openings and keep door fully closed completely - Check temperature in operating noise, ...you experience Possible Causes and/or Recommended Solutions The refrigerator is not completely open - See "Using the Control(s)." The ice maker is blocked open - See "Water Supply Requirements." Discard...
...Temperature Control(s) are some models) NOTE: This is an indication of low water pressure. ■ The water valve is noisy Refrigerator noise has been reduced over the years. Minimize door openings and keep door fully closed completely - Check temperature in operating noise, ...you experience Possible Causes and/or Recommended Solutions The refrigerator is not completely open - See "Using the Control(s)." The ice maker is blocked open - See "Water Supply Requirements." Discard...

Use & Care Guide
Page 19
In the U.S.A., visit our webpage www.whirlpool.com/ accessories or call 1-800-807-6777. ACCESSORIES The following accessories are available for the Part Number. In Canada, visit our webpage www.whirlpoolparts.ca ... Part #W10355049B affresh® Kitchen & Appliance Cleaner: In U.S.A., order Part #W10355010 In Canada, order Part #W10355010B 19 To order, contact us and ask for your refrigerator.
In the U.S.A., visit our webpage www.whirlpool.com/ accessories or call 1-800-807-6777. ACCESSORIES The following accessories are available for the Part Number. In Canada, visit our webpage www.whirlpoolparts.ca ... Part #W10355049B affresh® Kitchen & Appliance Cleaner: In U.S.A., order Part #W10355010 In Canada, order Part #W10355010B 19 To order, contact us and ask for your refrigerator.

Dimension Guide
Page 1
... of 110°F (43°C). PRODUCT DIMENSIONS G F cabinet E not incl. handle D incl. Depth - If you do not install the refrigerator near a heat source, such as an oven or radiator. 2" (5.08 cm) Because Whirlpool Corporation policy includes a continuous commitment to change without notice. For complete details, see Installation our products, we reserve the...
... of 110°F (43°C). PRODUCT DIMENSIONS G F cabinet E not incl. handle D incl. Depth - If you do not install the refrigerator near a heat source, such as an oven or radiator. 2" (5.08 cm) Because Whirlpool Corporation policy includes a continuous commitment to change without notice. For complete details, see Installation our products, we reserve the...

