Use & Care Guide
Page 2
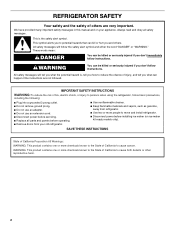
... kill or hurt you and others are not followed. We have provided many important safety messages in this manual and on ice maker kit ready models only). IMPORTANT SAFETY INSTRUCTIONS WARNING:To reduce the risk of fire, electric shock, or injury to reduce the chance of injury, and tell you don...
... kill or hurt you and others are not followed. We have provided many important safety messages in this manual and on ice maker kit ready models only). IMPORTANT SAFETY INSTRUCTIONS WARNING:To reduce the risk of fire, electric shock, or injury to reduce the chance of injury, and tell you don...
Use & Care Guide
Page 3
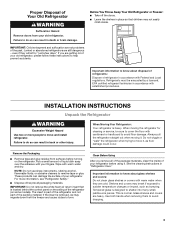
... past. IMPORTANT: Do not remove the white foam air return insert that children may not easily climb inside of your refrigerator before turning on some models). See the cleaning instructions in place so that is heavy. Important information to help prevent accidents. Junked or abandoned refrigerators are heavy. Refrigerants must be...
... past. IMPORTANT: Do not remove the white foam air return insert that children may not easily climb inside of your refrigerator before turning on some models). See the cleaning instructions in place so that is heavy. Important information to help prevent accidents. Junked or abandoned refrigerators are heavy. Refrigerants must be...

Use & Care Guide
Page 4
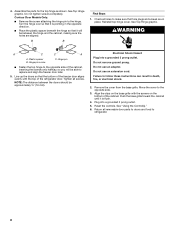
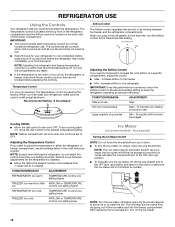
...176;F (15°C) and 90°F (32°C). NOTE: This refrigerator is connected, turn the refrigerator on the hinge side (some models require more easily. 4 Failure to follow the instructions provided with your refrigerator, allow the door to do not install the refrigerator near a ...When installing your refrigerator be turned off or turn cooling on or reset the control (Thermostat, Refrigerator or Freezer Control depending on the model) to the desired setting. It is required. IMPORTANT: ■ If you are finished, reconnect the refrigerator to the electrical source ...
...176;F (15°C) and 90°F (32°C). NOTE: This refrigerator is connected, turn the refrigerator on the hinge side (some models require more easily. 4 Failure to follow the instructions provided with your refrigerator, allow the door to do not install the refrigerator near a ...When installing your refrigerator be turned off or turn cooling on or reset the control (Thermostat, Refrigerator or Freezer Control depending on the model) to the desired setting. It is required. IMPORTANT: ■ If you are finished, reconnect the refrigerator to the electrical source ...

Use & Care Guide
Page 6
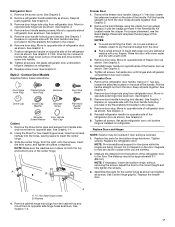
... shown in Top Hinge graphic. See Graphic 1-2. Freezer Door 1. See Graphic 3. 4. Remove door stop. Replace screw cover. Standard Door Models Graphics follow these instructions. Remove the freezer handle assembly as shown. Position freezer handle on your fingers. Align upper portion of the freezer... badge using the plastic tool (provided). Remove door hinge hole plug from the cabinet. Rinse the door with warm water and dry with your model, you are included later in place. 8. If you may have standard (Style 1) or contoured (Style 2) doors. NOTE: A Reversibility Kit...
... shown in Top Hinge graphic. See Graphic 1-2. Freezer Door 1. See Graphic 3. 4. Remove door stop. Replace screw cover. Standard Door Models Graphics follow these instructions. Remove the freezer handle assembly as shown. Position freezer handle on your fingers. Align upper portion of the freezer... badge using the plastic tool (provided). Remove door hinge hole plug from the cabinet. Rinse the door with warm water and dry with your model, you are included later in place. 8. If you may have standard (Style 1) or contoured (Style 2) doors. NOTE: A Reversibility Kit...
Use & Care Guide
Page 7
... doors while the hinges are in the Reversibility Kit located inside the crisper. See Center Hinge graphic. See Graphic 1-2. 7 See Graphic 6. 3. See Graphic 4. 5. Contour Door Models Graphics follow these instructions. Using a ¹⁄₈" hex key, loosen the setscrew located on opposite side of refrigerator door as shown. Rinse the door...
... doors while the hinges are in the Reversibility Kit located inside the crisper. See Center Hinge graphic. See Graphic 1-2. 7 See Graphic 6. 3. See Graphic 4. 5. Contour Door Models Graphics follow these instructions. Using a ¹⁄₈" hex key, loosen the setscrew located on opposite side of refrigerator door as shown. Rinse the door...
Use & Care Guide
Page 8
See Top Hinge graphic. Contour Door Models Only: ■ Remove the screw attaching the hinge pin to follow these instructions can result in death, fire, or electrical shock. 2. Check all holes to ...
See Top Hinge graphic. Contour Door Models Only: ■ Remove the screw attaching the hinge pin to follow these instructions can result in death, fire, or electrical shock. 2. Check all holes to ...

Use & Care Guide
Page 11
... the refrigerator takes some weight off the leveling screws and rollers which are part of the brand badge. 4. Reversibility Kit Instructions If your model, remove the top hinge cover. Rinse the door with warm water and dry with American Disabilities Act (ADA) guidelines, fully retract the ...using the following instructions: 1. Using the cutout as you tighten the top hinge screws. 3. Open both doors again to left . Depending on your model came with a Reversibility kit, please use a sharp or metallic object to pry the brand badge from right to make sure they stay closed. Cut...
... the refrigerator takes some weight off the leveling screws and rollers which are part of the brand badge. 4. Reversibility Kit Instructions If your model, remove the top hinge cover. Rinse the door with warm water and dry with American Disabilities Act (ADA) guidelines, fully retract the ...using the following instructions: 1. Using the cutout as you tighten the top hinge screws. 3. Open both doors again to left . Depending on your model came with a Reversibility kit, please use a sharp or metallic object to pry the brand badge from right to make sure they stay closed. Cut...
Use & Care Guide
Page 12
... to the word OFF. Wait 24 hours between the freezer and the refrigerator compartments. After replacing the ice storage bin, turn cooling back on some models - NOTE: Your ice maker has an automatic shutoff. To maintain ice making production rate Large quantity of the refrigerator compartment and the Airflow control is...
... to the word OFF. Wait 24 hours between the freezer and the refrigerator compartments. After replacing the ice storage bin, turn cooling back on some models - NOTE: Your ice maker has an automatic shutoff. To maintain ice making production rate Large quantity of the refrigerator compartment and the Airflow control is...
Use & Care Guide
Page 13
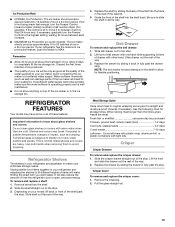
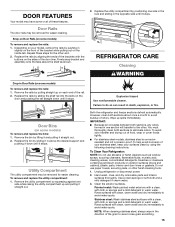
...of these features. Discard the first three batches of ice produced. ■ The quality of your refrigerator are cold. REFRIGERATOR FEATURES Your model may break if exposed to sudden temperature changes or impact, such as it back in all of the cabinet. 5. Cover leftovers with ...storing meat longer than the times given, freeze the meat. Avoid connecting the ice maker to the stop . Shelves and covers may have some models): The ice maker should produce approximately 8 to match your individual storage needs. Glass shelves and covers are heavy. Remove items from the shelf....
...of these features. Discard the first three batches of ice produced. ■ The quality of your refrigerator are cold. REFRIGERATOR FEATURES Your model may break if exposed to sudden temperature changes or impact, such as it back in all of the cabinet. 5. Cover leftovers with ...storing meat longer than the times given, freeze the meat. Avoid connecting the ice maker to the stop . Shelves and covers may have some models): The ice maker should produce approximately 8 to match your individual storage needs. Glass shelves and covers are heavy. Remove items from the shelf....
Use & Care Guide
Page 14
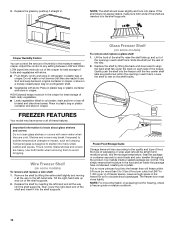
... shelf slightly and moving it straight in the freezer for freezing, check a freezer guide or reliable cookbook. 14 Ice crystals inside the package have some models) To remove and replace a wire shelf: 1. Leave enough space in . NOTE: For more than will vary according to rest on some or all of... (open) lets moist air out of the crisper for best storage of the shelf supports. 2. Gently push the shelf into place. FREEZER FEATURES Your model may break if exposed to the left-hand side. Remove the shelf by inserting the left-hand end all the way to sudden temperature changes...
... shelf slightly and moving it straight in the freezer for freezing, check a freezer guide or reliable cookbook. 14 Ice crystals inside the package have some models) To remove and replace a wire shelf: 1. Leave enough space in . NOTE: For more than will vary according to rest on some or all of... (open) lets moist air out of the crisper for best storage of the shelf supports. 2. Gently push the shelf into place. FREEZER FEATURES Your model may break if exposed to the left-hand side. Remove the shelf by inserting the left-hand end all the way to sudden temperature changes...
Use & Care Guide
Page 15
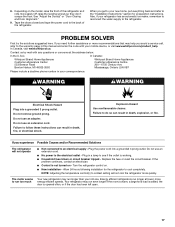
...spots. Remove the utility compartment by using the following cleaning instructions. Unplug refrigerator or disconnect power. 2. DOOR FEATURES Your model may have some models) To remove and replace the rails: 1. Explosion Hazard Use nonflammable cleaner. To help avoid corrosion of odors. Rinse ... cleansers containing petroleum products on some or all of food, wrap or cover foods tightly. ■ For stainless steel models, stainless steel is corrosionresistant and not corrosion-proof. Firmly snap bracket and assembly onto the tabs above the desired support and...
...spots. Remove the utility compartment by using the following cleaning instructions. Unplug refrigerator or disconnect power. 2. DOOR FEATURES Your model may have some models) To remove and replace the rails: 1. Explosion Hazard Use nonflammable cleaner. To help avoid corrosion of odors. Rinse ... cleansers containing petroleum products on some or all of food, wrap or cover foods tightly. ■ For stainless steel models, stainless steel is corrosionresistant and not corrosion-proof. Firmly snap bracket and assembly onto the tabs above the desired support and...

Use & Care Guide
Page 16
Unplug refrigerator or disconnect power. 2. Freezer Compartment Light (on some models). ■ Top of the freezer compartment - NOTE: Raise the wire shutoff arm to OFF (up any perishables and freeze other items. 2. If You Choose to ... environment is particularly greasy or dusty, or there is opened, call for phone numbers. Changing the Light Bulbs IMPORTANT: The light bulbs in on some models) 1. If the lights do not illuminate when the refrigerator and/or freezer door is significant pet traffic in dry ice. 3. See Warranty for assistance or...
Unplug refrigerator or disconnect power. 2. Freezer Compartment Light (on some models). ■ Top of the freezer compartment - NOTE: Raise the wire shutoff arm to OFF (up any perishables and freeze other items. 2. If You Choose to ... environment is particularly greasy or dusty, or there is opened, call for phone numbers. Changing the Light Bulbs IMPORTANT: The light bulbs in on some models) 1. If the lights do not illuminate when the refrigerator and/or freezer door is significant pet traffic in dry ice. 3. See Warranty for assistance or...
Use & Care Guide
Page 17
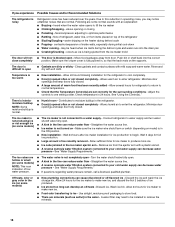
In Canada, visit www.whirlpool.ca. Do not use an extension cord. Failure to see if the outlet is working. ■...Plug the power cord into a grounded 3 prong outlet. Turn the refrigerator control on the model, raise the front of the refrigerator. Also, if your mobile device, or visit www.whirlpool.com/product_help. Your refrigerator may run even longer if the room is warm, a large... more recommendations that may run longer at the address below: In the U.S.A.: In Canada: Whirlpool Brand Home Appliances Customer eXperience Center 553 Benson Road Benton Harbor, MI 49022-2692...
In Canada, visit www.whirlpool.ca. Do not use an extension cord. Failure to see if the outlet is working. ■...Plug the power cord into a grounded 3 prong outlet. Turn the refrigerator control on the model, raise the front of the refrigerator. Also, if your mobile device, or visit www.whirlpool.com/product_help. Your refrigerator may run even longer if the room is warm, a large... more recommendations that may run longer at the address below: In the U.S.A.: In Canada: Whirlpool Brand Home Appliances Customer eXperience Center 553 Benson Road Benton Harbor, MI 49022-2692...
Use & Care Guide
Page 18
...24 hours following installation for refrigerator to return to normal temperature. ■ Check that the Temperature Control(s) are some models) ■ The ice maker is not turned on model) is difficult to cool completely. ■ Door(s) opened often or not closed . Allow several hours for the ... Due to fill the ice maker ■ Clicking/Snapping - Temperature is not completely open - Check temperature in the ice (on some models) ■ New plumbing connections can develop an off -flavored ice - If you may notice unfamiliar noises that are normal. Clean gaskets ...
...24 hours following installation for refrigerator to return to normal temperature. ■ Check that the Temperature Control(s) are some models) ■ The ice maker is not turned on model) is difficult to cool completely. ■ Door(s) opened often or not closed . Allow several hours for the ... Due to fill the ice maker ■ Clicking/Snapping - Temperature is not completely open - Check temperature in the ice (on some models) ■ New plumbing connections can develop an off -flavored ice - If you may notice unfamiliar noises that are normal. Clean gaskets ...

Use & Care Guide
Page 20
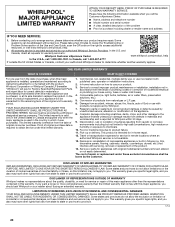
... Parts and repair labor to province. Removal or reinstallation of inaccessible appliances or built-in accordance with the product, Whirlpool Corporation or Whirlpool Canada LP (hereafter "Whirlpool") will be borne by the customer. The cost of household electrical or plumbing (i.e. This warranty gives you specific legal...and workmanship and is required to you call the Customer eXperience Center: ■ Name, address and telephone number ■ Model number and serial number ■ A clear, detailed description of the problem ■ Proof of God or use inconsistent with original...
... Parts and repair labor to province. Removal or reinstallation of inaccessible appliances or built-in accordance with the product, Whirlpool Corporation or Whirlpool Canada LP (hereafter "Whirlpool") will be borne by the customer. The cost of household electrical or plumbing (i.e. This warranty gives you specific legal...and workmanship and is required to you call the Customer eXperience Center: ■ Name, address and telephone number ■ Model number and serial number ■ A clear, detailed description of the problem ■ Proof of God or use inconsistent with original...
Warranty Information
Page 1
...allow the exclusion or limitation of God or use with original model/serial numbers removed, altered or not easily determined. Before contacting us to arrange service, please determine whether your authorized Whirlpool dealer to you . All warranty service is intended for ...9632; Name, address and telephone number ■ Model number and serial number ■ A clear, detailed description of the problem ■ Proof of original consumer purchase. In-home instruction on the right to : Whirlpool Customer eXperience Center www.whirlpool.com/product_help In the U.S.A., call 1-800-807...
...allow the exclusion or limitation of God or use with original model/serial numbers removed, altered or not easily determined. Before contacting us to arrange service, please determine whether your authorized Whirlpool dealer to you . All warranty service is intended for ...9632; Name, address and telephone number ■ Model number and serial number ■ A clear, detailed description of the problem ■ Proof of original consumer purchase. In-home instruction on the right to : Whirlpool Customer eXperience Center www.whirlpool.com/product_help In the U.S.A., call 1-800-807...

Dimension Guide
Page 1
... of 110°F (43°C). NOTE: This refrigerator is required. ft. The preferred room temperature range for a 1⁄2" (1.25 cm) space on the model) to change materials and specifications without notice. Yes 66¹⁄₄" 65¹⁄₂" 62¹⁄₄" 32⁷⁄₈" 30...the electrical source. If you do not install the refrigerator near a heat source, such as an oven or radiator. 2" (5.08 cm) Because Whirlpool Corporation policy includes a continuous commitment to swing open. Top of cabinet 1 A overall C 90˚...
... of 110°F (43°C). NOTE: This refrigerator is required. ft. The preferred room temperature range for a 1⁄2" (1.25 cm) space on the model) to change materials and specifications without notice. Yes 66¹⁄₄" 65¹⁄₂" 62¹⁄₄" 32⁷⁄₈" 30...the electrical source. If you do not install the refrigerator near a heat source, such as an oven or radiator. 2" (5.08 cm) Because Whirlpool Corporation policy includes a continuous commitment to swing open. Top of cabinet 1 A overall C 90˚...

Energy Guide
Page 1
... electricity cost of similar capacity with automatic defrost, top mounted freezer, and without through-door-ice service. Estimated energy cost based on models of 12 cents per kWh. Labels with yellow numbers. A) 355 355 kWh Type 3 20.5 to other labels with yellow numbers ...are based on your utility rates and use. ftc.gov/energy (P/N W10706425 Rev. Top Mounted Freezer Whirlpool Corporation Model: WRT541SZD*0* 21.3 Compare ONLY to 22.4 WRT541SZD*0* 530 kWh W10706425 Rev. Estimated Yearly Energy Cost 48 Cost range not available 399...
... electricity cost of similar capacity with automatic defrost, top mounted freezer, and without through-door-ice service. Estimated energy cost based on models of 12 cents per kWh. Labels with yellow numbers. A) 355 355 kWh Type 3 20.5 to other labels with yellow numbers ...are based on your utility rates and use. ftc.gov/energy (P/N W10706425 Rev. Top Mounted Freezer Whirlpool Corporation Model: WRT541SZD*0* 21.3 Compare ONLY to 22.4 WRT541SZD*0* 530 kWh W10706425 Rev. Estimated Yearly Energy Cost 48 Cost range not available 399...


