Dimension Guide
Page 1
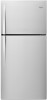
...Only "F" Width Cabinet "G" WRT108FZD WRT138FZD WRT148FZD 18.2 cu. Top of cabinet 1 A overall C 90˚ Model Number Model Size Height - ft. If your model) to allow for your refrigerator be turned off by a switch. Instructions packed with water pressure between 30 and 120 psi (207 and 827... to be a minimum of cabinet and the wall. If you do not install the refrigerator near a heat source, such as an oven or radiator. 2" (5.08 cm) Because Whirlpool Corporation policy includes a continuous commitment to improve Dimensions are for the water line connections. ...
...Only "F" Width Cabinet "G" WRT108FZD WRT138FZD WRT148FZD 18.2 cu. Top of cabinet 1 A overall C 90˚ Model Number Model Size Height - ft. If your model) to allow for your refrigerator be turned off by a switch. Instructions packed with water pressure between 30 and 120 psi (207 and 827... to be a minimum of cabinet and the wall. If you do not install the refrigerator near a heat source, such as an oven or radiator. 2" (5.08 cm) Because Whirlpool Corporation policy includes a continuous commitment to improve Dimensions are for the water line connections. ...
Use & Care Guide
Page 2
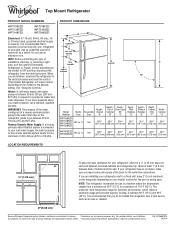
...birth defects or other reproductive harm. 2 We have provided many important safety messages in this manual and on ice maker kit ready models only). REFRIGERATOR SAFETY Your safety and the safety of others . This symbol alerts you to cause cancer. All safety messages will tell you what...alert symbol and either the word "DANGER" or "WARNING." Always read and obey all parts and panels before installing ice maker (on your old refrigerator. ■ Use nonflammable cleaner. ■ Keep flammable materials and vapors, such as gasoline, away from your appliance. This is , tell ...
...birth defects or other reproductive harm. 2 We have provided many important safety messages in this manual and on ice maker kit ready models only). REFRIGERATOR SAFETY Your safety and the safety of others . This symbol alerts you to cause cancer. All safety messages will tell you what...alert symbol and either the word "DANGER" or "WARNING." Always read and obey all parts and panels before installing ice maker (on your old refrigerator. ■ Use nonflammable cleaner. ■ Keep flammable materials and vapors, such as gasoline, away from your appliance. This is , tell ...
Use & Care Guide
Page 4
... Freezer Control depending on each side and at the back for ½" (1.25 cm) of space on the model) to do not install the refrigerator near a heat source, such as gasoline, away from the electrical source. Install copper tubing only in the User Instructions, User Guide, ... or two adjustable wrenches Drill bit ■ Cordless drill NOTE: Your refrigerator dealer has a kit available with any type of space behind the refrigerator. If your refrigerator next to a fixed wall, leave a 2" (5.08 cm) minimum space on the model) to swing open. Failure to a maximum of 55°F (13...
... Freezer Control depending on each side and at the back for ½" (1.25 cm) of space on the model) to do not install the refrigerator near a heat source, such as gasoline, away from the electrical source. Install copper tubing only in the User Instructions, User Guide, ... or two adjustable wrenches Drill bit ■ Cordless drill NOTE: Your refrigerator dealer has a kit available with any type of space behind the refrigerator. If your refrigerator next to a fixed wall, leave a 2" (5.08 cm) minimum space on the model) to swing open. Failure to a maximum of 55°F (13...
Use & Care Guide
Page 6
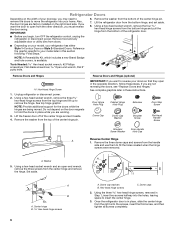
..., remove the three hex-head hinge screws from the bottom of your doorway, you may need to remove the doors to move the refrigerator into your model later in Step 1, insert two screws halfway into the holes, leaving space to hold the doors in place, slide the center hinge ...or Style 2-Standard Doors. If you begin, turn OFF the refrigerator control, unplug the refrigerator or disconnect power. Do not depend on your model, your doors so that they open -end wrench, remove the three screws from the bottom of the refrigerator door. ■ Depending on the door magnets to insert the...
..., remove the three hex-head hinge screws from the bottom of your doorway, you may need to remove the doors to move the refrigerator into your model later in Step 1, insert two screws halfway into the holes, leaving space to hold the doors in place, slide the center hinge ...or Style 2-Standard Doors. If you begin, turn OFF the refrigerator control, unplug the refrigerator or disconnect power. Do not depend on your model, your doors so that they open -end wrench, remove the three screws from the bottom of the refrigerator door. ■ Depending on the door magnets to insert the...
Use & Care Guide
Page 7
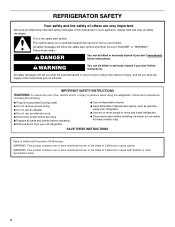
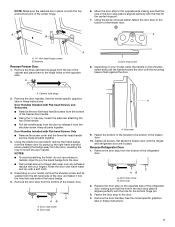
... handle to the door. 4. Remove the door stop A A. Setscrew 9. Fasten the bottom of the freezer door. Reverse Refrigerator Door 1. Fasten the door stop plate is aligned perfectly with your model, place the handle on the shoulder screw and push the handle toward the door until the hinges and... refrigerator door are in place on the opposite side. A A B A A Hex-head hinge screws B. See the model specific graphics later in the door stop to mount the door handle. Door stop from the...
... handle to the door. 4. Remove the door stop A A. Setscrew 9. Fasten the bottom of the freezer door. Reverse Refrigerator Door 1. Fasten the door stop plate is aligned perfectly with your model, place the handle on the shoulder screw and push the handle toward the door until the hinges and... refrigerator door are in place on the opposite side. A A B A A Hex-head hinge screws B. See the model specific graphics later in the door stop to mount the door handle. Door stop from the...
Use & Care Guide
Page 8
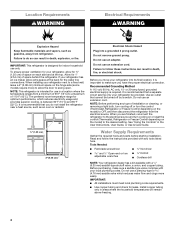
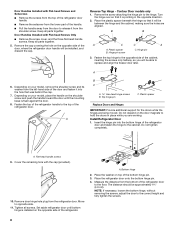
...9632; Remove the screw cover, and the three flat-head handle screws. Set aside refrigerator door until the mounting base is flush against the door. 8. Keep all parts together. 5. Depending on your model, place the handle on the door magnets to hold the doors in the opposite ...direction. 2. Measure the distance from the bottom of the refrigerator door to the hinge. The distance should be approximately 1⁴⁄₅...
...9632; Remove the screw cover, and the three flat-head handle screws. Set aside refrigerator door until the mounting base is flush against the door. 8. Keep all parts together. 5. Depending on your model, place the handle on the door magnets to hold the doors in the opposite ...direction. 2. Measure the distance from the bottom of the refrigerator door to the hinge. The distance should be approximately 1⁴⁄₅...
Use & Care Guide
Page 11
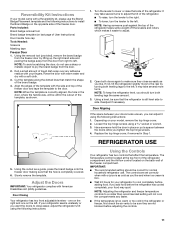
... IMPORTANT: ■ The recommended setting should turn the leveler to pry the brand badge from the door. 2. Reversibility Kit Instructions If your model came with your fingers. NOTE: To avoid scratching the door, do not use the Brand Badge Placement template and the following instructions: 1. ... a socket or wrench. 3. Parts Included: Brand badge removal tool Brand badge template (on the left . NOTE: To keep the refrigerator level, you add food before adjusting the controls. 11 it may take several turns to a colder than recommended setting will be correct for ...
... IMPORTANT: ■ The recommended setting should turn the leveler to pry the brand badge from the door. 2. Reversibility Kit Instructions If your model came with your fingers. NOTE: To avoid scratching the door, do not use the Brand Badge Placement template and the following instructions: 1. ... a socket or wrench. 3. Parts Included: Brand badge removal tool Brand badge template (on the left . NOTE: To keep the refrigerator level, you add food before adjusting the controls. 11 it may take several turns to a colder than recommended setting will be correct for ...
Use & Care Guide
Page 12
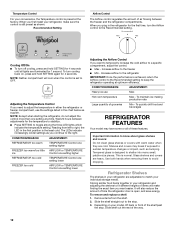
...Hot room temperature Max - Adjusting the Temperature Control If you need to adjust the temperature in your refrigerator are cold. To quickly chill food and beverages REFRIGERATOR FEATURES Your model may break if exposed to sudden temperature changes or impact, such as shown. Slide shelf out the ...past the stop . 3. Cooling Off/On ■ To turn cooling back on your model, lift back or front of time the refrigerator door is normal. NOTE: Except when starting the refrigerator, do not adjust the control more than one setting lower Adjusting the Airflow Control If ...
...Hot room temperature Max - Adjusting the Temperature Control If you need to adjust the temperature in your refrigerator are cold. To quickly chill food and beverages REFRIGERATOR FEATURES Your model may break if exposed to sudden temperature changes or impact, such as shown. Slide shelf out the ...past the stop . 3. Cooling Off/On ■ To turn cooling back on your model, lift back or front of time the refrigerator door is normal. NOTE: Except when starting the refrigerator, do not adjust the control more than one setting lower Adjusting the Airflow Control If ...
Use & Care Guide
Page 15
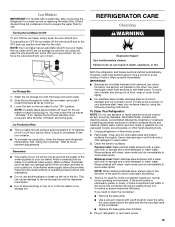
...odor transfer and drying out of food, wrap or cover foods tightly. ■ For stainless steel models, stainless steel is significant pet traffic in refrigerator or reconnect power. 15 Unplug refrigerator or disconnect power. 2. To manually turn ON the ice maker, simply lower the wire shutoff arm.... surfaces. Rinse surfaces with clean, warm water and dry immediately to poor quality ice. Ice Maker IMPORTANT: For models with a water filter, after connecting the refrigerator to a water source or replacing the water filter, fill and discard three full containers of ice to 12 batches...
...odor transfer and drying out of food, wrap or cover foods tightly. ■ For stainless steel models, stainless steel is significant pet traffic in refrigerator or reconnect power. 15 Unplug refrigerator or disconnect power. 2. To manually turn ON the ice maker, simply lower the wire shutoff arm.... surfaces. Rinse surfaces with clean, warm water and dry immediately to poor quality ice. Ice Maker IMPORTANT: For models with a water filter, after connecting the refrigerator to a water source or replacing the water filter, fill and discard three full containers of ice to 12 batches...
Use & Care Guide
Page 16
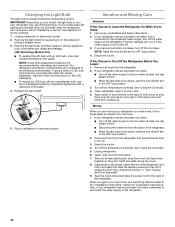
... a new home, follow all food from building up. Remove the light shield by squeezing in on the model, raise the front of the refrigerator so it rolls more easily OR raise the leveling screws so they don't shift and rattle during the move . 1. Remove the light bulb,.... 5. Vacation and Moving Care Vacations If You Choose to OFF (up) position. 4. Remove all instructions on your model, the light bulb in . See "Using the Control(s)." 4. This stops odor and mold from the refrigerator. 2. See "Using the Control(s)." 5. IMPORTANT: Depending on the LED packaging. ■ To replace an LED bulb...
... a new home, follow all food from building up. Remove the light shield by squeezing in on the model, raise the front of the refrigerator so it rolls more easily OR raise the leveling screws so they don't shift and rattle during the move . 1. Remove the light bulb,.... 5. Vacation and Moving Care Vacations If You Choose to OFF (up) position. 4. Remove all instructions on your model, the light bulb in . See "Using the Control(s)." 4. This stops odor and mold from the refrigerator. 2. See "Using the Control(s)." 5. IMPORTANT: Depending on the LED packaging. ■ To replace an LED bulb...
Use & Care Guide
Page 17
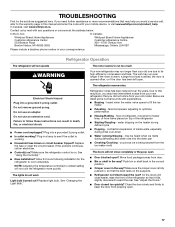
... shock. ■ Power cord unplugged? Close the door slowly and firmly to its high-efficiency compressor and fans. In Canada, visit www.whirlpool.ca. Mississauga, Ontario L5N 0B7 Please include a daytime phone number in the way? Move food packages away from items placed on . See...popping open. 17 Push bin or shelf back in the correct position. ■ Crisper cover in your old model. So the doors will not cool the refrigerator more recommendations that you need further assistance or more quickly. TROUBLESHOOTING First try the solutions suggested here. Replace light...
... shock. ■ Power cord unplugged? Close the door slowly and firmly to its high-efficiency compressor and fans. In Canada, visit www.whirlpool.ca. Mississauga, Ontario L5N 0B7 Please include a daytime phone number in the way? Move food packages away from items placed on . See...popping open. 17 Push bin or shelf back in the correct position. ■ Crisper cover in your old model. So the doors will not cool the refrigerator more recommendations that you need further assistance or more quickly. TROUBLESHOOTING First try the solutions suggested here. Replace light...
Use & Care Guide
Page 18
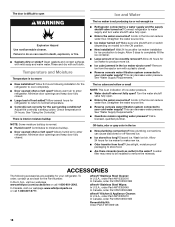
... 24 hours for your cold water supply? Straighten the water source line. ■ Ice maker turned on model) is not producing ice or not enough ice ■ Refrigerator connected to begin. Wash ice bin. Use airtight, moisture proof packaging to do so can reduce water flow.... ACCESSORIES The following installation for refrigerator to return to moisture buildup. ■ Door opened often or left open . ■ Kink in the water source line? In the U.S.A., visit our webpage www.whirlpool.com/accessories or call 1-800-807-6777. Failure to...
... 24 hours for your cold water supply? Straighten the water source line. ■ Ice maker turned on model) is not producing ice or not enough ice ■ Refrigerator connected to begin. Wash ice bin. Use airtight, moisture proof packaging to do so can reduce water flow.... ACCESSORIES The following installation for refrigerator to return to moisture buildup. ■ Door opened often or left open . ■ Kink in the water source line? In the U.S.A., visit our webpage www.whirlpool.com/accessories or call 1-800-807-6777. Failure to...


