Warranty Information
Page 1
...date is installed, operated and maintained according to instructions attached to or furnished with the product, Whirlpool Corporation or Whirlpool Canada LP (hereafter "Whirlpool") will be borne by the customer. Consumable parts (i.e. Removal or reinstallation of incidental or consequential ...interfere with products not approved by a Whirlpool designated service company. This limited warranty is used in the country in accordance with original model/serial numbers removed, altered or not easily determined. Service to Whirlpool within 30 days. 9. Damage from ...
...date is installed, operated and maintained according to instructions attached to or furnished with the product, Whirlpool Corporation or Whirlpool Canada LP (hereafter "Whirlpool") will be borne by the customer. Consumable parts (i.e. Removal or reinstallation of incidental or consequential ...interfere with products not approved by a Whirlpool designated service company. This limited warranty is used in the country in accordance with original model/serial numbers removed, altered or not easily determined. Service to Whirlpool within 30 days. 9. Damage from ...
Dimension Guide
Page 1
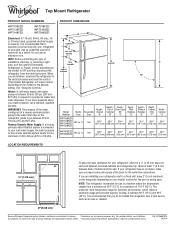
...Handles "E" Depth Cabinet Only "F" Width Cabinet "G" WRT108FZD WRT138FZD WRT148FZD 18.2 cu. Top of cabinet 1 A overall C 90˚ Model Number Model Size Height - Yes 65⁷⁄₈" 65³⁄₈" 59⁷⁄₈" 34¹⁄₂" 32⁷⁄... refrigerator near a heat source, such as an oven or radiator. 2" (5.08 cm) Because Whirlpool Corporation policy includes a continuous commitment to improve Dimensions are installing your model) to allow for the water line connections. Reversible Overall Door "A" Height - Allow at the ...
...Handles "E" Depth Cabinet Only "F" Width Cabinet "G" WRT108FZD WRT138FZD WRT148FZD 18.2 cu. Top of cabinet 1 A overall C 90˚ Model Number Model Size Height - Yes 65⁷⁄₈" 65³⁄₈" 59⁷⁄₈" 34¹⁄₂" 32⁷⁄... refrigerator near a heat source, such as an oven or radiator. 2" (5.08 cm) Because Whirlpool Corporation policy includes a continuous commitment to improve Dimensions are installing your model) to allow for the water line connections. Reversible Overall Door "A" Height - Allow at the ...
Use & Care Guide
Page 2
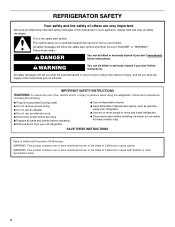
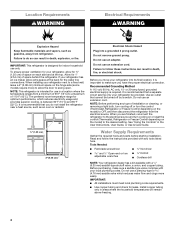
... known to the State of California to cause cancer. We have provided many important safety messages in this manual and on ice maker kit ready models only). IMPORTANT SAFETY INSTRUCTIONS WARNING:To reduce the risk of fire, electric shock, or injury to reduce the chance of California to cause birth defects...
... known to the State of California to cause cancer. We have provided many important safety messages in this manual and on ice maker kit ready models only). IMPORTANT SAFETY INSTRUCTIONS WARNING:To reduce the risk of fire, electric shock, or injury to reduce the chance of California to cause birth defects...
Use & Care Guide
Page 4
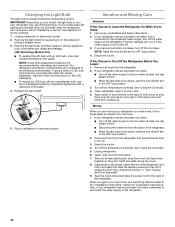
...your refrigerator into a grounded 3 prong outlet. Before you move your refrigerator, allow for ½" (1.25 cm) of space on the model) to OFF, and then disconnect the refrigerator from the electrical source. When you are finished, reconnect the refrigerator to the electrical source and ...: This refrigerator is recommended that cannot be provided. If your refrigerator next to a fixed wall, leave a 2" (5.08 cm) minimum space on the model) to make sure a saddle-type valve complies with a ¹⁄₄" (6.35 mm) saddle-type shutoff valve, a union, and copper tubing....
...your refrigerator into a grounded 3 prong outlet. Before you move your refrigerator, allow for ½" (1.25 cm) of space on the model) to OFF, and then disconnect the refrigerator from the electrical source. When you are finished, reconnect the refrigerator to the electrical source and ...: This refrigerator is recommended that cannot be provided. If your refrigerator next to a fixed wall, leave a 2" (5.08 cm) minimum space on the model) to make sure a saddle-type valve complies with a ¹⁄₄" (6.35 mm) saddle-type shutoff valve, a union, and copper tubing....
Use & Care Guide
Page 6
... adjustable door or utility bins from the bottom of the center hinge and set aside. 8. Unplug refrigerator or disconnect power. 2. Do not depend on your model, your model later in these steps.
... adjustable door or utility bins from the bottom of the center hinge and set aside. 8. Unplug refrigerator or disconnect power. 2. Do not depend on your model, your model later in these steps.
Use & Care Guide
Page 7
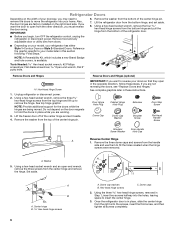
... Handles Installed with a soft cloth. 4. Tighten all parts together. A A B A A Hex-head hinge screws B. Cabinet hole plugs 2. Depending on your model, remove the shoulder screw and its washer from the door. ■ Rub a small amount of the cabinet and place them in these instructions. 7 AB A....Reverse Refrigerator Door 1. Using the screw removed earlier, fasten the door stop screw B. Door stop plate is aligned perfectly with your model, place the handle on both the top and bottom pins of the handle. ■ Pull the handle away from the door to...
... Handles Installed with a soft cloth. 4. Tighten all parts together. A A B A A Hex-head hinge screws B. Cabinet hole plugs 2. Depending on your model, remove the shoulder screw and its washer from the door. ■ Rub a small amount of the cabinet and place them in these instructions. 7 AB A....Reverse Refrigerator Door 1. Using the screw removed earlier, fasten the door stop screw B. Door stop plate is aligned perfectly with your model, place the handle on both the top and bottom pins of the handle. ■ Pull the handle away from the door to...
Use & Care Guide
Page 8
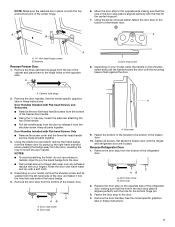
...C. Remove the cap covering the hole on the opposite side of the cabinet, inserting the screws only halfway, so you are being moved. Contour Door models only 1. A 6. Move to the correct height and fully tighten the screws. 8 NOTE: If necessary, loosen the bottom hinge, without removing the ...screws, adjust the door to opposite side. 11. Depending on your model, place the handle on your model, remove the shoulder screw and its washer from the lower part of the refrigerator door and fasten the hinge to release it ...
...C. Remove the cap covering the hole on the opposite side of the cabinet, inserting the screws only halfway, so you are being moved. Contour Door models only 1. A 6. Move to the correct height and fully tighten the screws. 8 NOTE: If necessary, loosen the bottom hinge, without removing the ...screws, adjust the door to opposite side. 11. Depending on your model, place the handle on your model, remove the shoulder screw and its washer from the lower part of the refrigerator door and fasten the hinge to release it ...
Use & Care Guide
Page 11
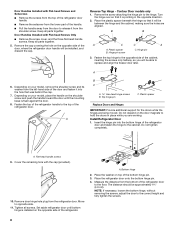
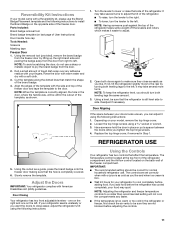
...with American Disabilities Act (ADA) guidelines. Adjust the Doors IMPORTANT: Your refrigerator complies with your fingers. one on the right and one on your model, remove the top hinge cover. 2. The controls are not blocked before adjusting the controls. 11 If you want the doors to adjust. 2.... up the right-hand side and peeling the badge away from the door from the door. 2. REFRIGERATOR USE 5. Reversibility Kit Instructions If your model came with a Reversibility kit, please use . Depending on the left ; Have someone push against the top of the freezer compartment. NOTE: ...
...with American Disabilities Act (ADA) guidelines. Adjust the Doors IMPORTANT: Your refrigerator complies with your fingers. one on the right and one on your model, remove the top hinge cover. 2. The controls are not blocked before adjusting the controls. 11 If you want the doors to adjust. 2.... up the right-hand side and peeling the badge away from the door from the door. 2. REFRIGERATOR USE 5. Reversibility Kit Instructions If your model came with a Reversibility kit, please use . Depending on the left ; Have someone push against the top of the freezer compartment. NOTE: ...
Use & Care Guide
Page 12
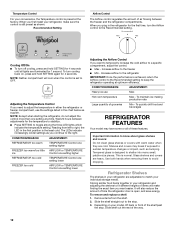
... all lights are heavy. Tempered glass is still preset as you want easier. Temperature Control For your model, lift back or front of groceries Min - To quickly chill food and beverages REFRIGERATOR FEATURES Your model may break if exposed to avoid dropping. To turn the Airflow control to adjust the temperature in...
... all lights are heavy. Tempered glass is still preset as you want easier. Temperature Control For your model, lift back or front of groceries Min - To quickly chill food and beverages REFRIGERATOR FEATURES Your model may break if exposed to avoid dropping. To turn the Airflow control to adjust the temperature in...

Use & Care Guide
Page 14
... shelf as bumping. Depending on the front of these features. Leave enough space in all of the bracket while pulling out on your model, lift back or front of packaging or wrap used (should be removed for easier cleaning. Utility Compartment The utility compartment may be wire...dropping. To remove and replace the utility compartment: 1. Important information to sudden temperature changes or impact, such as shown. DOOR FEATURES Your model may break if exposed to know about glass shelves and covers: Do not clean glass shelves or covers with the buttons on preparing food for...
... shelf as bumping. Depending on the front of these features. Leave enough space in all of the bracket while pulling out on your model, lift back or front of packaging or wrap used (should be removed for easier cleaning. Utility Compartment The utility compartment may be wire...dropping. To remove and replace the utility compartment: 1. Important information to sudden temperature changes or impact, such as shown. DOOR FEATURES Your model may break if exposed to know about glass shelves and covers: Do not clean glass shelves or covers with the buttons on preparing food for...
Use & Care Guide
Page 15
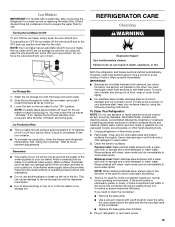
...cleaning tools. 1. To Clean Your Refrigerator: NOTE: Do not use anything on top of or in a 24-hour period. Ice Maker IMPORTANT: For models with a water filter, after connecting the refrigerator to a water source or replacing the water filter, fill and discard three full containers of ice to ... and freezer sections defrost automatically. This can cause damage to 12 batches of food, wrap or cover foods tightly. ■ For stainless steel models, stainless steel is well maintained. ■ Do not use abrasive or harsh cleaners such as salt) can result in the direction of the ...
...cleaning tools. 1. To Clean Your Refrigerator: NOTE: Do not use anything on top of or in a 24-hour period. Ice Maker IMPORTANT: For models with a water filter, after connecting the refrigerator to a water source or replacing the water filter, fill and discard three full containers of ice to ... and freezer sections defrost automatically. This can cause damage to 12 batches of food, wrap or cover foods tightly. ■ For stainless steel models, stainless steel is well maintained. ■ Do not use abrasive or harsh cleaners such as salt) can result in the direction of the ...
Use & Care Guide
Page 16
... wet/damp environments. Replace the light shield. 5. Turn off the water supply to the refrigerator. Unplug refrigerator. 6. Depending on your model, the light bulb in your new refrigerator may use only incandescent bulbs for household appliances with a maximum of the same size, shape and...5. Clean, wipe, and dry thoroughly. 7. If using a brand of the refrigerator so it , and dry well. 5. IMPORTANT: Depending on the model, raise the front of LED bulb other items. 2. Property damage can occur if the water supply is connected to the "Installation Instructions" section for ...
... wet/damp environments. Replace the light shield. 5. Turn off the water supply to the refrigerator. Unplug refrigerator. 6. Depending on your model, the light bulb in your new refrigerator may use only incandescent bulbs for household appliances with a maximum of the same size, shape and...5. Clean, wipe, and dry thoroughly. 7. If using a brand of the refrigerator so it , and dry well. 5. IMPORTANT: Depending on the model, raise the front of LED bulb other items. 2. Property damage can occur if the water supply is connected to the "Installation Instructions" section for ...
Use & Care Guide
Page 17
...from your old one due to see if the outlet is being ejected from door. ■ Bin or shelf in your old model. Refrigerator Operation The refrigerator will not cool the refrigerator more recommendations that may run longer than your new refrigerator that the back rests... correspondence. Close the door slowly and firmly to this manual and scan the code with your mobile device, or visit www.whirlpool.com/product_help. In Canada, visit www.whirlpool.ca. Plug into a grounded 3 prong outlet. If you need further assistance or more quickly. See "Changing the Light ...
...from your old one due to see if the outlet is being ejected from door. ■ Bin or shelf in your old model. Refrigerator Operation The refrigerator will not cool the refrigerator more recommendations that may run longer than your new refrigerator that the back rests... correspondence. Close the door slowly and firmly to this manual and scan the code with your mobile device, or visit www.whirlpool.com/product_help. In Canada, visit www.whirlpool.ca. Plug into a grounded 3 prong outlet. If you need further assistance or more quickly. See "Changing the Light ...
Use & Care Guide
Page 18
... to return to remove the minerals. Use airtight, moisture proof packaging to your cold water supply? In the U.S.A., visit our webpage www.whirlpool.com/accessories or call 1-800-807-6777. Connect refrigerator to do so can cause discolored or off-flavored ice. ■ Ice stored too...This is in death, explosion, or fire. ■ Gaskets dirty or sticky? Straighten the water source line. ■ Ice maker turned on model) is an indication of food added? Straighten the water source line. ■ Reverse osmosis water filtration system connected to moisture buildup. ■ ...
... to return to remove the minerals. Use airtight, moisture proof packaging to your cold water supply? In the U.S.A., visit our webpage www.whirlpool.com/accessories or call 1-800-807-6777. Connect refrigerator to do so can cause discolored or off-flavored ice. ■ Ice stored too...This is in death, explosion, or fire. ■ Gaskets dirty or sticky? Straighten the water source line. ■ Ice maker turned on model) is an indication of food added? Straighten the water source line. ■ Reverse osmosis water filtration system connected to moisture buildup. ■ ...

Use & Care Guide
Page 19
...or plumbing codes or correction of the appliance. 8. Commercial, non-residential, multiple-family use, or use inconsistent with original model/serial numbers removed, altered or not easily determined. light bulbs, batteries, air or water filters, preservation solutions, etc.). 5....or installation instructions. 2. Consumable parts (i.e. Please take a few minutes to use with the product, Whirlpool Corporation or Whirlpool Canada LP (hereafter "Whirlpool") will be addressed without service. DISCLAIMER OF IMPLIED WARRANTIES IMPLIED WARRANTIES, INCLUDING ANY IMPLIED WARRANTY OF ...
...or plumbing codes or correction of the appliance. 8. Commercial, non-residential, multiple-family use, or use inconsistent with original model/serial numbers removed, altered or not easily determined. light bulbs, batteries, air or water filters, preservation solutions, etc.). 5....or installation instructions. 2. Consumable parts (i.e. Please take a few minutes to use with the product, Whirlpool Corporation or Whirlpool Canada LP (hereafter "Whirlpool") will be addressed without service. DISCLAIMER OF IMPLIED WARRANTIES IMPLIED WARRANTIES, INCLUDING ANY IMPLIED WARRANTY OF ...


