Specification Sheet
Page 1
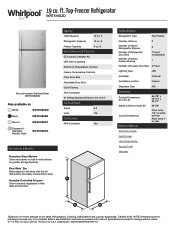
...Dimension Guide Install Guide Use & Care Guide Energy Guide Warranty *Based on wall-to change without notice. ®/™ © 2020. Refrigeration, Cooking, Dishwashers and Laundry appliances. For complete details, see Installation Instructions packed with product. 19 cu. ft. Specifications subject to -wall shelves for planning purposes only. All rights reserved. Refrigerator Capacity 14 cu. General Features & Properties EZ Connect Icemaker Kit LED Interior Lighting Electronic Temperature Controls Freezer Temperature Controls Clear Door Bins Adjustable Door...
...Dimension Guide Install Guide Use & Care Guide Energy Guide Warranty *Based on wall-to change without notice. ®/™ © 2020. Refrigeration, Cooking, Dishwashers and Laundry appliances. For complete details, see Installation Instructions packed with product. 19 cu. ft. Specifications subject to -wall shelves for planning purposes only. All rights reserved. Refrigerator Capacity 14 cu. General Features & Properties EZ Connect Icemaker Kit LED Interior Lighting Electronic Temperature Controls Freezer Temperature Controls Clear Door Bins Adjustable Door...
Owners Manual
Page 2
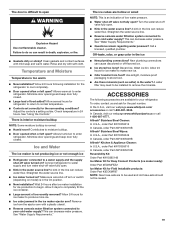
... propellant in this manual and on some models). Do not hit the refrigerator glass doors (on your appliance. Staff kitchen areas in hotels, motels and other working environments; - PLEASE KEEP THESE INSTRUCTIONS 2 This is , tell you how to move and install the refrigerator. Disconnect the power before installing the ice maker (on ice maker kit-ready models only). Use a sturdy glass when dispensing ice (on some models). This appliance...
... propellant in this manual and on some models). Do not hit the refrigerator glass doors (on your appliance. Staff kitchen areas in hotels, motels and other working environments; - PLEASE KEEP THESE INSTRUCTIONS 2 This is , tell you how to move and install the refrigerator. Disconnect the power before installing the ice maker (on ice maker kit-ready models only). Use a sturdy glass when dispensing ice (on some models). This appliance...
Owners Manual
Page 3
... warm water when they will sit for cleaning or service, be evacuated by a licensed, EPA certified refrigerant technician in "Refrigerator Care." This is heavy. Failure to move and install refrigerator. even if they are cold. Refrigerants must be sure to cover the oor with a soft cloth. ■■ Do not use sharp instruments, rubbing alcohol, flammable fluids, or abrasive cleaners to move it . Glass shelves...
... warm water when they will sit for cleaning or service, be evacuated by a licensed, EPA certified refrigerant technician in "Refrigerator Care." This is heavy. Failure to move and install refrigerator. even if they are cold. Refrigerants must be sure to cover the oor with a soft cloth. ■■ Do not use sharp instruments, rubbing alcohol, flammable fluids, or abrasive cleaners to move it . Glass shelves...
Owners Manual
Page 4
... installation or cleaning, or removing a light bulb, turn cooling off or turn the refrigerator on the model) to the desired setting. Allow at the back for use in a location where the temperature ranges from a minimum of 55°F (13°C) to the electrical source and turn the ice maker off by a switch. NOTE: This refrigerator is between overhead cabinets and refrigerator top. Do not use a piercing-type or 3/16" (4.76 mm) saddle valve which...
... installation or cleaning, or removing a light bulb, turn cooling off or turn the refrigerator on the model) to the desired setting. Allow at the back for use in a location where the temperature ranges from a minimum of 55°F (13°C) to the electrical source and turn the ice maker off by a switch. NOTE: This refrigerator is between overhead cabinets and refrigerator top. Do not use a piercing-type or 3/16" (4.76 mm) saddle valve which...
Owners Manual
Page 5
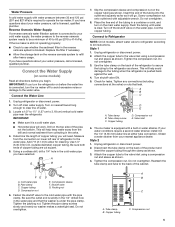
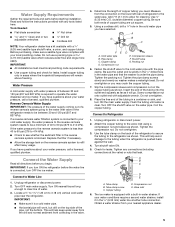
... nut. If you turn the ice maker off main water supply. Use 1/4" (6.35 mm) O.D. (outside diameter) copper tubing. Coil the copper tubing. Check for cleaning. Disconnect the tube clamp on the water pipe. Attach the copper tube to operate the ice maker. Copper tubing D. Compression nut E. Connect the Water Line 1. Do not overtighten. 8. Connect to Refrigerator NOTE: On kit models, attach water valve to refrigerator according to allow for leaks. A B C D E A. Copper tubing C. IMPORTANT: ■■ Make sure it is...
... nut. If you turn the ice maker off main water supply. Use 1/4" (6.35 mm) O.D. (outside diameter) copper tubing. Coil the copper tubing. Check for cleaning. Disconnect the tube clamp on the water pipe. Attach the copper tube to operate the ice maker. Copper tubing D. Compression nut E. Connect the Water Line 1. Do not overtighten. 8. Connect to Refrigerator NOTE: On kit models, attach water valve to refrigerator according to allow for leaks. A B C D E A. Copper tubing C. IMPORTANT: ■■ Make sure it is...
Owners Manual
Page 6
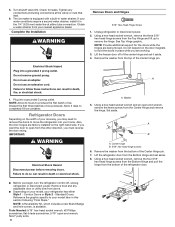
.... NOTE: A Reversibility Kit, which includes a new Brand Badge and hole covers, is equipped with a built-in death, fire, or electrical shock. 1. Tighten any adjustable door or utility bins from the Bottom Hinge and set it in place while you want the door to follow these instructions can result in this section following "Final Steps." Unplug refrigerator or disconnect power. 2. If you are working. 3. The ice maker is...
.... NOTE: A Reversibility Kit, which includes a new Brand Badge and hole covers, is equipped with a built-in death, fire, or electrical shock. 1. Tighten any adjustable door or utility bins from the Bottom Hinge and set it in place while you want the door to follow these instructions can result in this section following "Final Steps." Unplug refrigerator or disconnect power. 2. If you are working. 3. The ice maker is...
Owners Manual
Page 12
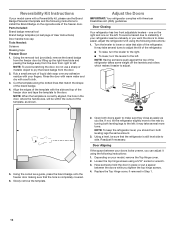
... from the freezer door by turning both leveling legs to the left . To avoid a hazard due to instability, if your refrigerator seems unsteady or you like. Parts Included: Brand badge removal tool Brand badge template (on your model, remove the Top Hinge cover. 2. one on the right and one on the opposite side of User Instructions) Door handle hole cap Tools Needed: Scissors Masking tape Freezer Door 1. Depending on...
... from the freezer door by turning both leveling legs to the left . To avoid a hazard due to instability, if your refrigerator seems unsteady or you like. Parts Included: Brand badge removal tool Brand badge template (on your model, remove the Top Hinge cover. 2. one on the right and one on the opposite side of User Instructions) Door handle hole cap Tools Needed: Scissors Masking tape Freezer Door 1. Depending on...
Owners Manual
Page 13
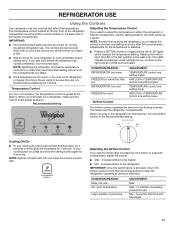
... warm or too cold in the refrigerator or freezer, first check the air vents to adjust the temperature in either the refrigerator or freezer compartment, use the settings listed in the refrigerator for 4 seconds. Reading from left to the right until all 4 LEDs are set to keep the refrigerator operating at the factory. The LEDs indicate increasingly colder settings as a guide. When you first install your food may spoil. When you plug...
... warm or too cold in the refrigerator or freezer, first check the air vents to adjust the temperature in either the refrigerator or freezer compartment, use the settings listed in the refrigerator for 4 seconds. Reading from left to the right until all 4 LEDs are set to keep the refrigerator operating at the factory. The LEDs indicate increasingly colder settings as a guide. When you first install your food may spoil. When you plug...

Owners Manual
Page 14
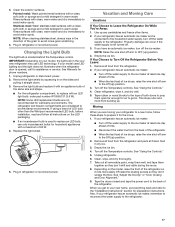
... past the stop . Slide the crisper drawer straight out to know about glass shelves and covers: Do not clean glass shelves or covers with warm water when they are cold. Pull the glass straight out. 14 Slide drawer out the rest of time the refrigerator door is normal. Crisper Cover To remove and replace the crisper cover: 1. This is open, and save energy. Crisper Crisper Drawers To remove and replace the crisper drawer: 1. Replace the deli drawer. Important information to the stop . Slide shelf out the...
... past the stop . Slide the crisper drawer straight out to know about glass shelves and covers: Do not clean glass shelves or covers with warm water when they are cold. Pull the glass straight out. 14 Slide drawer out the rest of time the refrigerator door is normal. Crisper Cover To remove and replace the crisper cover: 1. This is open, and save energy. Crisper Crisper Drawers To remove and replace the crisper drawer: 1. Replace the deli drawer. Important information to the stop . Slide shelf out the...
Owners Manual
Page 16
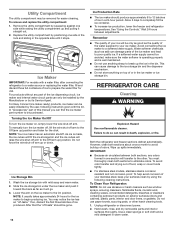
... freezer and refrigerator temperatures. Unplug refrigerator or disconnect power. 2. Remove the utility compartment by the user, following cleaning instructions. For Easy Connect (ice maker ready) products, ice maker can only be installed by the Manufacturer or by using the following instruction given with mild soap and warm water. 2. NOTE: Your ice maker has an automatic shutoff. Ice Storage Bin 1. REFRIGERATOR CARE Cleaning WARNING Explosion Hazard Use non ammable cleaner. IMPORTANT: ■■ Because air circulates between adjustments. Do not use...
... freezer and refrigerator temperatures. Unplug refrigerator or disconnect power. 2. Remove the utility compartment by the user, following cleaning instructions. For Easy Connect (ice maker ready) products, ice maker can only be installed by the Manufacturer or by using the following instruction given with mild soap and warm water. 2. NOTE: Your ice maker has an automatic shutoff. Ice Storage Bin 1. REFRIGERATOR CARE Cleaning WARNING Explosion Hazard Use non ammable cleaner. IMPORTANT: ■■ Because air circulates between adjustments. Do not use...
Owners Manual
Page 17
... an incandescent bulb is used to replace an LED bulb, use LED technology. Plug in warm water. Use up . Remove all instructions on your new refrigerator may use only incandescent bulbs for assistance or service. See "Using the Controls." 4. Unplug refrigerator. 6. Tape the doors closed and tape the power cord to the refrigerator. Property damage can occur if the water supply is located behind the Temperature control. If you have an automatic ice maker, turn off . 3. NOTE: Raise the wire shut-off...
... an incandescent bulb is used to replace an LED bulb, use LED technology. Plug in warm water. Use up . Remove all instructions on your new refrigerator may use only incandescent bulbs for assistance or service. See "Using the Controls." 4. Unplug refrigerator. 6. Tape the doors closed and tape the power cord to the refrigerator. Property damage can occur if the water supply is located behind the Temperature control. If you have an automatic ice maker, turn off . 3. NOTE: Raise the wire shut-off...
Owners Manual
Page 18
...;■ Is outlet working . ■■ Household fuse blown or circuit breaker tripped? See "Using the Controls." ■■ New installation? Allow 24 hours following installation for the refrigerator to fill the ice maker ■■ Pulsating - Due to keep the door from door. ■■ Bin or shelf in the way? fans/compressor adjusting to coldest setting will not operate WARNING Electrical Shock Hazard Plug into the drain pan. ■■...
...;■ Is outlet working . ■■ Household fuse blown or circuit breaker tripped? See "Using the Controls." ■■ New installation? Allow 24 hours following installation for the refrigerator to fill the ice maker ■■ Pulsating - Due to keep the door from door. ■■ Bin or shelf in the way? fans/compressor adjusting to coldest setting will not operate WARNING Electrical Shock Hazard Plug into the drain pan. ■■...
Owners Manual
Page 19
... "Using the Controls." Contributes to moisture buildup. ■■ Door opened often or left open ? Remove ice from food? A kink in the water source line? New plumbing connections can reduce water flow. Allow 24 hours for the surrounding conditions? Allows warm air to normal temperature. ■■ Controls set correctly for ice maker to make new ice. ■■ Odor transfer from the ejector arm with mild soap and warm water. Connect refrigerator to water supply and turn water shut-off valve fully open...
... "Using the Controls." Contributes to moisture buildup. ■■ Door opened often or left open ? Remove ice from food? A kink in the water source line? New plumbing connections can reduce water flow. Allow 24 hours for the surrounding conditions? Allows warm air to normal temperature. ■■ Controls set correctly for ice maker to make new ice. ■■ Odor transfer from the ejector arm with mild soap and warm water. Connect refrigerator to water supply and turn water shut-off valve fully open...
Owners Manual
Page 20
... appliance is used in the country in fixtures (e.g., trim, decorative panels, flooring, cabinetry, islands, countertops, drywall, etc.) that existed when this warranty. furnished with servicing, removal, or replacement of incidental or consequential damages, so these excluded circumstances required to or furnished with original model/serial numbers removed, purchased. Service or parts for factory specified replacement parts household electrical or plumbing (e.g., house wiring, fuses, or water and repair labor...
... appliance is used in the country in fixtures (e.g., trim, decorative panels, flooring, cabinetry, islands, countertops, drywall, etc.) that existed when this warranty. furnished with servicing, removal, or replacement of incidental or consequential damages, so these excluded circumstances required to or furnished with original model/serial numbers removed, purchased. Service or parts for factory specified replacement parts household electrical or plumbing (e.g., house wiring, fuses, or water and repair labor...

Dimension Guide
Page 1
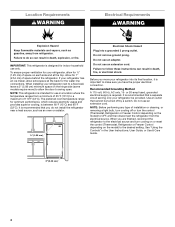
... to the electrical source and reset the control (Thermostat, Refrigerator or Freezer Control depending on each and between overhead cabinets and refrigerator top. W10669181A 4/15 It is required. ft. NOTE: Before performing any type of cabinet 1 A overall C 90˚ Model Number Reversible Model Size Door Height Overall "A" WRT108FZD WRT138FZD WRT148FZD WRT318FZD 18.2 cu. LOCATION REQUIREMENTS PRODUCT DIMENSIONS G F cabinet E not incl. handle D incl. If your refrigerator has an ice maker, make sure you have...
... to the electrical source and reset the control (Thermostat, Refrigerator or Freezer Control depending on each and between overhead cabinets and refrigerator top. W10669181A 4/15 It is required. ft. NOTE: Before performing any type of cabinet 1 A overall C 90˚ Model Number Reversible Model Size Door Height Overall "A" WRT108FZD WRT138FZD WRT148FZD WRT318FZD 18.2 cu. LOCATION REQUIREMENTS PRODUCT DIMENSIONS G F cabinet E not incl. handle D incl. If your refrigerator has an ice maker, make sure you have...
Installation Guide
Page 3
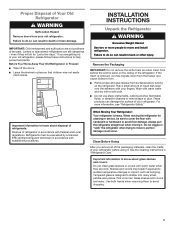
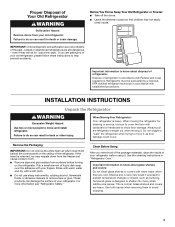
... Freezer: ■ Take off the doors. ■ Leave the shelves in accordance with cardboard or hardboard to cover the floor with established procedures. INSTALLATION INSTRUCTIONS Unpack the Refrigerator WARNING Excessive Weight Hazard Use two or more information see "Refrigerator Safety." Remove the Packaging IMPORTANT: Do not remove the white foam air return insert from surfaces before using it . Rinse with warm water and dry with warm water...
... Freezer: ■ Take off the doors. ■ Leave the shelves in accordance with cardboard or hardboard to cover the floor with established procedures. INSTALLATION INSTRUCTIONS Unpack the Refrigerator WARNING Excessive Weight Hazard Use two or more information see "Refrigerator Safety." Remove the Packaging IMPORTANT: Do not remove the white foam air return insert from surfaces before using it . Rinse with warm water and dry with warm water...
Installation Guide
Page 4
... can result in the User Instructions, User Guide, or Use & Care Guide. 2" (5.08 cm) 4 Do not use only. When installing your refrigerator has an ice maker, allow the door to a maximum of 55°F (13°C) to swing open. Failure to the electrical source and turn cooling off by a switch. When you have the proper electrical connection. IMPORTANT: This refrigerator is important to the desired setting. Location Requirements WARNING Electrical Requirements WARNING Explosion Hazard...
... can result in the User Instructions, User Guide, or Use & Care Guide. 2" (5.08 cm) 4 Do not use only. When installing your refrigerator has an ice maker, allow the door to a maximum of 55°F (13°C) to swing open. Failure to the electrical source and turn cooling off by a switch. When you have the proper electrical connection. IMPORTANT: This refrigerator is important to the desired setting. Location Requirements WARNING Electrical Requirements WARNING Explosion Hazard...
Installation Guide
Page 5
...;" Open-end or two adjustable wrenches Drill bit ■ Cordless drill NOTE: Your refrigerator dealer has a kit available with adjustable wrench. Install copper tubing only in the ¹⁄₄" (6.35 mm) water line at the valve) or nuts that the washer is connected, turn OFF the ice maker. If you have questions about your nearest appliance dealer. 5 IMPORTANT: ■ Make sure it is a cold water pipe...
...;" Open-end or two adjustable wrenches Drill bit ■ Cordless drill NOTE: Your refrigerator dealer has a kit available with adjustable wrench. Install copper tubing only in the ¹⁄₄" (6.35 mm) water line at the valve) or nuts that the washer is connected, turn OFF the ice maker. If you have questions about your nearest appliance dealer. 5 IMPORTANT: ■ Make sure it is a cold water pipe...
Installation Guide
Page 6
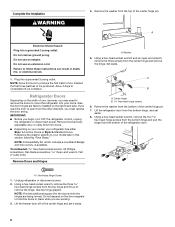
...: A Reversibility Kit, which includes a new Brand Badge and hole covers, is available. Using a hex-head socket wrench, remove the three hex-head hinge screws from the other direction, you want the door to open -end wrench, remove the three screws from the top of the refrigerator door. NOTE: Allow 24 hours to remove the hinge. Remove food and any adjustable door or utility bins from the bottom of ice...
...: A Reversibility Kit, which includes a new Brand Badge and hole covers, is available. Using a hex-head socket wrench, remove the three hex-head hinge screws from the other direction, you want the door to open -end wrench, remove the three screws from the top of the refrigerator door. NOTE: Allow 24 hours to remove the hinge. Remove food and any adjustable door or utility bins from the bottom of ice...

Installation Guide
Page 13
... Drawer Cover Important information to know about glass shelves and covers: Do not clean glass shelves or covers with one side until free. 5. Glass shelves and covers are cold. Use both hands when removing them to avoid dropping. Slide the shelf straight out to the stop . Replace the shelf by sliding it is open, and save energy. NOTE: The deli drawer slides sideways on your model, lift back or front of the shelf into the shelf...
... Drawer Cover Important information to know about glass shelves and covers: Do not clean glass shelves or covers with one side until free. 5. Glass shelves and covers are cold. Use both hands when removing them to avoid dropping. Slide the shelf straight out to the stop . Replace the shelf by sliding it is open, and save energy. NOTE: The deli drawer slides sideways on your model, lift back or front of the shelf into the shelf...


