Dimension Guide
Page 1
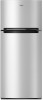
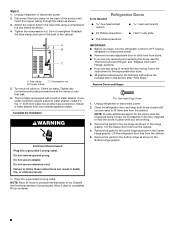
... (64.1 cm) (71.1 cm) LOCATION REQUIREMENTS 3" (7.5 cm) 1/2" (1.25 cm) To ensure proper ventilation for your refrigerator has an ice maker, make sure you are finished, reconnect the refrigerator to the electrical source and reset the control (Thermostat, Refrigerator or Freezer Control depending on the..."B" Depth Door Open 90° "C" Depth Overall "D" Depth Cabinet Only "E" Width Cabinet "F" WRT518SZF 17.7 cu ft. Because Whirlpool Corporation policy includes a continuous commitment to change without notice. Instructions packed with water pressure between 30 and 120 psi (207 and ...
... (64.1 cm) (71.1 cm) LOCATION REQUIREMENTS 3" (7.5 cm) 1/2" (1.25 cm) To ensure proper ventilation for your refrigerator has an ice maker, make sure you are finished, reconnect the refrigerator to the electrical source and reset the control (Thermostat, Refrigerator or Freezer Control depending on the..."B" Depth Door Open 90° "C" Depth Overall "D" Depth Cabinet Only "E" Width Cabinet "F" WRT518SZF 17.7 cu ft. Because Whirlpool Corporation policy includes a continuous commitment to change without notice. Instructions packed with water pressure between 30 and 120 psi (207 and ...
Use & Care Guide
Page 2
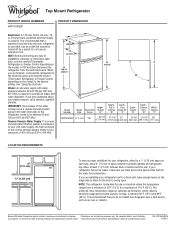
... harm. 2 WARNING: This product contains one or more people to move and install refrigerator. ■ Disconnect power before installing ice maker (on ice maker kit ready models only). ■ Use a sturdy glass when dispensing ice (on some models). ■ Do not hit the refrigerator glass doors (on your appliance. WARNING You can kill or hurt...
... harm. 2 WARNING: This product contains one or more people to move and install refrigerator. ■ Disconnect power before installing ice maker (on ice maker kit ready models only). ■ Use a sturdy glass when dispensing ice (on some models). ■ Do not hit the refrigerator glass doors (on your appliance. WARNING You can kill or hurt...

Use & Care Guide
Page 4
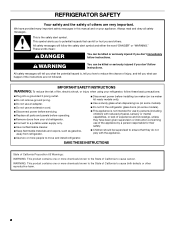
... door to make sure you leave some extra space at least 1" (2.5 cm) between overhead cabinets and refrigerator top. Before you move your refrigerator has an ice maker, make sure you do so can result in death, explosion, or fire. It is recommended that a separate circuit serving only your refrigerator, it is important...
... door to make sure you leave some extra space at least 1" (2.5 cm) between overhead cabinets and refrigerator top. Before you move your refrigerator has an ice maker, make sure you do so can result in death, explosion, or fire. It is recommended that a separate circuit serving only your refrigerator, it is important...
Use & Care Guide
Page 5
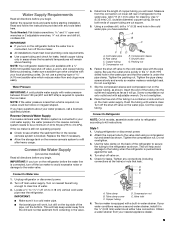
... saddle-type valve complies with adjustable wrench. Connect the Water Supply (on the refrigerator before the water line is connected, turn off the ice maker. ■ All installations must meet local plumbing code requirements. ■ Use copper tubing and check for leaks. Connect to 3.18 cm)... compression sleeve and compression nut on . 5. Turn shut-off valve, a union, and copper tubing. Compression nut E. Do not overtighten. 3. The ice maker is equipped with water pressure between 30 and 120 psi (207 and 827 kPa) is a cold water pipe. ■ Horizontal pipe will go. ...
... saddle-type valve complies with adjustable wrench. Connect the Water Supply (on the refrigerator before the water line is connected, turn off the ice maker. ■ All installations must meet local plumbing code requirements. ■ Use copper tubing and check for leaks. Connect to 3.18 cm)... compression sleeve and compression nut on . 5. Turn shut-off valve, a union, and copper tubing. Compression nut E. Do not overtighten. 3. The ice maker is equipped with water pressure between 30 and 120 psi (207 and 827 kPa) is a cold water pipe. ■ Horizontal pipe will go. ...
Use & Care Guide
Page 6
... (6.35 mm) water line at the valve) or nuts that leak. 6. Attach the copper tube to completely fill ice container. Do not overtighten. The ice maker is equipped with a built-in this section after "Final Steps." Failure to reverse the door swing, follow these instructions ... and sleeve as shown in death, fire, or electrical shock. 1. Unplug refrigerator or disconnect power. 2. Turn shut-off valve on the back of ice. Plug into a grounded 3 prong outlet. Refrigerator Doors Tools Needed: hex-head socket wrench open-end wrench ■ #2 Phillips screwdriver ■ Flat...
... (6.35 mm) water line at the valve) or nuts that leak. 6. Attach the copper tube to completely fill ice container. Do not overtighten. The ice maker is equipped with a built-in this section after "Final Steps." Failure to reverse the door swing, follow these instructions ... and sleeve as shown in death, fire, or electrical shock. 1. Unplug refrigerator or disconnect power. 2. Turn shut-off valve on the back of ice. Plug into a grounded 3 prong outlet. Refrigerator Doors Tools Needed: hex-head socket wrench open-end wrench ■ #2 Phillips screwdriver ■ Flat...
Use & Care Guide
Page 10
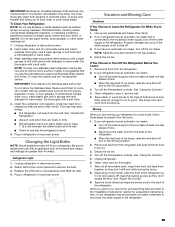
...first time, turn the Freezer control to the highest setting, waiting 24 hours between the freezer and the refrigerator compartments. Ice Production Rate ■ NORMAL Ice Production: The ice maker should produce approximately 16 to a higher (colder) setting will keep the refrigerator operating at least 24 hours between 3... compartment. NOTE: Turn off arm to the Off (arm up ) position. ■ To manually turn off the ice maker, lift the wire shut-off the ice maker before you want to temporarily increase the cold air flow to clean the bin. It is made fast enough - Allow...
...first time, turn the Freezer control to the highest setting, waiting 24 hours between the freezer and the refrigerator compartments. Ice Production Rate ■ NORMAL Ice Production: The ice maker should produce approximately 16 to a higher (colder) setting will keep the refrigerator operating at least 24 hours between 3... compartment. NOTE: Turn off arm to the Off (arm up ) position. ■ To manually turn off the ice maker, lift the wire shut-off the ice maker before you want to temporarily increase the cold air flow to clean the bin. It is made fast enough - Allow...
Use & Care Guide
Page 11
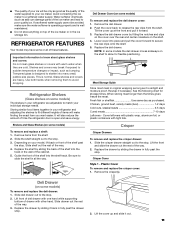
...the deli drawer moves sideways on some models) To remove and replace the deli drawer cover: 1. Shelves and Glass Shelves (on the shelf to your ice maker. Depending on some models) To remove and replace the deli drawer: 1. Push the cover back to sudden temperature changes or impact, such as it...containers with other hand. Replace the drawer by sliding it out. 11 Lift the front and slide the drawer out the rest of the ice maker and lead to match your individual storage needs. This is designed to fit different heights of items will make sure the water softener is ...
...the deli drawer moves sideways on some models) To remove and replace the deli drawer cover: 1. Shelves and Glass Shelves (on the shelf to your ice maker. Depending on some models) To remove and replace the deli drawer: 1. Push the cover back to sudden temperature changes or impact, such as it...containers with other hand. Replace the drawer by sliding it out. 11 Lift the front and slide the drawer out the rest of the ice maker and lead to match your individual storage needs. This is designed to fit different heights of items will make sure the water softener is ...
Use & Care Guide
Page 13
...refrigerator, wipe it rolls more easily OR raise the leveling screws so they are moving your refrigerator has an automatic ice maker: ■ Turn off the water supply to the ice maker at least one appliance bulb MAX 40 watt. 4. This stops odor and mold from building up ) position....and tape them open far enough for air to get to the "Installation Instructions" section for preparation instructions. If your refrigerator has an automatic ice maker, remember to reconnect the water supply to the Off (up . Turn off arm to the refrigerator. 13 Clean, wipe, and dry thoroughly....
...refrigerator, wipe it rolls more easily OR raise the leveling screws so they are moving your refrigerator has an automatic ice maker: ■ Turn off the water supply to the ice maker at least one appliance bulb MAX 40 watt. 4. This stops odor and mold from building up ) position....and tape them open far enough for air to get to the "Installation Instructions" section for preparation instructions. If your refrigerator has an automatic ice maker, remember to reconnect the water supply to the Off (up . Turn off arm to the refrigerator. 13 Clean, wipe, and dry thoroughly....
Use & Care Guide
Page 14
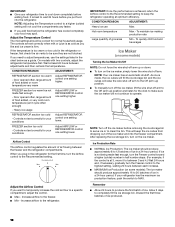
In Canada, visit www.whirlpool.ca. WARNING WARNING Electrical Shock Hazard Plug into the drain pan ■ Creaking/Cracking - Do not use an adapter. Allow 24 hours following installation for the refrigerator to fill the ice maker ■ Clicking/Snapping - The refrigerator is ...being ejected from items placed on - may run longer at the address below: In the U.S.A.: Whirlpool Brand Home Appliances Customer eXperience Center 553 Benson Road ...
In Canada, visit www.whirlpool.ca. WARNING WARNING Electrical Shock Hazard Plug into the drain pan ■ Creaking/Cracking - Do not use an adapter. Allow 24 hours following installation for the refrigerator to fill the ice maker ■ Clicking/Snapping - The refrigerator is ...being ejected from items placed on - may run longer at the address below: In the U.S.A.: Whirlpool Brand Home Appliances Customer eXperience Center 553 Benson Road ...
Use & Care Guide
Page 15
... humid air to remove the minerals. The ice maker is ■ The ice maker is in the on some models) ■ Ice stored too long can cause discolored or off -taste - Remove ice from door. Wash ice bin. Use airtight, moisture-proof packaging to open - In the U.S.A., visit our webpage www.whirlpool.com/accessories or call 1-800-901...
... humid air to remove the minerals. The ice maker is ■ The ice maker is in the on some models) ■ Ice stored too long can cause discolored or off -taste - Remove ice from door. Wash ice bin. Use airtight, moisture-proof packaging to open - In the U.S.A., visit our webpage www.whirlpool.com/accessories or call 1-800-901...


