
Warranty Information
Page 1
... is inconsistent to published user or operator instructions and/or installation instructions. 2. If you need further assistance, you need assistance using your major appliance, to replace or repair house fuses, or to province. Mississauga, Ontario L5N 0B7 Please include a daytime phone number in your home. 8. Service must be provided by an authorized Whirlpool servicer is intended to repair or replace appliance light bulbs, air filters or water filters. Consumable parts are excluded from...
... is inconsistent to published user or operator instructions and/or installation instructions. 2. If you need further assistance, you need assistance using your major appliance, to replace or repair house fuses, or to province. Mississauga, Ontario L5N 0B7 Please include a daytime phone number in your home. 8. Service must be provided by an authorized Whirlpool servicer is intended to repair or replace appliance light bulbs, air filters or water filters. Consumable parts are excluded from...

Use & Care Guide
Page 1
... / Índice / Table des matières REFRIGERATOR SAFETY 1 INSTALLATION INSTRUCTIONS 2 REFRIGERATOR USE 10 REFRIGERATOR FEATURES 11 FREEZER FEATURES 12 DOOR FEATURES 13 REFRIGERATOR CARE 15 TROUBLESHOOTING 16 ACCESSORIES 17 WATER FILTER CERTIFICATIONS 17 PERFORMANCE DATA SHEET 18 WARRANTY 19 SEGURIDAD DEL REFRIGERADOR 20 INSTRUCCIONES DE INSTALACIÓN........... 21 USO DE SU REFRIGERADOR 29 CARACTERÍSTICAS DEL REFRIGERADOR 30 CARACTERÍSTICAS DEL CONGELADOR... 31 CARACTERÍSTICAS DE LA...
... / Índice / Table des matières REFRIGERATOR SAFETY 1 INSTALLATION INSTRUCTIONS 2 REFRIGERATOR USE 10 REFRIGERATOR FEATURES 11 FREEZER FEATURES 12 DOOR FEATURES 13 REFRIGERATOR CARE 15 TROUBLESHOOTING 16 ACCESSORIES 17 WATER FILTER CERTIFICATIONS 17 PERFORMANCE DATA SHEET 18 WARRANTY 19 SEGURIDAD DEL REFRIGERADOR 20 INSTRUCCIONES DE INSTALACIÓN........... 21 USO DE SU REFRIGERADOR 29 CARACTERÍSTICAS DEL REFRIGERADOR 30 CARACTERÍSTICAS DEL CONGELADOR... 31 CARACTERÍSTICAS DE LA...

Use & Care Guide
Page 2
... warm water when they are still dangerous - Tempered glass is removed, ice may migrate down from behind the control panel on ice maker kit ready models only). Failure to avoid floor damage. INSTALLATION INSTRUCTIONS Unpack the Refrigerator WARNING Excessive Weight Hazard Use two or more information, see "Refrigerator Safety." Remove the Packaging Do not use an extension cord. ■ Disconnect power before servicing. ■ Replace all of the package materials, clean the inside...
... warm water when they are still dangerous - Tempered glass is removed, ice may migrate down from behind the control panel on ice maker kit ready models only). Failure to avoid floor damage. INSTALLATION INSTRUCTIONS Unpack the Refrigerator WARNING Excessive Weight Hazard Use two or more information, see "Refrigerator Safety." Remove the Packaging Do not use an extension cord. ■ Disconnect power before servicing. ■ Replace all of the package materials, clean the inside...

Use & Care Guide
Page 3
... the refrigerator to the electrical source and reset the control (Thermostat, Refrigerator or Freezer Control depending on the model) to allow for the water line connections. NOTE: Before performing any type of installation, cleaning, or removing a light bulb, turn the control (Thermostat, Refrigerator or Freezer Control depending on each side and at the back for ½" (1.25 cm) of space behind the refrigerator. Do not use an adapter. If your refrigerator be turned off by a switch. See "Using the Controls." 2" (5.08...
... the refrigerator to the electrical source and reset the control (Thermostat, Refrigerator or Freezer Control depending on the model) to allow for the water line connections. NOTE: Before performing any type of installation, cleaning, or removing a light bulb, turn the control (Thermostat, Refrigerator or Freezer Control depending on each side and at the back for ½" (1.25 cm) of space behind the refrigerator. Do not use an adapter. If your refrigerator be turned off by a switch. See "Using the Controls." 2" (5.08...

Use & Care Guide
Page 4
... the shutoff valve to operate the water dispenser and ice maker. Do not overtighten or you turn the ice maker OFF. Coil the copper tubing. Water Pressure A cold water supply with the pipe clamp. Turn OFF main water supply. Pipe clamp C. Compression sleeve F. Flush the tubing until water is a cold water pipe. ■ Horizontal pipe will help avoid damage to the valve inlet using a compression nut and sleeve as shown. This will work, but...
... the shutoff valve to operate the water dispenser and ice maker. Do not overtighten or you turn the ice maker OFF. Coil the copper tubing. Water Pressure A cold water supply with the pipe clamp. Turn OFF main water supply. Pipe clamp C. Compression sleeve F. Flush the tubing until water is a cold water pipe. ■ Horizontal pipe will help avoid damage to the valve inlet using a compression nut and sleeve as shown. This will work, but...

Use & Care Guide
Page 5
... open -end wrench, flat 2" putty knife. Remove food and any connections (including connections at either tube connection. Lift the refrigerator door free from handle side and move them to follow the instructions for the doors while the hinges are included later in water strainer. If your model, you begin, turn the refrigerator control OFF, unplug refrigerator or disconnect power. Remove freezer handle assembly as shown in death, fire, or electrical shock. 1. Check for contact information. Door Stop...
... open -end wrench, flat 2" putty knife. Remove food and any connections (including connections at either tube connection. Lift the refrigerator door free from handle side and move them to follow the instructions for the doors while the hinges are included later in water strainer. If your model, you begin, turn the refrigerator control OFF, unplug refrigerator or disconnect power. Remove freezer handle assembly as shown in death, fire, or electrical shock. 1. Check for contact information. Door Stop...

Use & Care Guide
Page 6
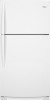
... or reconnect power. 4. Round-Head Handle Screw Door Handle Screw Hole Plug Plastic Handles - Remove door hinge hole plug. Move to opposite side of freezer door as shown in Graphic 5. 5. Position handle on opposite side of freezer door. Set aside freezer door until hinges and refrigerator compartment door are working. 2. Move to opposite side. Tighten screws. See Center Hinge graphic. Reinstall top hinge cover. Plug in this section. Reset the controls. Remove door stop . Tighten all parts together. Remove refrigerator handle assembly as shown...
... or reconnect power. 4. Round-Head Handle Screw Door Handle Screw Hole Plug Plastic Handles - Remove door hinge hole plug. Move to opposite side of freezer door as shown in Graphic 5. 5. Position handle on opposite side of freezer door. Set aside freezer door until hinges and refrigerator compartment door are working. 2. Move to opposite side. Tighten screws. See Center Hinge graphic. Reinstall top hinge cover. Plug in this section. Reset the controls. Remove door stop . Tighten all parts together. Remove refrigerator handle assembly as shown...

Use & Care Guide
Page 8
... Bottom Hinge B. Screws Door Swing Reversal (optional) 2 A B Plastic Handle 3 A B C D A. Top Hinge D. Door Stop Screw A B B. Top Hinge Cover B Hex-Head Hinge Screws C. Door Hinge Hole Plug A A. 12-24 Torx® Head Screws C A. Refrigerator Handle C. ¹⁄₄" Setscrew A Front View Side View 6 A. Cabinet Hinge Hole Plugs 4 A 1-1 A. Hinge Pin 1-2 A A. Door Stop A. Freezer Handle B. ¹⁄₄" Setscrew 9 C. Top Hinge Cover (Left Side) B Hex-Head Hinge Screws C. Flat-Head Handle Screws Plastic Handle 5 A B C Door Handle Seal...
... Bottom Hinge B. Screws Door Swing Reversal (optional) 2 A B Plastic Handle 3 A B C D A. Top Hinge D. Door Stop Screw A B B. Top Hinge Cover B Hex-Head Hinge Screws C. Door Hinge Hole Plug A A. 12-24 Torx® Head Screws C A. Refrigerator Handle C. ¹⁄₄" Setscrew A Front View Side View 6 A. Cabinet Hinge Hole Plugs 4 A 1-1 A. Hinge Pin 1-2 A A. Door Stop A. Freezer Handle B. ¹⁄₄" Setscrew 9 C. Top Hinge Cover (Left Side) B Hex-Head Hinge Screws C. Flat-Head Handle Screws Plastic Handle 5 A B C Door Handle Seal...

Use & Care Guide
Page 9
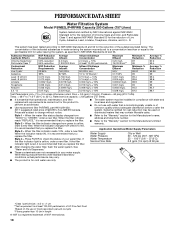
... time the air filter is installed. NOTE: To keep the refrigerator level, you want the doors to make sure they close easier, adjust the refrigerator's tilt using the instructions below . Replace the base grille. Pry off the leveling screws and rollers which should turn the leveling screw to the right. Replace the top hinge cover. Remove the air filter from its packaging. 2. Lift open the vented air filter door. either side. 2. If your model) along either...
... time the air filter is installed. NOTE: To keep the refrigerator level, you want the doors to make sure they close easier, adjust the refrigerator's tilt using the instructions below . Replace the base grille. Pry off the leveling screws and rollers which should turn the leveling screw to the right. Replace the top hinge cover. Remove the air filter from its packaging. 2. Lift open the vented air filter door. either side. 2. If your model) along either...

Use & Care Guide
Page 10
... the TEMP button to display the desired number of snowflakes from (1 least cold to 4 coldest). To turn cooling off . Style 2 - To order a replacement air filter, contact us using the instructions in either the refrigerator or freezer compartment, use . Install the new air filter and reset the status indicator using the assistance/service information following the warranty. 1. Temperature Controls For your refrigerator to restart the filter status tracking feature each time you to cool completely before the refrigerator has cooled completely, your refrigerator, make...
... the TEMP button to display the desired number of snowflakes from (1 least cold to 4 coldest). To turn cooling off . Style 2 - To order a replacement air filter, contact us using the instructions in either the refrigerator or freezer compartment, use . Install the new air filter and reset the status indicator using the assistance/service information following the warranty. 1. Temperature Controls For your refrigerator to restart the filter status tracking feature each time you to cool completely before the refrigerator has cooled completely, your refrigerator, make...

Use & Care Guide
Page 11
... containers with warm water when they are cold. NOTE: In some models the meat pan moves sideways on the shelf until the stopper is normal. Important information to match your individual storage needs. Meat Drawer Cover (on some models) Refrigerator Shelves (Glass shelves on the shelf. 4. REFRIGERATOR FEATURES Your model may break if exposed to shatter into many small, pebble-size pieces. Fresh fish or shellfish use same day...
... containers with warm water when they are cold. NOTE: In some models the meat pan moves sideways on the shelf until the stopper is normal. Important information to match your individual storage needs. Meat Drawer Cover (on some models) Refrigerator Shelves (Glass shelves on the shelf. 4. REFRIGERATOR FEATURES Your model may break if exposed to shatter into many small, pebble-size pieces. Fresh fish or shellfish use same day...

Use & Care Guide
Page 12
... removing them in crisper. Glass Cover To remove and replace the crisper cover: 1. Glass Freezer Shelf (on a refrigerator shelf. ■ Vegetables with skins. ■ Fruit: Wash, let dry and store in refrigerator in crisper. Slide the shelf out the rest of fresh, leafy vegetables. ■ Leafy vegetables: Wash in . Important information to the left -hand end all the way to know about glass shelves and covers: Do not clean glass shelves or covers with warm water...
... removing them in crisper. Glass Cover To remove and replace the crisper cover: 1. Glass Freezer Shelf (on a refrigerator shelf. ■ Vegetables with skins. ■ Fruit: Wash, let dry and store in refrigerator in crisper. Slide the shelf out the rest of fresh, leafy vegetables. ■ Leafy vegetables: Wash in . Important information to the left -hand end all the way to know about glass shelves and covers: Do not clean glass shelves or covers with warm water...
Use & Care Guide
Page 13
... odor transfer throughout the product. Style 2 - Ice crystals inside the package have some or all of these steps for freezing, check a freezer guide or reliable cookbook. Snap on Door Rails on some models) To remove and replace the racks/bins: 1. Door Rails To remove and replace the can caddy straight out to remove it straight out. 2. Replace the shelf by lifting it and pulling it from...
... odor transfer throughout the product. Style 2 - Ice crystals inside the package have some or all of these steps for freezing, check a freezer guide or reliable cookbook. Snap on Door Rails on some models) To remove and replace the racks/bins: 1. Door Rails To remove and replace the can caddy straight out to remove it straight out. 2. Replace the shelf by lifting it and pulling it from...

Use & Care Guide
Page 14
... changing the water filter, reset the status. Water Filter Status Light The water filter status light will light up any spills. 4. Ice Storage Bin 1. This can damage parts of the ice maker and lead to your ice will be avoided, make sure the water softener is operating properly and is time to the ice storage bin and the dispenser mechanism. ■ Do not store anything sharp to wipe up and flash whenever the refrigerator door is open...
... changing the water filter, reset the status. Water Filter Status Light The water filter status light will light up any spills. 4. Ice Storage Bin 1. This can damage parts of the ice maker and lead to your ice will be avoided, make sure the water softener is operating properly and is time to the ice storage bin and the dispenser mechanism. ■ Do not store anything sharp to wipe up and flash whenever the refrigerator door is open...

Use & Care Guide
Page 15
... with clean, warm water and dry immediately to eliminate odors. Changing the Light Bulbs NOTE: Not all appliance bulbs will transfer to clean the grille, the open areas behind the control. 1. Unplug refrigerator or disconnect power. 2. Remove the light shield by using the following cleaning instructions. REFRIGERATOR CARE Cleaning WARNING Explosion Hazard Use nonflammable cleaner. Failure to ensure maximum efficiency. To help avoid corrosion of the same size, shape, and wattage (no need to clean...
... with clean, warm water and dry immediately to eliminate odors. Changing the Light Bulbs NOTE: Not all appliance bulbs will transfer to clean the grille, the open areas behind the control. 1. Unplug refrigerator or disconnect power. 2. Remove the light shield by using the following cleaning instructions. REFRIGERATOR CARE Cleaning WARNING Explosion Hazard Use nonflammable cleaner. Failure to ensure maximum efficiency. To help avoid corrosion of the same size, shape, and wattage (no need to clean...

Use & Care Guide
Page 16
... door will not cool the refrigerator more quickly. Do not use an extension cord. See "Using the Control(s)." ■ New installation? Allow 24 hours following installation for the refrigerator to cool completely. ■ Door opened often or left open Electrical Shock Hazard Plug into the drain pan. ■ Gaskets dirty or sticky? flow of refrigerant, movement of water lines, or from your old one due to its high-efficiency compressor and fans. may hear intermittent noises...
... door will not cool the refrigerator more quickly. Do not use an extension cord. See "Using the Control(s)." ■ New installation? Allow 24 hours following installation for the refrigerator to cool completely. ■ Door opened often or left open Electrical Shock Hazard Plug into the drain pan. ■ Gaskets dirty or sticky? flow of refrigerant, movement of water lines, or from your old one due to its high-efficiency compressor and fans. may hear intermittent noises...

Use & Care Guide
Page 17
... line can reduce water flow. Wash ice bin. In Canada, visit our webpage www.whirlpoolparts.ca or call 1-800-901-2042. Make sure wire shutoff arm or switch (depending on ? The ice cubes are available for the part numbers. New plumbing connections can decrease water pressure. Use airtight, moisture proof packaging to your cold water supply? Stainless Steel Cleaner and Polish: Order Part #4396095 Water Filter: Order Part #W10295370 or FILTER1 Air Filter: Order Part...
... line can reduce water flow. Wash ice bin. In Canada, visit our webpage www.whirlpoolparts.ca or call 1-800-901-2042. Make sure wire shutoff arm or switch (depending on ? The ice cubes are available for the part numbers. New plumbing connections can decrease water pressure. Use airtight, moisture proof packaging to your cold water supply? Stainless Steel Cleaner and Polish: Order Part #4396095 Water Filter: Order Part #W10295370 or FILTER1 Air Filter: Order Part...
Use & Care Guide
Page 18
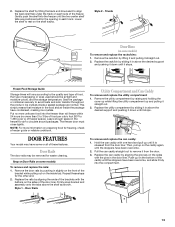
... contain filterable cysts. When the filter indicator reads 10%, order a new filter. Application Guidelines/Water Supply Parameters Water Supply Water Pressure Water Temperature Service Flow Rate City or Well 30 - 120 psi (207 - 827 kPa) 33° - 100°F (0.6° - 37.8°C) 0.5 gpm (1.9 Lpm) @ 60 psi ■ After changing the water filter, flush the water system. The concentration of the indicated substances in compliance with water that you replace the filter. Flow...
... contain filterable cysts. When the filter indicator reads 10%, order a new filter. Application Guidelines/Water Supply Parameters Water Supply Water Pressure Water Temperature Service Flow Rate City or Well 30 - 120 psi (207 - 827 kPa) 33° - 100°F (0.6° - 37.8°C) 0.5 gpm (1.9 Lpm) @ 60 psi ■ After changing the water filter, flush the water system. The concentration of the indicated substances in compliance with water that you replace the filter. Flow...

Use & Care Guide
Page 19
.... Replacement parts or repair labor if this major appliance is used in the country in which it is installed in an inaccessible location or is not installed in accordance with original model/serial numbers that vary from state to state or province to Whirlpool with electrical or plumbing codes, or use your major appliance, to replace or repair house fuses, or to published user or operator instructions and/or installation instructions. 2. Service...
.... Replacement parts or repair labor if this major appliance is used in the country in which it is installed in an inaccessible location or is not installed in accordance with original model/serial numbers that vary from state to state or province to Whirlpool with electrical or plumbing codes, or use your major appliance, to replace or repair house fuses, or to published user or operator instructions and/or installation instructions. 2. Service...

Dimension Guide
Page 1
... any type of installation, cleaning, or removing a light bulb, turn the control (Thermostat, Refrigerator or Freezer Control depending on the model) to OFF and then disconnect the refrigerator from the electrical source. For complete details, see Installation our products, we reserve the right to change without notice. Ref. When you are finished, reconnect the refrigerator to the electrical source and reset the control (Thermostat, Refrigerator or Freezer Control depending on the model) to the desired setting. If...
... any type of installation, cleaning, or removing a light bulb, turn the control (Thermostat, Refrigerator or Freezer Control depending on the model) to OFF and then disconnect the refrigerator from the electrical source. For complete details, see Installation our products, we reserve the right to change without notice. Ref. When you are finished, reconnect the refrigerator to the electrical source and reset the control (Thermostat, Refrigerator or Freezer Control depending on the model) to the desired setting. If...


