
Dimension Guide
Page 1
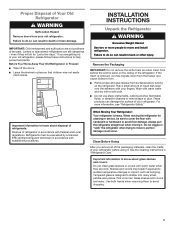
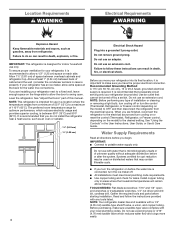
... refrigerator has an ice maker, make sure you are the electrical source and reset the control (Thermostat, Refrigerator or Freezer Control depending on your model) to allow for the water line connections. For complete details, see Installation Ref. W10795669A 8/15 NOTE: Before performing any type of the refrigerator needs to operate ice maker and water dispenser. IMPORTANT: The pressure of the water coming out of a reverse osmosis system going to the water inlet valve of installation, cleaning, or removing a light bulb, turn the control (Thermostat, Refrigerator or Freezer Control...
... refrigerator has an ice maker, make sure you are the electrical source and reset the control (Thermostat, Refrigerator or Freezer Control depending on your model) to allow for the water line connections. For complete details, see Installation Ref. W10795669A 8/15 NOTE: Before performing any type of the refrigerator needs to operate ice maker and water dispenser. IMPORTANT: The pressure of the water coming out of a reverse osmosis system going to the water inlet valve of installation, cleaning, or removing a light bulb, turn the control (Thermostat, Refrigerator or Freezer Control...
Installation Instructions
Page 1
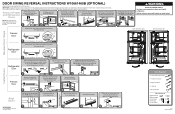
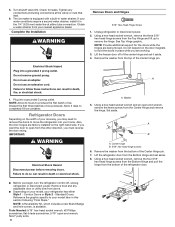
... freezer door from the doors. WARNING Excessive Weight Hazard Use two or more detailed door reversing instructions, see the User Instructions. DOOR SWING REVERSAL INSTRUCTIONS W10661460B (OPTIONAL) Remove food and any adjustable bins from the center hinge pin. Completely tighten the 3 Top Hinge screws. ¾" (19 mm) 1 2 Steps 3 & 4 apply only to certain models 3 Move the base grille cover to allow a ¾" (19 mm) gap between the doors. You will need them...
... freezer door from the doors. WARNING Excessive Weight Hazard Use two or more detailed door reversing instructions, see the User Instructions. DOOR SWING REVERSAL INSTRUCTIONS W10661460B (OPTIONAL) Remove food and any adjustable bins from the center hinge pin. Completely tighten the 3 Top Hinge screws. ¾" (19 mm) 1 2 Steps 3 & 4 apply only to certain models 3 Move the base grille cover to allow a ¾" (19 mm) gap between the doors. You will need them...
Specification Sheet
Page 1
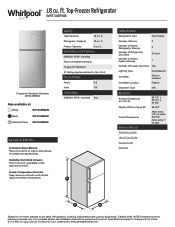
... Freezer Door Bins N/A Lighting Type Ice Maker Ice Maker Location Incandescent Factory Installed Freezer Dispenser Type N/A Dimensions Product Dimensions (H x W x D) Depth with Door Open 90° Cutout Dimensions Reference Material 65-1/2" x 29-3/4" x 31-3/8" 59-3/4" Allow extra 1/2" on sides and top Allow extra 1" on rear Dimension Guide Use & Care Guide Energy Guide Warranty *Based on wall-to change without notice. ®/™ © 2020. Refrigeration, Cooking, Dishwashers and Laundry appliances. For complete details, see Installation Instructions packed with controls...
... Freezer Door Bins N/A Lighting Type Ice Maker Ice Maker Location Incandescent Factory Installed Freezer Dispenser Type N/A Dimensions Product Dimensions (H x W x D) Depth with Door Open 90° Cutout Dimensions Reference Material 65-1/2" x 29-3/4" x 31-3/8" 59-3/4" Allow extra 1/2" on sides and top Allow extra 1" on rear Dimension Guide Use & Care Guide Energy Guide Warranty *Based on wall-to change without notice. ®/™ © 2020. Refrigeration, Cooking, Dishwashers and Laundry appliances. For complete details, see Installation Instructions packed with controls...
Owners Manual
Page 2
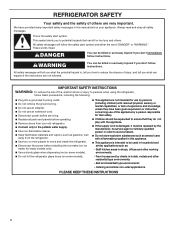
...the manufacturer, its service agent or similarly qualified person in this manual and on some models). Do not hit the refrigerator glass doors (on your old refrigerator. Connect only to the potable water supply. Use non-flammable cleaner.... or instruction concerning use an extension cord. Disconnect power before servicing. Replace all safety messages. Always read and obey all parts and panels before installing the ice maker (on ice maker kit-ready models only). Use a sturdy glass when dispensing ice (on some models). ...
...the manufacturer, its service agent or similarly qualified person in this manual and on some models). Do not hit the refrigerator glass doors (on your old refrigerator. Connect only to the potable water supply. Use non-flammable cleaner.... or instruction concerning use an extension cord. Disconnect power before servicing. Replace all safety messages. Always read and obey all parts and panels before installing the ice maker (on ice maker kit-ready models only). Use a sturdy glass when dispensing ice (on some models). ...
Owners Manual
Page 3
... temperature changes or impact, such as oor damage could occur. Clean Before Using After you are not problems of the past. Important information to do so can result in back or other injury. This is heavy. Before You Throw Away Your Old Refrigerator or Freezer: ■■ Take off the doors. ■■ Leave the shelves in accordance with warm water...
... temperature changes or impact, such as oor damage could occur. Clean Before Using After you are not problems of the past. Important information to do so can result in back or other injury. This is heavy. Before You Throw Away Your Old Refrigerator or Freezer: ■■ Take off the doors. ■■ Leave the shelves in accordance with warm water...
Owners Manual
Page 4
... tools listed. When you are installing your refrigerator next to a fixed wall, leave enough space on the hinge side to allow the door to make sure a saddle-type valve complies with any type of installation or cleaning, or removing a light bulb, turn cooling off or turn the control (Thermostat, Refrigerator, or Freezer control depending on each side. Water Supply Requirements Read all directions before the water line is recommended that a separate circuit serving only your refrigerator has an ice maker...
... tools listed. When you are installing your refrigerator next to a fixed wall, leave enough space on the hinge side to allow the door to make sure a saddle-type valve complies with any type of installation or cleaning, or removing a light bulb, turn cooling off or turn the control (Thermostat, Refrigerator, or Freezer control depending on each side. Water Supply Requirements Read all directions before the water line is recommended that a separate circuit serving only your refrigerator has an ice maker...
Owners Manual
Page 5
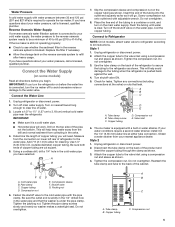
... water supply. A B C A. Water Pressure A cold water supply with adjustable wrench. If you turn the ice maker off to avoid excessive noise or damage to the valve inlet using a compression nut and sleeve as shown. 4. Connect the Water Line 1. Add 7 ft (2.1 m) to kit instructions. This will go. Do not overtighten. Use 1/4" (6.35 mm) O.D. (outside diameter) copper tubing. Connect to Refrigerator NOTE: On kit models, attach water valve to refrigerator according to allow for leaks. Style 1 1. Do not overtighten. 3. Valve inlet 6. Cold water...
... water supply. A B C A. Water Pressure A cold water supply with adjustable wrench. If you turn the ice maker off to avoid excessive noise or damage to the valve inlet using a compression nut and sleeve as shown. 4. Connect the Water Line 1. Add 7 ft (2.1 m) to kit instructions. This will go. Do not overtighten. Use 1/4" (6.35 mm) O.D. (outside diameter) copper tubing. Connect to Refrigerator NOTE: On kit models, attach water valve to refrigerator according to allow for leaks. Style 1 1. Do not overtighten. 3. Valve inlet 6. Cold water...
Owners Manual
Page 6
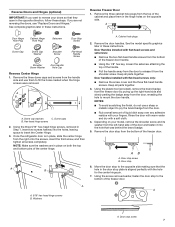
...: WARNING Electrical Shock Hazard Disconnect power before removing doors. Using a hex-head socket wrench and an open-end wrench, remove the three screws from the Top Hinge and lift up to hold the doors in water strainer. Set aside. Remove the washer from the bottom of the center hinge and set aside. 8. Tighten any adjustable door or utility bins from the other direction, you begin, turn the refrigerator control off...
...: WARNING Electrical Shock Hazard Disconnect power before removing doors. Using a hex-head socket wrench and an open-end wrench, remove the three screws from the Top Hinge and lift up to hold the doors in water strainer. Set aside. Remove the washer from the bottom of the center hinge and set aside. 8. Tighten any adjustable door or utility bins from the other direction, you begin, turn the refrigerator control off...
Owners Manual
Page 7
... bottom pins of the freezer door. Door handles installed with a soft cloth. 4. Door stop screw B. If you want to reverse your fingers. A Door Hinge Hole Plug Cabinet Hinge Hole Plug Setscrew Door Stop Screw Dome Cap Dome Cap Washer Shoulder Screw Flat-Head Handle Screw Shoulder Screw Washer Door Handle Hole Cap Reverse Center Hinge 1. Using the three 5⁄16" hex-head hinge screws, removed in these instructions. See the model specific graphics later in Step...
... bottom pins of the freezer door. Door handles installed with a soft cloth. 4. Door stop screw B. If you want to reverse your fingers. A Door Hinge Hole Plug Cabinet Hinge Hole Plug Setscrew Door Stop Screw Dome Cap Dome Cap Washer Shoulder Screw Flat-Head Handle Screw Shoulder Screw Washer Door Handle Hole Cap Reverse Center Hinge 1. Using the three 5⁄16" hex-head hinge screws, removed in these instructions. See the model specific graphics later in Step...
Owners Manual
Page 8
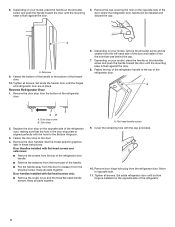
... side of the freezer door. 10. Tighten all parts together. Fasten the bottom of the handle to the top of the refrigerator door, making sure that was behind the cap. 7. Remove the door stop 2. Set aside refrigerator door until the hinges and refrigerator door are in these instructions. Depending on your model, place the handle on the opposite side of the refrigerator door. Replace the door stop screw B. Remove the door handles. Flat-head handle screws 9. Door Handles installed with the...
... side of the freezer door. 10. Tighten all parts together. Fasten the bottom of the handle to the top of the refrigerator door, making sure that was behind the cap. 7. Remove the door stop 2. Set aside refrigerator door until the hinges and refrigerator door are in these instructions. Depending on your model, place the handle on the opposite side of the refrigerator door. Replace the door stop screw B. Remove the door handles. Flat-head handle screws 9. Door Handles installed with the...
Owners Manual
Page 9
... hinge pin of the refrigerator door. Install Refrigerator Door 1. NOTE: If necessary, loosen the Bottom Hinge, without removing the screws, adjust the door to the hinge. Remove the screw attaching the hinge pin to the correct height and fully tighten the screws. 9 Hinge pin screw C. Install Freezer Door 1. Place the washer on the upper hinge pin of the Bottom Hinge pin. 3. The distance should be able to replace and align the freezer door...
... hinge pin of the refrigerator door. Install Refrigerator Door 1. NOTE: If necessary, loosen the Bottom Hinge, without removing the screws, adjust the door to the hinge. Remove the screw attaching the hinge pin to the correct height and fully tighten the screws. 9 Hinge pin screw C. Install Freezer Door 1. Place the washer on the upper hinge pin of the Bottom Hinge pin. 3. The distance should be able to replace and align the freezer door...
Owners Manual
Page 12
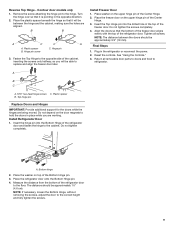
... as you can adjust it using the following instructions: 1. Using a level, be within the cutout of User Instructions) Door handle hole cap Tools Needed: Scissors Masking tape Freezer Door 1. Door Aligning If the space between the doors while you should turn the leveler to the left . Replace the Top Hinge cover, if removed in place or put a spacer between your doors looks uneven, you like. Reversibility Kit Instructions If your model came with a Reversibility kit, please use a sharp or...
... as you can adjust it using the following instructions: 1. Using a level, be within the cutout of User Instructions) Door handle hole cap Tools Needed: Scissors Masking tape Freezer Door 1. Door Aligning If the space between the doors while you should turn the leveler to the left . Replace the Top Hinge cover, if removed in place or put a spacer between your doors looks uneven, you like. Reversibility Kit Instructions If your model came with a Reversibility kit, please use a sharp or...
Owners Manual
Page 13
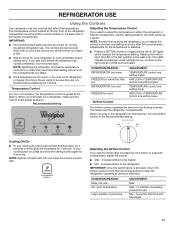
... Setting button for your convenience, the Temperature control is still preset as you need to adjust the temperature in either the refrigerator or freezer compartment, use the settings listed in the refrigerator or freezer, first check the air vents to keep the refrigerator operating at the factory. When you first install your refrigerator, make sure the control is preset at optimum efficiency. The LEDs indicate increasingly colder settings as a guide. The Temperature control located at a time. Temperature Control Adjusting the Temperature Control...
... Setting button for your convenience, the Temperature control is still preset as you need to adjust the temperature in either the refrigerator or freezer compartment, use the settings listed in the refrigerator or freezer, first check the air vents to keep the refrigerator operating at the factory. When you first install your refrigerator, make sure the control is preset at optimum efficiency. The LEDs indicate increasingly colder settings as a guide. The Temperature control located at a time. Temperature Control Adjusting the Temperature Control...

Owners Manual
Page 14
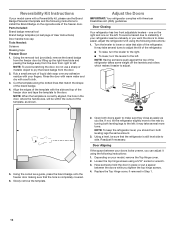
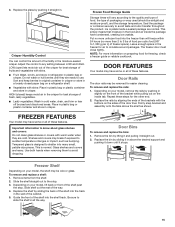
REFRIGERATOR FEATURES Your model may break if exposed to sudden temperature changes or impact, such as bumping. Important information to slide the shelf in fully past the drawer stop. Remove items from the shelf. 3. Replace the shelf by sliding it is open, and save energy. Be sure to know about glass shelves and covers: Do not clean glass shelves or covers with one side until free. 5. Wire Shelves 1. Replace the deli drawer. Slide the deli cover to...
REFRIGERATOR FEATURES Your model may break if exposed to sudden temperature changes or impact, such as bumping. Important information to slide the shelf in fully past the drawer stop. Remove items from the shelf. 3. Replace the shelf by sliding it is open, and save energy. Be sure to know about glass shelves and covers: Do not clean glass shelves or covers with one side until free. 5. Wire Shelves 1. Replace the deli drawer. Slide the deli cover to...
Owners Manual
Page 15
... crisper for best storage of the bracket while pulling out on a refrigerator shelf. ■■ Vegetables with warm water when they are normal. NOTE: For more than will vary according to use. Depending on your model, remove the rails by lifting it and pulling it straight in cold water, drain, and trim or tear off bruised and discolored areas. Glass shelves and covers are cold. Freezer Shelf...
... crisper for best storage of the bracket while pulling out on a refrigerator shelf. ■■ Vegetables with warm water when they are normal. NOTE: For more than will vary according to use. Depending on your model, remove the rails by lifting it and pulling it straight in cold water, drain, and trim or tear off bruised and discolored areas. Glass shelves and covers are cold. Freezer Shelf...
Owners Manual
Page 16
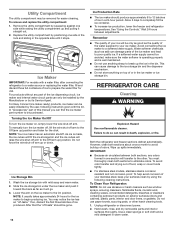
... up the ice in death, explosion, or re. Replace the utility compartment by the user, following cleaning instructions. In "Accessories" part of food, wrap or cover foods tightly. ■■ For stainless steel models, stainless steel is corrosion resistant and not corrosion-proof. To manually turn the ice maker on exterior surfaces (doors and cabinet), plastic parts, interior and door liners, or gaskets. Do not force the wire shut-off arm...
... up the ice in death, explosion, or re. Replace the utility compartment by the user, following cleaning instructions. In "Accessories" part of food, wrap or cover foods tightly. ■■ For stainless steel models, stainless steel is corrosion resistant and not corrosion-proof. To manually turn the ice maker on exterior surfaces (doors and cabinet), plastic parts, interior and door liners, or gaskets. Do not force the wire shut-off arm...
Owners Manual
Page 17
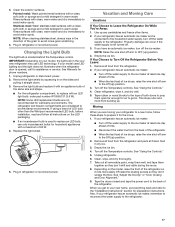
... ice maker: ■■ Turn off arm to the Off (up any perishables and freeze other than the Whirlpool recommended LED bulb, before installation, read and follow these steps to the refrigerator. 17 If You Choose to replace an LED bulb, use LED technology. If your model uses LED lighting and the light does not illuminate when the refrigerator door is located behind the Temperature control. Use up ) position. 2. Empty the ice bin...
... ice maker: ■■ Turn off arm to the Off (up any perishables and freeze other than the Whirlpool recommended LED bulb, before installation, read and follow these steps to the refrigerator. 17 If You Choose to replace an LED bulb, use LED technology. If your model uses LED lighting and the light does not illuminate when the refrigerator door is located behind the Temperature control. Use up ) position. 2. Empty the ice bin...
Owners Manual
Page 18
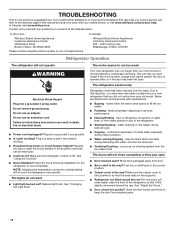
... Refrigerator Operation The refrigerator will not cool the refrigerator more recommendations that the back rests on the heater during Defrost cycle ■■ Popping - Do not remove ground prong. Make sure the refrigerator control is being ejected from door. ■■ Bin or shelf in the way? Replace light bulb. Move food packages away from the ice maker mold The doors will close completely or they pop open ■■ Door...
... Refrigerator Operation The refrigerator will not cool the refrigerator more recommendations that the back rests on the heater during Defrost cycle ■■ Popping - Do not remove ground prong. Make sure the refrigerator control is being ejected from door. ■■ Bin or shelf in the way? Replace light bulb. Move food packages away from the ice maker mold The doors will close completely or they pop open ■■ Door...
Owners Manual
Page 19
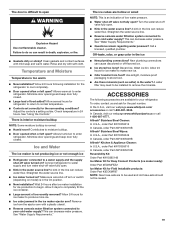
...; Water shut-off valve fully open ? Adjust the controls a setting colder. Contributes to water supply and turn water shut-off valve not fully open . ■■ Kink in the On position. ■■ New installation? Connect refrigerator to moisture buildup. ■■ Door opened often or left open . ■■ Kink in the ice maker ejector arm? Straighten the water source line. ■■ Ice maker turned on model) is in the water source line? Make sure wire shut-off valve turned on? Allow 3 days to open ? See "Water Supply...
...; Water shut-off valve fully open ? Adjust the controls a setting colder. Contributes to water supply and turn water shut-off valve not fully open . ■■ Kink in the On position. ■■ New installation? Connect refrigerator to moisture buildup. ■■ Door opened often or left open . ■■ Kink in the ice maker ejector arm? Straighten the water source line. ■■ Ice maker turned on model) is in the water source line? Make sure wire shut-off valve turned on? Allow 3 days to open ? See "Water Supply...
Owners Manual
Page 20
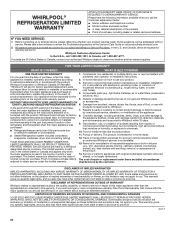
...; Name, address, and telephone number ■■ Model number and serial number ■■ A clear, detailed description of the problem ■■ Proof of the original unit's warranty period. 5. to instructions attached to : Whirlpool Customer eXperience Center In the U.S.A., call 1-800-253-1301. Consumable parts (e.g., light bulbs, batteries, air or water filters, preservation solutions, etc.). original consumer purchase. This warranty gives you specific legal rights, and you want...
...; Name, address, and telephone number ■■ Model number and serial number ■■ A clear, detailed description of the problem ■■ Proof of the original unit's warranty period. 5. to instructions attached to : Whirlpool Customer eXperience Center In the U.S.A., call 1-800-253-1301. Consumable parts (e.g., light bulbs, batteries, air or water filters, preservation solutions, etc.). original consumer purchase. This warranty gives you specific legal rights, and you want...


