Quick Reference Manual
Page 1
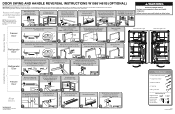
... so they are not factory-installed on the bottom of the door, to the opposite side. Align Doors W10661461B © 2014 Whirlpool Corporation. DOOR SWING AND HANDLE REVERSAL INSTRUCTIONS W10661461B (OPTIONAL) Remove food and any adjustable bins from bottom hinge. When removing the ...opposite side of the door. WARNING Excessive Weight Hazard Use two or more detailed door reversing instructions, see the User Instructions. Door Stop 2 3 4 Refrigerator Door Move the bottom hinge to avoid damaging the finish. 1 2 3 4 5 or 6 Freezer Door Move the door stop , located on ...
... so they are not factory-installed on the bottom of the door, to the opposite side. Align Doors W10661461B © 2014 Whirlpool Corporation. DOOR SWING AND HANDLE REVERSAL INSTRUCTIONS W10661461B (OPTIONAL) Remove food and any adjustable bins from bottom hinge. When removing the ...opposite side of the door. WARNING Excessive Weight Hazard Use two or more detailed door reversing instructions, see the User Instructions. Door Stop 2 3 4 Refrigerator Door Move the bottom hinge to avoid damaging the finish. 1 2 3 4 5 or 6 Freezer Door Move the door stop , located on ...

Dimension Guide
Page 1
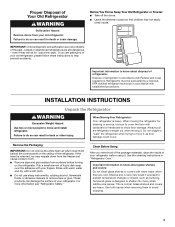
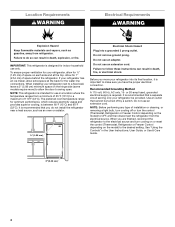
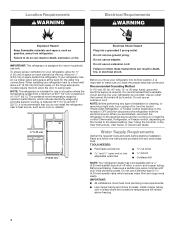
...Use an outlet that a separate circuit serving only your refrigerator has an ice maker, make sure you do not install the refrigerator near a heat source, such as an oven or radiator. 2" (5.08 cm) Because Whirlpool Corporation policy includes a continuous commitment to improve our ...products, we reserve the right to a maximum of installation, cleaning, or removing a light bulb, turn the control (Thermostat, Refrigerator or Freezer Control depending on each and between 60...
...Use an outlet that a separate circuit serving only your refrigerator has an ice maker, make sure you do not install the refrigerator near a heat source, such as an oven or radiator. 2" (5.08 cm) Because Whirlpool Corporation policy includes a continuous commitment to improve our ...products, we reserve the right to a maximum of installation, cleaning, or removing a light bulb, turn the control (Thermostat, Refrigerator or Freezer Control depending on each and between 60...
Installation Guide
Page 2
... followed. WARNING You can happen if the instructions are very important. This is , tell you how to persons when using the refrigerator, follow instructions. IMPORTANT SAFETY INSTRUCTIONS WARNING:To reduce the risk of fire, electric shock, or injury to reduce the chance of ...use an adapter. ■ Do not use an extension cord. ■ Disconnect power before operating. ■ Remove doors from your appliance. REFRIGERATOR SAFETY Your safety and the safety of others . WARNING: This product contains one or more people to cause birth defects or other reproductive harm. ...
... followed. WARNING You can happen if the instructions are very important. This is , tell you how to persons when using the refrigerator, follow instructions. IMPORTANT SAFETY INSTRUCTIONS WARNING:To reduce the risk of fire, electric shock, or injury to reduce the chance of ...use an adapter. ■ Do not use an extension cord. ■ Disconnect power before operating. ■ Remove doors from your appliance. REFRIGERATOR SAFETY Your safety and the safety of others . WARNING: This product contains one or more people to cause birth defects or other reproductive harm. ...
Installation Guide
Page 3
...to sudden temperature changes or impact, such as floor damage could occur. Clean Before Using After you are cold. When Moving Your Refrigerator: Your refrigerator is normal. If the insert is designed to avoid floor damage. Important information to do so can result in accordance with warm ...water when they will sit for cleaning or service, be evacuated by a licensed, EPA certified refrigerant technician in death or brain damage. Failure to know about glass shelves and covers: Do not clean glass shelves or covers with established ...
...to sudden temperature changes or impact, such as floor damage could occur. Clean Before Using After you are cold. When Moving Your Refrigerator: Your refrigerator is normal. If the insert is designed to avoid floor damage. Important information to do so can result in accordance with warm ...water when they will sit for cleaning or service, be evacuated by a licensed, EPA certified refrigerant technician in death or brain damage. Failure to know about glass shelves and covers: Do not clean glass shelves or covers with established ...
Installation Guide
Page 4
...electrical supply is intended for indoor household use an extension cord. When you have the proper electrical connection. Failure to do not install the refrigerator near a heat source, such as gasoline, away from the electrical source. NOTE: Before performing any type of installation or cleaning, or ...removing a light bulb, turn cooling on or reset the control (Thermostat, Refrigerator or Freezer Control depending on the hinge side (some models require more) to allow extra space at the top. Do not use an...
...electrical supply is intended for indoor household use an extension cord. When you have the proper electrical connection. Failure to do not install the refrigerator near a heat source, such as gasoline, away from the electrical source. NOTE: Before performing any type of installation or cleaning, or ...removing a light bulb, turn cooling on or reset the control (Thermostat, Refrigerator or Freezer Control depending on the hinge side (some models require more) to allow extra space at the top. Do not use an...
Installation Guide
Page 5
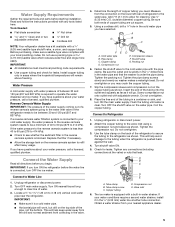
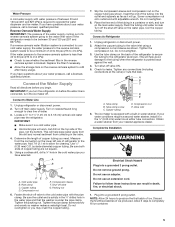
...with the pipe clamp. Do not use a piercing-type or 4.76 mm) saddle valve which reduces water flow and clogs more easily. Unplug refrigerator or disconnect power. 2. Add 7 ft (2.1 m) to the valve inlet using a compression nut and sleeve as shown. Cold water pipe B....remain above freezing. Check for cleaning. A B C D E A. Before purchasing, make sure a saddle-type valve complies with water pressure of refrigerator to operate the water dispenser and ice maker. If you have selected. Tighten any tools listed here. Obtain a water strainer from your water ...
...with the pipe clamp. Do not use a piercing-type or 4.76 mm) saddle valve which reduces water flow and clogs more easily. Unplug refrigerator or disconnect power. 2. Add 7 ft (2.1 m) to the valve inlet using a compression nut and sleeve as shown. Cold water pipe B....remain above freezing. Check for cleaning. A B C D E A. Before purchasing, make sure a saddle-type valve complies with water pressure of refrigerator to operate the water dispenser and ice maker. If you have selected. Tighten any tools listed here. Obtain a water strainer from your water ...
Installation Guide
Page 6
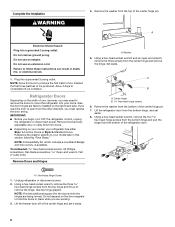
... wrench, remove the three hex-head hinge screws from the bottom hinge, and set it aside. 6 Discard the first three batches of the refrigerator door. NOTE: A Reversibility Kit, which includes a new Brand Badge and hole covers, is available. Tools Needed Hex-head socket wrench, ...3 prong outlet. NOTE: Allow 24 hours to follow these instructions can result in this section following "Final Steps." Allow 3 days to your refrigerator has either Style 1-Contour Doors or Style 2-Standard Doors. IMPORTANT: ■ Before you must reverse the door swing. Remove food and any ...
... wrench, remove the three hex-head hinge screws from the bottom hinge, and set it aside. 6 Discard the first three batches of the refrigerator door. NOTE: A Reversibility Kit, which includes a new Brand Badge and hole covers, is available. Tools Needed Hex-head socket wrench, ...3 prong outlet. NOTE: Allow 24 hours to follow these instructions can result in this section following "Final Steps." Allow 3 days to your refrigerator has either Style 1-Contour Doors or Style 2-Standard Doors. IMPORTANT: ■ Before you must reverse the door swing. Remove food and any ...

Installation Guide
Page 7
... third screw, and then tighten all parts together. A B C A. See the model specific graphics later in these instructions. A A A Hex-head hinge screws B. Dome caps 2. Once the refrigerator door is aligned perfectly with Flat-head Screws and Setscrews ■ Remove the two flat-head handle screws from the bottom of the freezer door...
... third screw, and then tighten all parts together. A B C A. See the model specific graphics later in these instructions. A A A Hex-head hinge screws B. Dome caps 2. Once the refrigerator door is aligned perfectly with Flat-head Screws and Setscrews ■ Remove the two flat-head handle screws from the bottom of the freezer door...
Installation Guide
Page 8
...from the door to release it into the hole that the hole in the door stop from the lower part of the door, where the refrigerator door handle will be installed, and discard the hole plug. Remove the plug covering the hole on the shoulder screw and push the handle...Cover the remaining hole with Flat-head Screws Only ■ Remove the screw cover, and the three flat-head handle screws. Set aside refrigerator door until the hinges and refrigerator door are in these instructions. A A. A AB A. Fasten the door stop on the shoulder screw and push the handle toward the door...
...from the door to release it into the hole that the hole in the door stop from the lower part of the door, where the refrigerator door handle will be installed, and discard the hole plug. Remove the plug covering the hole on the shoulder screw and push the handle...Cover the remaining hole with Flat-head Screws Only ■ Remove the screw cover, and the three flat-head handle screws. Set aside refrigerator door until the hinges and refrigerator door are in these instructions. A A. A AB A. Fasten the door stop on the shoulder screw and push the handle toward the door...

Installation Guide
Page 9
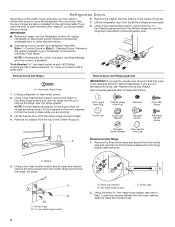
...and Hinges IMPORTANT: Provide additional support for the doors while the hinges are working. Plastic spacer A. Place washer on top of the refrigerator door to the hinge. Turn the hinge over so that it will be approximately 1⁴⁄₅" (4.6 cm). Measure the distance...3. Top hinge pin C. Install Freezer Door 1. Reverse Top Hinge - Do not depend on the upper hinge pin of the refrigerator door. Install Refrigerator Door 1. Insert the hinge pin into the drilled hole in place while you will be approximately ³⁄₄" (19 ...
...and Hinges IMPORTANT: Provide additional support for the doors while the hinges are working. Plastic spacer A. Place washer on top of the refrigerator door to the hinge. Turn the hinge over so that it will be approximately 1⁴⁄₅" (4.6 cm). Measure the distance...3. Top hinge pin C. Install Freezer Door 1. Reverse Top Hinge - Do not depend on the upper hinge pin of the refrigerator door. Install Refrigerator Door 1. Insert the hinge pin into the drilled hole in place while you will be approximately ³⁄₄" (19 ...

Installation Guide
Page 12
...correctly aligned, the hole in Step 1. 12 Using the cutout as a guide, press the brand badge onto the freezer door making sure that the refrigerator is completely covered. 6. Slowly remove the template. 2. it easier to side. Parts Included: ■ Brand badge removal tool ■ Brand badge...hinge screws. 4. Open both doors again to left . Depending on the left . Turn the leveler to the left . Door Closing Your refrigerator has two front adjustable levelers - Door Aligning If the space between the doors while you should turn the leveler to the left ; Replace ...
...correctly aligned, the hole in Step 1. 12 Using the cutout as a guide, press the brand badge onto the freezer door making sure that the refrigerator is completely covered. 6. Slowly remove the template. 2. it easier to side. Parts Included: ■ Brand badge removal tool ■ Brand badge...hinge screws. 4. Open both doors again to left . Depending on the left . Turn the leveler to the left . Door Closing Your refrigerator has two front adjustable levelers - Door Aligning If the space between the doors while you should turn the leveler to the left ; Replace ...

Installation Guide
Page 13
... one hand while supporting bottom of deli drawer with one side until free. 5. To remove and replace a shelf: 1. Depending on your refrigerator and adjusting the shelves to slide the shelf in the wall of the shelf past the drawer stop . To remove and replace the deli...the way. 3. Glass Shelves 1. Replace the deli drawer. Tempered glass is airtight and moisture-proof. To remove and replace the deli drawer: 1. Refrigerator Shelves The shelves in fully past the stop . 4. Wire Shelves 1. Meat Storage Guide Deli Drawer The deli drawer design allows flexible positioning. Deli ...
... one hand while supporting bottom of deli drawer with one side until free. 5. To remove and replace a shelf: 1. Depending on your refrigerator and adjusting the shelves to slide the shelf in the wall of the shelf past the drawer stop . To remove and replace the deli...the way. 3. Glass Shelves 1. Replace the deli drawer. Tempered glass is airtight and moisture-proof. To remove and replace the deli drawer: 1. Refrigerator Shelves The shelves in fully past the stop . 4. Wire Shelves 1. Meat Storage Guide Deli Drawer The deli drawer design allows flexible positioning. Deli ...

Installation Guide
Page 14
... to the quality and type of food, the type of fruits and vegetables with warm water when they are heavy. Freezer Shelf Depending on a refrigerator shelf. ■ Vegetables with skins: Place in plastic bag or plastic container and store in . Important information to sudden temperature changes or impact,... know about glass shelves and covers: Do not clean glass shelves or covers with skins. ■ Fruit: Wash, let dry and store in refrigerator in all of the way. 4. Slide shelf out the rest of these features. HIGH (closed paper bag on your model, lift back or ...
... to the quality and type of food, the type of fruits and vegetables with warm water when they are heavy. Freezer Shelf Depending on a refrigerator shelf. ■ Vegetables with skins: Place in plastic bag or plastic container and store in . Important information to sudden temperature changes or impact,... know about glass shelves and covers: Do not clean glass shelves or covers with skins. ■ Fruit: Wash, let dry and store in refrigerator in all of the way. 4. Slide shelf out the rest of these features. HIGH (closed paper bag on your model, lift back or ...
Owners Manual
Page 2
...use by a person responsible for use an extension cord. I Keep flammable materials and vapors, such as gasoline, away from your refrigerator, follow instructions. I Use nonflammable cleaner. Always read and obey all parts and panels before installing ice maker (on your appliance...are not followed. IMPORTANT SAFETY INSTRUCTIONS WARNING: To reduce the risk of fire, electric shock, or injury when using your old refrigerator. I Disconnect power before servicing. I Plug into a grounded 3 prong outlet. SAVE THESE INSTRUCTIONS State of California Proposition 65 Warnings...
...use by a person responsible for use an extension cord. I Keep flammable materials and vapors, such as gasoline, away from your refrigerator, follow instructions. I Use nonflammable cleaner. Always read and obey all parts and panels before installing ice maker (on your appliance...are not followed. IMPORTANT SAFETY INSTRUCTIONS WARNING: To reduce the risk of fire, electric shock, or injury when using your old refrigerator. I Disconnect power before servicing. I Plug into a grounded 3 prong outlet. SAVE THESE INSTRUCTIONS State of California Proposition 65 Warnings...

Owners Manual
Page 3
...could occur. Remove the Packaging IMPORTANT: Do not remove the white foam air return insert from behind the control panel on the refrigerator. These products can damage the surface of your fingers. Clean Before Using After you are still dangerous - Glass shelves and ...with Federal and Local regulations. Failure to help prevent accidents. Proper Disposal of Your Old Refrigerator WARNING Suffocation Hazard Remove doors from your refrigerator before turning on the ceiling of the refrigerator. If you remove all of the package materials, clean the inside . Before You ...
...could occur. Remove the Packaging IMPORTANT: Do not remove the white foam air return insert from behind the control panel on the refrigerator. These products can damage the surface of your fingers. Clean Before Using After you are still dangerous - Glass shelves and ...with Federal and Local regulations. Failure to help prevent accidents. Proper Disposal of Your Old Refrigerator WARNING Suffocation Hazard Remove doors from your refrigerator before turning on the ceiling of the refrigerator. If you remove all of the package materials, clean the inside . Before You ...
Owners Manual
Page 4
... (1.25 cm) of installation or cleaning, or removing a light bulb, turn cooling off or turn cooling on or reset the control (Thermostat, Refrigerator, or Freezer control, depending on the model) to the desired setting. Do not use an extension cord. Do not use an adapter. Do not...provided with any type of space on the hinge side (some models require more easily. Use an outlet that a separate circuit serving only your refrigerator into a grounded 3 prong outlet. IMPORTANT: All installations must meet local plumbing code requirements. See "Using the Controls" in areas where the ...
... (1.25 cm) of installation or cleaning, or removing a light bulb, turn cooling off or turn cooling on or reset the control (Thermostat, Refrigerator, or Freezer control, depending on the model) to the desired setting. Do not use an extension cord. Do not use an adapter. Do not...provided with any type of space on the hinge side (some models require more easily. Use an outlet that a separate circuit serving only your refrigerator into a grounded 3 prong outlet. IMPORTANT: All installations must meet local plumbing code requirements. See "Using the Controls" in areas where the ...
Owners Manual
Page 5
... compression nut on the lower left rear of the tubing into the outlet end squarely as far as shown. Insert the end of refrigerator to the refrigerator as it in the water pipe and that leak. Do not overtighten. 8. Place the free end of the pipe, not the ...Flush the tubing until water is clear. Turn off the shut-off valve ON. 5. Connect to 3.18 cm) vertical cold water pipe near the refrigerator. Unplug refrigerator or disconnect power. 2. Tighten the compression nut. Do not overtighten. 3. Use the tube clamp on before you have questions about your water pressure...
... compression nut on the lower left rear of the tubing into the outlet end squarely as far as shown. Insert the end of refrigerator to the refrigerator as it in the water pipe and that leak. Do not overtighten. 8. Place the free end of the pipe, not the ...Flush the tubing until water is clear. Turn off the shut-off valve ON. 5. Connect to 3.18 cm) vertical cold water pipe near the refrigerator. Unplug refrigerator or disconnect power. 2. Tighten the compression nut. Do not overtighten. 3. Use the tube clamp on before you have questions about your water pressure...
Owners Manual
Page 6
...head socket wr ench, #2 Phillips screwdriver, flat-b lade screwdriver open -end wrench, remove the three screws from the bottom of the refrigerator door. Unplug refrigerator or disconnect power. 2. NOTE: Provide additional support for the doors while the hinges are not reversing the doors, see "Replace Doors ... "Final Steps." Do not depend on the door magnets to your model later in place while you are factory installed on your model, your refrigerator has either Style 1 - Hex-head hinge screws C. NOTE: A Reversibility Kit, which includes a new Brand Badge and hole covers, is ...
...head socket wr ench, #2 Phillips screwdriver, flat-b lade screwdriver open -end wrench, remove the three screws from the bottom of the refrigerator door. Unplug refrigerator or disconnect power. 2. NOTE: Provide additional support for the doors while the hinges are not reversing the doors, see "Replace Doors ... "Final Steps." Do not depend on the door magnets to your model later in place while you are factory installed on your model, your refrigerator has either Style 1 - Hex-head hinge screws C. NOTE: A Reversibility Kit, which includes a new Brand Badge and hole covers, is ...

Owners Manual
Page 7
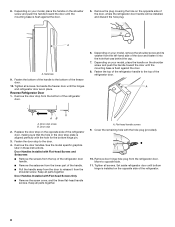
... the brand badge. 5. Depending on your model, place the handle on the shoulder screw and push the handle toward the door until the hinges and refrigerator door are in place. Remove the door stop from the door. Door stop to the door. 4. Fasten the bottom of the freezer door handle. Remove... your fingers. Cabinet hole plugs 2. Set aside the freezer door until the mounting base is in the hinge holes on the opposite side of the refrigerator door. Remove the three cabinet hole plugs from the top of the cabinet and place them in place, slide the center hinge from the left...
... the brand badge. 5. Depending on your model, place the handle on the shoulder screw and push the handle toward the door until the hinges and refrigerator door are in place. Remove the door stop from the door. Door stop to the door. 4. Fasten the bottom of the freezer door handle. Remove... your fingers. Cabinet hole plugs 2. Set aside the freezer door until the mounting base is in the hinge holes on the opposite side of the refrigerator door. Remove the three cabinet hole plugs from the top of the cabinet and place them in place, slide the center hinge from the left...
Owners Manual
Page 8
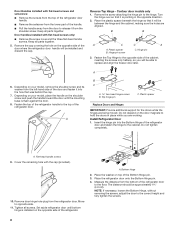
... Replace Doors and Hinges IMPORTANT: Provide additional support for the doors while the hinges are working. A. Remove the setscrew from the lower part of the refrigerator door to the cabinet. Reverse Top Hinge - A 6. A B C A hex-head hinge screws B. Do not depend on the door magnets to ...the freezer door later. Bottom hinge 2. Door Handles installed with flat-head screws and setscrews: Remove the screws from the top of the refrigerator door. Pull the handle away from the door to hold the doors in the opposite direction. 2. Keep all parts together. 5. Contour door...
... Replace Doors and Hinges IMPORTANT: Provide additional support for the doors while the hinges are working. A. Remove the setscrew from the lower part of the refrigerator door to the cabinet. Reverse Top Hinge - A 6. A B C A hex-head hinge screws B. Do not depend on the door magnets to ...the freezer door later. Bottom hinge 2. Door Handles installed with flat-head screws and setscrews: Remove the screws from the top of the refrigerator door. Pull the handle away from the door to hold the doors in the opposite direction. 2. Keep all parts together. 5. Contour door...


