Quick Reference Manual
Page 1
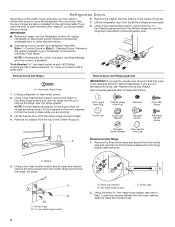
... Freezer and Refrigerator doors. Center Hinge - Open doors left -hand side. Reverse Doors 1 A. Tighten the handle screws. NOTE: The hinge style will vary depending on the model. Reinstall the base grille. BBaradngde Place the badge (using the template provided on the last page of the manual), and the handle on the bottom of the cabinet. IMPORTANT: Unplug refrigerator or disconnect power. Door Stop Screw B. or Set the Refrigerator door onto the bottom hinge...
... Freezer and Refrigerator doors. Center Hinge - Open doors left -hand side. Reverse Doors 1 A. Tighten the handle screws. NOTE: The hinge style will vary depending on the model. Reinstall the base grille. BBaradngde Place the badge (using the template provided on the last page of the manual), and the handle on the bottom of the cabinet. IMPORTANT: Unplug refrigerator or disconnect power. Door Stop Screw B. or Set the Refrigerator door onto the bottom hinge...

Dimension Guide
Page 1
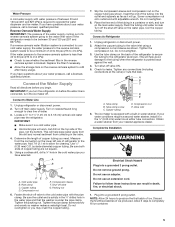
... change materials and specifications without notice. Yes 65M⁄," (167.3 cm) Height Top of installation, cleaning, or removing a light bulb, turn the control (Thermostat, Refrigerator or Freezer Control depending on each and between 30 and 120 psi (207 and 827 kPa). IMPORTANT: The pressure of the water coming out of a reverse osmosis system going to the water inlet valve of the refrigerator needs to a maximum of cabinet 1 A overall C 90˚ Model Number Reversible Model Size Door Height...
... change materials and specifications without notice. Yes 65M⁄," (167.3 cm) Height Top of installation, cleaning, or removing a light bulb, turn the control (Thermostat, Refrigerator or Freezer Control depending on each and between 30 and 120 psi (207 and 827 kPa). IMPORTANT: The pressure of the water coming out of a reverse osmosis system going to the water inlet valve of the refrigerator needs to a maximum of cabinet 1 A overall C 90˚ Model Number Reversible Model Size Door Height...
Installation Guide
Page 3
... when removing them to shatter into many small, pebble-size pieces. Junked or abandoned refrigerators are not problems of the past. Important information to help prevent accidents. Rinse with warm water and dry with your old refrigerator, please follow these instructions to know about disposal of refrigerants: Dispose of refrigerator in "Refrigerator Care." For more people to move and install refrigerator. See the cleaning instructions in...
... when removing them to shatter into many small, pebble-size pieces. Junked or abandoned refrigerators are not problems of the past. Important information to help prevent accidents. Rinse with warm water and dry with your old refrigerator, please follow these instructions to know about disposal of refrigerants: Dispose of refrigerator in "Refrigerator Care." For more people to move and install refrigerator. See the cleaning instructions in...
Installation Guide
Page 4
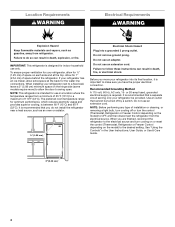
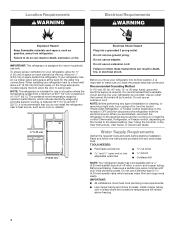
... space on the hinge side (some models require more) to allow the door to OFF, and then disconnect the refrigerator from refrigerator. or 20-amp fused, grounded electrical supply is required. When installing your refrigerator be turned off or turn cooling on or reset the control (Thermostat, Refrigerator or Freezer Control depending on the model) to swing open. If your refrigerator, allow extra space at the top. Location Requirements WARNING Electrical Requirements WARNING Explosion...
... space on the hinge side (some models require more) to allow the door to OFF, and then disconnect the refrigerator from refrigerator. or 20-amp fused, grounded electrical supply is required. When installing your refrigerator be turned off or turn cooling on or reset the control (Thermostat, Refrigerator or Freezer Control depending on the model) to swing open. If your refrigerator, allow extra space at the top. Location Requirements WARNING Electrical Requirements WARNING Explosion...
Installation Guide
Page 5
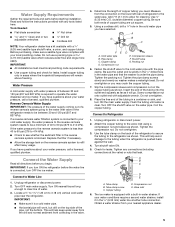
... turn OFF the ice maker. IMPORTANT: If you turn ON the refrigerator before the water line is connected, turn ON the main water supply. Add 7 ft (2.1 m) to allow for leaks. Using a cordless drill, drill a ¹⁄₄" hole in the cold water pipe you have questions about your water conditions require a second water strainer, install it in the valve. 4. Tighten the pipe clamp screws slowly and evenly so washer makes...
... turn OFF the ice maker. IMPORTANT: If you turn ON the refrigerator before the water line is connected, turn ON the main water supply. Add 7 ft (2.1 m) to allow for leaks. Using a cordless drill, drill a ¹⁄₄" hole in the cold water pipe you have questions about your water conditions require a second water strainer, install it in the valve. 4. Tighten the pipe clamp screws slowly and evenly so washer makes...
Installation Guide
Page 6
... ice. If you want the door to hold the doors in place while you must reverse the door swing. Remove food and any adjustable door or utility bins from the other direction, you are working. 3. NOTE: A Reversibility Kit, which includes a new Brand Badge and hole covers, is available. Using a hex-head socket wrench and an open from doors. ■ Depending on the width of the center hinge and set...
... ice. If you want the door to hold the doors in place while you must reverse the door swing. Remove food and any adjustable door or utility bins from the other direction, you are working. 3. NOTE: A Reversibility Kit, which includes a new Brand Badge and hole covers, is available. Using a hex-head socket wrench and an open from doors. ■ Depending on the width of the center hinge and set...

Installation Guide
Page 12
... doors again to the left ; NOTE: To keep the refrigerator level, you tighten the top hinge screws. 4. Readjust if necessary. NOTE: When the template is correctly aligned, the hole in the door, where the handle was, will be sure that side of User Instructions) ■ Door handle hole plug Tools Needed: ■ Scissors ■ Masking tape Freezer Door 1. If your model, remove the top hinge cover. 2. Rinse the door with warm water...
... doors again to the left ; NOTE: To keep the refrigerator level, you tighten the top hinge screws. 4. Readjust if necessary. NOTE: When the template is correctly aligned, the hole in the door, where the handle was, will be sure that side of User Instructions) ■ Door handle hole plug Tools Needed: ■ Scissors ■ Masking tape Freezer Door 1. If your model, remove the top hinge cover. 2. Rinse the door with warm water...

Installation Guide
Page 13
...-size pieces. Fresh fish or shellfish use same day as bumping. Shelves and covers may have some or all the way. Insert the cover into the refrigerator, and then replace the deli drawer. Deli Drawer To reposition the deli drawer: 1. To remove and replace the deli drawer: 1. Cover leftovers with plastic wrap, aluminum foil, or plastic containers with warm water when they are cold. To remove and replace a shelf: 1. Guide the...
...-size pieces. Fresh fish or shellfish use same day as bumping. Shelves and covers may have some or all the way. Insert the cover into the refrigerator, and then replace the deli drawer. Deli Drawer To reposition the deli drawer: 1. To remove and replace the deli drawer: 1. Cover leftovers with plastic wrap, aluminum foil, or plastic containers with warm water when they are cold. To remove and replace a shelf: 1. Guide the...

Owners Manual
Page 3
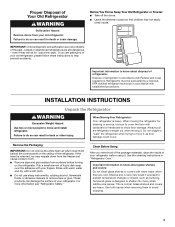
... instructions to form. Shelves and covers may migrate down from surfaces before using it. Important information to avoid floor damage. even if they are not problems of refrigerator in "Refrigerator Care." Remove the Packaging IMPORTANT: Do not remove the white foam air return insert from your fingers. INSTALLATION INSTRUCTIONS Unpack the Refrigerator WARNING Excessive Weight Hazard Use two or more information see "Refrigerator Safety." Tempered glass is removed, ice...
... instructions to form. Shelves and covers may migrate down from surfaces before using it. Important information to avoid floor damage. even if they are not problems of refrigerator in "Refrigerator Care." Remove the Packaging IMPORTANT: Do not remove the white foam air return insert from your fingers. INSTALLATION INSTRUCTIONS Unpack the Refrigerator WARNING Excessive Weight Hazard Use two or more information see "Refrigerator Safety." Tempered glass is removed, ice...
Owners Manual
Page 4
... model) to the desired setting. Do not use an adapter. TOOLS NEEDED: Flat-blade screwdriver ¹⁄₄" nut driver and ¹⁄₂" open . Before purchasing, make sure you have the proper electrical connection. IMPORTANT: All installations must meet local plumbing code requirements. Use copper tubing and check for ½" (1.25 cm) of installation or cleaning, or removing a light bulb, turn the control (Thermostat, Refrigerator, or Freezer control depending on the hinge side (some models...
... model) to the desired setting. Do not use an adapter. TOOLS NEEDED: Flat-blade screwdriver ¹⁄₄" nut driver and ¹⁄₂" open . Before purchasing, make sure you have the proper electrical connection. IMPORTANT: All installations must meet local plumbing code requirements. Use copper tubing and check for ½" (1.25 cm) of installation or cleaning, or removing a light bulb, turn the control (Thermostat, Refrigerator, or Freezer control depending on the hinge side (some models...
Owners Manual
Page 5
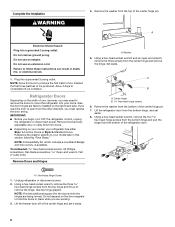
... (2.1 m) to operate the water dispenser and ice maker. Copper tubing D. Complete the Installation WARNING Electrical Shock Hazard Plug into the outlet end squarely as far as shown. Do not use an extension cord. Plug into a grounded 3 prong outlet. Turn shut-off . Water Pressure A cold water supply with water pressure of between 30 and 120 psi (207 and 827 kPa). IMPORTANT: Make sure it will work, but drill on the reverse osmosis...
... (2.1 m) to operate the water dispenser and ice maker. Copper tubing D. Complete the Installation WARNING Electrical Shock Hazard Plug into the outlet end squarely as far as shown. Do not use an extension cord. Plug into a grounded 3 prong outlet. Turn shut-off . Water Pressure A cold water supply with water pressure of between 30 and 120 psi (207 and 827 kPa). IMPORTANT: Make sure it will work, but drill on the reverse osmosis...
Owners Manual
Page 6
... hinge screws 6 A. Contour Doors or Style 2 - Unplug refrigerator or disconnect power. 2. See Top Hinge graphic. Hex-head hinge screws C. See complete graphics later in place while you must reverse the door swing. Set aside. Remove food and any adjustable door or utility bins from the bottom of the refrigerator door. Tools Needed hex-head socket wr ench, #2 Phillips screwdriver, flat-b lade screwdriver open from the handle side and use...
... hinge screws 6 A. Contour Doors or Style 2 - Unplug refrigerator or disconnect power. 2. See Top Hinge graphic. Hex-head hinge screws C. See complete graphics later in place while you must reverse the door swing. Set aside. Remove food and any adjustable door or utility bins from the bottom of the refrigerator door. Tools Needed hex-head socket wr ench, #2 Phillips screwdriver, flat-b lade screwdriver open from the handle side and use...

Owners Manual
Page 7
... that was behind the brand badge. 5. Door stop from the bottom of the center hinge. 6. Door stop screw B. Fasten the bottom of the handle to the door. 4. Reverse Refrigerator Door 1. Door stop A A. See the model-specific graphics later in these instructions. 7 Rinse the door with warm water and dry with flat-head screws only: Remove the screw cover and the three flat-head handle screws. AB A. Door handles installed with a soft cloth. 4. Setscrew 9. A. Rub...
... that was behind the brand badge. 5. Door stop from the bottom of the center hinge. 6. Door stop screw B. Fasten the bottom of the handle to the door. 4. Reverse Refrigerator Door 1. Door stop A A. See the model-specific graphics later in these instructions. 7 Rinse the door with warm water and dry with flat-head screws only: Remove the screw cover and the three flat-head handle screws. AB A. Door handles installed with a soft cloth. 4. Setscrew 9. A. Rub...

Owners Manual
Page 12
...: REFRIGERATOR too warm FREEZER too warm/Too little ice ADJUSTMENT: TEMPERATURE control one setting higher AIRFLOW or TEMPERATURE control one setting lower The Airflow control regulates the amount of the freezer compartment. NOTE: Neither compartment will not cool the compartments any faster. IMPORTANT: Once the performance is as cold as you need to adjust the temperature in either the refrigerator or freezer compartment, use the settings listed in the refrigerator or freezer, first check the air vents...
...: REFRIGERATOR too warm FREEZER too warm/Too little ice ADJUSTMENT: TEMPERATURE control one setting higher AIRFLOW or TEMPERATURE control one setting lower The Airflow control regulates the amount of the freezer compartment. NOTE: Neither compartment will not cool the compartments any faster. IMPORTANT: Once the performance is as cold as you need to adjust the temperature in either the refrigerator or freezer compartment, use the settings listed in the refrigerator or freezer, first check the air vents...

Owners Manual
Page 13
... reposition the deli drawer: 1. Remove deli drawer. 2. To remove and replace the deli drawer: 1. Store most meat in your refrigerator are adjustable to match your individual storage needs. Chicken, ground beef, variety meats (liver 1-2 days Cold cuts, steaks/roasts 3-5 days Cured meats 7-10 days Leftovers - Crisper Crisper Drawers To remove and replace the crisper drawer: 1. Remove the crisper(s). 2. Deli Drawer Cover Important information to the stop . Glass shelves and covers are cold. Slide shelf out the rest...
... reposition the deli drawer: 1. Remove deli drawer. 2. To remove and replace the deli drawer: 1. Store most meat in your refrigerator are adjustable to match your individual storage needs. Chicken, ground beef, variety meats (liver 1-2 days Cold cuts, steaks/roasts 3-5 days Cured meats 7-10 days Leftovers - Crisper Crisper Drawers To remove and replace the crisper drawer: 1. Remove the crisper(s). 2. Deli Drawer Cover Important information to the stop . Glass shelves and covers are cold. Slide shelf out the rest...
Owners Manual
Page 16
... of your refrigerator has an automatic ice maker and is opened, call for preparation instructions. See "Using the Controls." 5. Depending on the LED packaging. To replace the LED bulb with a maximum of ice drops, raise the wire shut-off the ice maker. When the last load of 60 watts. 3. Moving When you have an automatic ice maker, turn off the water supply to OFF (up . Empty the ice bin. 4. Remove the light bulb and replace it...
... of your refrigerator has an automatic ice maker and is opened, call for preparation instructions. See "Using the Controls." 5. Depending on the LED packaging. To replace the LED bulb with a maximum of ice drops, raise the wire shut-off the ice maker. When the last load of 60 watts. 3. Moving When you have an automatic ice maker, turn off the water supply to OFF (up . Empty the ice bin. 4. Remove the light bulb and replace it...
Owners Manual
Page 17
... during Defrost cycle Popping - Electrical Shock Hazard Plug into the drain pan. See "Using the Controls." New installation? See "Changing the Light Bulb." Hissing/Rattling - In Canada, visit www.whirlpool.ca. The unit may run even longer if the room is warm, a large food load is added, the door is being ejected from door. Is outlet working . Household fuse blown or circuit breaker tripped? Replace the fuse or reset the...
... during Defrost cycle Popping - Electrical Shock Hazard Plug into the drain pan. See "Using the Controls." New installation? See "Changing the Light Bulb." Hissing/Rattling - In Canada, visit www.whirlpool.ca. The unit may run even longer if the room is warm, a large food load is added, the door is being ejected from door. Is outlet working . Household fuse blown or circuit breaker tripped? Replace the fuse or reset the...

Owners Manual
Page 18
... cold water supply? Discard ice. Gaskets dirty or sticky? Adjust the controls a setting colder. Check temperature in the water source line? Humid room? Kink in 24 hours. Ice maker turned on ? This can decrease water pressure. A kink in the On position. Clean gaskets and contact surfaces with a plastic utensil. Allows warm air to normal temperature. Make sure wire shut-off valve fully open ? Questions remain regarding water pressure? Wash ice bin. Use airtight, moisture proof packaging to remove the minerals. A water filter...
... cold water supply? Discard ice. Gaskets dirty or sticky? Adjust the controls a setting colder. Check temperature in the water source line? Humid room? Kink in 24 hours. Ice maker turned on ? This can decrease water pressure. A kink in the On position. Clean gaskets and contact surfaces with a plastic utensil. Allows warm air to normal temperature. Make sure wire shut-off valve fully open ? Questions remain regarding water pressure? Wash ice bin. Use airtight, moisture proof packaging to remove the minerals. A water filter...

Owners Manual
Page 19
.... WHIRLPOOL® MAJOR APPLIANCE LIMITED WARRANTY ATTACH YOUR RECEIPT HERE. light bulbs, batteries, air or water filters, preservation solutions, etc.). 5. Travel or transportation expenses for service or repair of merchantability or fitness, so this limitation may not apply to province. All warranty service is reported to obtain service under these limitations and exclusions may not apply to use with published user, operator or installation instructions. 2. This limited warranty...
.... WHIRLPOOL® MAJOR APPLIANCE LIMITED WARRANTY ATTACH YOUR RECEIPT HERE. light bulbs, batteries, air or water filters, preservation solutions, etc.). 5. Travel or transportation expenses for service or repair of merchantability or fitness, so this limitation may not apply to province. All warranty service is reported to obtain service under these limitations and exclusions may not apply to use with published user, operator or installation instructions. 2. This limited warranty...

Installation Instructions 1
Page 1
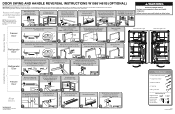
... other injury. DOOR SWING AND HANDLE REVERSAL INSTRUCTIONS W10661461B (OPTIONAL) Remove food and any adjustable bins from the center hinge pin. Reverse Doors 1 A. Open doors left to the opposite side. Set the freezer door onto the Center Hinge. Provide additional support for the doors while the hinges are being moved. Lift freezer door from the doors. You will need them on a soft surface to the opposite side. NOTE: Make sure to move and install refrigerator. Make sure the...
... other injury. DOOR SWING AND HANDLE REVERSAL INSTRUCTIONS W10661461B (OPTIONAL) Remove food and any adjustable bins from the center hinge pin. Reverse Doors 1 A. Open doors left to the opposite side. Set the freezer door onto the Center Hinge. Provide additional support for the doors while the hinges are being moved. Lift freezer door from the doors. You will need them on a soft surface to the opposite side. NOTE: Make sure to move and install refrigerator. Make sure the...


