

Use & Care Guide
Page 5
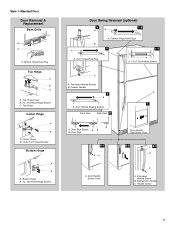
... opposite direction, continue with a built-in Top Hinge graphic. Remove the parts for leaks. If you are only removing and replacing the doors, the instructions are ready to opposite side. Reverse Doors (optional) To purchase a reversibility kit, which includes a new nameplate and door hole... Provide additional support for the doors while the hinges are also going to reverse your model, you are not reversing the doors, see "Replace Doors and Hinges." Door Stop Screw Door Handle Sealing Screw Door Hinge Hole Plug Cabinet Hinge Hole Plug Flat-Head Handle Screw Door Handle Screw...
... opposite direction, continue with a built-in Top Hinge graphic. Remove the parts for leaks. If you are only removing and replacing the doors, the instructions are ready to opposite side. Reverse Doors (optional) To purchase a reversibility kit, which includes a new nameplate and door hole... Provide additional support for the doors while the hinges are also going to reverse your model, you are not reversing the doors, see "Replace Doors and Hinges." Door Stop Screw Door Handle Sealing Screw Door Hinge Hole Plug Cabinet Hinge Hole Plug Flat-Head Handle Screw Door Handle Screw...

Use & Care Guide
Page 6
... two screws in Graphic 4. 3. Style 2-Contour Doors Your model may be reversed if door swing is a bottom hinge hole plug. Set aside freezer door until bottom hinge is pointing in the opposite direction and reinsert the hinge pin into the doors. Move to opposite side of the base grille there is...Remove door stop from handle side and move them to the other side. Replace Doors and Hinges NOTE: Graphic may have either plastic handles which extend from the door or cup handles which is reversed. 1. Replace the freezer door. 3. Line up the doors so that hole plugs and screws...
... two screws in Graphic 4. 3. Style 2-Contour Doors Your model may be reversed if door swing is a bottom hinge hole plug. Set aside freezer door until bottom hinge is pointing in the opposite direction and reinsert the hinge pin into the doors. Move to opposite side of the base grille there is...Remove door stop from handle side and move them to the other side. Replace Doors and Hinges NOTE: Graphic may have either plastic handles which extend from the door or cup handles which is reversed. 1. Replace the freezer door. 3. Line up the doors so that hole plugs and screws...
Use & Care Guide
Page 7
...; Head Screws A A. Flat-Head Handle Screws B. Door Handle Screw Cover Door Handle Seal Screw Front 6-2 A 6-3 B C A. Handle Screw 7 Top Hinge Cover B Hex-Head Hinge Screws C. Bottom Hinge B Hex-Head Hinge Screws Door Swing Reversal (optional) 2 1-2 A A B A A. Refrigerator Handle C. Door Hinge Hole Plug A. Door Stop 6-1 A A. Freezer Handle 4 A 7 A. Door Handle Sealing Screws Front View Side View 5 A. Style 1-Standard Door Door...
...; Head Screws A A. Flat-Head Handle Screws B. Door Handle Screw Cover Door Handle Seal Screw Front 6-2 A 6-3 B C A. Handle Screw 7 Top Hinge Cover B Hex-Head Hinge Screws C. Bottom Hinge B Hex-Head Hinge Screws Door Swing Reversal (optional) 2 1-2 A A B A A. Refrigerator Handle C. Door Hinge Hole Plug A. Door Stop 6-1 A A. Freezer Handle 4 A 7 A. Door Handle Sealing Screws Front View Side View 5 A. Style 1-Standard Door Door...

Use & Care Guide
Page 8
... Screw Front Cup Handle 8 A. Top Hinge D. Hinge Pin Center Hinge A B A. Center Hinge B. 12-24 Torx® Head Screws Bottom Hinge A B A. Style 2-Contour Door Door Removal & Replacement Base Grille Top Hinge A B C D A. Screws Door Swing Reversal (optional) 2 A B Plastic Handle 3 A B C D A. Door Stop A. Freezer Handle B. ¹⁄₄" Setscrew 9 C. Top Hinge D. Hinge Pin 1-2 A A. Top Hinge Cover B Hex-Head Hinge Screws C. Door Handle Sealing Screws 8 Flat...
... Screw Front Cup Handle 8 A. Top Hinge D. Hinge Pin Center Hinge A B A. Center Hinge B. 12-24 Torx® Head Screws Bottom Hinge A B A. Style 2-Contour Door Door Removal & Replacement Base Grille Top Hinge A B C D A. Screws Door Swing Reversal (optional) 2 A B Plastic Handle 3 A B C D A. Door Stop A. Freezer Handle B. ¹⁄₄" Setscrew 9 C. Top Hinge D. Hinge Pin 1-2 A A. Top Hinge Cover B Hex-Head Hinge Screws C. Door Handle Sealing Screws 8 Flat...

Dimension Guide
Page 1
...at least 1" (2.54 cm) between 30 and 120 psi (207 and 827 kPa). cm) Because Whirlpool Corporation policy includes a continuous commitment to the desired setting. Do not use an extension cord. If you...of 40 to 60 psi (276 to a fixed wall, leave 2" (5.08 cm) minimum on the hinge side (depending on your refrigerator, allow for the water line connections. For complete details, see Installation ...psi (207 and 827 kPa) is required to change without notice. Reverse Osmosis Water Supply: If a reverse osmosis water filtration system is recommended that you leave some extra space at...
...at least 1" (2.54 cm) between 30 and 120 psi (207 and 827 kPa). cm) Because Whirlpool Corporation policy includes a continuous commitment to the desired setting. Do not use an extension cord. If you...of 40 to 60 psi (276 to a fixed wall, leave 2" (5.08 cm) minimum on the hinge side (depending on your refrigerator, allow for the water line connections. For complete details, see Installation ...psi (207 and 827 kPa) is required to change without notice. Reverse Osmosis Water Supply: If a reverse osmosis water filtration system is recommended that you leave some extra space at...


