
Installation Instructions
Page 2
... "WARNING." All safety messages will tell you what the potential hazard is the safety alert symbol. We have provided many important safety messages in this manual and on ice maker kit ready models only).
... "WARNING." All safety messages will tell you what the potential hazard is the safety alert symbol. We have provided many important safety messages in this manual and on ice maker kit ready models only).
Installation Instructions
Page 6
... Doors and Hinges" sections. ■ Depending on opposite side of handle and drive top screw into handle. Set aside door until you are in this manual). If you are also going to reverse the door swing, follow the instructions for the appropriate door style. Do not depend on the door magnets...
... Doors and Hinges" sections. ■ Depending on opposite side of handle and drive top screw into handle. Set aside door until you are in this manual). If you are also going to reverse the door swing, follow the instructions for the appropriate door style. Do not depend on the door magnets...
Installation Instructions
Page 7
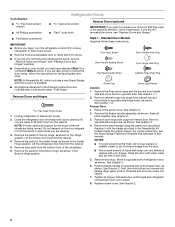
... place. 7 See Graphic 6. 2. See Graphic 6. See Graphic 6. Remove the screw cover. Style 2 - Slide the center hinge, from the door. ■ Rub a small amount of this manual). Keep all parts together. Replace it with the door handle hole plug provided in the Reversibility Kit located in the Reversibility Kit located inside the...
... place. 7 See Graphic 6. 2. See Graphic 6. See Graphic 6. Remove the screw cover. Style 2 - Slide the center hinge, from the door. ■ Rub a small amount of this manual). Keep all parts together. Replace it with the door handle hole plug provided in the Reversibility Kit located in the Reversibility Kit located inside the...
Owners Manual
Page 2
...: This product contains one or more chemicals known to the State of California to cause cancer. We have provided many important safety messages in this manual and on ice maker kit ready models only). This is , tell you how to persons when using the refrigerator, follow the safety alert symbol and...
...: This product contains one or more chemicals known to the State of California to cause cancer. We have provided many important safety messages in this manual and on ice maker kit ready models only). This is , tell you how to persons when using the refrigerator, follow the safety alert symbol and...

Owners Manual
Page 6
... freezer handle assembly, as shown in the Center Hinge graphic. Remove door hinge hole plug from doors. ■ If you are included later in this manual). Replace it with a soft cloth. 5. See Graphic 2. Align upper portion of this section after "Final Steps." See Graphic 2. 6 Remove the parts for the center hinge...
... freezer handle assembly, as shown in the Center Hinge graphic. Remove door hinge hole plug from doors. ■ If you are included later in this manual). Replace it with a soft cloth. 5. See Graphic 2. Align upper portion of this section after "Final Steps." See Graphic 2. 6 Remove the parts for the center hinge...

Owners Manual
Page 7
... last page of refrigerator door, as shown. Move to pry the brand badge from the cabinet top and move them to opposite side of this manual). Reinstall freezer handle on opposite side with your fingers. See Graphic 2. 5. Keep all screws. Replace on opposite side of freezer door, as shown. Style 2 - Pull...
... last page of refrigerator door, as shown. Move to pry the brand badge from the cabinet top and move them to opposite side of this manual). Reinstall freezer handle on opposite side with your fingers. See Graphic 2. 5. Keep all screws. Replace on opposite side of freezer door, as shown. Style 2 - Pull...
Quick Reference Manual
Page 1
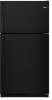
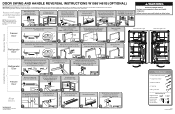
... bottom hinge to the opposite side. Tighten the screws (previously loosened), and reinstall and tighten the Center Hinge screw. Align Doors W10661461B © 2014 Whirlpool Corporation. Tighten the two screws (previously loosened), and reinstall and tighten the Center Hinge screw. 3 4 5 Tools Required ‡ 5/16" Hex ... grilles, firmly pull the grille toward you are working. NOTE: Handles are on the door magnets to the opposite sides of the manual), and the handle on some models. Reverse Doors 1 A. or Set the Refrigerator door onto the bottom hinge pin. Lift freezer door...
... bottom hinge to the opposite side. Tighten the screws (previously loosened), and reinstall and tighten the Center Hinge screw. Align Doors W10661461B © 2014 Whirlpool Corporation. Tighten the two screws (previously loosened), and reinstall and tighten the Center Hinge screw. 3 4 5 Tools Required ‡ 5/16" Hex ... grilles, firmly pull the grille toward you are working. NOTE: Handles are on the door magnets to the opposite sides of the manual), and the handle on some models. Reverse Doors 1 A. or Set the Refrigerator door onto the bottom hinge pin. Lift freezer door...

