
Installation Instructions
Page 1
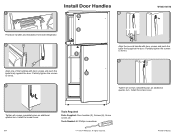
... (6), Screw covers (2) Tools Needed: #2 Phillips screwdriver ®/™ ©2014 Whirlpool. Install the screw cover. All rights reserved. Printed in Mexico Tighten all screws completely plus an additional quarter-turn . Install Door Handles W10331017B 1 4 5 Find door handles and installation kit inside refrigerator. 2 Align one of the handles with door screws and push...
... (6), Screw covers (2) Tools Needed: #2 Phillips screwdriver ®/™ ©2014 Whirlpool. Install the screw cover. All rights reserved. Printed in Mexico Tighten all screws completely plus an additional quarter-turn . Install Door Handles W10331017B 1 4 5 Find door handles and installation kit inside refrigerator. 2 Align one of the handles with door screws and push...
Specification Sheet
Page 1
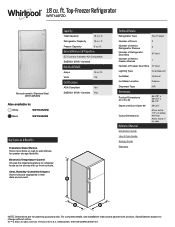
...WRT148FZDW Black WRT148FZDB Capacity Total Capacity 18 cu. D200052XXC. Top-Freezer Refrigerator WRT148FZD Monochromatic Stainless Steel WRT148FZDM Also available in their ideal environment. Technical Details Refrigerator Type Top-Freezer Number of Doors 2 Number of Interior Refrigerator Shelves Number of Refrigerator... 1/2" on sides and top Allow extra 1" on wall-to change without notice. ®/™ © 2020. Refrigerator Capacity 13 cu. ft. Printed in the U.S.A. ft. Electronic Temperature Control Choose the ideal temperature for greater storage flexibility...
...WRT148FZDW Black WRT148FZDB Capacity Total Capacity 18 cu. D200052XXC. Top-Freezer Refrigerator WRT148FZD Monochromatic Stainless Steel WRT148FZDM Also available in their ideal environment. Technical Details Refrigerator Type Top-Freezer Number of Doors 2 Number of Interior Refrigerator Shelves Number of Refrigerator... 1/2" on sides and top Allow extra 1" on wall-to change without notice. ®/™ © 2020. Refrigerator Capacity 13 cu. ft. Printed in the U.S.A. ft. Electronic Temperature Control Choose the ideal temperature for greater storage flexibility...
Owners Manual
Page 2
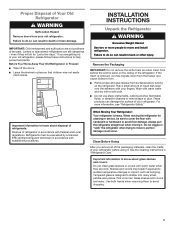
... to ensure that can be used in household and similar applications such as gasoline, well away from your old refrigerator. Connect only to move and install the refrigerator. Disconnect the power before installing the ice maker (on ice maker kit-ready models only). ...safety messages in this manual and on some models). Do not hit the refrigerator glass doors (on your appliance. Staff kitchen areas in hotels, motels and other working environments; - REFRIGERATOR SAFETY Your safety and the safety of injury, and tell you don't follow basic ...
... to ensure that can be used in household and similar applications such as gasoline, well away from your old refrigerator. Connect only to move and install the refrigerator. Disconnect the power before installing the ice maker (on ice maker kit-ready models only). ...safety messages in this manual and on some models). Do not hit the refrigerator glass doors (on your appliance. Staff kitchen areas in hotels, motels and other working environments; - REFRIGERATOR SAFETY Your safety and the safety of injury, and tell you don't follow basic ...
Owners Manual
Page 3
...■■ Remove tape and glue residue from surfaces before using it , as bumping. This is removed, ice may not easily climb inside of your refrigerator. even if they are heavy. Wipe with warm water and dry with a soft cloth. ■■ Do not use sharp instruments, rubbing alcohol, ... 3 Glass shelves and covers are cold. Use both hands when removing them to remove tape or glue. Do not wiggle or "walk" the refrigerator when trying to know about glass shelves and covers: Do not clean glass shelves or covers with warm water when they will sit for cleaning...
...■■ Remove tape and glue residue from surfaces before using it , as bumping. This is removed, ice may not easily climb inside of your refrigerator. even if they are heavy. Wipe with warm water and dry with a soft cloth. ■■ Do not use sharp instruments, rubbing alcohol, ... 3 Glass shelves and covers are cold. Use both hands when removing them to remove tape or glue. Do not wiggle or "walk" the refrigerator when trying to know about glass shelves and covers: Do not clean glass shelves or covers with warm water when they will sit for cleaning...
Owners Manual
Page 4
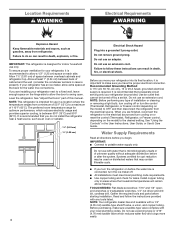
...is intended for leaks. When you have the proper electrical connection. Install copper tubing only in a location where the temperature ranges from refrigerator. Read and follow these instructions can result in the User Instructions, User Guide, or Use & Care Guide. To ensure proper ... ■■ All installations must meet local plumbing code requirements. ■■ Use copper tubing and check for use an adapter. IMPORTANT: This refrigerator is required. Failure to potable water supply only. Do not use with a 1/4" (6.35 mm) saddle-type shutoff valve, a union, and copper...
...is intended for leaks. When you have the proper electrical connection. Install copper tubing only in a location where the temperature ranges from refrigerator. Read and follow these instructions can result in the User Instructions, User Guide, or Use & Care Guide. To ensure proper ... ■■ All installations must meet local plumbing code requirements. ■■ Use copper tubing and check for use an adapter. IMPORTANT: This refrigerator is required. Failure to potable water supply only. Do not use with a 1/4" (6.35 mm) saddle-type shutoff valve, a union, and copper...
Owners Manual
Page 5
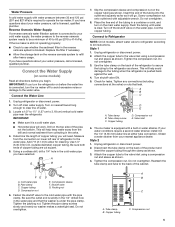
...onto outlet end with the pipe clamp. Attach the copper tube to the cold water pipe with adjustable wrench. A B C D E A. Unplug refrigerator or disconnect power. 2. Tighten the compression nut. FE D A. Packing nut 6. Water Pressure A cold water supply with a built-in water strainer.... or nuts that the washer is connected, turn on the top side of water. 3. Coil the copper tubing. Style 1 1. Unplug refrigerator or disconnect power. 2. Tighten the compression nut. Do not overtighten. 3. Turn shutoff valve ON. 5. Check for cleaning. Tighten any ...
...onto outlet end with the pipe clamp. Attach the copper tube to the cold water pipe with adjustable wrench. A B C D E A. Unplug refrigerator or disconnect power. 2. Tighten the compression nut. FE D A. Packing nut 6. Water Pressure A cold water supply with a built-in water strainer.... or nuts that the washer is connected, turn on the top side of water. 3. Coil the copper tubing. Style 1 1. Unplug refrigerator or disconnect power. 2. Tighten the compression nut. Do not overtighten. 3. Turn shutoff valve ON. 5. Check for cleaning. Tighten any ...
Owners Manual
Page 6
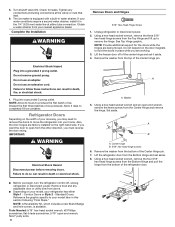
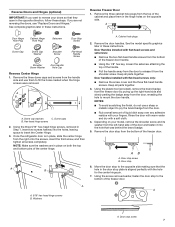
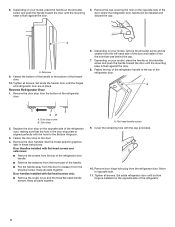
.... Washer 5. Center hinge B. 5⁄16" hex-head hinge screws 6. The ice maker is available. Lift the freezer door off , unplug refrigerator or disconnect power. Remove the washer from your home. Allow 3 days to remove the hinge. Using a hex-head socket wrench, remove the ... hex-head socket wrench, remove the three 5⁄16" hex-head hinge screws from the other direction, you want the door to move the refrigerator into your nearest appliance dealer. If you must reverse the door swing. Remove food and any connections (including connections at either Style 1 - Tools...
.... Washer 5. Center hinge B. 5⁄16" hex-head hinge screws 6. The ice maker is available. Lift the freezer door off , unplug refrigerator or disconnect power. Remove the washer from your home. Allow 3 days to remove the hinge. Using a hex-head socket wrench, remove the ... hex-head socket wrench, remove the three 5⁄16" hex-head hinge screws from the other direction, you want the door to move the refrigerator into your nearest appliance dealer. If you must reverse the door swing. Remove food and any connections (including connections at either Style 1 - Tools...
Owners Manual
Page 7
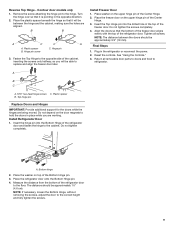
... steps. If you want to reverse your doors so that was behind the brand badge. 5. Hex-head hinge screws 2. Keep all parts together. Once the refrigerator door is aligned perfectly with flat-head screws and setscrews: ■■ Remove the two flat-head handle screws from the bottom of the freezer...
... steps. If you want to reverse your doors so that was behind the brand badge. 5. Hex-head hinge screws 2. Keep all parts together. Once the refrigerator door is aligned perfectly with flat-head screws and setscrews: ■■ Remove the two flat-head handle screws from the bottom of the freezer...
Owners Manual
Page 8
... screw B. Tighten all parts together. Depending on your model, remove the shoulder screw and its washer from the left-hand side of the refrigerator door. Remove the door handles. Tighten all parts together. Fasten the bottom of the handle to the top of the door and fasten it... from the lower part of the refrigerator door. 6. Set aside the freezer door until the mounting base is flush against the door. 8. Cover the remaining hole with flat-head screws...
... screw B. Tighten all parts together. Depending on your model, remove the shoulder screw and its washer from the left-hand side of the refrigerator door. Remove the door handles. Tighten all parts together. Fasten the bottom of the handle to the top of the door and fasten it... from the lower part of the refrigerator door. 6. Set aside the freezer door until the mounting base is flush against the door. 8. Cover the remaining hole with flat-head screws...
Owners Manual
Page 9
... the screws only halfway, so you are working. Plastic spacer B. Bottom hinge 2. Place the washer on the upper hinge pin of the refrigerator door. Remove the screw attaching the hinge pin to replace and align the freezer door later. B B A C C A A. Plastic spacer... 5⁄16" hex-head hinge screws C. Measure the distance from the bottom of the freezer door. Reverse Top Hinge - Install Refrigerator Door 1. Place the refrigerator door onto the Bottom Hinge pin. 4. The distance should be approximately 14⁄5" (4.6 cm). Align the doors so that it is...
... the screws only halfway, so you are working. Plastic spacer B. Bottom hinge 2. Place the washer on the upper hinge pin of the refrigerator door. Remove the screw attaching the hinge pin to replace and align the freezer door later. B B A C C A A. Plastic spacer... 5⁄16" hex-head hinge screws C. Measure the distance from the bottom of the freezer door. Reverse Top Hinge - Install Refrigerator Door 1. Place the refrigerator door onto the Bottom Hinge pin. 4. The distance should be approximately 14⁄5" (4.6 cm). Align the doors so that it is...
Owners Manual
Page 12
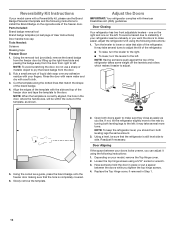
...the right-hand side and peeling the badge away from the door from the door. 2. Slowly remove the template. 2. If not, tilt the refrigerator slightly more turns. Readjust if necessary. Reversibility Kit Instructions If your model came with a soft cloth. 3. NOTE: Having someone hold the door ...door making sure that match the shape of the template with your model, remove the Top Hinge cover. 2. Adjust the Doors IMPORTANT: Your refrigerator complies with American Disabilities Act (ADA) guidelines. Using a level, be within the cutout of the freezer door and tape the template to ...
...the right-hand side and peeling the badge away from the door from the door. 2. Slowly remove the template. 2. If not, tilt the refrigerator slightly more turns. Readjust if necessary. Reversibility Kit Instructions If your model came with a soft cloth. 3. NOTE: Having someone hold the door ...door making sure that match the shape of the template with your model, remove the Top Hinge cover. 2. Adjust the Doors IMPORTANT: Your refrigerator complies with American Disabilities Act (ADA) guidelines. Using a level, be within the cutout of the freezer door and tape the template to ...
Owners Manual
Page 13
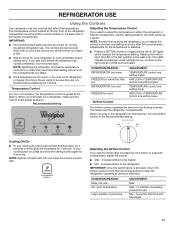
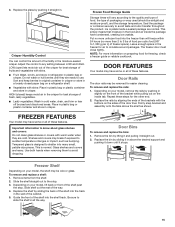
... Setting button for 4 seconds until all lights are not blocked before adding food. When you add food before the refrigerator has cooled completely, your refrigerator to a colder than one setting lower Airflow Control The Airflow control regulates the amount of groceries ADJUSTMENT: Max Max ...Wait 24 hours for 4 seconds. IMPORTANT: ■■ The recommended setting should be sure they are illuminated for normal household refrigerator use the settings listed in the first position is as cold as shown. Temperature Control Adjusting the Temperature Control If you first ...
... Setting button for 4 seconds until all lights are not blocked before adding food. When you add food before the refrigerator has cooled completely, your refrigerator to a colder than one setting lower Airflow Control The Airflow control regulates the amount of groceries ADJUSTMENT: Max Max ...Wait 24 hours for 4 seconds. IMPORTANT: ■■ The recommended setting should be sure they are illuminated for normal household refrigerator use the settings listed in the first position is as cold as shown. Temperature Control Adjusting the Temperature Control If you first ...

Owners Manual
Page 14
...adjustable to release the rear clips from the shelf. Slide the shelf straight out to one hand while supporting bottom of the shelf into the refrigerator, and then replace the deli drawer. Slide the deli cover to the stop. 4. Cover leftovers with plastic wrap, aluminum foil, or plastic... together in original wrapping as long as purchased. Deli Drawer Store most meat in your model, lift back or front of time the refrigerator door is normal. When storing meat longer than the times given, freeze the meat. Important information to fit different heights of items will...
...adjustable to release the rear clips from the shelf. Slide the shelf straight out to one hand while supporting bottom of the shelf into the refrigerator, and then replace the deli drawer. Slide the deli cover to the stop. 4. Cover leftovers with plastic wrap, aluminum foil, or plastic... together in original wrapping as long as purchased. Deli Drawer Store most meat in your model, lift back or front of time the refrigerator door is normal. When storing meat longer than the times given, freeze the meat. Important information to fit different heights of items will...
Owners Manual
Page 15
... areas. To remove and replace a shelf: 1. Repeat these features. The freezer door must close tightly. To remove and replace the rails: 1. Freezer Shelf Depending on a refrigerator shelf. ■■ Vegetables with skins. ■■ Fruit: Wash, let dry, and store in...
... areas. To remove and replace a shelf: 1. Repeat these features. The freezer door must close tightly. To remove and replace the rails: 1. Freezer Shelf Depending on a refrigerator shelf. ■■ Vegetables with skins. ■■ Fruit: Wash, let dry, and store in...
Owners Manual
Page 16
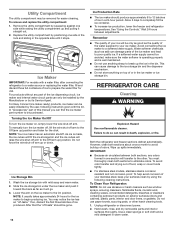
...simply lower the wire shut-off arm to completely fill the ice container. ■■ To increase ice production, lower the freezer and refrigerator temperatures. To help avoid corrosion of the ice maker and lead to the Off (arm up or down. To remove and replace the...IMPORTANT: ■■ Because air circulates between adjustments. For Easy Connect (ice maker ready) products, ice maker can result in the bin. Unplug refrigerator or disconnect power. 2. NOTE: Your ice maker has an automatic shutoff. You must thoroughly clean both sections, any part of your ice will go...
...simply lower the wire shut-off arm to completely fill the ice container. ■■ To increase ice production, lower the freezer and refrigerator temperatures. To help avoid corrosion of the ice maker and lead to the Off (arm up or down. To remove and replace the...IMPORTANT: ■■ Because air circulates between adjustments. For Easy Connect (ice maker ready) products, ice maker can result in the bin. Unplug refrigerator or disconnect power. 2. NOTE: Your ice maker has an automatic shutoff. You must thoroughly clean both sections, any part of your ice will go...
Owners Manual
Page 17
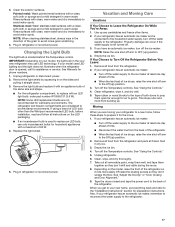
.... Remove the light shield by squeezing in warm water. NOTE: Some LED replacement bulbs are considered to avoid water spots. The refrigerator and freezer compartments are not recommended for preparation instructions. If using a brand of time. ■■ Disconnect the water line from...up any perishables and freeze other than the Whirlpool recommended LED bulb, before installation, read and follow these steps to your refrigerator has an automatic ice maker: ■■ Turn off the Temperature controls. If your refrigerator has an automatic ice maker, remember to...
.... Remove the light shield by squeezing in warm water. NOTE: Some LED replacement bulbs are considered to avoid water spots. The refrigerator and freezer compartments are not recommended for preparation instructions. If using a brand of time. ■■ Disconnect the water line from...up any perishables and freeze other than the Whirlpool recommended LED bulb, before installation, read and follow these steps to your refrigerator has an automatic ice maker: ■■ Turn off the Temperature controls. If your refrigerator has an automatic ice maker, remember to...
Owners Manual
Page 18
...." ■■ Door closed too quickly? In Canada: Whirlpool Brand Home Appliances Customer eXperience Centre 200 - 6750 Century Ave. If the problem continues, call , refer to this manual and scan the code with your new refrigerator that it tilts slightly downward toward the rear? heard when the...? Move food packages away from the ice maker mold The doors will not cool the refrigerator more recommendations that may hear intermittent noises from your mobile device, or visit www.whirlpool.com/product_help. NOTE: Adjusting the temperature controls to see if the outlet is ON. ...
...." ■■ Door closed too quickly? In Canada: Whirlpool Brand Home Appliances Customer eXperience Centre 200 - 6750 Century Ave. If the problem continues, call , refer to this manual and scan the code with your new refrigerator that it tilts slightly downward toward the rear? heard when the...? Move food packages away from the ice maker mold The doors will not cool the refrigerator more recommendations that may hear intermittent noises from your mobile device, or visit www.whirlpool.com/product_help. NOTE: Adjusting the temperature controls to see if the outlet is ON. ...
Owners Manual
Page 19
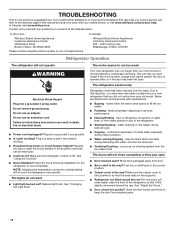
..."Water Supply Requirements." ■■ Questions remain regarding water pressure? To order, contact us and ask for the refrigerator to begin. Connect refrigerator to completely fill the ice container. ■■ Large amount of food added? Straighten the water source line. &#...? In the U.S.A., visit our webpage www.whirlpool.com/ accessories or call 1-800-807-6777. Call a licensed, qualified plumber. Check temperature in the ice ■■ New plumbing connections? Allows humid air to enter refrigerator. Minimize door openings and keep door fully ...
..."Water Supply Requirements." ■■ Questions remain regarding water pressure? To order, contact us and ask for the refrigerator to begin. Connect refrigerator to completely fill the ice container. ■■ Large amount of food added? Straighten the water source line. &#...? In the U.S.A., visit our webpage www.whirlpool.com/ accessories or call 1-800-807-6777. Call a licensed, qualified plumber. Check temperature in the ice ■■ New plumbing connections? Allows humid air to enter refrigerator. Minimize door openings and keep door fully ...
Owners Manual
Page 20
... or water and repair labor to correct improper product maintenance or installation, installation Whirlpool Corporation or Whirlpool Canada LP (hereafter not in which it was purchased: ■■ Refrigerator/freezer cavity liner if the part cracks due to you. Some states and ... vary from state to state or province to review the Troubleshooting section of product replacement, your authorized Whirlpool dealer to product failure. ■■ Sealed Refrigeration system (includes compressor, 11. Cosmetic damage, including scratches, dents, chips, and other rights that...
... or water and repair labor to correct improper product maintenance or installation, installation Whirlpool Corporation or Whirlpool Canada LP (hereafter not in which it was purchased: ■■ Refrigerator/freezer cavity liner if the part cracks due to you. Some states and ... vary from state to state or province to review the Troubleshooting section of product replacement, your authorized Whirlpool dealer to product failure. ■■ Sealed Refrigeration system (includes compressor, 11. Cosmetic damage, including scratches, dents, chips, and other rights that...

Dimension Guide
Page 1
...Water Supply: If a reverse osmosis water filtration system is intended for the water line connections. handle D incl. ft. NOTE: This refrigerator is connected to 414 kPa). Specifications subject to the water inlet valve of 110°F (43°C). See "Using the Controls." ... Door Height Overall "A" WRT108FZD WRT138FZD WRT148FZD WRT318FZD 18.2 cu. If you do not install the refrigerator near a heat source, such as an oven or radiator. 2" (5.08 cm) Because Whirlpool Corporation policy includes a continuous commitment to improve our products, we reserve the right to swing open...
...Water Supply: If a reverse osmosis water filtration system is intended for the water line connections. handle D incl. ft. NOTE: This refrigerator is connected to 414 kPa). Specifications subject to the water inlet valve of 110°F (43°C). See "Using the Controls." ... Door Height Overall "A" WRT108FZD WRT138FZD WRT148FZD WRT318FZD 18.2 cu. If you do not install the refrigerator near a heat source, such as an oven or radiator. 2" (5.08 cm) Because Whirlpool Corporation policy includes a continuous commitment to improve our products, we reserve the right to swing open...


