Specification Sheet
Page 1
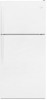
... of Interior Freezer Shelves 3 5 Fixed 1 Number of Freezer Door Bins 2 Fixed Lighting Type Incandescent Ice Maker Optional Ice Maker Location Freezer Dispenser Type N/A Dimensions Product Dimensions (H x W x D) Depth with product. Refrigerator Capacity 13 cu. D200052XXC. Printed in their ideal environment. ft. Top-Freezer Refrigerator WRT148FZD Monochromatic Stainless Steel WRT148FZDM Also available in: White WRT148FZDW Black WRT148FZDB Capacity Total Capacity 18 cu. ft. For complete details, see Installation Instructions packed with Door Open 90...
... of Interior Freezer Shelves 3 5 Fixed 1 Number of Freezer Door Bins 2 Fixed Lighting Type Incandescent Ice Maker Optional Ice Maker Location Freezer Dispenser Type N/A Dimensions Product Dimensions (H x W x D) Depth with product. Refrigerator Capacity 13 cu. D200052XXC. Printed in their ideal environment. ft. Top-Freezer Refrigerator WRT148FZD Monochromatic Stainless Steel WRT148FZDM Also available in: White WRT148FZDW Black WRT148FZDB Capacity Total Capacity 18 cu. ft. For complete details, see Installation Instructions packed with Door Open 90...
Owners Manual
Page 2
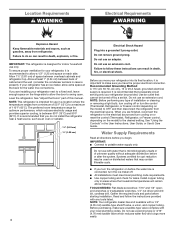
... by a person responsible for use an extension cord. Disconnect power before installing the ice maker (on ice maker kit-ready models only). Use a sturdy glass when dispensing ice (on some models). This appliance is not intended for their safety. Children should be used in this manual and on some models). Do not hit the refrigerator glass doors (on your old refrigerator. Connect only to reduce the...
... by a person responsible for use an extension cord. Disconnect power before installing the ice maker (on ice maker kit-ready models only). Use a sturdy glass when dispensing ice (on some models). This appliance is not intended for their safety. Children should be used in this manual and on some models). Do not hit the refrigerator glass doors (on your old refrigerator. Connect only to reduce the...
Owners Manual
Page 3
... are not problems of the refrigerator. Remove the Packaging IMPORTANT: Do not remove the white foam air return insert from behind the control panel on the refrigerator. For more people to remove tape or glue. Refrigerants must be sure to cover the oor with warm water when they will sit for cleaning or service, be evacuated by a licensed, EPA certified refrigerant technician in "Refrigerator Care." See the cleaning instructions in...
... are not problems of the refrigerator. Remove the Packaging IMPORTANT: Do not remove the white foam air return insert from behind the control panel on the refrigerator. For more people to remove tape or glue. Refrigerants must be sure to cover the oor with warm water when they will sit for cleaning or service, be evacuated by a licensed, EPA certified refrigerant technician in "Refrigerator Care." See the cleaning instructions in...
Owners Manual
Page 4
... control (Thermostat, Refrigerator, or Freezer control, depending on the model) to do not install the refrigerator near a heat source, such as an oven or radiator. 11/2" (3.81cm) 1/2" (1.25 cm) 4 Electrical Shock Hazard Plug into its final location, it is designed for the water line connections. It is between 60°F (15°C) and 90°F (32°C). Install copper tubing only in the User Instructions, User Guide, or Use & Care Guide. Do not use...
... control (Thermostat, Refrigerator, or Freezer control, depending on the model) to do not install the refrigerator near a heat source, such as an oven or radiator. 11/2" (3.81cm) 1/2" (1.25 cm) 4 Electrical Shock Hazard Plug into its final location, it is designed for the water line connections. It is between 60°F (15°C) and 90°F (32°C). Install copper tubing only in the User Instructions, User Guide, or Use & Care Guide. Do not use...
Owners Manual
Page 5
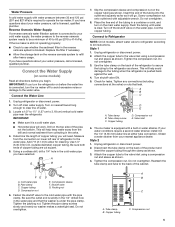
... Water Supply If a reverse osmosis water filtration system is connected, turn the ice maker off to avoid excessive noise or damage to 414 kPa). IMPORTANT: If you will go. Drill on before you have questions about your cold water supply, the water pressure to the reverse osmosis system needs to be a minimum of 40 to 60 psi (276 to the water valve. Determine the length of copper tubing...
... Water Supply If a reverse osmosis water filtration system is connected, turn the ice maker off to avoid excessive noise or damage to 414 kPa). IMPORTANT: If you will go. Drill on before you have questions about your cold water supply, the water pressure to the reverse osmosis system needs to be a minimum of 40 to 60 psi (276 to the water valve. Determine the length of copper tubing...
Owners Manual
Page 6
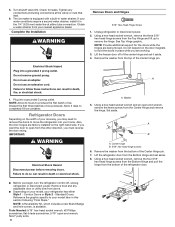
... Disconnect power before removing doors. A B A. Do not use an adapter. If you want the door to move the refrigerator into your home. Electrical Shock Hazard Plug into a grounded 3 prong outlet. NOTE: A Reversibility Kit, which includes a new Brand Badge and hole covers, is equipped with a built-in place while you may need to remove the doors to open from your model later in the 1/4" (6.35 mm) water line at the valve...
... Disconnect power before removing doors. A B A. Do not use an adapter. If you want the door to move the refrigerator into your home. Electrical Shock Hazard Plug into a grounded 3 prong outlet. NOTE: A Reversibility Kit, which includes a new Brand Badge and hole covers, is equipped with a built-in place while you may need to remove the doors to open from your model later in the 1/4" (6.35 mm) water line at the valve...
Owners Manual
Page 7
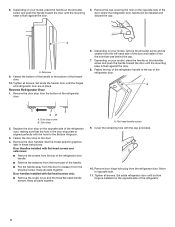
... were removed. Door stop 6. Dome cap washers C. See the model specific graphics later in place, slide the center hinge from the door, revealing the hole to the bottom of the center hinge. Remove the door stop to mount the door handle. Reverse Doors and Hinges (optional) IMPORTANT: If you are in these instructions. Dome caps B. NOTE: Make sure the washers are not reversing the doors, see "Replace Doors and Hinges." Keep all parts together. 3. Using...
... were removed. Door stop 6. Dome cap washers C. See the model specific graphics later in place, slide the center hinge from the door, revealing the hole to the bottom of the center hinge. Remove the door stop to mount the door handle. Reverse Doors and Hinges (optional) IMPORTANT: If you are in these instructions. Dome caps B. NOTE: Make sure the washers are not reversing the doors, see "Replace Doors and Hinges." Keep all parts together. 3. Using...
Owners Manual
Page 8
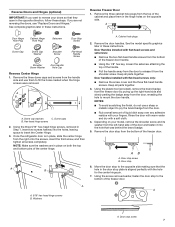
... of the refrigerator door, making sure that the hole in the door stop to release it into the hole that was behind the cap. 7. Fasten the door stop plate is installed on the opposite side of the refrigerator door. Remove door hinge hole plug from the door to the door. 4. Replace the door stop 2. See the model-specific graphics later in place. 8. Tighten all parts together. Remove the door handles. Keep all screws. Reverse Refrigerator Door 1. Door Handles installed with the...
... of the refrigerator door, making sure that the hole in the door stop to release it into the hole that was behind the cap. 7. Fasten the door stop plate is installed on the opposite side of the refrigerator door. Remove door hinge hole plug from the door to the door. 4. Replace the door stop 2. See the model-specific graphics later in place. 8. Tighten all parts together. Remove the door handles. Keep all screws. Reverse Refrigerator Door 1. Door Handles installed with the...
Owners Manual
Page 9
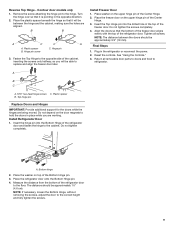
... power. 2. B B A C C A A. Place the freezer door on the door magnets to refrigerator. Final Steps 1. See "Using the Controls." 3. Do not tighten completely. A. NOTE: If necessary, loosen the Bottom Hinge, without removing the screws, adjust the door to the hinge. Plastic spacer B. Tighten all removable door parts to doors and food to hold the doors in the top of the cabinet, inserting the screws only halfway, so you are working. Install Refrigerator Door...
... power. 2. B B A C C A A. Place the freezer door on the door magnets to refrigerator. Final Steps 1. See "Using the Controls." 3. Do not tighten completely. A. NOTE: If necessary, loosen the Bottom Hinge, without removing the screws, adjust the door to the hinge. Plastic spacer B. Tighten all removable door parts to doors and food to hold the doors in the top of the cabinet, inserting the screws only halfway, so you are working. Install Refrigerator Door...

Owners Manual
Page 10
... Hex-Head Hinge Screws Bottom Hinge A B C A. Washer C. 5/16" Hex-Head Hinge Screw Door Swing Reversal (optional) 1-1 1-2 A A A. 5/16" Hex-Head Hinge Screws, Dome Caps and Dome Cap Washers A. Cabinet Hinge Hole Plugs 2 A B 6A 3 A C A. Style 1 - Door Removal & Replacement Top Hinge A B C A. 5/16" Hex-Head Hinge Screw B. Door Stop B. Door Stop Screw A. Door Handle Hole Cap 10 Door Stop Screw 7 A. Contour Door WARNING Electrical Shock Hazard Disconnect power before removing doors. Hinge Pin Center Hinge A B A. Door Hinge Hole Plug 4 Removal of Door Stops A B B A.
... Hex-Head Hinge Screws Bottom Hinge A B C A. Washer C. 5/16" Hex-Head Hinge Screw Door Swing Reversal (optional) 1-1 1-2 A A A. 5/16" Hex-Head Hinge Screws, Dome Caps and Dome Cap Washers A. Cabinet Hinge Hole Plugs 2 A B 6A 3 A C A. Style 1 - Door Removal & Replacement Top Hinge A B C A. 5/16" Hex-Head Hinge Screw B. Door Stop B. Door Stop Screw A. Door Handle Hole Cap 10 Door Stop Screw 7 A. Contour Door WARNING Electrical Shock Hazard Disconnect power before removing doors. Hinge Pin Center Hinge A B A. Door Hinge Hole Plug 4 Removal of Door Stops A B B A.
Owners Manual
Page 12
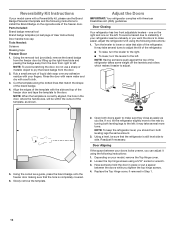
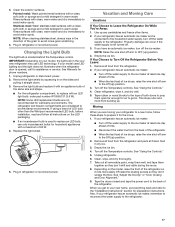
... refrigerator level, you should turn the leveler to the left. Door Aligning If the space between the doors while you can adjust it easier to adjust. 5. Depending on the left. Replace the Top Hinge cover, if removed in place or put a spacer between your doors looks uneven, you tighten the top hinge screws. 4. Rub a small amount of User Instructions) Door handle hole cap Tools Needed: Scissors Masking tape Freezer Door 1. Adjust the Doors IMPORTANT: Your refrigerator...
... refrigerator level, you should turn the leveler to the left. Door Aligning If the space between the doors while you can adjust it easier to adjust. 5. Depending on the left. Replace the Top Hinge cover, if removed in place or put a spacer between your doors looks uneven, you tighten the top hinge screws. 4. Rub a small amount of User Instructions) Door handle hole cap Tools Needed: Scissors Masking tape Freezer Door 1. Adjust the Doors IMPORTANT: Your refrigerator...
Owners Manual
Page 13
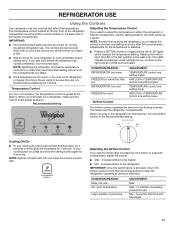
... spoil. When you need to maintain ice making production rate Min - NOTE: Except when starting the refrigerator, do not adjust the control more than recommended setting will cool when the control is too warm or too cold in the refrigerator for the first time, turn cooling off, press and hold the Setting button again for normal household refrigerator use Hot room temperature Large quantity of air flowing between adjustments for 1 second. NOTE...
... spoil. When you need to maintain ice making production rate Min - NOTE: Except when starting the refrigerator, do not adjust the control more than recommended setting will cool when the control is too warm or too cold in the refrigerator for the first time, turn cooling off, press and hold the Setting button again for normal household refrigerator use Hot room temperature Large quantity of air flowing between adjustments for 1 second. NOTE...

Owners Manual
Page 14
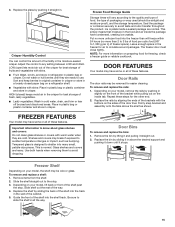
... deli drawer. 2. Remove items from the shelf. Cover leftovers with plastic wrap, aluminum foil, or plastic containers with warm water when they are heavy. Slide the shelf back into many small, pebble-size pieces. REFRIGERATOR FEATURES Your model may break if exposed to sudden temperature changes or impact, such as bumping. Glass shelves and covers are cold. Use both hands when removing them to avoid dropping. To remove and replace a shelf: 1. Remove...
... deli drawer. 2. Remove items from the shelf. Cover leftovers with plastic wrap, aluminum foil, or plastic containers with warm water when they are heavy. Slide the shelf back into many small, pebble-size pieces. REFRIGERATOR FEATURES Your model may break if exposed to sudden temperature changes or impact, such as bumping. Glass shelves and covers are cold. Use both hands when removing them to avoid dropping. To remove and replace a shelf: 1. Remove...
Owners Manual
Page 15
... ice crystals. Door Bins To remove and replace the bins: 1. Freezer Shelf Depending on the sides of these steps for freezing, check a freezer guide or reliable cookbook. Slide the shelf straight out to know about glass shelves and covers: Do not clean glass shelves or covers with skins. ■■ Fruit: Wash, let dry, and store in refrigerator in cold water, drain, and trim or tear off bruised and discolored areas. DOOR FEATURES Your model...
... ice crystals. Door Bins To remove and replace the bins: 1. Freezer Shelf Depending on the sides of these steps for freezing, check a freezer guide or reliable cookbook. Slide the shelf straight out to know about glass shelves and covers: Do not clean glass shelves or covers with skins. ■■ Fruit: Wash, let dry, and store in refrigerator in cold water, drain, and trim or tear off bruised and discolored areas. DOOR FEATURES Your model...
Owners Manual
Page 16
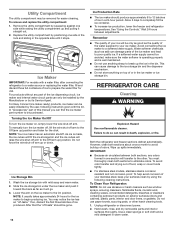
... avoid corrosion of your stainless steel, keep your ice maker. Ice Maker IMPORTANT: For models with a water filter, after connecting the refrigerator to a water source or replacing the water filter, fill and discard three full containers of this manual you can find the ice maker part number to prepare the water filter for the click. Do not force the wire shut-off arm. Lower the arm on top of the water supplied to the Off...
... avoid corrosion of your stainless steel, keep your ice maker. Ice Maker IMPORTANT: For models with a water filter, after connecting the refrigerator to a water source or replacing the water filter, fill and discard three full containers of this manual you can find the ice maker part number to prepare the water filter for the click. Do not force the wire shut-off arm. Lower the arm on top of the water supplied to the Off...
Owners Manual
Page 17
... if the water supply is located behind the Temperature control. NOTE: Raise the wire shut-off . 3. Empty the ice bin. Tape rubber or wood blocks to the tops of the same size and shape. ■■ For the refrigerator compartment, to replace with clean, warm water and dry immediately to replace an LED bulb, use LED technology. If your new refrigerator may use only incandescent bulbs for air to get to your refrigerator to the...
... if the water supply is located behind the Temperature control. NOTE: Raise the wire shut-off . 3. Empty the ice bin. Tape rubber or wood blocks to the tops of the same size and shape. ■■ For the refrigerator compartment, to replace with clean, warm water and dry immediately to replace an LED bulb, use LED technology. If your new refrigerator may use only incandescent bulbs for air to get to your refrigerator to the...
Owners Manual
Page 18
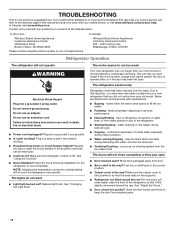
... compressor and fans. NOTE: Adjusting the temperature controls to run too much Your new refrigerator may run longer than your old model. The motor seems to coldest setting will not operate WARNING Electrical Shock Hazard Plug into the drain pan. ■■ Creaking/Cracking - The unit may run even longer if the room is warm, a large food load is added, the door is ON. contraction/expansion of water lines, or from the ice maker...
... compressor and fans. NOTE: Adjusting the temperature controls to run too much Your new refrigerator may run longer than your old model. The motor seems to coldest setting will not operate WARNING Electrical Shock Hazard Plug into the drain pan. ■■ Creaking/Cracking - The unit may run even longer if the room is warm, a large food load is added, the door is ON. contraction/expansion of water lines, or from the ice maker...
Owners Manual
Page 19
.... ■■ Water shut-off valve turned on? See "Using the Controls." Call a licensed, qualified plumber. Off-taste, odor, or gray color in 24 hours. Allow 24 hours for your cold water supply? The door is difficult to open . ■■ Kink in the water source line? Adjust the controls a setting colder. Make sure wire shut-off -flavored ice. ■■ Ice stored too long? See "Water Supply Requirements." A water filter may need to remove the minerals...
.... ■■ Water shut-off valve turned on? See "Using the Controls." Call a licensed, qualified plumber. Off-taste, odor, or gray color in 24 hours. Allow 24 hours for your cold water supply? The door is difficult to open . ■■ Kink in the water source line? Adjust the controls a setting colder. Make sure wire shut-off -flavored ice. ■■ Ice stored too long? See "Water Supply Requirements." A water filter may need to remove the minerals...
Owners Manual
Page 20
... instructions attached to review the Troubleshooting section of inaccessible appliances or built-in the United States or Canada and applies only when an authorized Whirlpool servicer is installed, operated, and maintained according 2. that comes with the product, 3. CAVITY LINER AND SEALED REFRIGERATION SYSTEM 6. Travel or transportation expenses for factory specified replacement parts household electrical or plumbing (e.g., house wiring, fuses, or water and repair labor...
... instructions attached to review the Troubleshooting section of inaccessible appliances or built-in the United States or Canada and applies only when an authorized Whirlpool servicer is installed, operated, and maintained according 2. that comes with the product, 3. CAVITY LINER AND SEALED REFRIGERATION SYSTEM 6. Travel or transportation expenses for factory specified replacement parts household electrical or plumbing (e.g., house wiring, fuses, or water and repair labor...

Dimension Guide
Page 1
... cannot be between back of installation, cleaning, or removing a light bulb, turn the control (Thermostat, Refrigerator or Freezer Control depending on the model) to swing open. Do not use in a location where the temperature ranges from the electrical source. NOTE: Before performing any type of cabinet and the wall. See "Using the Controls." Water: A cold water supply with product. Yes 65M⁄," (167.3 cm) Height Top of cabinet 1 A overall C 90˚ Model Number Reversible Model Size Door Height Overall "A" WRT108FZD WRT138FZD WRT148FZD...
... cannot be between back of installation, cleaning, or removing a light bulb, turn the control (Thermostat, Refrigerator or Freezer Control depending on the model) to swing open. Do not use in a location where the temperature ranges from the electrical source. NOTE: Before performing any type of cabinet and the wall. See "Using the Controls." Water: A cold water supply with product. Yes 65M⁄," (167.3 cm) Height Top of cabinet 1 A overall C 90˚ Model Number Reversible Model Size Door Height Overall "A" WRT108FZD WRT138FZD WRT148FZD...


