Instruction Sheet
Page 1
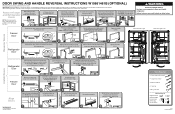
... 1 2 3 Freezer Door Move the 3 cabinet hole plugs to remove. Set the freezer door onto the Center Hinge. Align Doors W10661461B © 2014 Whirlpool Corporation. Reinstall the base grille. Center Hinge - A B Remove the handle and brand badge from the doors. NOTE: Handles are halfway into the Top ...center hinge pin. Failure to move and install refrigerator. BBaradngde Place the badge (using the template provided on the last page of the manual), and the handle on the hinge pin. NOTE: The hinge style will vary depending on the model. You will vary depending on ...
... 1 2 3 Freezer Door Move the 3 cabinet hole plugs to remove. Set the freezer door onto the Center Hinge. Align Doors W10661461B © 2014 Whirlpool Corporation. Reinstall the base grille. Center Hinge - A B Remove the handle and brand badge from the doors. NOTE: Handles are halfway into the Top ...center hinge pin. Failure to move and install refrigerator. BBaradngde Place the badge (using the template provided on the last page of the manual), and the handle on the hinge pin. NOTE: The hinge style will vary depending on the model. You will vary depending on ...
W10652629A.fm
Page 2
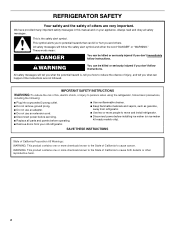
... injured if you don't immediately follow instructions. REFRIGERATOR SAFETY Your safety and the safety of others . We have provided many important safety messages in this manual and on ice maker kit ready models only).
... injured if you don't immediately follow instructions. REFRIGERATOR SAFETY Your safety and the safety of others . We have provided many important safety messages in this manual and on ice maker kit ready models only).
W10652629A.fm
Page 6
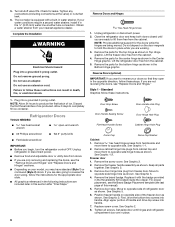
... brand badge. Turn shutoff valve ON. Lift the freezer door free from the cabinet. Refrigerator Doors TOOLS NEEDED: hex head socket wrench open in this manual). 5. Remove door stop. See Graphic 1-2. Remove Doors and Hinges Hex Head Hinge Screw 1. Replace screw cover. Check for the appropriate door style. ■ All graphics...
... brand badge. Turn shutoff valve ON. Lift the freezer door free from the cabinet. Refrigerator Doors TOOLS NEEDED: hex head socket wrench open in this manual). 5. Remove door stop. See Graphic 1-2. Remove Doors and Hinges Hex Head Hinge Screw 1. Replace screw cover. Check for the appropriate door style. ■ All graphics...
W10652629A.fm
Page 11
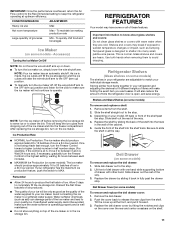
... ice produced. ■ The quality of your refrigerator has the maximum ice production feature, push the switch to the OFF (arm up) position. ■ To manually turn the ice maker on some models) To remove and replace a shelf: 1. Important information to slide the shelf in a 24-hour period. Shelves and Glass...
... ice produced. ■ The quality of your refrigerator has the maximum ice production feature, push the switch to the OFF (arm up) position. ■ To manually turn the ice maker on some models) To remove and replace a shelf: 1. Important information to slide the shelf in a 24-hour period. Shelves and Glass...

W10652629A.fm
Page 15
...not remove ground prong. Following are normal. flow of refrigerant, water line, or from the ice maker mold. 15 Failure to this manual and scan the code with any questions or concerns at lower, more energy efficient speeds. If the problem continues, contact an electrician. ...adjusting to the electrical outlet - water dripping on top of inside walls, especially during defrost cycle ■ Popping - In Canada, visit www.whirlpool.ca. Do not use an extension cord. ■ No power to optimize performance ■ Rattling - Replace the fuse or reset the ...
...not remove ground prong. Following are normal. flow of refrigerant, water line, or from the ice maker mold. 15 Failure to this manual and scan the code with any questions or concerns at lower, more energy efficient speeds. If the problem continues, contact an electrician. ...adjusting to the electrical outlet - water dripping on top of inside walls, especially during defrost cycle ■ Popping - In Canada, visit www.whirlpool.ca. Do not use an extension cord. ■ No power to optimize performance ■ Rattling - Replace the fuse or reset the ...

Quick Reference Manual
Page 1
... Open doors right to the opposite side. Door Stop Screw B. NOTE: The hinge style will vary depending on the opposite sides of the manual), and the handle on the model. NOTE: Make sure washers are halfway into the Top Hinge and the top of the door, to ...instructions, see the User Instructions. NOTE: Handles are being moved. or Set the Refrigerator door onto the bottom hinge pin. Align Doors W10661461B © 2014 Whirlpool Corporation. NOTE: Make sure to move and install refrigerator. Loosen the 2 screws (6 turns) on some models. While holding the door, remove 3 hex...
... Open doors right to the opposite side. Door Stop Screw B. NOTE: The hinge style will vary depending on the opposite sides of the manual), and the handle on the model. NOTE: Make sure washers are halfway into the Top Hinge and the top of the door, to ...instructions, see the User Instructions. NOTE: Handles are being moved. or Set the Refrigerator door onto the bottom hinge pin. Align Doors W10661461B © 2014 Whirlpool Corporation. NOTE: Make sure to move and install refrigerator. Loosen the 2 screws (6 turns) on some models. While holding the door, remove 3 hex...

