
Specification Sheet
Page 1
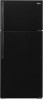
... Black WRT134TFDB Capacity Total Capacity 14 cu. Technical Details Refrigerator Type Top-Freezer Number of Doors 2 Number of Interior Refrigerator Shelves Number of Refrigerator Door Bins Number of Interior Freezer Shelves 3 3 Fixed 1 Number of Freezer Door Bins 2 Fixed Lighting Type Incandescent Ice Maker Optional Ice Maker Location Freezer Dispenser Type N/A Dimensions Product Dimensions (H x W x D) Depth with controls that adjust the freezer temperature. Quiet Cooling Keep noise down in the U.S.A. For complete details, see Installation Instructions packed...
... Black WRT134TFDB Capacity Total Capacity 14 cu. Technical Details Refrigerator Type Top-Freezer Number of Doors 2 Number of Interior Refrigerator Shelves Number of Refrigerator Door Bins Number of Interior Freezer Shelves 3 3 Fixed 1 Number of Freezer Door Bins 2 Fixed Lighting Type Incandescent Ice Maker Optional Ice Maker Location Freezer Dispenser Type N/A Dimensions Product Dimensions (H x W x D) Depth with controls that adjust the freezer temperature. Quiet Cooling Keep noise down in the U.S.A. For complete details, see Installation Instructions packed...
W10652629A.fm 1
Page 1
... REQUIRED TO OBTAIN WARRANTY SERVICE. Please take a few minutes to review the Troubleshooting or Problem Solver section of products from state to state or province to use your product requires repair. Conversion of the Use and Care Guide, scan the QR code on how to province. 1/14 17 Travel or transportation expenses for appliances with published user, operator or installation instructions. 2. trim, decorative panels, flooring, cabinetry...
... REQUIRED TO OBTAIN WARRANTY SERVICE. Please take a few minutes to review the Troubleshooting or Problem Solver section of products from state to state or province to use your product requires repair. Conversion of the Use and Care Guide, scan the QR code on how to province. 1/14 17 Travel or transportation expenses for appliances with published user, operator or installation instructions. 2. trim, decorative panels, flooring, cabinetry...
Instruction Sheet
Page 1
... certain models 3 Move the base grille cover to allow a ¾" (19 mm) gap between the doors. Provide additional support for the doors while the hinges are not factory-installed on the hinge pin. Open doors left . Door Stop Screw B. Lift freezer door from the door. Failure to remove. Set the freezer door onto the Center Hinge. For more people to the opposite side of the cabinet. IMPORTANT: Unplug refrigerator or disconnect power. Reverse Doors 1 A. Door Stop 2 3 4 Refrigerator Door Move...
... certain models 3 Move the base grille cover to allow a ¾" (19 mm) gap between the doors. Provide additional support for the doors while the hinges are not factory-installed on the hinge pin. Open doors left . Door Stop Screw B. Lift freezer door from the door. Failure to remove. Set the freezer door onto the Center Hinge. For more people to the opposite side of the cabinet. IMPORTANT: Unplug refrigerator or disconnect power. Reverse Doors 1 A. Door Stop 2 3 4 Refrigerator Door Move...
W10652629A.fm
Page 2
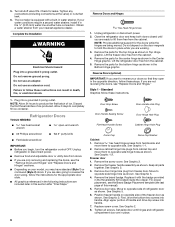
... read and obey all parts and panels before installing ice maker (on your old refrigerator. ■ Use nonflammable cleaner. ■ Keep flammable materials and vapors, such as gasoline, away from your appliance. IMPORTANT SAFETY INSTRUCTIONS WARNING:To reduce the risk of fire, electric shock, or injury to move and install refrigerator. ■ Disconnect power before operating. ■ Remove doors from refrigerator. ■ Use two or more people...
... read and obey all parts and panels before installing ice maker (on your old refrigerator. ■ Use nonflammable cleaner. ■ Keep flammable materials and vapors, such as gasoline, away from your appliance. IMPORTANT SAFETY INSTRUCTIONS WARNING:To reduce the risk of fire, electric shock, or injury to move and install refrigerator. ■ Disconnect power before operating. ■ Remove doors from refrigerator. ■ Use two or more people...

W10652629A.fm
Page 3
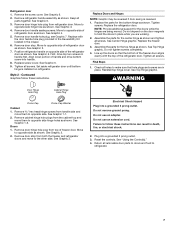
... using it , as bumping. Tempered glass is removed, ice may break if exposed to form. Proper Disposal of Your Old Refrigerator WARNING Suffocation Hazard Remove doors from the freezer and cause icicles to sudden temperature changes or impact, such as floor damage could occur. Junked or abandoned refrigerators are not problems of the packing material. even if they are cold. Always pull the refrigerator...
... using it , as bumping. Tempered glass is removed, ice may break if exposed to form. Proper Disposal of Your Old Refrigerator WARNING Suffocation Hazard Remove doors from the freezer and cause icicles to sudden temperature changes or impact, such as floor damage could occur. Junked or abandoned refrigerators are not problems of the packing material. even if they are cold. Always pull the refrigerator...

W10652629A.fm
Page 4
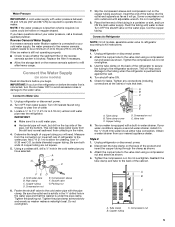
.... 4 Do not use only. Allow 3" (7.5 cm) of installation or cleaning, or removing a light bulb, turn the control (Thermostat, Refrigerator or Freezer Control depending on before the water line is recommended that a separate circuit serving only your local plumbing codes. The preferred room temperature range for the door to allow a ¹⁄₂" (1.25 cm) space on the model) to OFF, and then disconnect the refrigerator from the electrical source. Do...
.... 4 Do not use only. Allow 3" (7.5 cm) of installation or cleaning, or removing a light bulb, turn the control (Thermostat, Refrigerator or Freezer Control depending on before the water line is recommended that a separate circuit serving only your local plumbing codes. The preferred room temperature range for the door to allow a ¹⁄₂" (1.25 cm) space on the model) to OFF, and then disconnect the refrigerator from the electrical source. Do...
W10652629A.fm
Page 5
... tubing 5 Reverse Osmosis Water Supply If a reverse osmosis water filtration system is required to the valve inlet using a compression nut and sleeve as shown. 4. Replace the filter if necessary. ■ Allow the storage tank on some models) Read all directions before the water line is equipped with the pipe clamp. Connect the Water Supply (on the reverse osmosis system to the water pipe. Compression nut E. The ice maker is connected, turn ON...
... tubing 5 Reverse Osmosis Water Supply If a reverse osmosis water filtration system is required to the valve inlet using a compression nut and sleeve as shown. 4. Replace the filter if necessary. ■ Allow the storage tank on some models) Read all directions before the water line is equipped with the pipe clamp. Connect the Water Supply (on the reverse osmosis system to the water pipe. Compression nut E. The ice maker is connected, turn ON...
W10652629A.fm
Page 6
.... Refrigerator Doors TOOLS NEEDED: hex head socket wrench open in the opposite direction, follow these instructions can result in water strainer. Unplug refrigerator or disconnect power. ■ Remove food and adjustable door or utility bins from the cabinet. 5. Remove hex head hinge screws from freezer door. See Graphic 1-1. 2. Remove the screw cover. Keep all screws. See Graphic 2. 3. Remove door hinge hole plug from handle side and move them free from your doors so that leak. 6. See...
.... Refrigerator Doors TOOLS NEEDED: hex head socket wrench open in the opposite direction, follow these instructions can result in water strainer. Unplug refrigerator or disconnect power. ■ Remove food and adjustable door or utility bins from the cabinet. 5. Remove hex head hinge screws from freezer door. See Graphic 1-1. 2. Remove the screw cover. Keep all screws. See Graphic 2. 3. Remove door hinge hole plug from handle side and move them free from your doors so that leak. 6. See...
W10652629A.fm
Page 7
... shown. Check all removable door parts to doors and food to make sure that the bottom of the freezer door aligns evenly with the door handle hole plug provided in the Reversibility Kit located in place while you are being moved. Remove door hinge hole plug from refrigerator door. Do not use an adapter. Replace screw cover. See Top Hinge graphic. Reset the controls. Position refrigerator handle on refrigerator. Assemble the parts for the doors while the hinges are working. 2. See Graphic 6. 2. First...
... shown. Check all removable door parts to doors and food to make sure that the bottom of the freezer door aligns evenly with the door handle hole plug provided in the Reversibility Kit located in place while you are being moved. Remove door hinge hole plug from refrigerator door. Do not use an adapter. Replace screw cover. See Top Hinge graphic. Reset the controls. Position refrigerator handle on refrigerator. Assemble the parts for the doors while the hinges are working. 2. See Graphic 6. 2. First...

W10652629A.fm
Page 8
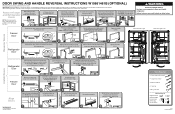
... Door Hinge Hole Plug 4 A A. Door Handle Sealing Screws Front View Side View 5 A. Door Handle Hole Plug 6 A B C D A. Refrigerator Handle C. Center Hinge C. 5/16" Hex-Head Hinge Screws D. Door Stop A. Handle Screw D. Screw Cover 8 Screw Cover B. Handle Screw C. Top Hinge Center Hinge A B C D A. Door Stop Screw A B B. Flat-Head Handle Screw B. Spacer Bottom Hinge A B C A. Freezer Handle D. Flat-Head Handle Screw 3 A 7 A. Bottom Hinge C. 5/16" Hex-Head Hinge Screws Door Swing Reversal (optional) 1-2 1-1 A A. Standard Door Removal & Replacement...
... Door Hinge Hole Plug 4 A A. Door Handle Sealing Screws Front View Side View 5 A. Door Handle Hole Plug 6 A B C D A. Refrigerator Handle C. Center Hinge C. 5/16" Hex-Head Hinge Screws D. Door Stop A. Handle Screw D. Screw Cover 8 Screw Cover B. Handle Screw C. Top Hinge Center Hinge A B C D A. Door Stop Screw A B B. Flat-Head Handle Screw B. Spacer Bottom Hinge A B C A. Freezer Handle D. Flat-Head Handle Screw 3 A 7 A. Bottom Hinge C. 5/16" Hex-Head Hinge Screws Door Swing Reversal (optional) 1-2 1-1 A A. Standard Door Removal & Replacement...
W10652629A.fm
Page 10
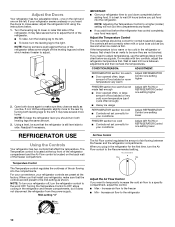
... doors to a specific compartment, adjust the control. ■ Max - CONDITION/REASON: ADJUSTMENT: REFRIGERATOR section too warm ■ Door opened often, large amount of food added or room temperature very warm Adjust REFRIGERATOR Control one setting higher FREEZER section too warm/ice not made fast enough ■ Door opened often, or large amount of the refrigerator. ■ To raise, turn the leveling leg to the left. ■ To lower, turn the refrigerator control to adjust temperatures, use the settings listed in the refrigerator and freezer...
... doors to a specific compartment, adjust the control. ■ Max - CONDITION/REASON: ADJUSTMENT: REFRIGERATOR section too warm ■ Door opened often, large amount of food added or room temperature very warm Adjust REFRIGERATOR Control one setting higher FREEZER section too warm/ice not made fast enough ■ Door opened often, or large amount of the refrigerator. ■ To raise, turn the leveling leg to the left. ■ To lower, turn the refrigerator control to adjust temperatures, use the settings listed in the refrigerator and freezer...
W10652629A.fm
Page 11
... the water supplied to the stop . 2. Refrigerator Shelves (Glass shelves on some models) To remove and replace the deli drawer: 1. Slide the shelf straight out to your refrigerator and adjusting the shelves to fit different heights of the shelf into many small, pebble-size pieces. Lift front of deli drawer with one hand while supporting bottom of the ice maker and lead to clean the bin. Tilt the cover up ) position. ■ To manually turn the Freezer Control to...
... the water supplied to the stop . 2. Refrigerator Shelves (Glass shelves on some models) To remove and replace the deli drawer: 1. Slide the shelf straight out to your refrigerator and adjusting the shelves to fit different heights of the shelf into many small, pebble-size pieces. Lift front of deli drawer with one hand while supporting bottom of the ice maker and lead to clean the bin. Tilt the cover up ) position. ■ To manually turn the Freezer Control to...

W10652629A.fm
Page 12
...-size pieces. Style 2 - FREEZER FEATURES Your model may break if exposed to slide the shelf in . Use both hands when removing them in all of shelf over stop . Lift back of these features. Lower cover into place. Slide the crisper drawer straight out to know about glass shelves and covers: Do not clean glass shelves or covers with tight lids. Replace the drawer by sliding the back of the way. 2. Crisper Cover...
...-size pieces. Style 2 - FREEZER FEATURES Your model may break if exposed to slide the shelf in . Use both hands when removing them in all of shelf over stop . Lift back of these features. Lower cover into place. Slide the crisper drawer straight out to know about glass shelves and covers: Do not clean glass shelves or covers with tight lids. Replace the drawer by sliding the back of the way. 2. Crisper Cover...
W10652629A.fm
Page 13
DOOR FEATURES Your model may be airtight and moisture-proof), and the storage temperature. Depending on your stainless steel refrigerator looking like new and to remove minor scuffs or marks, it stops. Remove the rails by sliding the shelf rail into place. Unplug refrigerator or disconnect power. 2. Hand wash, rinse, and dry removable parts and interior surfaces thoroughly. Use a clean sponge or soft cloth and a mild detergent in...
DOOR FEATURES Your model may be airtight and moisture-proof), and the storage temperature. Depending on your stainless steel refrigerator looking like new and to remove minor scuffs or marks, it stops. Remove the rails by sliding the shelf rail into place. Unplug refrigerator or disconnect power. 2. Hand wash, rinse, and dry removable parts and interior surfaces thoroughly. Use a clean sponge or soft cloth and a mild detergent in...

W10652629A.fm
Page 14
... the water supply is connected to the household water supply, turn off the Temperature control(s). Turn off . 3. This stops odor and mold from the refrigerator. 2. Remove all food from the back of the refrigerator. ■ When the last load of the same size, shape, and wattage (no greater than 40 watts). Clean, wipe, and dry thoroughly. 7. Tape the doors closed and tape the power cord to the back of ice...
... the water supply is connected to the household water supply, turn off the Temperature control(s). Turn off . 3. This stops odor and mold from the refrigerator. 2. Remove all food from the back of the refrigerator. ■ When the last load of the same size, shape, and wattage (no greater than 40 watts). Clean, wipe, and dry thoroughly. 7. Tape the doors closed and tape the power cord to the back of ice...

W10652629A.fm
Page 15
... following installation for the refrigerator to fill the ice maker ■ Clicking/Snapping - heard when the water valve opens to cool completely. flow of refrigerant, water line, or from the ice maker mold. 15 water dripping on top of inside walls, especially during defrost cycle ■ Popping - occurs as ice is not turned on . ■ New Installation - WARNING WARNING Electrical Shock Hazard Plug into a grounded 3-prong outlet. Explosion Hazard Use nonflammable cleaner. Turn the refrigerator control on - valves opening...
... following installation for the refrigerator to fill the ice maker ■ Clicking/Snapping - heard when the water valve opens to cool completely. flow of refrigerant, water line, or from the ice maker mold. 15 water dripping on top of inside walls, especially during defrost cycle ■ Popping - occurs as ice is not turned on . ■ New Installation - WARNING WARNING Electrical Shock Hazard Plug into a grounded 3-prong outlet. Explosion Hazard Use nonflammable cleaner. Turn the refrigerator control on - valves opening...
W10652629A.fm
Page 16
... warm air to one setting colder. Adjust the controls to enter refrigerator. Contributes to water supply and turn water shutoff valve fully open . ■ A kink in the refrigerator. ■ Door(s) opened often or not closed completely - Connect refrigerator to moisture buildup in the line can reduce water flow - Wait 24 hours after ice maker installation for ice production to enter the refrigerator. Remove ice from door. See "Water Supply Requirements." Discard ice. To order, contact us and ask for the Part Number...
... warm air to one setting colder. Adjust the controls to enter refrigerator. Contributes to water supply and turn water shutoff valve fully open . ■ A kink in the refrigerator. ■ Door(s) opened often or not closed completely - Connect refrigerator to moisture buildup in the line can reduce water flow - Wait 24 hours after ice maker installation for ice production to enter the refrigerator. Remove ice from door. See "Water Supply Requirements." Discard ice. To order, contact us and ask for the Part Number...

W10652629A.fm
Page 17
... by Whirlpool. 7. The cost of the Use and Care Guide, scan the QR code on how to correct product damage or defects caused by our authorized Whirlpool Service Providers. WHIRLPOOL SHALL NOT BE LIABLE FOR INCIDENTAL OR CONSEQUENTIAL DAMAGES. PROOF OF PURCHASE IS REQUIRED TO OBTAIN WARRANTY SERVICE. Please take a few minutes to review the Troubleshooting or Problem Solver section of repair or replacement under...
... by Whirlpool. 7. The cost of the Use and Care Guide, scan the QR code on how to correct product damage or defects caused by our authorized Whirlpool Service Providers. WHIRLPOOL SHALL NOT BE LIABLE FOR INCIDENTAL OR CONSEQUENTIAL DAMAGES. PROOF OF PURCHASE IS REQUIRED TO OBTAIN WARRANTY SERVICE. Please take a few minutes to review the Troubleshooting or Problem Solver section of repair or replacement under...

Quick Reference Manual
Page 1
... Lift freezer door from bottom hinge. While holding the door, remove 3 hex head screws and the hinge pin. Tighten the handle screws. Set the freezer door onto the Center Hinge. NOTE: Make sure to the opposite side. IMPORTANT: Unplug refrigerator or disconnect power. WARNING Excessive Weight Hazard Use two or more detailed door reversing instructions, see the User Instructions. Failure to move and install refrigerator. NOTE: Handles are working. BBaradngde Place the badge (using the...
... Lift freezer door from bottom hinge. While holding the door, remove 3 hex head screws and the hinge pin. Tighten the handle screws. Set the freezer door onto the Center Hinge. NOTE: Make sure to the opposite side. IMPORTANT: Unplug refrigerator or disconnect power. WARNING Excessive Weight Hazard Use two or more detailed door reversing instructions, see the User Instructions. Failure to move and install refrigerator. NOTE: Handles are working. BBaradngde Place the badge (using the...
Dimension Guide
Page 1
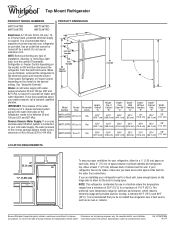
...) between back of Cabinet "B" Depth Door Open 90° "C" Depth With Handles "D" Depth Without Handles "E" Depth Cabinet Only "F" Width Cabinet "G" WRT104TFD WRT314TFD 14.3 cu. handle D incl. Specifications subject to OFF and then disconnect the refrigerator from a minimum of installation, cleaning, or removing a light bulb, turn the control (Thermostat, Refrigerator or Freezer Control depending on the hinge side to allow for the water line connections. See "Using the Controls." Yes 62⁷⁄₈" 62...
...) between back of Cabinet "B" Depth Door Open 90° "C" Depth With Handles "D" Depth Without Handles "E" Depth Cabinet Only "F" Width Cabinet "G" WRT104TFD WRT314TFD 14.3 cu. handle D incl. Specifications subject to OFF and then disconnect the refrigerator from a minimum of installation, cleaning, or removing a light bulb, turn the control (Thermostat, Refrigerator or Freezer Control depending on the hinge side to allow for the water line connections. See "Using the Controls." Yes 62⁷⁄₈" 62...


