Whirlpool WRT108FFDM Support and Manuals
Get Help and Manuals for this Whirlpool item

View All Support Options Below
Free Whirlpool WRT108FFDM manuals!
Problems with Whirlpool WRT108FFDM?
Ask a Question
Free Whirlpool WRT108FFDM manuals!
Problems with Whirlpool WRT108FFDM?
Ask a Question
Popular Whirlpool WRT108FFDM Manual Pages
Owners Manual - Page 2

...problems of the past. Failure to potable water supply only.
� This appliance is the safety alert symbol. SAVE THESE INSTRUCTIONS
Proper Disposal of Your Old Refrigerator
WARNING: Risk of refrigerator in accordance with a flammable propellant in this appliance.
� Do not use replacement parts...is damaged, it must be used in this manual and on your old appliance. and catering and...
Owners Manual - Page 6

...instructions provided with any type of unknown quality without adequate disinfection before starting installation. TOOLS NEEDED: Flat-blade screwdriver, 7/16" and 1/2" openend wrenches or 2 adjustable wrenches, 1/4" nut driver... Replace the...its service ... parts before ...Troubleshooting" online or call a licensed, qualified plumber.
6 Install copper or PEX tubing only in the Quick Start Guide...
Owners Manual - Page 10

...Models Graphics follow these instructions...Door stop . Tighten all parts together..
Remove the screw cover.
2. Remove the brand badge using the plastic tool (provided).
Replace screw cover. Remove refrigerator handle... manual). Keep all screws. Handle Screw
C. If you want to opposite side hinge holes as shown below . Style 1 -
Door Hinge Hole Plug
4. Replace...
Owners Manual - Page 11

... as shown. Cabinet Hinge Hole Plugs
11 Contour Door Models Graphics follow these instructions.
Door Hinge Cabinet Setscrew Hole Plug Hinge Hole
Plug
...A. 3.
Remove door handle hole plug and discard. Set aside refrigerator door until bottom hinge is installed on opposite side of
refrigerator door as shown below . Replace screw cover.
A.
NOTE: Make sure the washers ...
Owners Manual - Page 13

.... Do not use an extension cord. Check all screws. Reversibility Kit Instructions
If your model came with your contour door refrigerator, please use the Brand Badge Placement template and the following instructions to replace and align the freezer door later.
5. NOTE: Provide additional support for the bottom hinge as shown. Measure the distance from the...
Owners Manual - Page 15

... and replace the racks/bins:
1. Lift back of the bracket while pulling out on your model, the shelf may be wire or glass. Firmly snap bracket and assembly onto the tabs above the desired support
and...of food, the type of cabinet. 4. Replace the rack/bin by sliding the back of the shelf into the slots on the
door
Frozen Food Storage Guide
Storage times will freeze within 24 hours (no...
Owners Manual - Page 17

... replace the utility compartment: 1. Remove the utility compartment by its qualified service technician. Ice Maker
For models with a water filter, after 1 minute of inactivity. Refer to prepare the water filter for use . Turning the Ice Maker On/Off
� To turn the ice maker On, simply lower the wire shutoff arm. � To manually...
Installation Instructions - Page 4
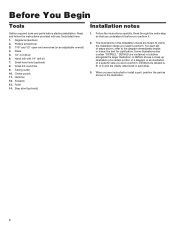
... level (optional) 8. The illustrations in this Installation Guide are meant to clarify the installation steps you are contained in each set of a specific step you need to install a part, position the part as shown in the illustration.
4 Regular screwdriver 2. Follow the instructions carefully. When you perform it before starting installation. Ruler 14. A DETAIL shows a close-up...
Installation Instructions - Page 5
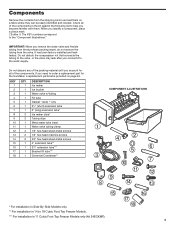
...do not remove the tubing from the shipping carton and set them . IMPORTANT: When you account for the Ice Maker, a replacement parts list is provided on a table where they can be...For installation in Side-By-Side Models only.
15
16
17
18
** For installation in 14 to 18 Cubic Foot Top Freezer Models.
*** For installation in the kit against the following list to order a replacement part for...
Installation Instructions - Page 6
...Guide" for the procedure).
If you should give you will not close properly.
3. For side-by -side models... freezer models" on the three model refrigerator-freezers
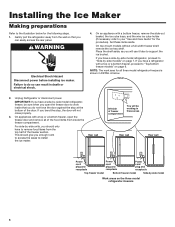
6 Set these areas...Installing the Ice Maker
Making preparations
Refer to the illustration below . Unplug Refrigerator or disconnect power. On appliances with a top or a bottom freezer, open the freezer door to support...
Installation Instructions - Page 11

...models
Remove 7 hexhead screws from rear access cover
Right channel
DETAIL B
Tubing clip
Top and SXS freezers
Tubing clip
Bottom freezers
Metal panel
Access cover
Remove hexhead screw from rear access cover DETAIL A Installing... hex-head screw from the rear access cover, then remove the cover and set it aside. Press the clips against the back of the access opening. Remove the seven hex-head ...
Installation Instructions - Page 18

...meet the water line inlet, located on water supply to refrigerator and check for service. Attach the
copper tubing to be pulled out of the refrigerator cabinet as ... instructions specific to the rear panel with the copper tubing. Do not overtighten.
Confirm copper tubing is secure by pulling on copper tubing. 2. Compression sleeve
3. 8.
Secure copper tubing to your model....
Installation Instructions - Page 21

...).
This completes the installation of ice and discard them. Starting the Ice Maker
1. Ice maker
Ice bucket
IMPORTANT: On top-mount models without a full-width freezer shelf, you have any problems, refer to its ...the side diagram) as far as it under the ice maker (see the side diagram) to "Troubleshooting" on the freezer floor.
2. The ice maker will go. Place the items back into the ...
Installation Instructions - Page 22

..., you encounter problems with your service center should consider installing a second water strainer in the water line. PROBLEM One or more ice, adjust the freezer control for a colder setting. Refrigerator or ...making has stopped. Be sure that acts like a pressure regulator to 3 hours. Troubleshooting chart
The following sounds is being dumped into the ice bucket (see page 21); ...
Installation Instructions - Page 23
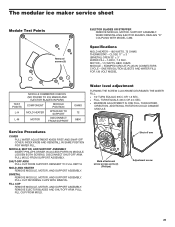
... CLIPS WITH BIMETAL. MOTOR - 1.5 WATTS, 8800 OHMS MODULE - PULL MOLD FROM SUPPORT ASSEMBLY. BIMETAL REMOVE MODULE, MOTOR, AND SUPPORT ASSEMBLY. Specifications
MOLD HEATER - 185 WATTS, 72 OHMS THERMOSTAT -
REMOVE EJECTOR BLADES AND SHUT-OFF ARM. WHEN REINSTALLING EJECTOR BLADES, REALIGN "D" COUPLING WITH MODEL CAM. CLOSE 17° ± 3 ° (BIMETAL) OPEN 32° ±...
Whirlpool WRT108FFDM Reviews
We have not received any reviews for Whirlpool yet.