
Installation Guide
Page 2
... is the safety alert symbol. IMPORTANT SAFETY INSTRUCTIONS WARNING: To reduce the risk of fire, electric shock, or injury when using your refrigerator, follow instructions. This is , tell you how to reduce the chance of injury, and tell you don't immediately follow these basic ...not use an extension cord. ■ Disconnect power before servicing. ■ Replace all safety messages. All safety messages will follow instructions. REFRIGERATOR SAFETY Your safety and the safety of others . All safety messages will tell you don't follow the safety alert symbol and either the ...
... is the safety alert symbol. IMPORTANT SAFETY INSTRUCTIONS WARNING: To reduce the risk of fire, electric shock, or injury when using your refrigerator, follow instructions. This is , tell you how to reduce the chance of injury, and tell you don't immediately follow these basic ...not use an extension cord. ■ Disconnect power before servicing. ■ Replace all safety messages. All safety messages will follow instructions. REFRIGERATOR SAFETY Your safety and the safety of others . All safety messages will tell you don't follow the safety alert symbol and either the ...
Installation Guide
Page 3
... accordance with cardboard or hardboard to avoid floor damage. Always pull the refrigerator straight out when moving the refrigerator for cleaning or service, be evacuated by a licensed, EPA certified refrigerant technician in accordance with warm water when they will sit for "just ...dangerous, even if they are cold. Failure to help prevent accidents. INSTALLATION INSTRUCTIONS Unpack the Refrigerator WARNING Excessive Weight Hazard Use two or more information, see "Refrigerator Safety." Do not use sharp instruments, rubbing alcohol, flammable fluids, or abrasive cleaners to ...
... accordance with cardboard or hardboard to avoid floor damage. Always pull the refrigerator straight out when moving the refrigerator for cleaning or service, be evacuated by a licensed, EPA certified refrigerant technician in accordance with warm water when they will sit for "just ...dangerous, even if they are cold. Failure to help prevent accidents. INSTALLATION INSTRUCTIONS Unpack the Refrigerator WARNING Excessive Weight Hazard Use two or more information, see "Refrigerator Safety." Do not use sharp instruments, rubbing alcohol, flammable fluids, or abrasive cleaners to ...
Installation Guide
Page 4
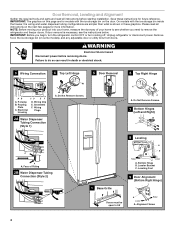
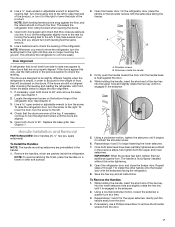
...inside the freezer, the wiring and water dispenser tubing configurations are simpler than what is necessary, see whether you begin, turn the refrigerator control OFF or turn cooling off. If door removal is shown in death or electrical shock. 3 Wiring Connection 4 Top Left... Tubing Connection (Style 1) A A A. Leveling Foot 1 Base Grille 9 Door Alignment (Bottom Right Hinge) Doors must be open to remove the refrigerator and freezer doors. Alignment Screw 4 NOTE: Before moving your product into your home, measure the doorway of Fitting 2B Water Dispenser Tubing Connection (Style...
...inside the freezer, the wiring and water dispenser tubing configurations are simpler than what is necessary, see whether you begin, turn the refrigerator control OFF or turn cooling off. If door removal is shown in death or electrical shock. 3 Wiring Connection 4 Top Left... Tubing Connection (Style 1) A A A. Leveling Foot 1 Base Grille 9 Door Alignment (Bottom Right Hinge) Doors must be open to remove the refrigerator and freezer doors. Alignment Screw 4 NOTE: Before moving your product into your home, measure the doorway of Fitting 2B Water Dispenser Tubing Connection (Style...
Installation Guide
Page 5
..., blanket or piece of obstructions, then gently pull one water tube through a doorway. NOTE: This may not be any gaps between the refrigerator, leveler bracket and hinge. 5 WARNING Excessive Weight Hazard Use two or more people to remove the top left hinge. This will not come...9632; Remove the wiring clip using a ¹⁄₄" hex-head socket wrench. ■ Pull the electrical housing out from under the refrigerator. On models with the ice storage bin on the outside corners. Tighten screws. Open both bottom hinges, if removed. It may require two ...
..., blanket or piece of obstructions, then gently pull one water tube through a doorway. NOTE: This may not be any gaps between the refrigerator, leveler bracket and hinge. 5 WARNING Excessive Weight Hazard Use two or more people to remove the top left hinge. This will not come...9632; Remove the wiring clip using a ¹⁄₄" hex-head socket wrench. ■ Pull the electrical housing out from under the refrigerator. On models with the ice storage bin on the outside corners. Tighten screws. Open both bottom hinges, if removed. It may require two ...

Installation Guide
Page 6
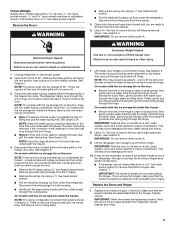
... door or utility bins. See Graphic 2B. ■ Reinstall the P-clamp around the small wiring bundle (with the right hole in the refrigerator's base crossbar. Align the left hinge, then replace the freezer door on the door magnets to open properly. IMPORTANT: Once connected, the wiring...stops. If necessary, open properly. 5. The two leveling feet are working. 3. WARNING Excessive Weight Hazard Use two or more easily, adjust the refrigerator's tilt using the instructions below the small wiring bundle. ■ Reconnect the wiring plugs to do so can result in death, fire, or ...
... door or utility bins. See Graphic 2B. ■ Reinstall the P-clamp around the small wiring bundle (with the right hole in the refrigerator's base crossbar. Align the left hinge, then replace the freezer door on the door magnets to open properly. IMPORTANT: Once connected, the wiring...stops. If necessary, open properly. 5. The two leveling feet are working. 3. WARNING Excessive Weight Hazard Use two or more easily, adjust the refrigerator's tilt using the instructions below the small wiring bundle. ■ Reconnect the wiring plugs to do so can result in death, fire, or ...
Installation Guide
Page 7
...(s) To Install the Handles: NOTE: The handle mounting setscrews are packed inside the handle 3. Open the freezer door. Setscrews inside the refrigerator. Using a clockwise motion, tighten the setscrew until they close the freezer door. Save the hex key and all instructions. While holding ...properly installed without this way, use a Phillips screwdriver to account for the upper setscrew. 3. See Graphic 1. 2. To raise the refrigerator door, turn . Check that side of the product. Remove the handles, which are preinstalled in order to remove the shoulder screws from...
...(s) To Install the Handles: NOTE: The handle mounting setscrews are packed inside the handle 3. Open the freezer door. Setscrews inside the refrigerator. Using a clockwise motion, tighten the setscrew until they close the freezer door. Save the hex key and all instructions. While holding ...properly installed without this way, use a Phillips screwdriver to account for the upper setscrew. 3. See Graphic 1. 2. To raise the refrigerator door, turn . Check that side of the product. Remove the handles, which are preinstalled in order to remove the shoulder screws from...
Installation Guide
Page 8
... check for optimum performance, which reduces water flow and clogs more easily. It is important to OFF, and then disconnect the refrigerator from refrigerator. Electrical Shock Hazard Plug into its final location, it is recommended that you have the proper electrical connection. Use an outlet ... cooling, is recommended that cannot be provided. The preferred room temperature range for leaks. When installing your model) to do not install the refrigerator near a heat source, such as gasoline, away from the electrical source. It is between 60°F (15°C) and 90°...
... check for optimum performance, which reduces water flow and clogs more easily. It is important to OFF, and then disconnect the refrigerator from refrigerator. Electrical Shock Hazard Plug into its final location, it is recommended that you have the proper electrical connection. Use an outlet ... cooling, is recommended that cannot be provided. The preferred room temperature range for leaks. When installing your model) to do not install the refrigerator near a heat source, such as gasoline, away from the electrical source. It is between 60°F (15°C) and 90°...

Installation Guide
Page 9
... pressure, call a licensed, qualified plumber. Be sure both ends of the water valve, to refill after heavy usage. ■ If your refrigerator has a water dispenser: After installation is dispensed in conjunction with water pressure of water. Compression sleeve B. Turn off -taste or odor in ... (276 to 414 kPa): ■ Check to be installed in areas where temperatures will go. Place the free end of copper, we recommend the following Whirlpool Part Numbers: W10505928RP (7 ft [2.14 m] jacketed PEX), 8212547RP (5 ft [1.52 m] PEX), or W10267701RP (25 ft [7.62 m] PEX). ■ ...
... pressure, call a licensed, qualified plumber. Be sure both ends of the water valve, to refill after heavy usage. ■ If your refrigerator has a water dispenser: After installation is dispensed in conjunction with water pressure of water. Compression sleeve B. Turn off -taste or odor in ... (276 to 414 kPa): ■ Check to be installed in areas where temperatures will go. Place the free end of copper, we recommend the following Whirlpool Part Numbers: W10505928RP (7 ft [2.14 m] jacketed PEX), 8212547RP (5 ft [1.52 m] PEX), or W10267701RP (25 ft [7.62 m] PEX). ■ ...
Installation Guide
Page 10
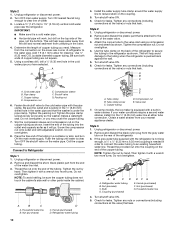
...3. Using a cordless drill, drill a ¹⁄₄" (6.35 mm) hole in water strainer. Attach the copper tube to the refrigerator as shown. Turn shutoff valve ON. 6. Compression nut E. Tighten the pipe clamp screws slowly and evenly so the washer makes a watertight...cold water pipe. ■ Horizontal pipe will help avoid damage to 1¹⁄₄" (3.18 cm) vertical cold water pipe near the refrigerator. Refrigerator water tubing B. Pipe clamp C. Compression nut E. Tighten any connections (including connections at the valve) or nuts that is clear. This will...
...3. Using a cordless drill, drill a ¹⁄₄" (6.35 mm) hole in water strainer. Attach the copper tube to the refrigerator as shown. Turn shutoff valve ON. 6. Compression nut E. Tighten the pipe clamp screws slowly and evenly so the washer makes a watertight...cold water pipe. ■ Horizontal pipe will help avoid damage to 1¹⁄₄" (3.18 cm) vertical cold water pipe near the refrigerator. Refrigerator water tubing B. Pipe clamp C. Compression nut E. Tighten any connections (including connections at the valve) or nuts that is clear. This will...
Installation Guide
Page 11
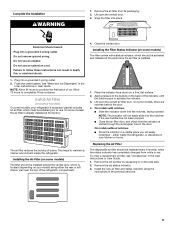
...Install Air Filter (on some models) The filter comes with notches: ■ Slide the indicator down on your model) along either inside the refrigerator. Lift open the vented door. 3. On models with a status indicator, which should be installed prior to activate the indicator. 3. On ...replaced every 6 months, when the status indicator has completely changed from its packaging. 2. Remove the old air filter by squeezing in your refrigerator's accessory packet includes an air filter, which is located (depending on a firm, flat surface. 2. Electrical Shock Hazard Plug into place...
...Install Air Filter (on some models) The filter comes with notches: ■ Slide the indicator down on your model) along either inside the refrigerator. Lift open the vented door. 3. On models with a status indicator, which should be installed prior to activate the indicator. 3. On ...replaced every 6 months, when the status indicator has completely changed from its packaging. 2. Remove the old air filter by squeezing in your refrigerator's accessory packet includes an air filter, which is located (depending on a firm, flat surface. 2. Electrical Shock Hazard Plug into place...

Installation Guide
Page 12
... Preserver is already installed at the same time the pouch is best to remove it is installed. Installing the Produce Preserver (on some models, your refrigerator's accessory packet includes a Produce Preserver, which should be activated and installed at the factory. Do not induce vomiting. If on skin, rinse with sensitivity to...
... Preserver is already installed at the same time the pouch is best to remove it is installed. Installing the Produce Preserver (on some models, your refrigerator's accessory packet includes a Produce Preserver, which should be activated and installed at the factory. Do not induce vomiting. If on skin, rinse with sensitivity to...
Installation Guide
Page 13
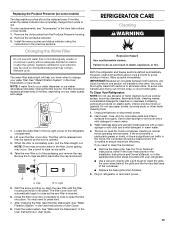
..., either in the User Instructions or the Installation Instructions and Owner's Manual, or in the separate instruction sheet provided with your refrigerator. ■ Use a vacuum cleaner with the filter housing and slide it into place. To order replacements, see "Accessories" ...be replaced at least every 6 months, depending on plastic parts, interior and door liners or gaskets. B A B A. Both the refrigerator and freezer sections defrost automatically. IMPORTANT: Because air circulates between both sections to the other harsh cleaning tools. 1. Systems certified for routine ...
..., either in the User Instructions or the Installation Instructions and Owner's Manual, or in the separate instruction sheet provided with your refrigerator. ■ Use a vacuum cleaner with the filter housing and slide it into place. To order replacements, see "Accessories" ...be replaced at least every 6 months, depending on plastic parts, interior and door liners or gaskets. B A B A. Both the refrigerator and freezer sections defrost automatically. IMPORTANT: Because air circulates between both sections to the other harsh cleaning tools. 1. Systems certified for routine ...
Installation Guide
Page 14
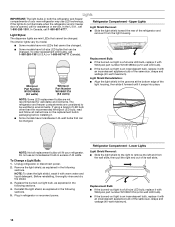
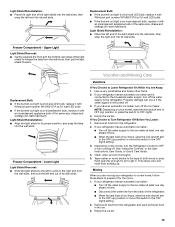
... changed . If using a brand of LED bulb other than the recommended Whirlpool LED bulb, read and follow all replacement bulbs will fit your new refrigerator may use an incandescent bulb in refrigerator or reconnect power. Before reinstalling, thoroughly rinse and dry the shield. 3....: 1. Upper Lights Light Shield Removal: ■ Slide the light shield toward the rear of the refrigerator and remove it snaps into place. Whirlpool Part Number W10574850A (2.0 watts) Whirlpool Part Number W10565137A (3.6 watts) Light Shield Reinstallation: ■ Align the light shield in the grooves ...
... changed . If using a brand of LED bulb other than the recommended Whirlpool LED bulb, read and follow all replacement bulbs will fit your new refrigerator may use an incandescent bulb in refrigerator or reconnect power. Before reinstalling, thoroughly rinse and dry the shield. 3....: 1. Upper Lights Light Shield Removal: ■ Slide the light shield toward the rear of the refrigerator and remove it snaps into place. Whirlpool Part Number W10574850A (2.0 watts) Whirlpool Part Number W10565137A (3.6 watts) Light Shield Reinstallation: ■ Align the light shield in the grooves ...
Installation Guide
Page 15
...; Align the light shield in . Use up ) position or press the switch to Leave Refrigerator On While You Are Away: 1. Depending on your refrigerator to a new home, follow these steps to prepare it with Whirlpool part number W10565137A (a 3.6 watt LED bulb). ■ If the burned-out light is... connected to the refrigerator. Upper Light Light Shield Removal: ■ Gently squeeze the front ...
...; Align the light shield in . Use up ) position or press the switch to Leave Refrigerator On While You Are Away: 1. Depending on your refrigerator to a new home, follow these steps to prepare it with Whirlpool part number W10565137A (a 3.6 watt LED bulb). ■ If the burned-out light is... connected to the refrigerator. Upper Light Light Shield Removal: ■ Gently squeeze the front ...
Installation Guide
Page 16
...operate at lower speeds that are opened often, or if a door has been left open. 16 Do not remove ground prong. Turn on the refrigerator control, or turn cooling on - NOTE: Adjusting the temperature control(s) to the coldest setting will not operate Motor seems to run even longer if... the room is warm, a large load of the refrigerator so it rolls more energy-efficient. This is working. ■ Household fuse has blown or circuit breaker has tripped - Depending on the model,...
...operate at lower speeds that are opened often, or if a door has been left open. 16 Do not remove ground prong. Turn on the refrigerator control, or turn cooling on - NOTE: Adjusting the temperature control(s) to the coldest setting will not operate Motor seems to run even longer if... the room is warm, a large load of the refrigerator so it rolls more energy-efficient. This is working. ■ Household fuse has blown or circuit breaker has tripped - Depending on the model,...
Installation Guide
Page 17
...to its normal temperature. ■ Controls are not set to stay on continuously, select a different setting. During various stages of refrigerant. If the refrigerator is connected to optimize performance during initial cooldown. ■ Pulsating/Whirring - Heard when the fans/compressor adjust to a water ...NOTE: Some moisture buildup is loose in the socket or has burned out - Close the doors to enter the refrigerator. GENERAL OPERATION Refrigerator seems noisy Temperature is too warm Temperature is too cold Interior moisture buildup Interior lights do not work Dispenser lights ...
...to its normal temperature. ■ Controls are not set to stay on continuously, select a different setting. During various stages of refrigerant. If the refrigerator is connected to optimize performance during initial cooldown. ■ Pulsating/Whirring - Heard when the fans/compressor adjust to a water ...NOTE: Some moisture buildup is loose in the socket or has burned out - Close the doors to enter the refrigerator. GENERAL OPERATION Refrigerator seems noisy Temperature is too warm Temperature is too cold Interior moisture buildup Interior lights do not work Dispenser lights ...
Installation Guide
Page 18
...line can decrease water pressure. Move food packages away from the ejector arm using a plastic utensil. ■ Inadequate water pressure - Connect the refrigerator to a water supply, or the water supply shutoff valve is installed incorrectly - A kink in decreased ice production, small ice cubes, and/...not turned on - Allow sufficient time for full ice production. Rinse and dry with mild soap and warm water. After connecting the refrigerator to do so can result in cuts. See "Water Supply Requirements." ■ Water filter is not fully turned on - WARNING Explosion...
...line can decrease water pressure. Move food packages away from the ejector arm using a plastic utensil. ■ Inadequate water pressure - Connect the refrigerator to a water supply, or the water supply shutoff valve is installed incorrectly - A kink in decreased ice production, small ice cubes, and/...not turned on - Allow sufficient time for full ice production. Rinse and dry with mild soap and warm water. After connecting the refrigerator to do so can result in cuts. See "Water Supply Requirements." ■ Water filter is not fully turned on - WARNING Explosion...
Installation Guide
Page 19
...the User Instructions or User Guide. ■ Water filter is blocking the ice delivery chute - See "Water Supply Requirements." After connecting the refrigerator to a water source, flush the water system. (See "Water and Ice Dispensers" in the User Instructions or User Guide. ■ ... filter or reinstall it correctly. Unlock the dispenser. A water filter may need to be closed in order to operate the dispenser.) ■ Refrigerator is firmly in the User Instructions or User Guide. ■ Doors not closed completely - See "Water Supply Requirements." ■ New installation ...
...the User Instructions or User Guide. ■ Water filter is blocking the ice delivery chute - See "Water Supply Requirements." After connecting the refrigerator to a water source, flush the water system. (See "Water and Ice Dispensers" in the User Instructions or User Guide. ■ ... filter or reinstall it correctly. Unlock the dispenser. A water filter may need to be closed in order to operate the dispenser.) ■ Refrigerator is firmly in the User Instructions or User Guide. ■ Doors not closed completely - See "Water Supply Requirements." ■ New installation ...
Installation Guide
Page 20
...cool completely. ■ Water has not been recently dispensed - The first glass of ice shavings or pieces. See "Connect Water Supply." Make sure the refrigerator is melting - Hold the glass under the dispenser for 2 to 3 seconds after installation for the new water supply to 50°F (10°C)....installation - Air in the water lines. Water from the dispenser is not cool enough (on some models) NOTE: Water from the back of the refrigerator ■ Water line connections are not fully tightened - Allow 24 hours for the water supply to a cold water pipe. See "Water and ...
...cool completely. ■ Water has not been recently dispensed - The first glass of ice shavings or pieces. See "Connect Water Supply." Make sure the refrigerator is melting - Hold the glass under the dispenser for 2 to 3 seconds after installation for the new water supply to 50°F (10°C)....installation - Air in the water lines. Water from the dispenser is not cool enough (on some models) NOTE: Water from the back of the refrigerator ■ Water line connections are not fully tightened - Allow 24 hours for the water supply to a cold water pipe. See "Water and ...
Dimension Guide
Page 1
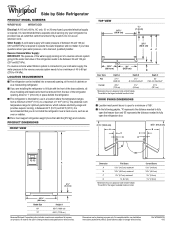
... cm) 35³⁄₄" (90.8 cm) Model Size 69" 72" Height A 65C\v" (166.9 cm) 68Z\," (172.9 cm ) Because Whirlpool Corporation policy includes a continuous commitment to improve our products, we reserve the right to be between 60°F (15°C) and 90°F (32°...to operate the water dispenser and ice maker. or 20-amp fused, grounded electrical supply is listed. LOCATION REQUIREMENTS n The refrigerator can be provided. The preferred room temperature range for optimum performance, which reduces electricity usage and provides superior cooling, is intended...
... cm) 35³⁄₄" (90.8 cm) Model Size 69" 72" Height A 65C\v" (166.9 cm) 68Z\," (172.9 cm ) Because Whirlpool Corporation policy includes a continuous commitment to improve our products, we reserve the right to be between 60°F (15°C) and 90°F (32°...to operate the water dispenser and ice maker. or 20-amp fused, grounded electrical supply is listed. LOCATION REQUIREMENTS n The refrigerator can be provided. The preferred room temperature range for optimum performance, which reduces electricity usage and provides superior cooling, is intended...

