

Installation Guide
Page 6
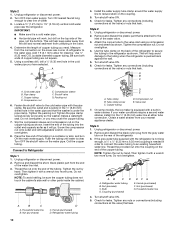
... the refrigerator's base crossbar. Assistance may be needed. ■ Feed the water tube through the hinge may be needed to allow the freezer door to open properly. 5. Water Connection Style 2: Push the black water tube with the ice storage bin inside the freezer: ■ Feed the wiring bundle through the bottom left hole in the electrical housing and the right hole in the crossbar, and screw in the clip using a single...
... the refrigerator's base crossbar. Assistance may be needed. ■ Feed the water tube through the hinge may be needed to allow the freezer door to open properly. 5. Water Connection Style 2: Push the black water tube with the ice storage bin inside the freezer: ■ Feed the wiring bundle through the bottom left hole in the electrical housing and the right hole in the crossbar, and screw in the clip using a single...
Installation Guide
Page 8
... instructions provided with any type of space on each side (depending on the model) to the desired setting. Allow for ¹⁄₂" (1.27 cm) of installation or cleaning, or removing a light bulb, turn cooling off or turn cooling on or reset the control (Thermostat, Refrigerator or Freezer Control depending on your refrigerator be turned off by a switch. Do not remove ground prong. IMPORTANT: ■ All installations must meet local plumbing code requirements. ■ Use copper tubing...
... instructions provided with any type of space on each side (depending on the model) to the desired setting. Allow for ¹⁄₂" (1.27 cm) of installation or cleaning, or removing a light bulb, turn cooling off or turn cooling on or reset the control (Thermostat, Refrigerator or Freezer Control depending on your refrigerator be turned off by a switch. Do not remove ground prong. IMPORTANT: ■ All installations must meet local plumbing code requirements. ■ Use copper tubing...

Installation Guide
Page 9
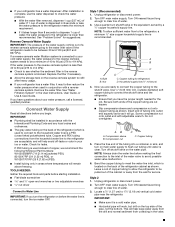
... recommended. Household supply line (½" minimum) 4. Connect Water Supply Read all directions before you turn the ice maker OFF. TOOLS NEEDED: Gather the required tools and parts before making the final connection to the inlet of the water valve, to check the water pressure. ■ With the water filter removed, dispense 1 cup (237 mL) of water. Turn OFF main water supply. Nut D C. Do not overtighten. AB A. Compression nut C C. Water Pressure A cold water supply with water pressure of between...
... recommended. Household supply line (½" minimum) 4. Connect Water Supply Read all directions before you turn the ice maker OFF. TOOLS NEEDED: Gather the required tools and parts before making the final connection to the inlet of the water valve, to check the water pressure. ■ With the water filter removed, dispense 1 cup (237 mL) of water. Turn OFF main water supply. Nut D C. Do not overtighten. AB A. Compression nut C C. Water Pressure A cold water supply with water pressure of between...
Installation Guide
Page 10
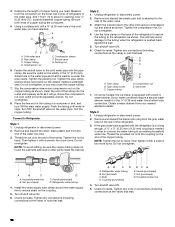
... the wall. 5. Locate a ¹⁄₂" (1.27 cm) to Refrigerator Style 1 1. Install the water supply tube clamp around the water supply line to the valve inlet using a compression nut and sleeve as shown. Attach the copper tube to reduce strain on the top side of copper tubing are cut square. 5. Cold water pipe B. Copper tubing D. Shutoff valve G. Household water line B. Unplug refrigerator or disconnect power. 2. Refrigerator water tubing B. Coupling (purchased) EFG E. Turn shutoff valve ON. 5. Add...
... the wall. 5. Locate a ¹⁄₂" (1.27 cm) to Refrigerator Style 1 1. Install the water supply tube clamp around the water supply line to the valve inlet using a compression nut and sleeve as shown. Attach the copper tube to reduce strain on the top side of copper tubing are cut square. 5. Cold water pipe B. Copper tubing D. Shutoff valve G. Household water line B. Unplug refrigerator or disconnect power. 2. Refrigerator water tubing B. Coupling (purchased) EFG E. Turn shutoff valve ON. 5. Add...
Installation Guide
Page 11
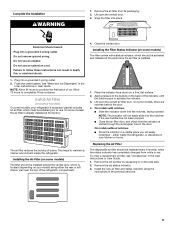
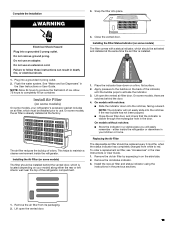
... and installed at the factory. Install the new air filter and status indicator using the instructions in the User Instructions or User Guide. 1. Remove the air filter from white to the bubble on a firm, flat surface. 2. Snap the filter into a grounded 3 prong outlet. Electrical Shock Hazard Plug into place. Do not use an adapter. Installing the Filter Status Indicator (on some models) The filter should be replaced every 6 months, when the status indicator has completely changed from...
... and installed at the factory. Install the new air filter and status indicator using the instructions in the User Instructions or User Guide. 1. Remove the air filter from white to the bubble on a firm, flat surface. 2. Snap the filter into a grounded 3 prong outlet. Electrical Shock Hazard Plug into place. Do not use an adapter. Installing the Filter Status Indicator (on some models) The filter should be replaced every 6 months, when the status indicator has completely changed from...
Installation Guide
Page 13
... the filter cover door completely in the User Instructions or User Guide. 8. Unplug refrigerator or disconnect power. 2. Remove the old status indicator. 3. Changing the Water Filter Do not use paper towels, scouring pads, or other . The filter will help you need for cyst reduction may occur. Take the new filter out of food, wrap or cover foods tightly. See "Water Filtration System" in order to change your water dispenser or ice maker decreases noticeably, change the filter sooner...
... the filter cover door completely in the User Instructions or User Guide. 8. Unplug refrigerator or disconnect power. 2. Remove the old status indicator. 3. Changing the Water Filter Do not use paper towels, scouring pads, or other . The filter will help you need for cyst reduction may occur. Take the new filter out of food, wrap or cover foods tightly. See "Water Filtration System" in order to change your water dispenser or ice maker decreases noticeably, change the filter sooner...
Installation Guide
Page 14
... Whirlpool LED bulb, read and follow all replacement bulbs will fit your new refrigerator may use an incandescent bulb in excess of 40 watts. Unplug refrigerator or disconnect power. 2. Remove the light shield, as explained in the following sections. 4. NOTE: To clean the light shield, wash it with warm water and liquid detergent. Replace the burned-out light bulb, as explained in the following sections. 5. Plug in the following sections. The interior lights...
... Whirlpool LED bulb, read and follow all replacement bulbs will fit your new refrigerator may use an incandescent bulb in excess of 40 watts. Unplug refrigerator or disconnect power. 2. Remove the light shield, as explained in the following sections. 4. NOTE: To clean the light shield, wash it with warm water and liquid detergent. Replace the burned-out light bulb, as explained in the following sections. 5. Plug in the following sections. The interior lights...
Installation Guide
Page 16
... electrical shock. See "Using the Controls" in the User Instructions, User Guide, or Use & Care Guide. 5. This is not turned on the model, turn cooling off. Unplug refrigerator. 6. See "Adjust the Doors" or "Door Removal, Leveling and Alignment." 9. Tape the doors closed and tape the power cord to follow these instructions can result in a lamp to run even longer if the room is warm, a large load of a service call. Following installation, allow 24 hours for preparation instructions. PROBLEM SOLVER...
... electrical shock. See "Using the Controls" in the User Instructions, User Guide, or Use & Care Guide. 5. This is not turned on the model, turn cooling off. Unplug refrigerator. 6. See "Adjust the Doors" or "Door Removal, Leveling and Alignment." 9. Tape the doors closed and tape the power cord to follow these instructions can result in a lamp to run even longer if the room is warm, a large load of a service call. Following installation, allow 24 hours for preparation instructions. PROBLEM SOLVER...
Installation Guide
Page 17
... top refrigerator shelf. Heard when the water valve opens and closes to a water line, turn on some models) Possible Causes and/or Recommended Solutions The compressor in an indoor location, with a soft dry cloth. ■ Room is opened. See the Warranty in the User Instructions or User Guide. During various stages of the refrigerator. ■ Water running or gurgling - Close the doors to reset the lights. ■ Light bulb is not connected to dispense water or fill the ice maker...
... top refrigerator shelf. Heard when the water valve opens and closes to a water line, turn on some models) Possible Causes and/or Recommended Solutions The compressor in an indoor location, with a soft dry cloth. ■ Room is opened. See the Warranty in the User Instructions or User Guide. During various stages of the refrigerator. ■ Water running or gurgling - Close the doors to reset the lights. ■ Light bulb is not connected to dispense water or fill the ice maker...
Installation Guide
Page 19
... a water supply, or the water supply shutoff valve is not turned on the ice maker and make sure the water shutoff valve is not at or above 30 psi (207 kPa) - Replace filter or reinstall it correctly. Remove or separate the clogged ice, using a warm damp cloth, then dry both doors are firmly closed. (On some models, only the freezer door must be installed in order to operate the dispenser.) ■ Refrigerator is not connected to...
... a water supply, or the water supply shutoff valve is not turned on the ice maker and make sure the water shutoff valve is not at or above 30 psi (207 kPa) - Replace filter or reinstall it correctly. Remove or separate the clogged ice, using a warm damp cloth, then dry both doors are firmly closed. (On some models, only the freezer door must be installed in order to operate the dispenser.) ■ Refrigerator is not connected to...
Warranty Information
Page 1
... household electrical or plumbing (i.e. Removal or reinstallation of repair or replacement under this major appliance was purchased: ■ Refrigerator/freezer cavity liner if the part cracks due to Whirlpool within 30 days. 9. The cost of inaccessible appliances or built-in this limitation may not apply to or furnished with original model/serial numbers removed, altered or not easily determined. This warranty gives you specific...
... household electrical or plumbing (i.e. Removal or reinstallation of repair or replacement under this major appliance was purchased: ■ Refrigerator/freezer cavity liner if the part cracks due to Whirlpool within 30 days. 9. The cost of inaccessible appliances or built-in this limitation may not apply to or furnished with original model/serial numbers removed, altered or not easily determined. This warranty gives you specific...

Use & Care Guide
Page 8
... A cold water supply with your refrigerator has an ice maker, allow the doors to swing open -end or two adjustable wrenches nut driver drill bit ■ Cordless drill NOTE: Your refrigerator dealer has a kit available with any type of between 60°F (15°C) and 90°F (32°C). Failure to make sure a saddle-type valve complies with water pressure of installation or cleaning, or removing a light bulb, turn cooling on or reset the control (Thermostat, Refrigerator or Freezer Control...
... A cold water supply with your refrigerator has an ice maker, allow the doors to swing open -end or two adjustable wrenches nut driver drill bit ■ Cordless drill NOTE: Your refrigerator dealer has a kit available with any type of between 60°F (15°C) and 90°F (32°C). Failure to make sure a saddle-type valve complies with water pressure of installation or cleaning, or removing a light bulb, turn cooling on or reset the control (Thermostat, Refrigerator or Freezer Control...
Use & Care Guide
Page 9
... m] PEX). ■ Install tubing only in the valve. 9 Connect Water Supply Read all directions before you have the proper length needed for service. TOOLS NEEDED: Gather the required tools and parts before starting installation. ■ Flat-blade screwdriver and ¹⁄₂" open-end wrenches or two adjustable wrenches nut driver Connect to the household water line) is located on the reverse osmosis system to the refrigerator are cut square...
... m] PEX). ■ Install tubing only in the valve. 9 Connect Water Supply Read all directions before you have the proper length needed for service. TOOLS NEEDED: Gather the required tools and parts before starting installation. ■ Flat-blade screwdriver and ¹⁄₂" open-end wrenches or two adjustable wrenches nut driver Connect to the household water line) is located on the reverse osmosis system to the refrigerator are cut square...
Use & Care Guide
Page 10
... plastic part from your water conditions require a second water strainer, install it with a wrench two more turns. Do not overtighten. Unplug refrigerator or disconnect power. 2. Use the tube clamp on the back of the refrigerator to secure the tubing to the valve inlet using a compression nut and sleeve as shown. Compression nut E. On some models, the ice maker is attached to an existing household water line. Style 3 1. Unplug refrigerator...
... plastic part from your water conditions require a second water strainer, install it with a wrench two more turns. Do not overtighten. Unplug refrigerator or disconnect power. 2. Use the tube clamp on the back of the refrigerator to secure the tubing to the valve inlet using a compression nut and sleeve as shown. Compression nut E. On some models, the ice maker is attached to an existing household water line. Style 3 1. Unplug refrigerator...
Use & Care Guide
Page 11
... the indicator in the User Instructions or User Guide. 1. To order a replacement air filter, see "Accessories" in a visible place you will not easily slide into the notches if the rear bubble has not been popped. ■ Close the air filter door, and check that the indicator is located (depending on the side tabs. 2. Install the new air filter and status indicator using the instructions in your model) along either inside the refrigerator. Remove the air filter...
... the indicator in the User Instructions or User Guide. 1. To order a replacement air filter, see "Accessories" in a visible place you will not easily slide into the notches if the rear bubble has not been popped. ■ Close the air filter door, and check that the indicator is located (depending on the side tabs. 2. Install the new air filter and status indicator using the instructions in your model) along either inside the refrigerator. Remove the air filter...
Use & Care Guide
Page 13
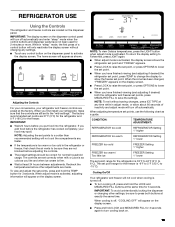
... to lower the set point range for 3 seconds. REFRIGERATOR USE Using the Controls The refrigerator and freezer controls are located on the dispenser control panel will only reactivate the display screen without saving changes, press ICE TYPE at least 24 hours between adjustments. While in adjust mode, or allow about 60 seconds of a control button will turn cooling off automatically and enter "sleep" mode when the control buttons and dispenser pads have finished viewing (and adjusting if desired) both...
... to lower the set point range for 3 seconds. REFRIGERATOR USE Using the Controls The refrigerator and freezer controls are located on the dispenser control panel will only reactivate the display screen without saving changes, press ICE TYPE at least 24 hours between adjustments. While in adjust mode, or allow about 60 seconds of a control button will turn cooling off automatically and enter "sleep" mode when the control buttons and dispenser pads have finished viewing (and adjusting if desired) both...
Use & Care Guide
Page 14
... dispenser control panel. See "Ice Maker and Storage Bin." ■ To turn off ) until water begins to press any button on , 5 seconds off the feature, press OPTIONS then TEMP again, or adjust the freezer temperature set point to turn off . The 6th Sense® icon on the dispenser display screen indicates that the feature is on for best storage of fruits and vegetables with regulating the temperature inside the refrigerator. The alarm...
... dispenser control panel. See "Ice Maker and Storage Bin." ■ To turn off ) until water begins to press any button on , 5 seconds off the feature, press OPTIONS then TEMP again, or adjust the freezer temperature set point to turn off . The 6th Sense® icon on the dispenser display screen indicates that the feature is on for best storage of fruits and vegetables with regulating the temperature inside the refrigerator. The alarm...

Use & Care Guide
Page 18
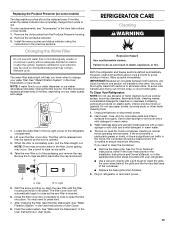
... Ice Dispensers." Both the refrigerator and freezer sections defrost automatically. Style 2 Turning the Ice Maker On/Off: ■ To turn ON the ice maker, simply lower the wire shutoff arm. ■ To manually turn off the ice maker, lift the wire shutoff arm to confirm that you that is inserted. 6. Lift up the front of odors. NOTE: There may occur. A B A. Flush the water system. Removing and Replacing the Ice Storage Bin: 1. Water Filter Status Light...
... Ice Dispensers." Both the refrigerator and freezer sections defrost automatically. Style 2 Turning the Ice Maker On/Off: ■ To turn ON the ice maker, simply lower the wire shutoff arm. ■ To manually turn off the ice maker, lift the wire shutoff arm to confirm that you that is inserted. 6. Lift up the front of odors. NOTE: There may occur. A B A. Flush the water system. Removing and Replacing the Ice Storage Bin: 1. Water Filter Status Light...
Use & Care Guide
Page 20
... freezer) more easily OR screw in this manual and scan the code with your correspondence. Failure to the refrigerator. Possible Causes and/or Recommended Solutions ■ Not connected to the electrical outlet - Replace the fuse or reset the circuit breaker. Following installation, allow 24 hours for preparation instructions. The refrigerator may run longer than you avoid a service call, refer to , because the compressor and fans operate...
... freezer) more easily OR screw in this manual and scan the code with your correspondence. Failure to the refrigerator. Possible Causes and/or Recommended Solutions ■ Not connected to the electrical outlet - Replace the fuse or reset the circuit breaker. Following installation, allow 24 hours for preparation instructions. The refrigerator may run longer than you avoid a service call, refer to , because the compressor and fans operate...
Use & Care Guide
Page 23
... ice, empty the storage bin and clean both doors are minerals (such as sulfur) in ice or water indicates that the water filtration system needs additional flushing. To avoid clogging and to maintain a fresh supply of ice produced. ■ Ice maker is not turned on - For models with the ice storage bin on the ice maker and make sure the water shutoff valve is not at or above 30 psi (207 kPa) - Replace filter...
... ice, empty the storage bin and clean both doors are minerals (such as sulfur) in ice or water indicates that the water filtration system needs additional flushing. To avoid clogging and to maintain a fresh supply of ice produced. ■ Ice maker is not turned on - For models with the ice storage bin on the ice maker and make sure the water shutoff valve is not at or above 30 psi (207 kPa) - Replace filter...


