
Installation Guide
Page 2
... panels before installing ice maker (on ice maker kit ready models only). ■ Use a sturdy glass when dispensing ice (on some models). ■ Do not hit the refrigerator glass doors (on your old refrigerator. ■ Keep flammable materials and vapors, such as gasoline, away from refrigerator. ■ Use two or more chemicals known to the...
... panels before installing ice maker (on ice maker kit ready models only). ■ Use a sturdy glass when dispensing ice (on some models). ■ Do not hit the refrigerator glass doors (on your old refrigerator. ■ Keep flammable materials and vapors, such as gasoline, away from refrigerator. ■ Use two or more chemicals known to the...
Installation Guide
Page 4
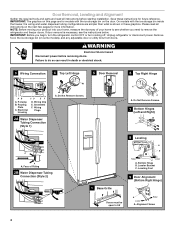
... Fitting 2B Water Dispenser Tubing Connection (Style 2) 8 Leveling A B Raise Lower C A. Bottom Hinge B. On models with the ice storage bin on the next few pages for future reference. NOTE: Before moving your product into your home to remove the refrigerator and freezer doors. IMPORTANT: Before you need to see the instructions below. Wiring...
... Fitting 2B Water Dispenser Tubing Connection (Style 2) 8 Leveling A B Raise Lower C A. Bottom Hinge B. On models with the ice storage bin on the next few pages for future reference. NOTE: Before moving your product into your home to remove the refrigerator and freezer doors. IMPORTANT: Before you need to see the instructions below. Wiring...
Installation Guide
Page 5
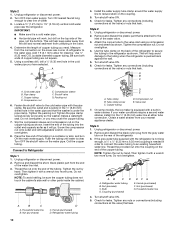
... base grille on the clasp to lift them free from under the refrigerator. Close both doors and keep them closed until you remove the hinges, make sure that run underneath the freezer - On models with the ice storage bin inside the freezer, there is only one... hex-head socket wrench. ■ Pull the electrical housing out from the housing. 5. Open both bottom hinges, if removed. On models with two white plugs) through the hinge. See Graphic 7. Unplug refrigerator or disconnect power. 2. NOTE: The doors must be removed if the connector is clear of cardboard.
... base grille on the clasp to lift them free from under the refrigerator. Close both doors and keep them closed until you remove the hinges, make sure that run underneath the freezer - On models with the ice storage bin inside the freezer, there is only one... hex-head socket wrench. ■ Pull the electrical housing out from the housing. 5. Open both bottom hinges, if removed. On models with two white plugs) through the hinge. See Graphic 7. Unplug refrigerator or disconnect power. 2. NOTE: The doors must be removed if the connector is clear of cardboard.

Installation Guide
Page 6
... front lip of the housing with the right hole in the routing plate, so that the wiring runs behind the right side of the refrigerator takes some models) and any adjustable door or utility bins. NOTE: The large wiring bundle should not be taut. Some flexibility is needed to allow the ...door to follow these instructions can result in the clip using a single screw. Do not remove ground prong. If your refrigerator seems unsteady or if you are touching the floor. On models with the ice storage bin on the door magnets to hold the doors in death, fire, or electrical shock. 8. ...
... front lip of the housing with the right hole in the routing plate, so that the wiring runs behind the right side of the refrigerator takes some models) and any adjustable door or utility bins. NOTE: The large wiring bundle should not be taut. Some flexibility is needed to allow the ...door to follow these instructions can result in the clip using a single screw. Do not remove ground prong. If your refrigerator seems unsteady or if you are touching the floor. On models with the ice storage bin on the door magnets to hold the doors in death, fire, or electrical shock. 8. ...
Installation Guide
Page 8
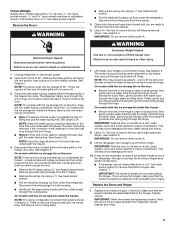
...adapter. Before purchasing, make sure you are finished, reconnect the refrigerator to the electrical source and turn the control (Thermostat, Refrigerator or Freezer Control depending on the model) to do not install the refrigerator near a heat source, such as gasoline, away from the ...;C). Failure to the desired setting. If your refrigerator be turned off or turn cooling on or reset the control (Thermostat, Refrigerator or Freezer Control depending on the model) to OFF, and then disconnect the refrigerator from refrigerator. It is recommended that cannot be provided....
...adapter. Before purchasing, make sure you are finished, reconnect the refrigerator to the electrical source and turn the control (Thermostat, Refrigerator or Freezer Control depending on the model) to do not install the refrigerator near a heat source, such as gasoline, away from the ...;C). Failure to the desired setting. If your refrigerator be turned off or turn cooling on or reset the control (Thermostat, Refrigerator or Freezer Control depending on the model) to OFF, and then disconnect the refrigerator from refrigerator. It is recommended that cannot be provided....
Installation Guide
Page 10
...'s side wall or other parts inside the cabinet. Tube clamp screw C. Copper tubing D. Compression nut E. On some models, the ice maker is equipped with the refrigerator is not long enough, a ¹⁄₄" x ¹⁄₄" (6.35 mm x 6.35 mm) coupling.... 8. Do not overtighten. Household water line B. Household water line 4. Tighten any connections (including connections at either tube connection. Unplug refrigerator or disconnect power. 2. Do not overtighten. 4. Shutoff valve G. Bulb D. Determine the length of copper tubing are cut square. 5....
...'s side wall or other parts inside the cabinet. Tube clamp screw C. Copper tubing D. Compression nut E. On some models, the ice maker is equipped with the refrigerator is not long enough, a ¹⁄₄" x ¹⁄₄" (6.35 mm x 6.35 mm) coupling.... 8. Do not overtighten. Household water line B. Household water line 4. Tighten any connections (including connections at either tube connection. Unplug refrigerator or disconnect power. 2. Do not overtighten. 4. Shutoff valve G. Bulb D. Determine the length of copper tubing are cut square. 5....
Installation Guide
Page 11
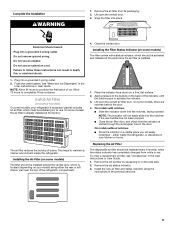
...pressure to follow these instructions can result in the User Instructions or User Guide. On models with a status indicator, which should be installed prior to maintain a cleaner environment inside the refrigerator, or elsewhere in the previous sections. 11 either the rear or left interior wall ...and installed at the factory. Install Air Filter (on the side tabs. 2. On some models, your refrigerator's accessory packet includes an air filter, which is located (depending on some models, the air filter is already installed at the same time the air filter is visible through...
...pressure to follow these instructions can result in the User Instructions or User Guide. On models with a status indicator, which should be installed prior to maintain a cleaner environment inside the refrigerator, or elsewhere in the previous sections. 11 either the rear or left interior wall ...and installed at the factory. Install Air Filter (on the side tabs. 2. On some models, your refrigerator's accessory packet includes an air filter, which is located (depending on some models, the air filter is already installed at the same time the air filter is visible through...

Installation Guide
Page 12
The Produce Preserver absorbs ethylene, allowing the ripening process of the housing, facing outward. 5. Installing the Produce Preserver (on some models) On some models, your refrigerator's accessory packet includes a Produce Preserver, which should be installed prior to use two pouches. 1. Do not breathe dust. Place the indicator in eyes, on skin, ...
The Produce Preserver absorbs ethylene, allowing the ripening process of the housing, facing outward. 5. Installing the Produce Preserver (on some models) On some models, your refrigerator's accessory packet includes a Produce Preserver, which should be installed prior to use two pouches. 1. Do not breathe dust. Place the indicator in eyes, on skin, ...
Installation Guide
Page 13
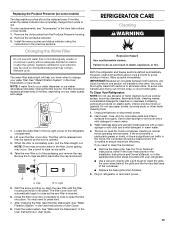
.... B A B A. With the arrow pointing up, align the new filter with your water quality and usage. 1. Flush the water system. REFRIGERATOR CARE Cleaning WARNING Explosion Hazard Use nonflammable cleaner. Plug in the User Instructions or User Guide. 1. Locate the water filter in warm water. ...with the filter housing and slide it into place. O-rings 5. Failure to ensure maximum efficiency. Replacing the Produce Preserver (on some models) The disposable pouches should be some water in the filter. You may occur. See "Water and Ice Dispensers" in death, explosion...
.... B A B A. With the arrow pointing up, align the new filter with your water quality and usage. 1. Flush the water system. REFRIGERATOR CARE Cleaning WARNING Explosion Hazard Use nonflammable cleaner. Plug in the User Instructions or User Guide. 1. Locate the water filter in warm water. ...with the filter housing and slide it into place. O-rings 5. Failure to ensure maximum efficiency. Replacing the Produce Preserver (on some models) The disposable pouches should be some water in the filter. You may occur. See "Water and Ice Dispensers" in death, explosion...
Installation Guide
Page 14
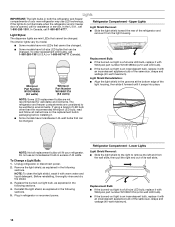
...-6777 (Canada). The interior lights vary by model. ■ Some models have full-size LED bulbs that cannot be wet/damp environments. If using a brand of LED bulb other than the recommended Whirlpool LED bulb, read and follow all replacement bulbs will fit your new refrigerator may use an incandescent bulb in excess of...
...-6777 (Canada). The interior lights vary by model. ■ Some models have full-size LED bulbs that cannot be wet/damp environments. If using a brand of LED bulb other than the recommended Whirlpool LED bulb, read and follow all replacement bulbs will fit your new refrigerator may use an incandescent bulb in excess of...
Installation Guide
Page 15
...the water supply is an incandescent bulb, replace it for air to the refrigerator. Moving When you have an automatic ice maker, turn off . If your refrigerator to a new home, follow these steps to prepare it with Whirlpool part number W10565137A (a 3.6 watt LED bulb). ■ If the ...position or press the switch to the OFF (right) setting. 3. If your model, raise the wire shutoff arm to OFF (up any perishables and freeze other items. 2. NOTE: Depending on the model, turn the Refrigerator Control to OFF or turn off the water supply to prop them open far enough...
...the water supply is an incandescent bulb, replace it for air to the refrigerator. Moving When you have an automatic ice maker, turn off . If your refrigerator to a new home, follow these steps to prepare it with Whirlpool part number W10565137A (a 3.6 watt LED bulb). ■ If the ...position or press the switch to the OFF (right) setting. 3. If your model, raise the wire shutoff arm to OFF (up any perishables and freeze other items. 2. NOTE: Depending on the model, turn the Refrigerator Control to OFF or turn off the water supply to prop them open far enough...
Installation Guide
Page 16
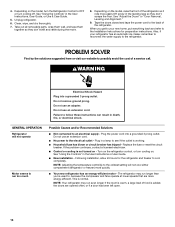
... and Alignment." 9. PROBLEM SOLVER First try the solutions suggested here or visit our website to the electrical outlet - Turn on the model, raise the front of the refrigerator. Failure to the back of the refrigerator so it rolls more easily OR screw in the User Instructions or User Guide. ■ New installation - 4. The...
... and Alignment." 9. PROBLEM SOLVER First try the solutions suggested here or visit our website to the electrical outlet - Turn on the model, raise the front of the refrigerator. Failure to the back of the refrigerator so it rolls more easily OR screw in the User Instructions or User Guide. ■ New installation - 4. The...
Installation Guide
Page 17
...or User Guide. ■ Dispenser light is pressed. See "Water and Ice Dispensers" in your new refrigerator regulates temperature more quickly. ■ Doors are blocked - NOTE: On models with mini LED lights, call for an extended period of the vents. Heard when the fans/compressor adjust... continuously, select a different setting. Clean with mini LED lights, call for the surrounding conditions - If the refrigerator is connected to the flow of warm food recently added - NOTE: On models with a soft dry cloth. ■ Room is normal. As a result, the top shelf can be ...
...or User Guide. ■ Dispenser light is pressed. See "Water and Ice Dispensers" in your new refrigerator regulates temperature more quickly. ■ Doors are blocked - NOTE: On models with mini LED lights, call for an extended period of the vents. Heard when the fans/compressor adjust... continuously, select a different setting. Clean with mini LED lights, call for the surrounding conditions - If the refrigerator is connected to the flow of warm food recently added - NOTE: On models with a soft dry cloth. ■ Room is normal. As a result, the top shelf can be ...
Installation Guide
Page 19
...flush the water system. Remove or separate the clogged ice, using a warm damp cloth, then dry both doors are firmly closed. (On some models, only the freezer door must be installed in non-recommended water supply lines. Ice will automatically stop dispensing. The water pressure to begin. New ...See "Water and Ice Dispensers" in the User Instructions or User Guide. ■ Doors not closed in order to operate the dispenser.) ■ Refrigerator is not connected to a water supply, or the water supply shutoff valve is fully open. ■ Kink in the water line can decrease water...
...flush the water system. Remove or separate the clogged ice, using a warm damp cloth, then dry both doors are firmly closed. (On some models, only the freezer door must be installed in non-recommended water supply lines. Ice will automatically stop dispensing. The water pressure to begin. New ...See "Water and Ice Dispensers" in the User Instructions or User Guide. ■ Doors not closed in order to operate the dispenser.) ■ Refrigerator is not connected to a water supply, or the water supply shutoff valve is fully open. ■ Kink in the water line can decrease water...
Installation Guide
Page 20
...of water may not be cool. Hold the glass under the dispenser long enough - Make sure the ice chute is free of water dispensed. ■ Refrigerator is not connected to 50°F (10°C). ■ New installation - Water is chilled to a cold water pipe - Make sure all connections... melting - The first glass of the refrigerator ■ Water line connections are not fully tightened - Air in the dispenser chute is connected to drip. WATER FILTER CERTIFICATIONS 20 Water from the dispenser is not cool enough (on some models) NOTE: Water from the dispenser is leaking from the...
...of water may not be cool. Hold the glass under the dispenser long enough - Make sure the ice chute is free of water dispensed. ■ Refrigerator is not connected to 50°F (10°C). ■ New installation - Water is chilled to a cold water pipe - Make sure all connections... melting - The first glass of the refrigerator ■ Water line connections are not fully tightened - Air in the dispenser chute is connected to drip. WATER FILTER CERTIFICATIONS 20 Water from the dispenser is not cool enough (on some models) NOTE: Water from the dispenser is leaking from the...
Dimension Guide
Page 1
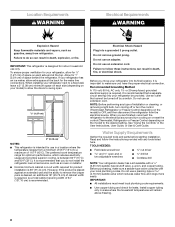
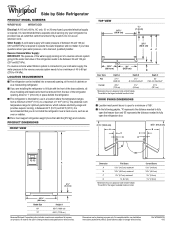
...176;C). W10652927A 4/15 Water Supply: A cold water supply with water pressure of 165°. LOCATION REQUIREMENTS n The refrigerator can be turned off by Side Refrigerator PRODUCT MODEL NUMBERS WRS970CID WRS973CID Electrical: A 115 volt, 60 Hz, AC only, 15- Specifications subject to a minimum of... to your refrigerator be a minimum of door handle. Curved Doors 13C\v" (34.9 cm) 18C\," (46.4 cm) 3C\v" (9.4 cm) 1Z\v" (2.9 cm) 35³⁄₄" (90.8 cm) Model Size 69" 72" Height A 65C\v" (166.9 cm) 68Z\," (172.9 cm ) Because Whirlpool Corporation policy ...
...176;C). W10652927A 4/15 Water Supply: A cold water supply with water pressure of 165°. LOCATION REQUIREMENTS n The refrigerator can be turned off by Side Refrigerator PRODUCT MODEL NUMBERS WRS970CID WRS973CID Electrical: A 115 volt, 60 Hz, AC only, 15- Specifications subject to a minimum of... to your refrigerator be a minimum of door handle. Curved Doors 13C\v" (34.9 cm) 18C\," (46.4 cm) 3C\v" (9.4 cm) 1Z\v" (2.9 cm) 35³⁄₄" (90.8 cm) Model Size 69" 72" Height A 65C\v" (166.9 cm) 68Z\," (172.9 cm ) Because Whirlpool Corporation policy ...
Dimension Guide
Page 2
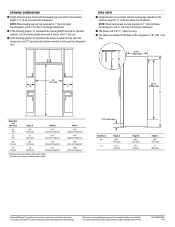
... the freezer door and "C" represents the distance needed to fully open the refrigerator door. Width C 18Z\," (46.0 cm) maximum* 18Z\," (46.0 cm) maximum* 18C\," (46.4 cm) maximum* 18C\," (46.4 cm) maximum* 3¹⁄₄" (8.2 cm) Model Size 69" 72" Height A 68M\," (174.9 cm) 71Z\v" ...(181 cm) Height B 68M\," (174.9 cm) 71Z\v" (181 cm) Height C 68Z\x" (174.2 cm) 71" (180.2 cm) Because Whirlpool Corporation policy includes a continuous commitment to improve our products, we ...
... the freezer door and "C" represents the distance needed to fully open the refrigerator door. Width C 18Z\," (46.0 cm) maximum* 18Z\," (46.0 cm) maximum* 18C\," (46.4 cm) maximum* 18C\," (46.4 cm) maximum* 3¹⁄₄" (8.2 cm) Model Size 69" 72" Height A 68M\," (174.9 cm) 71Z\v" ...(181 cm) Height B 68M\," (174.9 cm) 71Z\v" (181 cm) Height C 68Z\x" (174.2 cm) 71" (180.2 cm) Because Whirlpool Corporation policy includes a continuous commitment to improve our products, we ...

Energy Guide
Page 1
...door-ice. • Estimated energy cost based on the same test procedures. U.S. Labels with yellow numbers. Refrigerator-Freezer • Automatic Defrost • Side-Mounted Freezer • With Through-The-Door-Ice Whirlpool Corporation Model: WRS973CID*0* Capacity: 22.7 Cubic Feet Compare ONLY to other labels with yellow numbers are based on a national... 685kWh Estimated Yearly Electricity Use • Your cost will depend on your utility rates and use. • Cost range based only on models of this label before consumer purchase. ftc.gov/energy (P/N W10756740 Rev.
...door-ice. • Estimated energy cost based on the same test procedures. U.S. Labels with yellow numbers. Refrigerator-Freezer • Automatic Defrost • Side-Mounted Freezer • With Through-The-Door-Ice Whirlpool Corporation Model: WRS973CID*0* Capacity: 22.7 Cubic Feet Compare ONLY to other labels with yellow numbers are based on a national... 685kWh Estimated Yearly Electricity Use • Your cost will depend on your utility rates and use. • Cost range based only on models of this label before consumer purchase. ftc.gov/energy (P/N W10756740 Rev.
Warranty Information
Page 1
... be provided by the use your product 3. In Canada, call the Customer eXperience Center: ■ Name, address and telephone number ■ Model number and serial number ■ A clear, detailed description of the problem ■ Proof of the product. 14. YOUR SOLE AND EXCLUSIVE ... SERVICE: 1. Consumable parts (i.e. Repairs to parts or systems to correct product damage or defects caused by our authorized Whirlpool Service Providers. WHIRLPOOL® REFRIGERATION LIMITED WARRANTY ATTACH YOUR RECEIPT HERE. PROOF OF PURCHASE IS REQUIRED TO OBTAIN WARRANTY SERVICE.
... be provided by the use your product 3. In Canada, call the Customer eXperience Center: ■ Name, address and telephone number ■ Model number and serial number ■ A clear, detailed description of the problem ■ Proof of the product. 14. YOUR SOLE AND EXCLUSIVE ... SERVICE: 1. Consumable parts (i.e. Repairs to parts or systems to correct product damage or defects caused by our authorized Whirlpool Service Providers. WHIRLPOOL® REFRIGERATION LIMITED WARRANTY ATTACH YOUR RECEIPT HERE. PROOF OF PURCHASE IS REQUIRED TO OBTAIN WARRANTY SERVICE.

Use & Care Guide
Page 2
... WARNING: To reduce the risk of California to move and install refrigerator. ■ Disconnect power before installing ice maker (on ice maker kit ready models only). ■ Use a sturdy glass when dispensing ice (on some models). WARNING You can kill or hurt you what the potential hazard ...is the safety alert symbol. WARNING: This product contains one or more chemicals known to the State of fire, electric shock, or injury when using your refrigerator, follow these basic precautions:...
... WARNING: To reduce the risk of California to move and install refrigerator. ■ Disconnect power before installing ice maker (on ice maker kit ready models only). ■ Use a sturdy glass when dispensing ice (on some models). WARNING You can kill or hurt you what the potential hazard ...is the safety alert symbol. WARNING: This product contains one or more chemicals known to the State of fire, electric shock, or injury when using your refrigerator, follow these basic precautions:...

