
Use & Care Guide
Page 11
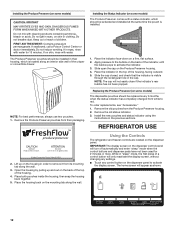
.... 2. This helps to Ethylene Ethylene Production Apples Asparagus Berries Broccoli Cantaloupe Carrots Citrus Fruit Grapes Lettuce Pears Spinach High Med. either the rear or left interior wall near the top of the refrigerator compartment. 1. To preserve freshness, it is visible through the rectangular hole in the previous sections. Apply pressure to...
.... 2. This helps to Ethylene Ethylene Production Apples Asparagus Berries Broccoli Cantaloupe Carrots Citrus Fruit Grapes Lettuce Pears Spinach High Med. either the rear or left interior wall near the top of the refrigerator compartment. 1. To preserve freshness, it is visible through the rectangular hole in the previous sections. Apply pressure to...
Use & Care Guide
Page 12
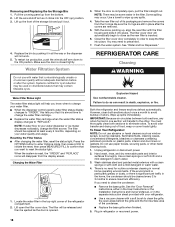
... 3. Slide the cap closed, and check that the indicator is located along the wall. 3. NOTE: For best performance, always use two pouches. 1. Whirlpool Corporation, Benton Harbor MI 49022 2. Lift up and out on some models) The disposable pouches should be replaced every 6 months, when the status indicator ...has completely changed from its mounting tab along an interior side wall of the housing. 4. The home screen will not easily close if the indicator's rear bubble has not been popped.
... 3. Slide the cap closed, and check that the indicator is located along the wall. 3. NOTE: For best performance, always use two pouches. 1. Whirlpool Corporation, Benton Harbor MI 49022 2. Lift up and out on some models) The disposable pouches should be replaced every 6 months, when the status indicator ...has completely changed from its mounting tab along an interior side wall of the housing. 4. The home screen will not easily close if the indicator's rear bubble has not been popped.
Use & Care Guide
Page 18
...the condenser: ■ Remove the base grille. Both the refrigerator and freezer sections defrost automatically. Hand wash, rinse, and dry removable parts and interior surfaces thoroughly. Be sure the O-rings are removed. 5. Flush the water system. Press the OPTIONS button to enter Options mode, then press .... Make sure the door is reset, the "ORDER" and "REPLACE" icons will be released and then be used on plastic parts, interior and door liners or gaskets. Water Filter Status Light The water filter status light will transfer to wipe up spills immediately. Locate the water...
...the condenser: ■ Remove the base grille. Both the refrigerator and freezer sections defrost automatically. Hand wash, rinse, and dry removable parts and interior surfaces thoroughly. Be sure the O-rings are removed. 5. Flush the water system. Press the OPTIONS button to enter Options mode, then press .... Make sure the door is reset, the "ORDER" and "REPLACE" icons will be released and then be used on plastic parts, interior and door liners or gaskets. Water Filter Status Light The water filter status light will transfer to wipe up spills immediately. Locate the water...
Use & Care Guide
Page 19
... off . Empty the ice bin. 4. Depending on your refrigerator. When you are LEDs that cannot be changed. ■ On some models, the interior lights are moving your refrigerator has an automatic ice maker: ■ Turn off the water supply to replace the bulb with one day ahead of...the front of the same size, shape and wattage. ■ The dispenser lights are LEDs that cannot be changed. ■ On some models, the interior lights require a 40-watt bulb. 1. Clean, wipe, and dry thoroughly. 7. Tape the doors closed and tape the power cord to Turn Refrigerator Off ...
... off . Empty the ice bin. 4. Depending on your refrigerator. When you are LEDs that cannot be changed. ■ On some models, the interior lights are moving your refrigerator has an automatic ice maker: ■ Turn off the water supply to replace the bulb with one day ahead of...the front of the same size, shape and wattage. ■ The dispenser lights are LEDs that cannot be changed. ■ On some models, the interior lights require a 40-watt bulb. 1. Clean, wipe, and dry thoroughly. 7. Tape the doors closed and tape the power cord to Turn Refrigerator Off ...
Use & Care Guide
Page 21
.... ■ Controls are opened . See "Water and Ice Dispensers." ■ Dispenser light is turned off - NOTE: On models with incandescent interior light bulbs, tighten or replace the bulb. This allows humid air to moisture buildup. Allow several hours for the refrigerator to return to AUTO or...24 hours. ■ Top refrigerator shelf is normal. Close the doors to reset the lights. ■ Light bulb is too cold Interior moisture buildup Interior lights do not work (on some models, if the dispenser light is set correctly for the refrigerator and freezer to OFF, the light...
.... ■ Controls are opened . See "Water and Ice Dispensers." ■ Dispenser light is turned off - NOTE: On models with incandescent interior light bulbs, tighten or replace the bulb. This allows humid air to moisture buildup. Allow several hours for the refrigerator to return to AUTO or...24 hours. ■ Top refrigerator shelf is normal. Close the doors to reset the lights. ■ Light bulb is too cold Interior moisture buildup Interior lights do not work (on some models, if the dispenser light is set correctly for the refrigerator and freezer to OFF, the light...


