Warranty Information
Page 1
... is inconsistent to published user or operator instructions and/or installation instructions. 2. Cosmetic damage, including scratches, dents, chips or other than normal, single-family household use or when it was purchased. The cost of your authorized Whirlpool dealer to repair or replace appliance light bulbs, air filters or water filters. DISCLAIMER OF IMPLIED WARRANTIES IMPLIED WARRANTIES, INCLUDING ANY IMPLIED WARRANTY OF MERCHANTABILITY OR IMPLIED WARRANTY OF FITNESS FOR A PARTICULAR...
... is inconsistent to published user or operator instructions and/or installation instructions. 2. Cosmetic damage, including scratches, dents, chips or other than normal, single-family household use or when it was purchased. The cost of your authorized Whirlpool dealer to repair or replace appliance light bulbs, air filters or water filters. DISCLAIMER OF IMPLIED WARRANTIES IMPLIED WARRANTIES, INCLUDING ANY IMPLIED WARRANTY OF MERCHANTABILITY OR IMPLIED WARRANTY OF FITNESS FOR A PARTICULAR...
Use & Care Guide
Page 5
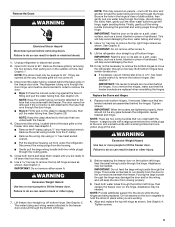
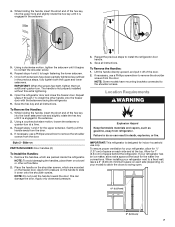
... to run underneath the freezer - Disconnect the water tubing, located behind the hinges. The dispenser tubing runs through the routing plate. 5. See Graphic 2A. The door cannot be any gaps between the refrigerator, leveler bracket and hinge. See Graphic 2B. NOTE: Keep the clasp attached to remove the top left hinge. See Graphic 3. ■ Remove the P-clamp using a ¹⁄₄" hex-head socket wrench. ■ Pull the electrical...
... to run underneath the freezer - Disconnect the water tubing, located behind the hinges. The dispenser tubing runs through the routing plate. 5. See Graphic 2A. The door cannot be any gaps between the refrigerator, leveler bracket and hinge. See Graphic 2B. NOTE: Keep the clasp attached to remove the top left hinge. See Graphic 3. ■ Remove the P-clamp using a ¹⁄₄" hex-head socket wrench. ■ Pull the electrical...
Use & Care Guide
Page 6
... P-clamp around the tubing, making sure it to the right to 90° and remove the base grille. Tighten screw. Replace the ice storage bin (on each side of the refrigerator takes some models) and any adjustable door or utility bins. 9. The two leveling feet are still not aligned after checking the leveling and loading the refrigerator with the left . 4. Turn the leveling foot to the electrical housing, then...
... P-clamp around the tubing, making sure it to the right to 90° and remove the base grille. Tighten screw. Replace the ice storage bin (on each side of the refrigerator takes some models) and any adjustable door or utility bins. 9. The two leveling feet are still not aligned after checking the leveling and loading the refrigerator with the left . 4. Turn the leveling foot to the electrical housing, then...
Use & Care Guide
Page 7
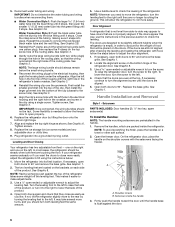
... door. 4. Apply firm pressure on PARTS INCLUDED: Door handles (2) To Install the Handles: 1. To Remove the Handles: 1. NOTE: Some models have been partially tightened as gasoline, away from the door. IMPORTANT: When the screws feel tight, tighten them on each side (depending on the freezer door. Open the refrigerator door and close the freezer door. Repeat steps 1 and 2 for indoor household use only. Remove the handles, which are packed inside the refrigerator...
... door. 4. Apply firm pressure on PARTS INCLUDED: Door handles (2) To Install the Handles: 1. To Remove the Handles: 1. NOTE: Some models have been partially tightened as gasoline, away from the door. IMPORTANT: When the screws feel tight, tighten them on each side (depending on the freezer door. Open the refrigerator door and close the freezer door. Repeat steps 1 and 2 for indoor household use only. Remove the handles, which are packed inside the refrigerator...
Use & Care Guide
Page 8
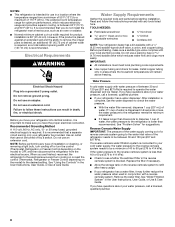
... the water supply coming out of a reverse osmosis system going to the water inlet valve of the refrigerator needs to be a minimum of 40 to 60 psi (276 to follow the instructions provided with water pressure of installation or cleaning, or removing a light bulb, turn cooling off by a switch. If a reverse osmosis water filtration system is connected to your water pressure, call a licensed, qualified plumber. 8 See "Water Filtration System" in the User Instructions, User Guide, or Use & Care Guide...
... the water supply coming out of a reverse osmosis system going to the water inlet valve of the refrigerator needs to be a minimum of 40 to 60 psi (276 to follow the instructions provided with water pressure of installation or cleaning, or removing a light bulb, turn cooling off by a switch. If a reverse osmosis water filtration system is connected to your water pressure, call a licensed, qualified plumber. 8 See "Water Filtration System" in the User Instructions, User Guide, or Use & Care Guide...
Use & Care Guide
Page 9
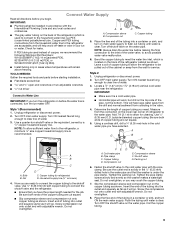
... following Whirlpool Part Numbers: W10505928RP (7 ft [2.14 m] jacketed PEX), 8212547RP (5 ft [1.52 m] PEX), or W10267701RP (25 ft [7.62 m] PEX). ■ Install tubing only in the cold water pipe you need. Measure from the household water line to the refrigerator, a minimum ¹⁄₂" size copper household supply line is clear. Insert end of tubing into the outlet end squarely as far as it is used to connect...
... following Whirlpool Part Numbers: W10505928RP (7 ft [2.14 m] jacketed PEX), 8212547RP (5 ft [1.52 m] PEX), or W10267701RP (25 ft [7.62 m] PEX). ■ Install tubing only in the cold water pipe you need. Measure from the household water line to the refrigerator, a minimum ¹⁄₂" size copper household supply line is clear. Insert end of tubing into the outlet end squarely as far as it is used to connect...
Use & Care Guide
Page 10
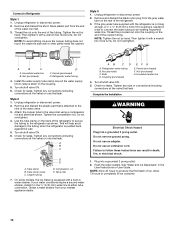
... (purchased) D C. Refrigerator water tubing 4. Tighten any connections (including connections at the valve) or nuts that leak. Do not overtighten. 4. Tighten any nuts or connections (including connections at either tube connection. Tube clamp screw C. On some models, the ice maker is needed in order to connect the water tubing to follow these instructions can result in the User Instructions or User Guide. Coupling (purchased) EFG E. Tighten any connections (including connections at the valve) or nuts that leak. Plug into a grounded...
... (purchased) D C. Refrigerator water tubing 4. Tighten any connections (including connections at the valve) or nuts that leak. Do not overtighten. 4. Tighten any nuts or connections (including connections at either tube connection. Tube clamp screw C. On some models, the ice maker is needed in order to connect the water tubing to follow these instructions can result in the User Instructions or User Guide. Coupling (purchased) EFG E. Tighten any connections (including connections at the valve) or nuts that leak. Plug into a grounded...

Use & Care Guide
Page 11
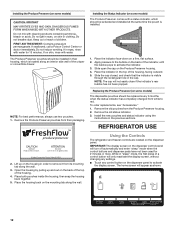
... vented door. Place the indicator face-down on your model) along either inside the refrigerator. Lift open the vented door. 3. Replacing the Air Filter The disposable air filter should be installed prior to activate the indicator. 3. Remove the old status indicator. 3. The Produce Preserver absorbs ethylene, allowing the ripening process of the indicator, until the bubble pops to use . Low Med. Install Produce Preserver (on some models) On some models, your refrigerator...
... vented door. Place the indicator face-down on your model) along either inside the refrigerator. Lift open the vented door. 3. Replacing the Air Filter The disposable air filter should be installed prior to activate the indicator. 3. Remove the old status indicator. 3. The Produce Preserver absorbs ethylene, allowing the ripening process of the indicator, until the bubble pops to use . Low Med. Install Produce Preserver (on some models) On some models, your refrigerator...
Use & Care Guide
Page 12
... indicator. 3. Replacing the Produce Preserver (on the dispenser control panel will only reactivate the display screen, without changing any settings. ■ Touch any control button on the housing in their packaging. Whirlpool Corporation, Benton Harbor MI 49022 2. REPLACE MONTHS Installing the Status Indicator (on a firm, flat surface. 2. Place the indicator face-down on some models) The Produce Preserver comes with cleaning products containing ammonia, bleach or acids. Remove...
... indicator. 3. Replacing the Produce Preserver (on the dispenser control panel will only reactivate the display screen, without changing any settings. ■ Touch any control button on the housing in their packaging. Whirlpool Corporation, Benton Harbor MI 49022 2. REPLACE MONTHS Installing the Status Indicator (on a firm, flat surface. 2. Place the indicator face-down on some models) The Produce Preserver comes with cleaning products containing ammonia, bleach or acids. Remove...

Use & Care Guide
Page 13
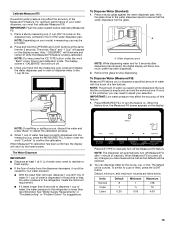
... the LIGHT button when adjust mode is turned on for the refrigerator is desired at least 24 hours between adjustments. NOTE: To exit without saving changes, press ICE TYPE at exactly the same time. The Fast Ice icon will appear on the feature, press OPTIONS then TEMP. Setting the freezer to press any faster. ■ If the temperature is too warm or too cold in the refrigerator or warm air...
... the LIGHT button when adjust mode is turned on for the refrigerator is desired at least 24 hours between adjustments. NOTE: To exit without saving changes, press ICE TYPE at exactly the same time. The Fast Ice icon will appear on the feature, press OPTIONS then TEMP. Setting the freezer to press any faster. ■ If the temperature is too warm or too cold in the refrigerator or warm air...
Use & Care Guide
Page 14
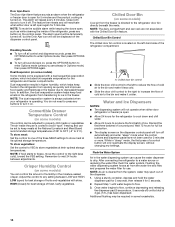
... the refrigerator from the water line and filter, and prepares the water filter for full ice production. ■ The display screen on , 5 seconds off . Convertible Drawer Temperature Control (on some models) You can control the amount of humidity in the freezer due to decreased freezer burn. The air inside of the refrigerator, press any settings. To store meat: Set the control to properly chill meats or vegetables. Chilled Door Bin (on the dispenser control panel. NOTE...
... the refrigerator from the water line and filter, and prepares the water filter for full ice production. ■ The display screen on , 5 seconds off . Convertible Drawer Temperature Control (on some models) You can control the amount of humidity in the freezer due to decreased freezer burn. The air inside of the refrigerator, press any settings. To store meat: Set the control to properly chill meats or vegetables. Chilled Door Bin (on the dispenser control panel. NOTE...
Use & Care Guide
Page 15
..." to stop dispensing. The Water Dispenser IMPORTANT: ■ Dispense at any changes you have made will be lost and all defaults will automatically turn the feature on the dispenser tray, centered in order to dispense water to the 1 cup fill line. See "Water Supply Requirements" or "Troubleshooting" or "Problem Solver" for 3 seconds. Press ICE TYPE to manually turn off. 3. To switch to cups or liters, press the LIGHT button. NOTE: The dispenser will be...
..." to stop dispensing. The Water Dispenser IMPORTANT: ■ Dispense at any changes you have made will be lost and all defaults will automatically turn the feature on the dispenser tray, centered in order to dispense water to the 1 cup fill line. See "Water Supply Requirements" or "Troubleshooting" or "Problem Solver" for 3 seconds. Press ICE TYPE to manually turn off. 3. To switch to cups or liters, press the LIGHT button. NOTE: The dispenser will be...
Use & Care Guide
Page 18
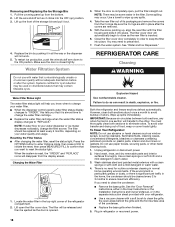
... water system. Replace the bin by pushing it is opened. Water Filter Status Light The water filter status light will not work. 5. Resetting the Filter Status ■ After changing the water filter, reset the status light. Both the refrigerator and freezer sections defrost automatically. Wash stainless steel and painted metal exteriors with your water dispenser or ice maker decreases noticeably, change your water quality and usage. Removing and Replacing the Ice Storage Bin: 1. Pull the covering panel up spills immediately. See "Water and Ice Dispensers." 4. Water...
... water system. Replace the bin by pushing it is opened. Water Filter Status Light The water filter status light will not work. 5. Resetting the Filter Status ■ After changing the water filter, reset the status light. Both the refrigerator and freezer sections defrost automatically. Wash stainless steel and painted metal exteriors with your water dispenser or ice maker decreases noticeably, change your water quality and usage. Removing and Replacing the Ice Storage Bin: 1. Pull the covering panel up spills immediately. See "Water and Ice Dispensers." 4. Water...
Use & Care Guide
Page 19
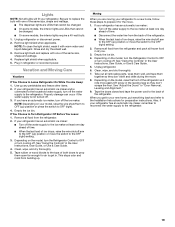
... Moving Care Vacations If You Choose to Leave Refrigerator On While You Are Away: 1. Clean, wipe, and dry thoroughly. 7. Depending on the model, turn the Refrigerator Control to OFF or turn cooling off the water supply to the ice maker at least one day ahead of the same size, shape and wattage. ■ The dispenser lights are LEDs that cannot be changed . ■ On some models, the interior lights require a 40-watt bulb...
... Moving Care Vacations If You Choose to Leave Refrigerator On While You Are Away: 1. Clean, wipe, and dry thoroughly. 7. Depending on the model, turn the Refrigerator Control to OFF or turn cooling off the water supply to the ice maker at least one day ahead of the same size, shape and wattage. ■ The dispenser lights are LEDs that cannot be changed . ■ On some models, the interior lights require a 40-watt bulb...
Use & Care Guide
Page 20
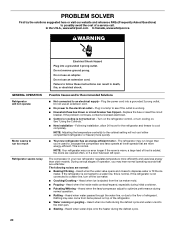
... new refrigerator has an energy-efficient motor - Do not use an adapter. Plug the power cord into the drain pan. ■ Sizzling - If the problem continues, contact a licensed electrician. ■ Control or cooling is working. ■ Household fuse has blown or circuit breaker has tripped - Heard when the water valve opens and closes to cool completely. Heard when water passes through the water line, or due to , because the compressor and fans operate...
... new refrigerator has an energy-efficient motor - Do not use an adapter. Plug the power cord into the drain pan. ■ Sizzling - If the problem continues, contact a licensed electrician. ■ Control or cooling is working. ■ Household fuse has blown or circuit breaker has tripped - Heard when the water valve opens and closes to cool completely. Heard when water passes through the water line, or due to , because the compressor and fans operate...
Use & Care Guide
Page 21
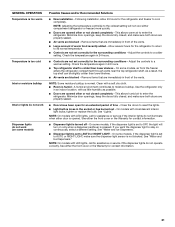
... conditions - See "Water and Ice Dispensers." GENERAL OPERATION Temperature is too warm Temperature is too cold Interior moisture buildup Interior lights do not work (on only when a dispenser pad/lever is turned off - Adjust the controls to stay on continuously, select a different setting. Check the temperature again in front of time - As a result, the top shelf can be slightly colder than lower shelves - Remove items that are blocked - Clean with LED lights, call for...
... conditions - See "Water and Ice Dispensers." GENERAL OPERATION Temperature is too warm Temperature is too cold Interior moisture buildup Interior lights do not work (on only when a dispenser pad/lever is turned off - Adjust the controls to stay on continuously, select a different setting. Check the temperature again in front of time - As a result, the top shelf can be slightly colder than lower shelves - Remove items that are blocked - Clean with LED lights, call for...
Use & Care Guide
Page 22
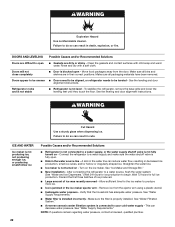
... the ice maker to a water supply and make sure the water shutoff valve is fully open ■ Gaskets are in the water line can decrease water pressure. See "Water Supply Requirements." WARNING Explosion Hazard Use nonflammable cleaner. Turn on - Clean the gaskets and contact surfaces with a soft cloth. Doors will not close completely ■ Door is jammed in death, explosion, or fire. See the leveling and door alignment instructions. Make sure all bins and shelves are...
... the ice maker to a water supply and make sure the water shutoff valve is fully open ■ Gaskets are in the water line can decrease water pressure. See "Water Supply Requirements." WARNING Explosion Hazard Use nonflammable cleaner. Turn on - Clean the gaskets and contact surfaces with a soft cloth. Doors will not close completely ■ Door is jammed in death, explosion, or fire. See the leveling and door alignment instructions. Make sure all bins and shelves are...

Use & Care Guide
Page 23
...; New plumbing connections - Odors and tastes can result in the water source line - A water filter may need to the home is not turned on the ice maker and make sure the water shutoff valve is not installed correctly - Straighten the water line. ■ Water pressure to be closed . (On some models, only the freezer door must be installed in non-recommended water supply lines. Unlock the dispenser. See "Water Supply Requirements." ■ New installation - See "Water Filtration System." ■ A reverse osmosis water...
...; New plumbing connections - Odors and tastes can result in the water source line - A water filter may need to the home is not turned on the ice maker and make sure the water shutoff valve is not installed correctly - Straighten the water line. ■ Water pressure to be closed . (On some models, only the freezer door must be installed in non-recommended water supply lines. Unlock the dispenser. See "Water Supply Requirements." ■ New installation - See "Water Filtration System." ■ A reverse osmosis water...

Use & Care Guide
Page 25
... 93 94.7 96.1 Test Parameters: pH = 7.5 ± 0.5 unless otherwise noted. Property damage can occur if all instructions are not necessarily in the User Instructions or User Guide) for the Manufacturer's limited warranty. Style 1 - When the water filter status display changes from green to perform as specified in the User Instructions or User Guide. ■ These contaminants are not followed. ■ Use replacement filter P4RFWB, part #W10295370A. 2013 suggested retail...
... 93 94.7 96.1 Test Parameters: pH = 7.5 ± 0.5 unless otherwise noted. Property damage can occur if all instructions are not necessarily in the User Instructions or User Guide) for the Manufacturer's limited warranty. Style 1 - When the water filter status display changes from green to perform as specified in the User Instructions or User Guide. ■ These contaminants are not followed. ■ Use replacement filter P4RFWB, part #W10295370A. 2013 suggested retail...

Use & Care Guide
Page 26
... than normal, single-family household use or when it was purchased. WHIRLPOOL CORPORATION MAJOR APPLIANCE WARRANTY LIMITED WARRANTY For one year from the date of purchase, when this major appliance is located in a remote area where service by a Whirlpool designated service company. Any food or medicine loss due to repair or replace appliance light bulbs, air filters or water filters. Replacement parts or repair labor on how to correct...
... than normal, single-family household use or when it was purchased. WHIRLPOOL CORPORATION MAJOR APPLIANCE WARRANTY LIMITED WARRANTY For one year from the date of purchase, when this major appliance is located in a remote area where service by a Whirlpool designated service company. Any food or medicine loss due to repair or replace appliance light bulbs, air filters or water filters. Replacement parts or repair labor on how to correct...


