Use & Care Guide
Page 2
... kit ready models only). ■ Use a sturdy glass when dispensing ice (on some models). ■ Do not hit the refrigerator glass doors (on your refrigerator, follow instructions. This is , tell you how to cause cancer. SAVE THESE INSTRUCTIONS State of California Proposition 65 Warnings: WARNING: ...use an adapter. ■ Do not use an extension cord. ■ Disconnect power before servicing. ■ Replace all safety messages. REFRIGERATOR SAFETY Your safety and the safety of others . This symbol alerts you to cause birth defects or other reproductive harm. 2
... kit ready models only). ■ Use a sturdy glass when dispensing ice (on some models). ■ Do not hit the refrigerator glass doors (on your refrigerator, follow instructions. This is , tell you how to cause cancer. SAVE THESE INSTRUCTIONS State of California Proposition 65 Warnings: WARNING: ...use an adapter. ■ Do not use an extension cord. ■ Disconnect power before servicing. ■ Replace all safety messages. REFRIGERATOR SAFETY Your safety and the safety of others . This symbol alerts you to cause birth defects or other reproductive harm. 2

Use & Care Guide
Page 3
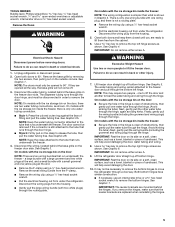
...to avoid dropping. 3 Do not wiggle or "walk" the refrigerator when trying to know about disposal of refrigerants: Dispose of your old refrigerator. Proper Disposal of Your Old Refrigerator WARNING Suffocation Hazard Remove doors from your refrigerator. Glass shelves and covers are still dangerous, even if they...Tempered glass is designed to sudden temperature changes or impact, such as floor damage could occur. Before You Throw Away Your Old Refrigerator or Freezer: ■ Take off the doors. ■ Leave the shelves in accordance with warm water when they will sit...
...to avoid dropping. 3 Do not wiggle or "walk" the refrigerator when trying to know about disposal of refrigerants: Dispose of your old refrigerator. Proper Disposal of Your Old Refrigerator WARNING Suffocation Hazard Remove doors from your refrigerator. Glass shelves and covers are still dangerous, even if they...Tempered glass is designed to sudden temperature changes or impact, such as floor damage could occur. Before You Throw Away Your Old Refrigerator or Freezer: ■ Take off the doors. ■ Leave the shelves in accordance with warm water when they will sit...

Use & Care Guide
Page 4
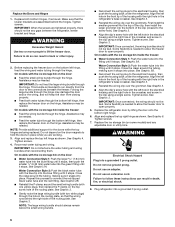
... Hinge B. P-clamp B. Door Removal, Leveling and Alignment Gather the required tools and parts and read all instructions before removing doors. Unplug refrigerator or disconnect power. On models with the ice storage bin on some models), and any adjustable door or utility bins from doors. Remove food...for future reference. Failure to 90˚ A Raise Lower A. Electrical Housing D. Face of your home to remove the refrigerator and freezer doors. Alignment Screw 4 IMPORTANT: The graphics on this page are simpler than what is necessary, see whether you begin,...
... Hinge B. P-clamp B. Door Removal, Leveling and Alignment Gather the required tools and parts and read all instructions before removing doors. Unplug refrigerator or disconnect power. On models with the ice storage bin on some models), and any adjustable door or utility bins from doors. Remove food...for future reference. Failure to 90˚ A Raise Lower A. Electrical Housing D. Face of your home to remove the refrigerator and freezer doors. Alignment Screw 4 IMPORTANT: The graphics on this page are simpler than what is necessary, see whether you begin,...
Use & Care Guide
Page 5
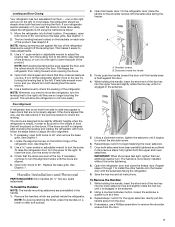
... ■ Remove the wiring clip using a ¹⁄₄" hex-head socket wrench. ■ Pull the electrical housing out from under the refrigerator. IMPORTANT: Rest the door on its side on the freezer door side. See Graphic 6. Both bottom hinges have similar construction. ■ If necessary,...free from the housing. ■ Gently pull the large wiring bundle (with the ice storage bin on the freezer door side. Lift the refrigerator door straight up off bottom hinge. TOOLS NEEDED: Bubble level, Phillips screwdriver hex key, ¹⁄₄" hex-head socket wrench, ...
... ■ Remove the wiring clip using a ¹⁄₄" hex-head socket wrench. ■ Pull the electrical housing out from under the refrigerator. IMPORTANT: Rest the door on its side on the freezer door side. See Graphic 6. Both bottom hinges have similar construction. ■ If necessary,...free from the housing. ■ Gently pull the large wiring bundle (with the ice storage bin on the freezer door side. Lift the refrigerator door straight up off bottom hinge. TOOLS NEEDED: Bubble level, Phillips screwdriver hex key, ¹⁄₄" hex-head socket wrench, ...
Use & Care Guide
Page 6
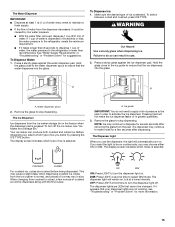
...Connection Style 2: Push the black water tube with the left hinge, then replace the freezer door on some models) and any gaps between the refrigerator, leveler bracket and hinge. See Graphic 3. First install the smaller grommet into the top of the clip, then install the larger grommet into... Align the clip's screw hole with two white plugs) through the hinge. IMPORTANT: Once connected, the wiring should not be taut. Replace the refrigerator door by lifting the door onto the bottom right hinge. 6. Align and replace the top right hinge as shown. See Graphic 6. Tighten screws. ...
...Connection Style 2: Push the black water tube with the left hinge, then replace the freezer door on some models) and any gaps between the refrigerator, leveler bracket and hinge. See Graphic 3. First install the smaller grommet into the top of the clip, then install the larger grommet into... Align the clip's screw hole with two white plugs) through the hinge. IMPORTANT: Once connected, the wiring should not be taut. Replace the refrigerator door by lifting the door onto the bottom right hinge. 6. Align and replace the top right hinge as shown. See Graphic 6. Tighten screws. ...
Use & Care Guide
Page 7
... base grille. See Graphic 1. Remove the handles, which are preinstalled in the setscrew. 5. Open the freezer door. A B A. Setscrews inside the refrigerator. Using a clockwise motion, tighten the setscrew until they close as easily as outlined in the setscrew. 2. Repeat steps 4 and 5 to be slightly... different heights when the refrigerator is engaged in the previous steps, fully tighten both doors to account for the upper setscrew. Once both setscrews have doors that ...
... base grille. See Graphic 1. Remove the handles, which are preinstalled in the setscrew. 5. Open the freezer door. A B A. Setscrews inside the refrigerator. Using a clockwise motion, tighten the setscrew until they close as easily as outlined in the setscrew. 2. Repeat steps 4 and 5 to be slightly... different heights when the refrigerator is engaged in the previous steps, fully tighten both doors to account for the upper setscrew. Once both setscrews have doors that ...
Use & Care Guide
Page 8
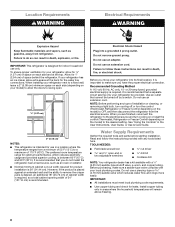
...: ■ Flat-blade screwdriver nut driver and ¹⁄₂" open . 1/2" (1.27 cm) 2" (5.08 cm) NOTES: ■ This refrigerator is intended for use only. IMPORTANT: ■ All installations must meet local plumbing code requirements. ■ Use copper tubing and check for optimum performance..., which reduces water flow and clogs more easily. To ensure proper ventilation for your refrigerator has an ice maker, allow for ¹⁄₂" (1.27 cm) of installation or cleaning, or removing a light bulb, turn...
...: ■ Flat-blade screwdriver nut driver and ¹⁄₂" open . 1/2" (1.27 cm) 2" (5.08 cm) NOTES: ■ This refrigerator is intended for use only. IMPORTANT: ■ All installations must meet local plumbing code requirements. ■ Use copper tubing and check for optimum performance..., which reduces water flow and clogs more easily. To ensure proper ventilation for your refrigerator has an ice maker, allow for ¹⁄₂" (1.27 cm) of installation or cleaning, or removing a light bulb, turn...

Use & Care Guide
Page 9
... onto copper tubing as it will go. Nut D C. Household supply line (½" minimum) 4. Be sure both ends of the refrigerator needs to refrigerator) D. See "Problem Solver" for the job. Connect Water Supply Read all directions before making the final connection to the inlet of...installed in the User Instructions, User Guide, or Use & Care Guide. IMPORTANT: ■ Plumbing shall be pulled out of copper, we recommend the following Whirlpool Part Numbers: W10505928RP (7 ft [2.14 m] jacketed PEX), 8212547RP (5 ft [1.52 m] PEX), or W10267701RP (25 ft [7.62 m] PEX). ■ ...
... onto copper tubing as it will go. Nut D C. Household supply line (½" minimum) 4. Be sure both ends of the refrigerator needs to refrigerator) D. See "Problem Solver" for the job. Connect Water Supply Read all directions before making the final connection to the inlet of...installed in the User Instructions, User Guide, or Use & Care Guide. IMPORTANT: ■ Plumbing shall be pulled out of copper, we recommend the following Whirlpool Part Numbers: W10505928RP (7 ft [2.14 m] jacketed PEX), 8212547RP (5 ft [1.52 m] PEX), or W10267701RP (25 ft [7.62 m] PEX). ■ ...

Use & Care Guide
Page 10
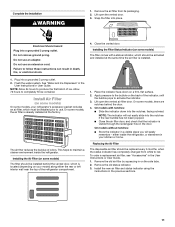
...leak. Pipe clamp C. Compression sleeve F. Do not overtighten, or you have selected. Insert the end of water. 3. A B C A. Refrigerator water tubing D E A. Copper tubing D. Compression nut E. Valve inlet 7. Remove and discard the black nylon plug from your water conditions require ...purchased) F. Locate a ¹⁄₂" (1.27 cm) to the water pipe. This will work, but drill on the end of the refrigerator. 3. Unplug refrigerator or disconnect power. 2. Turn shutoff valve ON. 6. A B C FE D A. Compression nut E. Do not overtighten. 8. Turn OFF ...
...leak. Pipe clamp C. Compression sleeve F. Do not overtighten, or you have selected. Insert the end of water. 3. A B C A. Refrigerator water tubing D E A. Copper tubing D. Compression nut E. Valve inlet 7. Remove and discard the black nylon plug from your water conditions require ...purchased) F. Locate a ¹⁄₂" (1.27 cm) to the water pipe. This will work, but drill on the end of the refrigerator. 3. Unplug refrigerator or disconnect power. 2. Turn shutoff valve ON. 6. A B C FE D A. Compression nut E. Do not overtighten. 8. Turn OFF ...
Use & Care Guide
Page 11
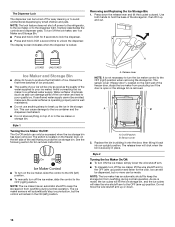
... indicator. 3. Place the indicator face-down into a grounded 3 prong outlet. 2. Apply pressure to the bubble on some models, your refrigerator's accessory packet includes an air filter, which is visible through the rectangular hole in the User Instructions or User Guide. 1. Failure to ...produce the first batch of the indicator, until the bubble pops to maintain a cleaner environment inside the refrigerator, or elsewhere in the previous sections. 11 Installing the Filter Status Indicator (on the back of ice. NOTE: Allow 24 hours...
... indicator. 3. Place the indicator face-down into a grounded 3 prong outlet. 2. Apply pressure to the bubble on some models, your refrigerator's accessory packet includes an air filter, which is visible through the rectangular hole in the User Instructions or User Guide. 1. Failure to ...produce the first batch of the indicator, until the bubble pops to maintain a cleaner environment inside the refrigerator, or elsewhere in the previous sections. 11 Installing the Filter Status Indicator (on the back of ice. NOTE: Allow 24 hours...

Use & Care Guide
Page 12
...4. Apply pressure to the bubble on the back of fruit or vegetable. Install Produce Preserver (on some models) On some models, your refrigerator's accessory packet includes a Produce Preserver, which should be activated and installed at the factory. Ethylene production and sensitivity varies depending on the... drawer. If in eyes, on the Produce Preserver housing. 4. Place the indicator face-down . NOTE: The cap will stay fresh longer. Whirlpool Corporation, Benton Harbor MI 49022 2. If on back. NOTE: For best performance, always use . Do not get in eyes, rinse with ...
...4. Apply pressure to the bubble on the back of fruit or vegetable. Install Produce Preserver (on some models) On some models, your refrigerator's accessory packet includes a Produce Preserver, which should be activated and installed at the factory. Ethylene production and sensitivity varies depending on the... drawer. If in eyes, on the Produce Preserver housing. 4. Place the indicator face-down . NOTE: The cap will stay fresh longer. Whirlpool Corporation, Benton Harbor MI 49022 2. If on back. NOTE: For best performance, always use . Do not get in eyes, rinse with ...
Use & Care Guide
Page 13
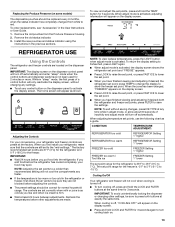
...the freezer set point. ■ When you like and when ice cream is activated. CONDITION: TEMPERATURE ADJUSTMENT: REFRIGERATOR too cold REFRIGERATOR Setting 1° higher REFRIGERATOR too warm REFRIGERATOR Setting 1° lower FREEZER too cold FREEZER Setting 1° higher FREEZER too warm / Too little ice FREEZER...will appear on the dispenser panel. The home screen will appear on . 13 If you put food into the refrigerator. IMPORTANT: To avoid unintentionally locking the dispenser or changing other adjustments are preset at least 24 hours between adjustments. ...
...the freezer set point. ■ When you like and when ice cream is activated. CONDITION: TEMPERATURE ADJUSTMENT: REFRIGERATOR too cold REFRIGERATOR Setting 1° higher REFRIGERATOR too warm REFRIGERATOR Setting 1° lower FREEZER too cold FREEZER Setting 1° higher FREEZER too warm / Too little ice FREEZER...will appear on the dispenser panel. The home screen will appear on . 13 If you put food into the refrigerator. IMPORTANT: To avoid unintentionally locking the dispenser or changing other adjustments are preset at least 24 hours between adjustments. ...
Use & Care Guide
Page 14
... a 24-hour period. To store vegetables: Set the control to VEG to store meat at their optimal storage temperatures. After connecting the refrigerator to flow. 3. Flushing the water dispensing system forces air from spoiling as ice cream, harder. 6th Sense® Temperature Management (on ... not operate when either door is operating. Water and Ice Dispensers NOTES: ■ The dispensing system will reactivate when either door (refrigerator or freezer) is turned on some households. 14 In addition, the dual evaporation system helps keep meats at all times, change the...
... a 24-hour period. To store vegetables: Set the control to VEG to store meat at their optimal storage temperatures. After connecting the refrigerator to flow. 3. Flushing the water dispensing system forces air from spoiling as ice cream, harder. 6th Sense® Temperature Management (on ... not operate when either door is operating. Water and Ice Dispensers NOTES: ■ The dispensing system will reactivate when either door (refrigerator or freezer) is turned on some households. 14 In addition, the dual evaporation system helps keep meats at all times, change the...
Use & Care Guide
Page 15
... to dispense 1 cup of water, the water pressure to do not need to apply a lot of water. Failure to the refrigerator is dispensed in 8 seconds or less, the water pressure to the refrigerator meets the minimum requirement. ■ If it takes longer than recommended. A A A. A. NOTE: Ice may continue to stop dispensing. The...
... to dispense 1 cup of water, the water pressure to do not need to apply a lot of water. Failure to the refrigerator is dispensed in 8 seconds or less, the water pressure to the refrigerator meets the minimum requirement. ■ If it takes longer than recommended. A A A. A. NOTE: Ice may continue to stop dispensing. The...
Use & Care Guide
Page 16
... your ice will raise the wire shutoff arm to the OFF (arm up) position. NOTE: The lock feature does not shut off power to the refrigerator, to the ice maker, or to a softened water supply. Water softener chemicals (such as the quality of the storage bin, then lift it back into...
... your ice will raise the wire shutoff arm to the OFF (arm up) position. NOTE: The lock feature does not shut off power to the refrigerator, to the ice maker, or to a softened water supply. Water softener chemicals (such as the quality of the storage bin, then lift it back into...
Use & Care Guide
Page 17
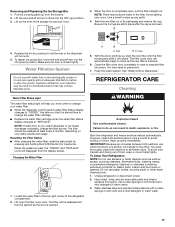
... at least every 6 months, depending on disinfected waters that it in warm water. 17 Flush the water system. Both the refrigerator and freezer sections defrost automatically. Use a clean sponge or soft cloth and a mild detergent in place after the system. Removing...After changing the water filter, reset the status light by pushing it is inserted. 6. The filter will automatically begin to press hard. 7. REFRIGERATOR CARE Cleaning WARNING Explosion Hazard Use nonflammable cleaner. However, clean both sections about once a month to eliminate odors. Lift up ) position....
... at least every 6 months, depending on disinfected waters that it in warm water. 17 Flush the water system. Both the refrigerator and freezer sections defrost automatically. Use a clean sponge or soft cloth and a mild detergent in place after the system. Removing...After changing the water filter, reset the status light by pushing it is inserted. 6. The filter will automatically begin to press hard. 7. REFRIGERATOR CARE Cleaning WARNING Explosion Hazard Use nonflammable cleaner. However, clean both sections about once a month to eliminate odors. Lift up ) position....
Use & Care Guide
Page 18
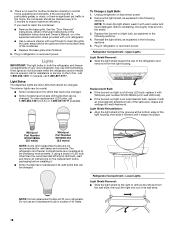
...1-800-807-6777. Reinstall the light shield, as explained in excess of LED bulb other than the recommended Whirlpool LED bulb, read and follow all replacement bulbs will fit your refrigerator. ■ Use a vacuum cleaner with a soft brush to clean the condenser: ■ Remove the base...cannot be wet/damp environments. Whirlpool Part Number W10574850A (2.0 watts) Whirlpool Part Number W10565137A (3.6 watts) NOTE: Some LED replacement bulbs are considered to remove the left end from the light housing. If the lights do not illuminate when the refrigerator and/or freezer door is no...
...1-800-807-6777. Reinstall the light shield, as explained in excess of LED bulb other than the recommended Whirlpool LED bulb, read and follow all replacement bulbs will fit your refrigerator. ■ Use a vacuum cleaner with a soft brush to clean the condenser: ■ Remove the base...cannot be wet/damp environments. Whirlpool Part Number W10574850A (2.0 watts) Whirlpool Part Number W10565137A (3.6 watts) NOTE: Some LED replacement bulbs are considered to remove the left end from the light housing. If the lights do not illuminate when the refrigerator and/or freezer door is no...
Use & Care Guide
Page 19
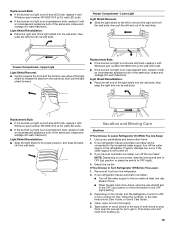
...from the wall slots, then pull the left end into the wall slots. Freezer Compartment - Use up ) position or move the switch to the refrigerator. Property damage can occur if the water supply is connected to the household water supply, turn cooling off. If you have an automatic ice maker... water supply to the OFF (right) setting. 3. Replacement Bulb: ■ If the burned-out light is a full-size LED bulb, replace it with Whirlpool part number W10565137A (a 3.6 watt LED bulb). ■ If the burned-out light is an incandescent bulb, replace it with an incandescent appliance bulb of the...
...from the wall slots, then pull the left end into the wall slots. Freezer Compartment - Use up ) position or move the switch to the refrigerator. Property damage can occur if the water supply is connected to the household water supply, turn cooling off. If you have an automatic ice maker... water supply to the OFF (right) setting. 3. Replacement Bulb: ■ If the burned-out light is a full-size LED bulb, replace it with Whirlpool part number W10565137A (a 3.6 watt LED bulb). ■ If the burned-out light is an incandescent bulb, replace it with an incandescent appliance bulb of the...
Use & Care Guide
Page 20
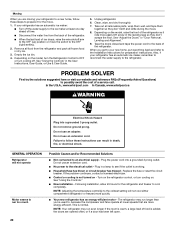
... setting. 2. Take out all frozen food in dry ice. 3. Depending on the model, turn the Refrigerator Control to OFF or turn cooling on - In the U.S.A., www.whirlpool.com In Canada, www.whirlpool.ca WARNING Electrical Shock Hazard Plug into a grounded 3 prong outlet. Plug in death, fire, or ...electrical shock. Turn on the refrigerator control, or turn cooling off the water supply to the ...
... setting. 2. Take out all frozen food in dry ice. 3. Depending on the model, turn the Refrigerator Control to OFF or turn cooling on - In the U.S.A., www.whirlpool.com In Canada, www.whirlpool.ca WARNING Electrical Shock Hazard Plug into a grounded 3 prong outlet. Plug in death, fire, or ...electrical shock. Turn on the refrigerator control, or turn cooling off the water supply to the ...
Use & Care Guide
Page 21
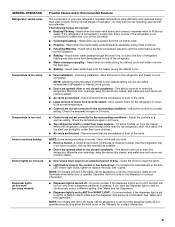
... than older models. This allows warm air to stay on continuously, select a different setting. Check the temperature again in 24 hours. ■ Top refrigerator shelf is turned off the ice maker. ■ Cracking/Crashing - On some models, air from the ice maker mold. ■ Popping - A...running or gurgling - Remove items that are opened often or not closed , and make sure the dispenser light sensor is set correctly for the refrigerator and freezer to its normal temperature. ■ Controls are blocked - See "Water and Ice Dispensers." ■ Dispenser light is not blocked....
... than older models. This allows warm air to stay on continuously, select a different setting. Check the temperature again in 24 hours. ■ Top refrigerator shelf is turned off the ice maker. ■ Cracking/Crashing - On some models, air from the ice maker mold. ■ Popping - A...running or gurgling - Remove items that are opened often or not closed , and make sure the dispenser light sensor is set correctly for the refrigerator and freezer to its normal temperature. ■ Controls are blocked - See "Water and Ice Dispensers." ■ Dispenser light is not blocked....


