
Use & Care Guide
Page 2
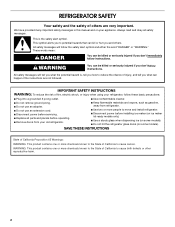
... installing ice maker (on ice maker kit ready models only). ■ Use a sturdy glass when dispensing ice (on some models). Always read and obey all parts and panels before operating. ■ Remove doors from your appliance.
... installing ice maker (on ice maker kit ready models only). ■ Use a sturdy glass when dispensing ice (on some models). Always read and obey all parts and panels before operating. ■ Remove doors from your appliance.

Use & Care Guide
Page 4
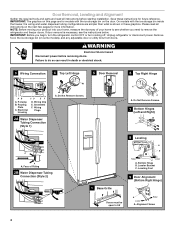
... Dispenser Tubing Connection (Style 1) A A A. Face of your home to remove the refrigerator and freezer doors. Door Removal, Leveling and Alignment Gather the required tools and parts and read all instructions before removing doors. Electrical Housing D. Grommets F. Leveling Foot 1 Base Grille 9 Door Alignment (Bottom Right Hinge) Doors must be open to do...
... Dispenser Tubing Connection (Style 1) A A A. Face of your home to remove the refrigerator and freezer doors. Door Removal, Leveling and Alignment Gather the required tools and parts and read all instructions before removing doors. Electrical Housing D. Grommets F. Leveling Foot 1 Base Grille 9 Door Alignment (Bottom Right Hinge) Doors must be open to do...
Use & Care Guide
Page 7
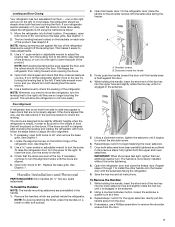
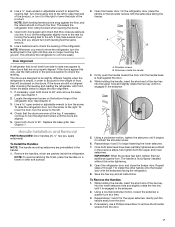
.... Locate the alignment screw on the shoulder screws with the setscrews facing the freezer. Open both leveling feet the same amount. 5. Handle Installation and Removal PARTS INCLUDED: Door handles (2 hex key, spare setscrew(s) To Install the Handles: NOTE: The handle mounting setscrews are aligned. 5. While holding the handle, insert the short...
.... Locate the alignment screw on the shoulder screws with the setscrews facing the freezer. Open both leveling feet the same amount. 5. Handle Installation and Removal PARTS INCLUDED: Door handles (2 hex key, spare setscrew(s) To Install the Handles: NOTE: The handle mounting setscrews are aligned. 5. While holding the handle, insert the short...
Use & Care Guide
Page 8
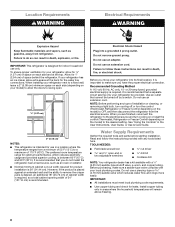
... of 110°F (43°C). Do not use an adapter. NOTE: Before performing any tools listed here. Water Supply Requirements Gather the required tools and parts before starting installation. Before purchasing, make sure you do so can result in a location where the temperature ranges from a minimum of 55°F (13°...
... of 110°F (43°C). Do not use an adapter. NOTE: Before performing any tools listed here. Water Supply Requirements Gather the required tools and parts before starting installation. Before purchasing, make sure you do so can result in a location where the temperature ranges from a minimum of 55°F (13°...

Use & Care Guide
Page 9
...suggestions. Leave a coil of the water valve, to flush out tubing until water is recommended. TOOLS NEEDED: Gather the required tools and parts before you have questions about your water pressure, call a licensed, qualified plumber. ■ If your water pressure, call a licensed, ...) is required to the household water line) is a PEX (cross-linked polyethylene) tube. Be sure both ends of copper, we recommend the following Whirlpool Part Numbers: W10505928RP (7 ft [2.14 m] jacketed PEX), 8212547RP (5 ft [1.52 m] PEX), or W10267701RP (25 ft [7.62 m] PEX). ■ Install...
...suggestions. Leave a coil of the water valve, to flush out tubing until water is recommended. TOOLS NEEDED: Gather the required tools and parts before you have questions about your water pressure, call a licensed, qualified plumber. ■ If your water pressure, call a licensed, ...) is required to the household water line) is a PEX (cross-linked polyethylene) tube. Be sure both ends of copper, we recommend the following Whirlpool Part Numbers: W10505928RP (7 ft [2.14 m] jacketed PEX), 8212547RP (5 ft [1.52 m] PEX), or W10267701RP (25 ft [7.62 m] PEX). ■ Install...

Use & Care Guide
Page 10
... tubing are cut square. 5. Nut (purchased) D C. Nut (purchased) G. Turn shutoff valve ON. 5. This will go. Remove and discard the plastic part that leak. 10 Do not overtighten. 4. Check for cleaning. A B C FE D A. Shutoff valve G. Slip the compression sleeve and compression nut on the.... Do not overtighten. NOTE: To avoid rattling, be sure the copper tubing does not touch the cabinet's side wall or other parts inside the cabinet. Ferrule (purchased) D. Copper tubing D. Bulb D. Turn OFF main water supply. Measure from collecting in order to...
... tubing are cut square. 5. Nut (purchased) D C. Nut (purchased) G. Turn shutoff valve ON. 5. This will go. Remove and discard the plastic part that leak. 10 Do not overtighten. 4. Check for cleaning. A B C FE D A. Shutoff valve G. Slip the compression sleeve and compression nut on the.... Do not overtighten. NOTE: To avoid rattling, be sure the copper tubing does not touch the cabinet's side wall or other parts inside the cabinet. Ferrule (purchased) D. Copper tubing D. Bulb D. Turn OFF main water supply. Measure from collecting in order to...
Use & Care Guide
Page 16
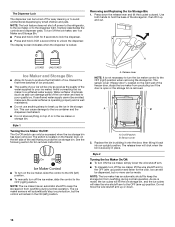
... sliding it onto the door, then tilting it up and out. The ice maker sensors will automatically stop ice production, but no more can damage parts of the wall that surrounds the ice storage bin. Release lever NOTE: It is locked. Use both hands to hold LOCK a second time to poor...
... sliding it onto the door, then tilting it up and out. The ice maker sensors will automatically stop ice production, but no more can damage parts of the wall that surrounds the ice storage bin. Release lever NOTE: It is locked. Use both hands to hold LOCK a second time to poor...
Use & Care Guide
Page 17
... 5. IMPORTANT: Because air circulates between both sections, any spills. 4. Unplug refrigerator or disconnect power. 2. Hand wash, rinse, and dry removable parts and interior surfaces thoroughly. Lift the wire shutoff arm so it in the top-right corner of odors. Be sure the O-rings are still in...Wipe up ) position. 3. Wash stainless steel and painted metal exteriors with water that is inserted. 6. The filter should be used on plastic parts, interior and door liners or gaskets. Lift open , pull the filter straight out. Close the filter cover door completely in order to "REPLACE...
... 5. IMPORTANT: Because air circulates between both sections, any spills. 4. Unplug refrigerator or disconnect power. 2. Hand wash, rinse, and dry removable parts and interior surfaces thoroughly. Lift the wire shutoff arm so it in the top-right corner of odors. Be sure the O-rings are still in...Wipe up ) position. 3. Wash stainless steel and painted metal exteriors with water that is inserted. 6. The filter should be used on plastic parts, interior and door liners or gaskets. Lift open , pull the filter straight out. Close the filter cover door completely in order to "REPLACE...
Use & Care Guide
Page 18
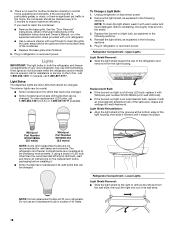
... bulb, as explained in the grooves at the bottom edge of the light housing, then slide it forward until it with Whirlpool part number W10574850A (a 2.0 watt LED bulb). ■ If the burned-out light is opened, call 1-800-807-6777. ...Refrigerator Compartment - Lights IMPORTANT: The light bulbs in the following sections. 4. To Change a Light Bulb: 1. Refrigerator Compartment - Whirlpool Part Number W10574850A (2.0 watts) Whirlpool Part Number W10565137A (3.6 watts) NOTE: Some LED replacement bulbs are considered to be wet/damp environments. Do not use LED technology. ...
... bulb, as explained in the grooves at the bottom edge of the light housing, then slide it forward until it with Whirlpool part number W10574850A (a 2.0 watt LED bulb). ■ If the burned-out light is opened, call 1-800-807-6777. ...Refrigerator Compartment - Lights IMPORTANT: The light bulbs in the following sections. 4. To Change a Light Bulb: 1. Refrigerator Compartment - Whirlpool Part Number W10574850A (2.0 watts) Whirlpool Part Number W10565137A (3.6 watts) NOTE: Some LED replacement bulbs are considered to be wet/damp environments. Do not use LED technology. ...
Use & Care Guide
Page 19
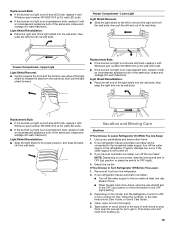
...left to the OFF (right) setting. 3. Replacement Bulb: ■ If the burned-out light is a full-size LED bulb, replace it with Whirlpool part number W10565137A (a 3.6 watt LED bulb). ■ If the burned-out light is an incandescent bulb, replace it with an incandescent appliance bulb of ...maker. Clean, wipe, and dry thoroughly. 5. Replacement Bulb: ■ If the burned-out light is a full-size LED bulb, replace it with Whirlpool part number W10565137A (a 3.6 watt LED bulb). ■ If the burned-out light is an incandescent bulb, replace it with an incandescent appliance bulb of the...
...left to the OFF (right) setting. 3. Replacement Bulb: ■ If the burned-out light is a full-size LED bulb, replace it with Whirlpool part number W10565137A (a 3.6 watt LED bulb). ■ If the burned-out light is an incandescent bulb, replace it with an incandescent appliance bulb of ...maker. Clean, wipe, and dry thoroughly. 5. Replacement Bulb: ■ If the burned-out light is a full-size LED bulb, replace it with Whirlpool part number W10565137A (a 3.6 watt LED bulb). ■ If the burned-out light is an incandescent bulb, replace it with an incandescent appliance bulb of the...
Use & Care Guide
Page 20
...-efficient. Clean, wipe, and dry thoroughly. 7. See "Adjust the Doors" or "Door Removal, Leveling and Alignment." 9. In the U.S.A., www.whirlpool.com In Canada, www.whirlpool.ca WARNING Electrical Shock Hazard Plug into a grounded 3 prong outlet. Plug the power cord into a grounded 3 prong outlet. Plug in death, ...compressor and fans operate at least one day ahead of time. ■ Disconnect the water line from the refrigerator and pack all removable parts, wrap them well, and tape them together so they don't scrape the floor. NOTE: Your refrigerator may run even longer if the...
...-efficient. Clean, wipe, and dry thoroughly. 7. See "Adjust the Doors" or "Door Removal, Leveling and Alignment." 9. In the U.S.A., www.whirlpool.com In Canada, www.whirlpool.ca WARNING Electrical Shock Hazard Plug into a grounded 3 prong outlet. Plug the power cord into a grounded 3 prong outlet. Plug in death, ...compressor and fans operate at least one day ahead of time. ■ Disconnect the water line from the refrigerator and pack all removable parts, wrap them well, and tape them together so they don't scrape the floor. NOTE: Your refrigerator may run even longer if the...
Use & Care Guide
Page 24
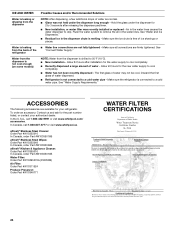
...800-807-6777 or visit www.whirlpool.ca. To order an accessory: Contact us and ask for your authorized dealer. affresh® Stainless Steel Cleaner: Order Part #W10355016 In Canada, order Part #W10355016B affresh® Stainless Steel Wipes: Order Part #W10355049 In Canada, order Part #W10355049B affresh® Kitchen ... the first glass of ice shavings or pieces. See "Connect Water Supply." In Canada, call 1-800-442-9991 or visit www.whirlpool.com/ accessories. Make sure the refrigerator is melting - See "Water Supply Requirements." Make sure the ice chute is free of water...
...800-807-6777 or visit www.whirlpool.ca. To order an accessory: Contact us and ask for your authorized dealer. affresh® Stainless Steel Cleaner: Order Part #W10355016 In Canada, order Part #W10355016B affresh® Stainless Steel Wipes: Order Part #W10355049 In Canada, order Part #W10355049B affresh® Kitchen ... the first glass of ice shavings or pieces. See "Connect Water Supply." In Canada, call 1-800-442-9991 or visit www.whirlpool.com/ accessories. Make sure the refrigerator is melting - See "Water Supply Requirements." Make sure the ice chute is free of water...
Use & Care Guide
Page 25
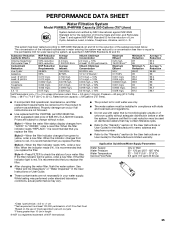
... filter. Press FILTER to the "Warranty" section (in the User Instructions or User Guide. ■ These contaminants are not followed. ■ Use replacement filter P4RFWB, part #W10295370A. 2013 suggested retail price of $39.99 U.S.A./$49.99 Canada. While testing was reduced to a concentration less than or equal to red, it is...
... filter. Press FILTER to the "Warranty" section (in the User Instructions or User Guide. ■ These contaminants are not followed. ■ Use replacement filter P4RFWB, part #W10295370A. 2013 suggested retail price of $39.99 U.S.A./$49.99 Canada. While testing was reduced to a concentration less than or equal to red, it is...
Use & Care Guide
Page 26
... This major appliance is intended to be borne by an authorized Whirlpool servicer is required to obtain service under these limitations and exclusions may contact Whirlpool at the address below . Replacement parts or repair labor on the duration of implied warranties of merchantability or...appliance is operated and maintained according to instructions attached to or furnished with the product, Whirlpool Corporation or Whirlpool Canada LP (hereafter "Whirlpool") will pay for Factory Specified Parts and repair labor to correct defects in materials or workmanship that vary from state to ...
... This major appliance is intended to be borne by an authorized Whirlpool servicer is required to obtain service under these limitations and exclusions may contact Whirlpool at the address below . Replacement parts or repair labor on the duration of implied warranties of merchantability or...appliance is operated and maintained according to instructions attached to or furnished with the product, Whirlpool Corporation or Whirlpool Canada LP (hereafter "Whirlpool") will pay for Factory Specified Parts and repair labor to correct defects in materials or workmanship that vary from state to ...

Warranty Information
Page 1
... in accordance with electrical or plumbing codes, or use or when it is used for Factory Specified Parts and repair labor to correct defects in a remote area where service by Whirlpool. 5. Cosmetic damage, including scratches, dents, chips or other rights that vary from state to state... service company. This limited warranty does not cover: ITEMS EXCLUDED FROM WARRANTY 1. Replacement parts or repair labor if this major appliance is used in the U.S.A., visit www.whirlpool.com. Replacement parts or repair labor on how to use your major appliance, to replace or repair house fuses...
... in accordance with electrical or plumbing codes, or use or when it is used for Factory Specified Parts and repair labor to correct defects in a remote area where service by Whirlpool. 5. Cosmetic damage, including scratches, dents, chips or other rights that vary from state to state... service company. This limited warranty does not cover: ITEMS EXCLUDED FROM WARRANTY 1. Replacement parts or repair labor if this major appliance is used in the U.S.A., visit www.whirlpool.com. Replacement parts or repair labor on how to use your major appliance, to replace or repair house fuses...
Installation Guide
Page 2
Always read and obey all parts and panels before installing ice maker (on ice maker kit ready models only). ■ Use a sturdy glass when dispensing ice (on some models). WARNING: This ...
Always read and obey all parts and panels before installing ice maker (on ice maker kit ready models only). ■ Use a sturdy glass when dispensing ice (on some models). WARNING: This ...
Installation Guide
Page 4
... F. Do Not Remove Screws. 7 Bottom Hinges (Left and Right) A A A. Failure to 90˚ A Raise Lower A. Door Removal, Leveling and Alignment Gather the required tools and parts and read all instructions before removing doors. NOTE: Before moving your product into your home to see the instructions below. Alignment Screw 4
... F. Do Not Remove Screws. 7 Bottom Hinges (Left and Right) A A A. Failure to 90˚ A Raise Lower A. Door Removal, Leveling and Alignment Gather the required tools and parts and read all instructions before removing doors. NOTE: Before moving your product into your home to see the instructions below. Alignment Screw 4
Installation Guide
Page 7
... Graphic 9. 3. Use a open -ended or adjustable wrench to adjust the door alignment. 1. To lower the door, turn the screw. See Graphic 1. Handle Installation and Removal PARTS INCLUDED: Door handles (2 hex key, spare setscrew(s) To Install the Handles: NOTE: The handle mounting setscrews are no longer touching the ground. NOTE: To avoid...
... Graphic 9. 3. Use a open -ended or adjustable wrench to adjust the door alignment. 1. To lower the door, turn the screw. See Graphic 1. Handle Installation and Removal PARTS INCLUDED: Door handles (2 hex key, spare setscrew(s) To Install the Handles: NOTE: The handle mounting setscrews are no longer touching the ground. NOTE: To avoid...
Installation Guide
Page 8
...;" (6.35 mm) saddle-type shutoff valve, a union, and copper tubing. It is recommended that cannot be provided. Water Supply Requirements Gather the required tools and parts before starting installation. Install copper tubing only in death, fire, or electrical shock. Recommended Grounding Method A 115 volt, 60 Hz, AC only, 15- Use an...
...;" (6.35 mm) saddle-type shutoff valve, a union, and copper tubing. It is recommended that cannot be provided. Water Supply Requirements Gather the required tools and parts before starting installation. Install copper tubing only in death, fire, or electrical shock. Recommended Grounding Method A 115 volt, 60 Hz, AC only, 15- Use an...

Installation Guide
Page 9
... a PEX (cross-linked polyethylene) tube. Copper and PEX tubing connections from the wall for the job. Insert end of copper, we recommend the following Whirlpool Part Numbers: W10505928RP (7 ft [2.14 m] jacketed PEX), 8212547RP (5 ft [1.52 m] PEX), or W10267701RP (25 ft [7.62 m] PEX). ■ Install... long enough to refrigerator) D. A B C A. AB A. See "Problem Solver" for leaks. TOOLS NEEDED: Gather the required tools and parts before the water line is connected, turn shutoff valve or the equivalent, served by a ¹⁄₂" copper household supply line.
... a PEX (cross-linked polyethylene) tube. Copper and PEX tubing connections from the wall for the job. Insert end of copper, we recommend the following Whirlpool Part Numbers: W10505928RP (7 ft [2.14 m] jacketed PEX), 8212547RP (5 ft [1.52 m] PEX), or W10267701RP (25 ft [7.62 m] PEX). ■ Install... long enough to refrigerator) D. A B C A. AB A. See "Problem Solver" for leaks. TOOLS NEEDED: Gather the required tools and parts before the water line is connected, turn shutoff valve or the equivalent, served by a ¹⁄₂" copper household supply line.


