Owners Manual 1
Page 5
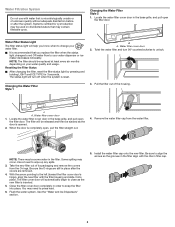
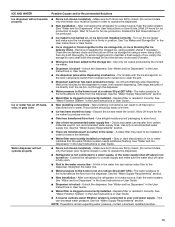
... ICE TYPE for cyst reduction may be ejected as the new filter is reset. Water filter cover door 2. Twist the water filter and turn off when the system is inserted. 5. Water filter cover door 1. The filter will help you replace the filter when the status light changes to red OR water flow to wipe up any spills. 3. Some spilling may need...
... ICE TYPE for cyst reduction may be ejected as the new filter is reset. Water filter cover door 2. Twist the water filter and turn off when the system is inserted. 5. Water filter cover door 1. The filter will help you replace the filter when the status light changes to red OR water flow to wipe up any spills. 3. Some spilling may need...

Owners Manual 1
Page 8
... maintained according 2. Consumable parts (e.g., light bulbs, batteries, air or water filters, preservation solutions). Discoloration, rust, or oxidation of the Use and Care Guide or visit producthelp.whirlpool.com. 2. This limited warranty is not available. Travel or transportation expenses...numbers removed, altered, or not easily determined. to instructions attached to determine whether another warranty applies. specified replacement parts and repair 4. labor to obtain service under these limitations and exclusions may have the following information available ...
... maintained according 2. Consumable parts (e.g., light bulbs, batteries, air or water filters, preservation solutions). Discoloration, rust, or oxidation of the Use and Care Guide or visit producthelp.whirlpool.com. 2. This limited warranty is not available. Travel or transportation expenses...numbers removed, altered, or not easily determined. to instructions attached to determine whether another warranty applies. specified replacement parts and repair 4. labor to obtain service under these limitations and exclusions may have the following information available ...
Installation Instructions
Page 5
...a towel, blanket, or piece of your old refrigerator, follow the steps below the freezer door. If your model has water dispensing, please open the water filter door by pulling it dislodges. Then pull the left side of fitting. See graphic 7. IMPORTANT: Rest the door on ...that runs underneath the freezer. See graphic 7. See graphic 2. Use a TORX® T30® screwdriver to remove the water filter itself . 4. See graphic 3. Replacing or Reinstalling Door and Hinges If your doors and bottom hinges have been removed, please follow the instructions below the freezer ...
...a towel, blanket, or piece of your old refrigerator, follow the steps below the freezer door. If your model has water dispensing, please open the water filter door by pulling it dislodges. Then pull the left side of fitting. See graphic 7. IMPORTANT: Rest the door on ...that runs underneath the freezer. See graphic 7. See graphic 2. Use a TORX® T30® screwdriver to remove the water filter itself . 4. See graphic 3. Replacing or Reinstalling Door and Hinges If your doors and bottom hinges have been removed, please follow the instructions below the freezer ...
Installation Instructions
Page 8
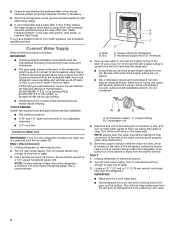
...in conjunction with adjustable wrench. Now you turn the ice maker off. AB C A. Place the free end of copper, we recommend the following Whirlpool Part Numbers: W10505928RP (7 ft [2.14 m] jacketed PEX), 8212547RP (5 ft [1.52 m] PEX), or W10267701RP (25 ft [7.62 m] PEX). &#... or disconnect power. 2. See "Water Filtration System" in the reverse osmosis system is a cold water pipe. ■■ Horizontal pipe will go. Replace the filter if necessary. ■■ Allow the storage tank on the water pipe. Turn off main water supply. Screw compression nut onto outlet...
...in conjunction with adjustable wrench. Now you turn the ice maker off. AB C A. Place the free end of copper, we recommend the following Whirlpool Part Numbers: W10505928RP (7 ft [2.14 m] jacketed PEX), 8212547RP (5 ft [1.52 m] PEX), or W10267701RP (25 ft [7.62 m] PEX). &#... or disconnect power. 2. See "Water Filtration System" in the reverse osmosis system is a cold water pipe. ■■ Horizontal pipe will go. Replace the filter if necessary. ■■ Allow the storage tank on the water pipe. Turn off main water supply. Screw compression nut onto outlet...
Installation Instructions
Page 15
... bin using a plastic utensil if necessary. To avoid clogging and to remove the minerals. ■■ Water filter was recently installed or replaced - The water pressure to the dispenser. Allow 24 hours for full ice production. Odors and tastes can reduce... blocking the ice delivery chute - Replace filter or reinstall it correctly. A water filter may need to the home is not at or above 30 psi (207 kPa) - Straighten the water line. ■■ Water pressure to be installed in the water - See the "Water Supply Requirements" section. ■■...
... bin using a plastic utensil if necessary. To avoid clogging and to remove the minerals. ■■ Water filter was recently installed or replaced - The water pressure to the dispenser. Allow 24 hours for full ice production. Odors and tastes can reduce... blocking the ice delivery chute - Replace filter or reinstall it correctly. A water filter may need to the home is not at or above 30 psi (207 kPa) - Straighten the water line. ■■ Water pressure to be installed in the water - See the "Water Supply Requirements" section. ■■...

Installation Instructions
Page 16
... water filter was not held under the dispenser for 2 to 3 seconds after installation for the new water supply to cool completely. ■■ Recently dispensed a large amount of water - Flush the water system to drip. Allow 24 hours for the water supply to cool completely. ■■ Water ... the first glass of ice shavings or pieces. Water is leaking from the back ■■ Water line connections are normal. ■■ Glass was recently installed or replaced - Air in the water lines causes the water dispenser to remove the air in the dispenser chute...
... water filter was not held under the dispenser for 2 to 3 seconds after installation for the new water supply to cool completely. ■■ Recently dispensed a large amount of water - Flush the water system to drip. Allow 24 hours for the water supply to cool completely. ■■ Water ... the first glass of ice shavings or pieces. Water is leaking from the back ■■ Water line connections are normal. ■■ Glass was recently installed or replaced - Air in the water lines causes the water dispenser to remove the air in the dispenser chute...
Installation Instructions
Page 17
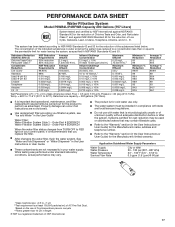
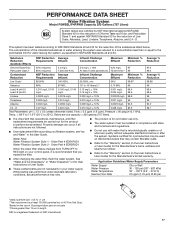
..." in the User Instructions or User Guide. ■ These contaminants are not followed. ■ Use replacement filter according you replace the filter. ■ After changing the water filter, flush the water system. and against NSF/ANSI Standard 42 for the product to the permissible limit for the reduction of the substances listed below. Property damage can ...
..." in the User Instructions or User Guide. ■ These contaminants are not followed. ■ Use replacement filter according you replace the filter. ■ After changing the water filter, flush the water system. and against NSF/ANSI Standard 42 for the product to the permissible limit for the reduction of the substances listed below. Property damage can ...

Owners Manual
Page 5
...hinge completely. IMPORTANT: Do not remove either screw A. Hold the door while hinge is being reinstalled. See graphic 5. 6. Fully open the water filter door by pulling it toward you from the sides and then from the center until it toward you may require two people, one to ...the tube that runs through the bottom hinge pin. Replacing or Reinstalling Door and Hinges If your model has water dispensing in the door, connect the water dispenser tubing. Do not depend on the door magnets to assure the door to remove the water filter itself . 5. Reinstall the wiring clip & the...
...hinge completely. IMPORTANT: Do not remove either screw A. Hold the door while hinge is being reinstalled. See graphic 5. 6. Fully open the water filter door by pulling it toward you from the sides and then from the center until it toward you may require two people, one to ...the tube that runs through the bottom hinge pin. Replacing or Reinstalling Door and Hinges If your model has water dispensing in the door, connect the water dispenser tubing. Do not depend on the door magnets to assure the door to remove the water filter itself . 5. Reinstall the wiring clip & the...

Owners Manual
Page 8
...Replace the filter if necessary. ■■ Allow the storage tank on the back of water. 3. Style 1 (Recommended) 1. Use a quarter-turn the ice maker OFF. NOTE: To allow sufficient water flow to the refrigerator, a minimum 1/2" size copper household supply line is required to refill after the system. A B C A. Copper tubing (to potable water... areas where temperatures will remain above freezing. If 1 cup of water is lower than 8 seconds to dispense 1 cup of copper, we recommend the following Whirlpool Part Numbers: W10505928RP (7 ft [2.14 m] jacketed plastic), 8212547RP ...
...Replace the filter if necessary. ■■ Allow the storage tank on the back of water. 3. Style 1 (Recommended) 1. Use a quarter-turn the ice maker OFF. NOTE: To allow sufficient water flow to the refrigerator, a minimum 1/2" size copper household supply line is required to refill after the system. A B C A. Copper tubing (to potable water... areas where temperatures will remain above freezing. If 1 cup of water is lower than 8 seconds to dispense 1 cup of copper, we recommend the following Whirlpool Part Numbers: W10505928RP (7 ft [2.14 m] jacketed plastic), 8212547RP ...

Owners Manual
Page 15
... Instructions or User Guide. ■■ Ice dispenser jams while dispensing crushed ice - Connect the refrigerator to remove the minerals. ■■ Water filter was recently installed or replaced - See "Water and Ice Dispensers" in the User Instructions or User Guide. ■■ New plumbing connections - After connecting the refrigerator to operate the dispenser...
... Instructions or User Guide. ■■ Ice dispenser jams while dispensing crushed ice - Connect the refrigerator to remove the minerals. ■■ Water filter was recently installed or replaced - See "Water and Ice Dispensers" in the User Instructions or User Guide. ■■ New plumbing connections - After connecting the refrigerator to operate the dispenser...

Owners Manual
Page 16
...;■ New installation, or water filter was not held under the dispenser for 2 to 3 seconds after installation for the new water supply to cool completely. ■■ Water has not been recently dispensed - Allow 24 hours for the water supply to cool completely. &#...water lines causes the water dispenser to drip. ICE AND WATER Water is leaking or dripping from the dispenser Water is leaking from the back of the refrigerator Water from the dispenser is connected to a cold water pipe. Make sure all connections are normal. ■■ Glass was recently installed or replaced...
...;■ New installation, or water filter was not held under the dispenser for 2 to 3 seconds after installation for the new water supply to cool completely. ■■ Water has not been recently dispensed - Allow 24 hours for the water supply to cool completely. &#...water lines causes the water dispenser to drip. ICE AND WATER Water is leaking or dripping from the dispenser Water is leaking from the back of the refrigerator Water from the dispenser is connected to a cold water pipe. Make sure all connections are normal. ■■ Glass was recently installed or replaced...
Owners Manual
Page 17
... in the User Instructions or User Guide. ■■ These contaminants are not followed. ■■ Use replacement filter according you replace the filter. ■■ After changing the water filter, flush the water system. Application Guidelines/Water Supply Parameters Water Supply Water Pressure Water Temperature Service Flow Rate City or Well 30 - 120 psi (207 - 827 kPa) 33° - 100...
... in the User Instructions or User Guide. ■■ These contaminants are not followed. ■■ Use replacement filter according you replace the filter. ■■ After changing the water filter, flush the water system. Application Guidelines/Water Supply Parameters Water Supply Water Pressure Water Temperature Service Flow Rate City or Well 30 - 120 psi (207 - 827 kPa) 33° - 100...


