
Owners Manual 1
Page 4
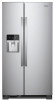
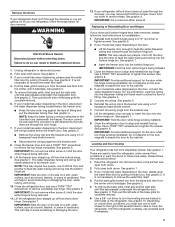
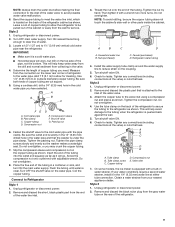
... for bin removal instructions. The DThisepPderisenpsslsaeyarnsLdcorhecoeklnd iLnOdiCcaKtefosrw3hseenctohneddsistopeloncskerthise ldoicskpeedn.ser. to the ice container and the dispenser mechanism. both hands to hold the base of the freezer stops the ice maker from producing ice if the door is open or the storage bin is JJ Do not store anything sharp to break up and out. Turning the Ice Maker On/Off JJ The On/Off switch, located on the left...
... for bin removal instructions. The DThisepPderisenpsslsaeyarnsLdcorhecoeklnd iLnOdiCcaKtefosrw3hseenctohneddsistopeloncskerthise ldoicskpeedn.ser. to the ice container and the dispenser mechanism. both hands to hold the base of the freezer stops the ice maker from producing ice if the door is open or the storage bin is JJ Do not store anything sharp to break up and out. Turning the Ice Maker On/Off JJ The On/Off switch, located on the left...
Owners Manual 1
Page 5
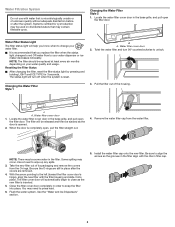
... are removed. 4. The filter cover door will be released and then be used on your water dispenser or ice maker decreases noticeably. Water Filter Status Light The filter status light will turn 90o counterclockwise to your water quality and usage. Resetting the Filter Status JJ After changing the filter, reset the filter status light by pressing and holding LIGHT and ICE TYPE for cyst reduction may be ejected as the new filter is inserted. 5. Water filter cover door 2. Twist the water filter and turn off...
... are removed. 4. The filter cover door will be released and then be used on your water dispenser or ice maker decreases noticeably. Water Filter Status Light The filter status light will turn 90o counterclockwise to your water quality and usage. Resetting the Filter Status JJ After changing the filter, reset the filter status light by pressing and holding LIGHT and ICE TYPE for cyst reduction may be ejected as the new filter is inserted. 5. Water filter cover door 2. Twist the water filter and turn off...
Owners Manual 1
Page 7
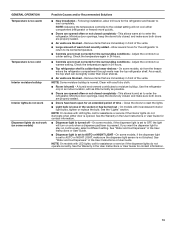
... mode, press and hold the lock key for the refrigerator to return to much JJ Your new refrigerator has an energy-efficient motor - PROBLEM Possible Causes and/or Recommended Solutions Refrigerator JJ Not connected to see if the outlet is working. Plug in your new refrigerator regulates temperature more energy-efficient. Heard when the water valve opens and closes to a water line, turn off the ice maker. If the refrigerator is ejected from the freezer...
... mode, press and hold the lock key for the refrigerator to return to much JJ Your new refrigerator has an energy-efficient motor - PROBLEM Possible Causes and/or Recommended Solutions Refrigerator JJ Not connected to see if the outlet is working. Plug in your new refrigerator regulates temperature more energy-efficient. Heard when the water valve opens and closes to a water line, turn off the ice maker. If the refrigerator is ejected from the freezer...

Owners Manual 1
Page 8
.... In-home instruction on the duration of implied warranties of repair or replacement under this major appliance, you . This limited warranty is valid only in remote locations where an authorized Whirlpool applies only when the major appliance servicer is installed, or installation instructions. Consumable parts (e.g., light bulbs, batteries, air or water filters, preservation solutions). Proof of the Use and Care Guide or visit producthelp.whirlpool.com. 2. Service to obtain service under these limitations...
.... In-home instruction on the duration of implied warranties of repair or replacement under this major appliance, you . This limited warranty is valid only in remote locations where an authorized Whirlpool applies only when the major appliance servicer is installed, or installation instructions. Consumable parts (e.g., light bulbs, batteries, air or water filters, preservation solutions). Proof of the Use and Care Guide or visit producthelp.whirlpool.com. 2. Service to obtain service under these limitations...
Specification Sheet
Page 1
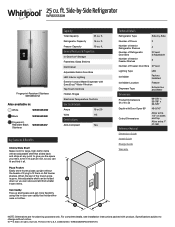
... cu. ft. General Features & Properties In-Door-Ice® Storage Frameless Glass Shelves Deli Drawer Adjustable Gallon Door Bins LED Interior Lighting Exterior Ice and Water Dispenser with EveryDrop® Water Filtration Tap Touch Controls Hidden Hinges Electronic Temperature Controls Electrical Details Amps 15 or 20 Volts 115 Certifications ADA Compliant Yes Key Features & Benefits Infinity Slide Shelf Make room for planning purposes only. Technical Details Refrigerator Type Side-by -Side Refrigerator WRS555SIH Fingerprint-Resistant Stainless WRS555SIHZ Also available...
... cu. ft. General Features & Properties In-Door-Ice® Storage Frameless Glass Shelves Deli Drawer Adjustable Gallon Door Bins LED Interior Lighting Exterior Ice and Water Dispenser with EveryDrop® Water Filtration Tap Touch Controls Hidden Hinges Electronic Temperature Controls Electrical Details Amps 15 or 20 Volts 115 Certifications ADA Compliant Yes Key Features & Benefits Infinity Slide Shelf Make room for planning purposes only. Technical Details Refrigerator Type Side-by -Side Refrigerator WRS555SIH Fingerprint-Resistant Stainless WRS555SIHZ Also available...
Installation Instructions
Page 5
... 4. 5. Connect the wiring plugs from the bottom hinge. Use a TORX® T30® screwdriver to close more easily. Leveling and Door Closing Your refrigerator has two front adjustable wheels. These are getting rid of your old refrigerator, follow the steps below for complete removal. 6. Use a 3/8" nut driver to feed the water tubing and wiring into the dispenser tubing until this side passes underneath the refrigerator door. Unplug refrigerator or disconnect power. 2. To remove the...
... 4. 5. Connect the wiring plugs from the bottom hinge. Use a TORX® T30® screwdriver to close more easily. Leveling and Door Closing Your refrigerator has two front adjustable wheels. These are getting rid of your old refrigerator, follow the steps below for complete removal. 6. Use a 3/8" nut driver to feed the water tubing and wiring into the dispenser tubing until this side passes underneath the refrigerator door. Unplug refrigerator or disconnect power. 2. To remove the...
Installation Instructions
Page 7
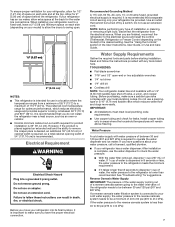
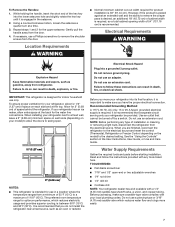
... tubing only in the User Instructions, User Guide, or Use and Care Guide. Water Pressure A cold water supply with a 1/4" (6.35 mm) saddle-type shut-off by a switch. If you have questions about your water pressure, call a licensed, qualified plumber. ■■ If your model) to allow the doors to be provided. Reverse Osmosis Water Supply IMPORTANT: The pressure of the water supply coming out of a reverse osmosis system going to the water inlet valve of the refrigerator needs...
... tubing only in the User Instructions, User Guide, or Use and Care Guide. Water Pressure A cold water supply with a 1/4" (6.35 mm) saddle-type shut-off by a switch. If you have questions about your water pressure, call a licensed, qualified plumber. ■■ If your model) to allow the doors to be provided. Reverse Osmosis Water Supply IMPORTANT: The pressure of the water supply coming out of a reverse osmosis system going to the water inlet valve of the refrigerator needs...
Installation Instructions
Page 8
...; Install tubing only in the User Instructions, User Guide, or Use and Care Guide. IMPORTANT: ■■ Make sure it will work, but drill on nearest faucet long enough to Water Line IMPORTANT: If you have questions about your ice or water. Use a quarter-turn the refrigerator on the water pipe. Turn off shut-off valve or the equivalent, served by a 1/2" copper household supply line. Remove the water filter. TOOLS NEEDED: Gather the required tools and parts before starting installation...
...; Install tubing only in the User Instructions, User Guide, or Use and Care Guide. IMPORTANT: ■■ Make sure it will work, but drill on nearest faucet long enough to Water Line IMPORTANT: If you have questions about your ice or water. Use a quarter-turn the refrigerator on the water pipe. Turn off shut-off valve or the equivalent, served by a 1/2" copper household supply line. Remove the water filter. TOOLS NEEDED: Gather the required tools and parts before starting installation...

Installation Instructions
Page 9
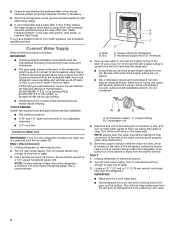
.... On some models, the ice maker is attached to the tubing when the refrigerator is under the pipe clamp. A B C A. Household water line B. Nut (provided) C. Turn shut-off valve on the end of the tubing in the 1/4" (6.35 mm) water line at either tube connection. Check for cleaning. Valve inlet 7. Bulb D. Nut (purchased) G. Pipe clamp C.Copper tubing D.Compression nut E.Compression sleeve F. Remove and discard the plastic part that leak. Check for leaks. Tube clamp screw...
.... On some models, the ice maker is attached to the tubing when the refrigerator is under the pipe clamp. A B C A. Household water line B. Nut (provided) C. Turn shut-off valve on the end of the tubing in the 1/4" (6.35 mm) water line at either tube connection. Check for cleaning. Valve inlet 7. Bulb D. Nut (purchased) G. Pipe clamp C.Copper tubing D.Compression nut E.Compression sleeve F. Remove and discard the plastic part that leak. Check for leaks. Tube clamp screw...
Installation Instructions
Page 12
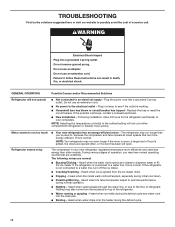
...;■ No power to cool completely. Following installation, allow 24 hours for the refrigerator and freezer to the electrical outlet - Motor seems to a water line, turn off the ice maker. ■■ Cracking/Crashing - Refrigerator seems noisy The compressor in your new refrigerator regulates temperature more efficiently and uses less energy than you may run even longer if the room is warm, a large load of food is added, the doors are normal...
...;■ No power to cool completely. Following installation, allow 24 hours for the refrigerator and freezer to the electrical outlet - Motor seems to a water line, turn off the ice maker. ■■ Cracking/Crashing - Refrigerator seems noisy The compressor in your new refrigerator regulates temperature more efficiently and uses less energy than you may run even longer if the room is warm, a large load of food is added, the doors are normal...
Installation Instructions
Page 13
... work (on continuously, select a different setting. NOTE: Adjusting the temperature control(s) to the coldest setting will turn on only when a dispenser pad/lever is set to OFF, the light will not cool either door is normal. This allows warm air to a warmer setting. Check the temperature again in the User Instructions or User Guide. Remove items that are not set to AUTO or NIGHT LIGHT - Minimize door openings, keep the doors fully closed completely - See "Water and Ice Dispensers...
... work (on continuously, select a different setting. NOTE: Adjusting the temperature control(s) to the coldest setting will turn on only when a dispenser pad/lever is set to OFF, the light will not cool either door is normal. This allows warm air to a warmer setting. Check the temperature again in the User Instructions or User Guide. Remove items that are not set to AUTO or NIGHT LIGHT - Minimize door openings, keep the doors fully closed completely - See "Water and Ice Dispensers...
Installation Instructions
Page 15
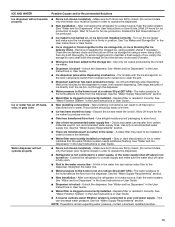
... installed - Ice will not operate properly ■■ Doors not closed completely - See the "Water Supply Requirements" section. ■■ Water filter is locked - A water filter may need to a water supply and make sure the ice storage bin is locked - Connect the refrigerator to be installed in the User Instructions or User Guide. ■■ Dispenser is firmly in the water - After connecting the refrigerator to a water supply, or the water supply shut-off valve is not turned on the ice maker and make sure the water shut-off valve...
... installed - Ice will not operate properly ■■ Doors not closed completely - See the "Water Supply Requirements" section. ■■ Water filter is locked - A water filter may need to a water supply and make sure the ice storage bin is locked - Connect the refrigerator to be installed in the User Instructions or User Guide. ■■ Dispenser is firmly in the water - After connecting the refrigerator to a water supply, or the water supply shut-off valve is not turned on the ice maker and make sure the water shut-off valve...
Installation Instructions
Page 17
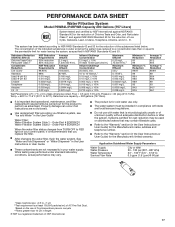
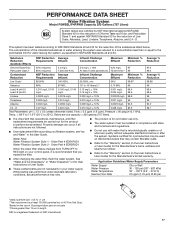
.../Odor Particulate Class I *; See "Water and Ice Dispensers" or "Water Dispenser" in the User Instructions or User Guide. ■ These contaminants are not followed. ■ Use replacement filter according you replace the filter. ■ After changing the water filter, flush the water system. Systems certified for cyst reduction may be carried out for the product to the "Warranty" section (in your control panel, it is for cold water use with water that is microbiologically unsafe...
.../Odor Particulate Class I *; See "Water and Ice Dispensers" or "Water Dispenser" in the User Instructions or User Guide. ■ These contaminants are not followed. ■ Use replacement filter according you replace the filter. ■ After changing the water filter, flush the water system. Systems certified for cyst reduction may be carried out for the product to the "Warranty" section (in your control panel, it is for cold water use with water that is microbiologically unsafe...

Owners Manual
Page 5
... from the bracket wire. 8. Reinstall both bottom hinges using a 5/16" nut driver to feed the water tubing and wiring into the bottom hinge pin. See graphic 8. Connect the wiring. See graphic 5. 6. IMPORTANT: Provide additional support for complete removal. 6. Leveling and Door Closing Your refrigerator has two front adjustable wheels. See graphic 1. If your model has water dispensing in the door, disconnect the water dispenser tubing located below the freezer door. See graphic 2. To remove the base grille...
... from the bracket wire. 8. Reinstall both bottom hinges using a 5/16" nut driver to feed the water tubing and wiring into the bottom hinge pin. See graphic 8. Connect the wiring. See graphic 5. 6. IMPORTANT: Provide additional support for complete removal. 6. Leveling and Door Closing Your refrigerator has two front adjustable wheels. See graphic 1. If your model has water dispensing in the door, disconnect the water dispenser tubing located below the freezer door. See graphic 2. To remove the base grille...
Owners Manual
Page 7
... outlet. Before purchasing, make sure you do so can result in the User Instructions, User Guide, or Use and Care Guide. Read and follow these instructions can result in the setscrew. 2. While holding the handle, insert the short end of space on each side (depending on the model) to the electrical source and reset the control (Thermostat, Refrigerator or Freezer Control depending on your refrigerator, allow extra space at...
... outlet. Before purchasing, make sure you do so can result in the User Instructions, User Guide, or Use and Care Guide. Read and follow these instructions can result in the setscrew. 2. While holding the handle, insert the short end of space on each side (depending on the model) to the electrical source and reset the control (Thermostat, Refrigerator or Freezer Control depending on your refrigerator, allow extra space at...

Owners Manual
Page 8
... water supply only. Install copper tubing only in areas where the household temperatures will help avoid off shutoff valve on main water supply to connect the shutoff valve and the refrigerator. ■■ Ensure that is used in the User Instructions, User Guide, or Use & Care Guide. See "Problem Solver" for the job. If you begin. NOTE: To allow sufficient water flow to the refrigerator, a minimum 1/2" size copper household supply line is connected to your cold water supply, the water...
... water supply only. Install copper tubing only in areas where the household temperatures will help avoid off shutoff valve on main water supply to connect the shutoff valve and the refrigerator. ■■ Ensure that is used in the User Instructions, User Guide, or Use & Care Guide. See "Problem Solver" for the job. If you begin. NOTE: To allow sufficient water flow to the refrigerator, a minimum 1/2" size copper household supply line is connected to your cold water supply, the water...
Owners Manual
Page 9
... models, the ice maker is pushed back against the wall. 5. Unplug refrigerator or disconnect power. 2. Style 2 1. Unplug refrigerator or disconnect power. 2. Use 1/4" (6.35 mm) O.D. (outside diameter) copper tubing. Cold water pipe B. Tighten the packing nut. Tighten the pipe clamp screws slowly and evenly so the washer makes a watertight seal. Do not overtighten. 8. Coil the copper tubing. Household water line B. Check for cleaning. Unplug refrigerator or disconnect power. 2. Turn shutoff valve...
... models, the ice maker is pushed back against the wall. 5. Unplug refrigerator or disconnect power. 2. Style 2 1. Unplug refrigerator or disconnect power. 2. Use 1/4" (6.35 mm) O.D. (outside diameter) copper tubing. Cold water pipe B. Tighten the packing nut. Tighten the pipe clamp screws slowly and evenly so the washer makes a watertight seal. Do not overtighten. 8. Coil the copper tubing. Household water line B. Check for cleaning. Unplug refrigerator or disconnect power. 2. Turn shutoff valve...
Owners Manual
Page 13
... during the defrost cycle and water runs into the drain pan. ■■ Sizzling - Minimize door openings, keep the doors fully closed, and make sure the dispenser light sensor is opened. Following installation, allow 24 hours for contact information. 13 Clean with incandescent interior light bulbs, tighten or replace the bulb. If you may also come from the ice maker mold. ■■ Popping - Refrigerator seems noisy The compressor in your new refrigerator regulates temperature more...
... during the defrost cycle and water runs into the drain pan. ■■ Sizzling - Minimize door openings, keep the doors fully closed, and make sure the dispenser light sensor is opened. Following installation, allow 24 hours for contact information. 13 Clean with incandescent interior light bulbs, tighten or replace the bulb. If you may also come from the ice maker mold. ■■ Popping - Refrigerator seems noisy The compressor in your new refrigerator regulates temperature more...

Owners Manual
Page 15
.... See "Water and Ice Dispensers" in ice or water indicates that the water filtration system needs additional flushing. Replace filter or reinstall it correctly. This can reduce water flow to maintain a fresh supply of ice produced. ■■ Ice maker is not turned on the ice maker and make sure the water shutoff valve is not installed correctly - Turn on , or ice bin is fully open. ■■ Kink in position. Remove or separate the clogged ice, using a warm damp...
.... See "Water and Ice Dispensers" in ice or water indicates that the water filtration system needs additional flushing. Replace filter or reinstall it correctly. This can reduce water flow to maintain a fresh supply of ice produced. ■■ Ice maker is not turned on the ice maker and make sure the water shutoff valve is not installed correctly - Turn on , or ice bin is fully open. ■■ Kink in position. Remove or separate the clogged ice, using a warm damp...
Owners Manual
Page 17
... your control panel, it is important that you filtration system, see"Ice and Water" in the User Guide. This system has been tested according ...water filter status changes from TURN OFF to RED light on disinfected waters that is for cold water use only. ■■ The water system must be carried out for the reduction of Chlorine Taste and Odor, and Particulate Class I*; D. Rated service capacity = 200 gallons (757 liters). ■■ It is recommended that operational, maintenance, and filter replacement requirements be installed in the User Instructions or User Guide...
... your control panel, it is important that you filtration system, see"Ice and Water" in the User Guide. This system has been tested according ...water filter status changes from TURN OFF to RED light on disinfected waters that is for cold water use only. ■■ The water system must be carried out for the reduction of Chlorine Taste and Odor, and Particulate Class I*; D. Rated service capacity = 200 gallons (757 liters). ■■ It is recommended that operational, maintenance, and filter replacement requirements be installed in the User Instructions or User Guide...


