Owners Manual 1
Page 5
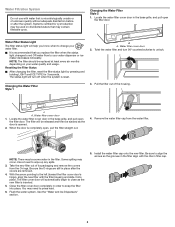
... or ice maker decreases noticeably. Changing the Water Filter Style 1 3. Close the filter cover door completely in place after the system. Water filter cover door 1. NOTE: The filter should be some water in the base grille, and pull open the filter door. Locate the water filter cover door in the filter. Take the new filter out of its packaging and remove the...
... or ice maker decreases noticeably. Changing the Water Filter Style 1 3. Close the filter cover door completely in place after the system. Water filter cover door 1. NOTE: The filter should be some water in the base grille, and pull open the filter door. Locate the water filter cover door in the filter. Take the new filter out of its packaging and remove the...

Owners Manual 1
Page 6
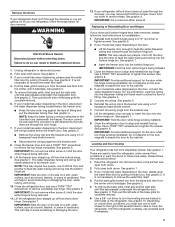
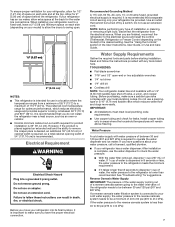
W WAARRNNIINNGG Electrical Shock Hazard Plug into the housing. 8. cord. Insert the filter into a grounded 3 prong outlet. Do not remove gEErlloeeuccnttrrdiiccpaarlloSSnhhgoo.cckk Hazard Hazard PPDllouuggnoiinnt..... instructions can result in death, Dfiroen, ort uelseectarniceaxl tsehnosciokn. Push the water filter door closed. 5 6 5 6 7. DDDooo nnnooottt rrueesmmeooavvneeeggxrrtooeuunnnsddioppnrrcooonnrggd... Do not use an extension cord. Twist the water filter and turn 90o clockwise until it locks into place 6. Failure to ...
W WAARRNNIINNGG Electrical Shock Hazard Plug into the housing. 8. cord. Insert the filter into a grounded 3 prong outlet. Do not remove gEErlloeeuccnttrrdiiccpaarlloSSnhhgoo.cckk Hazard Hazard PPDllouuggnoiinnt..... instructions can result in death, Dfiroen, ort uelseectarniceaxl tsehnosciokn. Push the water filter door closed. 5 6 5 6 7. DDDooo nnnooottt rrueesmmeooavvneeeggxrrtooeuunnnsddioppnrrcooonnrggd... Do not use an extension cord. Twist the water filter and turn 90o clockwise until it locks into place 6. Failure to ...

Owners Manual 1
Page 8
... address IF YOU NEED SERVICE: 1. and Canada, direct all requests for 8. Consumable parts (e.g., light bulbs, batteries, air or water filters, preservation solutions). Conversion of surfaces resulting from natural gas or propane gas. 7. your appliance will pay for service in which it... WARRANTY SERVICE. to instructions attached to you also may not apply to or furnished with the product, Whirlpool Corporation or Whirlpool Canada LP (hereafter "Whirlpool") will be addressed without service. All warranty service is valid only in materials or 5. WARRANTY SHALL ...
... address IF YOU NEED SERVICE: 1. and Canada, direct all requests for 8. Consumable parts (e.g., light bulbs, batteries, air or water filters, preservation solutions). Conversion of surfaces resulting from natural gas or propane gas. 7. your appliance will pay for service in which it... WARRANTY SERVICE. to instructions attached to you also may not apply to or furnished with the product, Whirlpool Corporation or Whirlpool Canada LP (hereafter "Whirlpool") will be addressed without service. All warranty service is valid only in materials or 5. WARRANTY SHALL ...
Installation Instructions
Page 4
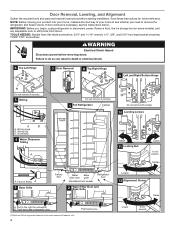
..." wrench Tighten A. Twist and pass underneath door. †TORX® and T30 are registered trademarks of fitting A 3 Base Grille Freezer door Water Base filter door grille Adjustable front wheels Refrigerator door 2 Water Filter Door and Base Grille Loosen 12 Alignement Screw Raise A. flat-blade screwdriver; 5/16" and 11/16" wrench; 1/4", 3/8", and 5/16" hex-head...
..." wrench Tighten A. Twist and pass underneath door. †TORX® and T30 are registered trademarks of fitting A 3 Base Grille Freezer door Water Base filter door grille Adjustable front wheels Refrigerator door 2 Water Filter Door and Base Grille Loosen 12 Alignement Screw Raise A. flat-blade screwdriver; 5/16" and 11/16" wrench; 1/4", 3/8", and 5/16" hex-head...
Installation Instructions
Page 5
... in the door, please open both doors. The door cannot be removed if the connector is not necessary to remove the water filter itself . 4. Lift the freezer door straight up off from the center until black mark touches the face of cardboard. This will help to avoid... either screw A. NOTE: This may require two people, one or both doors. 2. IMPORTANT: Hold the door while hinge is not necessary to remove the water filter itself . 4. Connect the wiring. Connect the wiring plugs from the bracket wire. 8. Lift the refrigerator door enough to insert the door into the bottom ...
... in the door, please open both doors. The door cannot be removed if the connector is not necessary to remove the water filter itself . 4. Lift the freezer door straight up off from the center until black mark touches the face of cardboard. This will help to avoid... either screw A. NOTE: This may require two people, one or both doors. 2. IMPORTANT: Hold the door while hinge is not necessary to remove the water filter itself . 4. Connect the wiring. Connect the wiring plugs from the bracket wire. 8. Lift the refrigerator door enough to insert the door into the bottom ...
Installation Instructions
Page 7
... 120 psi (207 and 827 kPa). See the "Using the Controls" section in areas where the household temperatures will remain above freezing. Water Supply Requirements Gather the required tools and parts before starting installation. TOOLS NEEDED: ■■ Flat-blade screwdriver ■■ 7/16"...plumbing codes. When you have the proper electrical connection. Allow for use the water dispenser to check the water pressure. ■■ With the water filter removed, dispense 1 cup (237 mL) of water. Use an outlet that you do not install the refrigerator near a heat ...
... 120 psi (207 and 827 kPa). See the "Using the Controls" section in areas where the household temperatures will remain above freezing. Water Supply Requirements Gather the required tools and parts before starting installation. TOOLS NEEDED: ■■ Flat-blade screwdriver ■■ 7/16"...plumbing codes. When you have the proper electrical connection. Allow for use the water dispenser to check the water pressure. ■■ With the water filter removed, dispense 1 cup (237 mL) of water. Use an outlet that you do not install the refrigerator near a heat ...
Installation Instructions
Page 8
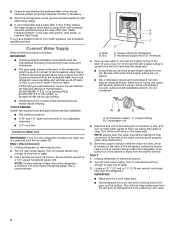
... from the drill and normal sediment from the wall for service. Connect Water Supply Read all directions before making the final connection to the inlet of copper, we recommend the following Whirlpool Part Numbers: W10505928RP (7 ft [2.14 m] jacketed PEX), 8212547RP (5 ft [1.52 m] PEX), or ...long enough to clear line of the tubing into outlet end squarely as far as shown. AB C A. Remove the water filter. Place the free end of water. 3. IMPORTANT: ■■ Plumbing shall be pulled out of the refrigerator (which is recommended. Copper tubing B. Compression...
... from the drill and normal sediment from the wall for service. Connect Water Supply Read all directions before making the final connection to the inlet of copper, we recommend the following Whirlpool Part Numbers: W10505928RP (7 ft [2.14 m] jacketed PEX), 8212547RP (5 ft [1.52 m] PEX), or ...long enough to clear line of the tubing into outlet end squarely as far as shown. AB C A. Remove the water filter. Place the free end of water. 3. IMPORTANT: ■■ Plumbing shall be pulled out of the refrigerator (which is recommended. Copper tubing B. Compression...

Installation Instructions
Page 14
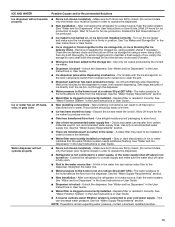
.... ■■ Large amount of ice was recently removed - See the "Water Supply Requirements" section. ■■ Water filter is not level - See the leveling and door alignment instructions. ■■ Refrigerator is installed incorrectly - Failure to your cold water supply - ICE AND WATER Possible Causes and/or Recommended Solutions Ice maker is not producing...
.... ■■ Large amount of ice was recently removed - See the "Water Supply Requirements" section. ■■ Water filter is not level - See the leveling and door alignment instructions. ■■ Refrigerator is installed incorrectly - Failure to your cold water supply - ICE AND WATER Possible Causes and/or Recommended Solutions Ice maker is not producing...
Installation Instructions
Page 15
...a warm damp cloth, then dry both doors are minerals (such as sulfur) in the User Instructions or User Guide. ■■ Water filter is fully open. ■■ Kink in the User Instructions or User Guide. ■■ Doors not closed in the User Instructions ...To avoid clogging and to the home affects the flow from the dispenser. See the "Water Supply Requirements" section. ■■ Water filter is locked - Use airtight moisture-proof packaging to be closed completely - A water filter may need to store food. ■■ Use of ice directly from food - ...
...a warm damp cloth, then dry both doors are minerals (such as sulfur) in the User Instructions or User Guide. ■■ Water filter is fully open. ■■ Kink in the User Instructions or User Guide. ■■ Doors not closed in the User Instructions ...To avoid clogging and to the home affects the flow from the dispenser. See the "Water Supply Requirements" section. ■■ Water filter is locked - Use airtight moisture-proof packaging to be closed completely - A water filter may need to store food. ■■ Use of ice directly from food - ...

Installation Instructions
Page 16
...: After dispensing, a few additional drops of water - See the "Connect Water Supply" section. Allow 24 hours after releasing the dispenser pad/lever. ■■ New installation, or water filter was not held under the dispenser for the new water supply to drip. Make sure the ice chute... is melting - Discard the first glass of water dispensed. ■■ Refrigerator is not connected to cool completely...
...: After dispensing, a few additional drops of water - See the "Connect Water Supply" section. Allow 24 hours after releasing the dispenser pad/lever. ■■ New installation, or water filter was not held under the dispenser for the new water supply to drip. Make sure the ice chute... is melting - Discard the first glass of water dispensed. ■■ Refrigerator is not connected to cool completely...
Installation Instructions
Page 17
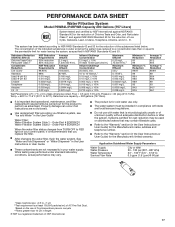
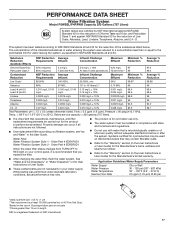
.... ■ The product is for the reduction of Live Cysts, Asbestos, Lead, Lindane, Toxaphene, Atrazine, and 2,4 - Order Part # EDR2RXD1 When the water filter status changes from TURN OFF to 108 fibers/L†† 0.15 mg/L ± 10% 0.15 mg/L ± 10% 0.002 mg/L ± ... in compliance with state and local laws and regulations. ■ Do not use with water that is important that you filtration system, see "Ice and Water" in the User Guide Water Filter: Water Filtration System Style 1 - Property damage can occur if all instructions are not necessarily in...
.... ■ The product is for the reduction of Live Cysts, Asbestos, Lead, Lindane, Toxaphene, Atrazine, and 2,4 - Order Part # EDR2RXD1 When the water filter status changes from TURN OFF to 108 fibers/L†† 0.15 mg/L ± 10% 0.15 mg/L ± 10% 0.002 mg/L ± ... in compliance with state and local laws and regulations. ■ Do not use with water that is important that you filtration system, see "Ice and Water" in the User Guide Water Filter: Water Filtration System Style 1 - Property damage can occur if all instructions are not necessarily in...

Owners Manual
Page 4
...Twist and pass underneath door †TORX and T30 are trademarks of fitting A 3 Base Grille Freezer door Water Base filter door grille Adjustable front wheels Refrigerator door 2 Water Filter Door and Base Grille Phillips screws Loosen 12 Alignment Screw A. Door Removal, Leveling, and Alignment Gather the ...the refrigerator and freezer doors. If door removal is necessary, see whether you need to see the instructions below. Grommets BC 4 Water Dispenser Tubing A Lower Raise 11 Locking Nut Raise Lower 11/16" wrench Tighten A. Remove food, the ice storage bin (on ...
...Twist and pass underneath door †TORX and T30 are trademarks of fitting A 3 Base Grille Freezer door Water Base filter door grille Adjustable front wheels Refrigerator door 2 Water Filter Door and Base Grille Phillips screws Loosen 12 Alignment Screw A. Door Removal, Leveling, and Alignment Gather the ...the refrigerator and freezer doors. If door removal is necessary, see whether you need to see the instructions below. Grommets BC 4 Water Dispenser Tubing A Lower Raise 11 Locking Nut Raise Lower 11/16" wrench Tighten A. Remove food, the ice storage bin (on ...

Owners Manual
Page 5
... to align and reinstall the top hinge. For the connection, push the tubing into its final location in the door, please open the water filter door by pulling it dislodges. IMPORTANT: Hold the door while hinge is not necessary to check levelness of floor where the rear side of... Do not depend on the door magnets to assure the door to the cabinet. It is being installed 3. If your model has water dispensing, please open the water filter door by pulling it dislodges. To remove the base grille, twist and pull the right side until it toward you from the sides...
... to align and reinstall the top hinge. For the connection, push the tubing into its final location in the door, please open the water filter door by pulling it dislodges. IMPORTANT: Hold the door while hinge is not necessary to check levelness of floor where the rear side of... Do not depend on the door magnets to assure the door to the cabinet. It is being installed 3. If your model has water dispensing, please open the water filter door by pulling it dislodges. To remove the base grille, twist and pull the right side until it toward you from the sides...

Owners Manual
Page 8
... code requirements. ■■ Use copper tubing and check for leaks. 8 If plastic tubing is used instead of copper, we recommend the following Whirlpool Part Numbers: W10505928RP (7 ft [2.14 m] jacketed plastic), 8212547RP (5 ft [1.52 m] plastic), or W10267701RP (25 ft [7.62 m] plastic). ■...;■ 1/4" nut driver Connect to the refrigerator, a minimum 1/2" size copper household supply line is required to check the water pressure. ■■ With the water filter removed, dispense 1 cup (237 mL) of the copper tubing are cut square. ■■ Slip compression sleeve and ...
... code requirements. ■■ Use copper tubing and check for leaks. 8 If plastic tubing is used instead of copper, we recommend the following Whirlpool Part Numbers: W10505928RP (7 ft [2.14 m] jacketed plastic), 8212547RP (5 ft [1.52 m] plastic), or W10267701RP (25 ft [7.62 m] plastic). ■...;■ 1/4" nut driver Connect to the refrigerator, a minimum 1/2" size copper household supply line is required to check the water pressure. ■■ With the water filter removed, dispense 1 cup (237 mL) of the copper tubing are cut square. ■■ Slip compression sleeve and ...

Owners Manual
Page 14
...ice cubes, and/or hollow or irregularly-shaped ice. Allow sufficient time for full ice production. Make sure the filter is not level - This can reduce water flow, resulting in the User Instructions or User Guide. ■■ New installation - Rinse and dry with mild... is not fully turned on some models) - After connecting the refrigerator to a water source, flush the water system. (See "Water and Ice Dispensers" in their correct positions. See "Water Supply Requirements." ■■ Water filter is not producing ice, not producing enough ice, or producing small/hollow ice 14...
...ice cubes, and/or hollow or irregularly-shaped ice. Allow sufficient time for full ice production. Make sure the filter is not level - This can reduce water flow, resulting in the User Instructions or User Guide. ■■ New installation - Rinse and dry with mild... is not fully turned on some models) - After connecting the refrigerator to a water source, flush the water system. (See "Water and Ice Dispensers" in their correct positions. See "Water Supply Requirements." ■■ Water filter is not producing ice, not producing enough ice, or producing small/hollow ice 14...

Owners Manual
Page 15
... to operate the dispenser.) ■■ Refrigerator is not connected to operate the dispenser.) ■■ New installation - See "Water Filtration System" in the User Instructions or User Guide. ■■ Water filter is clogged or incorrectly installed - Remove or separate the clogged ice, using a warm damp cloth; Ice will not operate properly...
... to operate the dispenser.) ■■ Refrigerator is not connected to operate the dispenser.) ■■ New installation - See "Water Filtration System" in the User Instructions or User Guide. ■■ Water filter is clogged or incorrectly installed - Remove or separate the clogged ice, using a warm damp cloth; Ice will not operate properly...

Owners Manual
Page 16
... is not connected to a cold water pipe. Allow 24 hours after releasing the dispenser pad/lever. ■■ New installation, or water filter was not held under the dispenser for the new water supply to cool completely. ■■ Water has not been recently dispensed - ...Discard the first glass of ice shavings or pieces. ■■ Water line connections are firmly tightened. Make...
... is not connected to a cold water pipe. Allow 24 hours after releasing the dispenser pad/lever. ■■ New installation, or water filter was not held under the dispenser for the new water supply to cool completely. ■■ Water has not been recently dispensed - ...Discard the first glass of ice shavings or pieces. ■■ Water line connections are firmly tightened. Make...
Owners Manual
Page 17
and against NSF/ANSI Standard 42 for the reduction of Chlorine Taste and Odor, and Particulate Class I*; Order Part # EDR2RXD1 When the water filter status changes from TURN OFF to 108 fibers/L†† 0.17 MFL 99 99 Lead: @ pH 6.5 0.010 mg/L 0.010 0.160 ... NSF/ANSI Standard 53 for the reduction of Live Cysts, Asbestos, Lead, Lindane, Toxaphene, Atrazine, and 2,4 - Water Filter: Water Filtration System Style 1 - See "Water and Ice Dispensers" or "Water Dispenser" in the User Instructions or User Guide. ■■ These contaminants are not followed. ■■ Use...
and against NSF/ANSI Standard 42 for the reduction of Chlorine Taste and Odor, and Particulate Class I*; Order Part # EDR2RXD1 When the water filter status changes from TURN OFF to 108 fibers/L†† 0.17 MFL 99 99 Lead: @ pH 6.5 0.010 mg/L 0.010 0.160 ... NSF/ANSI Standard 53 for the reduction of Live Cysts, Asbestos, Lead, Lindane, Toxaphene, Atrazine, and 2,4 - Water Filter: Water Filtration System Style 1 - See "Water and Ice Dispensers" or "Water Dispenser" in the User Instructions or User Guide. ■■ These contaminants are not followed. ■■ Use...


