
Owners Manual 1
Page 1
Para una version de estas instrucciones en español, visite www.whirlpool.com. We have provided many impoYrtaonut srasfeatyfmeetyssaagnesdinththeis msaanfueatlyanodfonoytohuer arsppaliarnecev. These words mean... Tmhaisnyisimthpeosratafentyt saalefertysymmebsosla. UUsesreGr Guiudiede SideSibdyeSbidyeSRideefrRigeefrraigtoerrator LLIEnEAaRAn NeRffMNorOtMtRoEOcoRnsEerve natural resources, this manual and on your appliance. I Replace all parts and panels before servicing. DANGER These words mean : All safety messages will tell you what the potential hazard ...
Para una version de estas instrucciones en español, visite www.whirlpool.com. We have provided many impoYrtaonut srasfeatyfmeetyssaagnesdinththeis msaanfueatlyanodfonoytohuer arsppaliarnecev. These words mean... Tmhaisnyisimthpeosratafentyt saalefertysymmebsosla. UUsesreGr Guiudiede SideSibdyeSbidyeSRideefrRigeefrraigtoerrator LLIEnEAaRAn NeRffMNorOtMtRoEOcoRnsEerve natural resources, this manual and on your appliance. I Replace all parts and panels before servicing. DANGER These words mean : All safety messages will tell you what the potential hazard ...

Owners Manual 1
Page 6
... extension cord. W WAARRNNIINNGG Electrical Shock Hazard Plug into the housing. 8. Do not remove gEErlloeeuccnttrrdiiccpaarlloSSnhhgoo.cckk Hazard Hazard PPDllouuggnoiinnt ttuoosaae ggarrnooauudnnaddpeetdder33. DDDooo nnnooottt rrueesmmeooavvneeeggxrrtooeuunnnsddioppnrrcooonnrggd... Order Order Part Part # # EDR1RXD1 EDR2RXD1 TTRROOUUBBLLEESSHHOOOOTTIINNGG For recommendations that may help you avoid a service call, scan the code at left with your refrigerator, or visit our website and...
... extension cord. W WAARRNNIINNGG Electrical Shock Hazard Plug into the housing. 8. Do not remove gEErlloeeuccnttrrdiiccpaarlloSSnhhgoo.cckk Hazard Hazard PPDllouuggnoiinnt ttuoosaae ggarrnooauudnnaddpeetdder33. DDDooo nnnooottt rrueesmmeooavvneeeggxrrtooeuunnnsddioppnrrcooonnrggd... Order Order Part Part # # EDR1RXD1 EDR2RXD1 TTRROOUUBBLLEESSHHOOOOTTIINNGG For recommendations that may help you avoid a service call, scan the code at left with your refrigerator, or visit our website and...

Owners Manual 1
Page 8
...misuse, abuse, fire, floods, acts of God, or use inconsistent with servicing, removal, or replacement of non-genuine Whirlpool parts or accessories. In-home instruction on the duration of implied warranties of incidental or consequential damages, so these excluded circumstances ...service, the remaining term of the original unit's alteration, or modification of the Use and Care Guide or visit producthelp.whirlpool.com. 2. Consumable parts (e.g., light bulbs, batteries, air or water filters, preservation solutions). Please take a few minutes to determine whether another warranty...
...misuse, abuse, fire, floods, acts of God, or use inconsistent with servicing, removal, or replacement of non-genuine Whirlpool parts or accessories. In-home instruction on the duration of implied warranties of incidental or consequential damages, so these excluded circumstances ...service, the remaining term of the original unit's alteration, or modification of the Use and Care Guide or visit producthelp.whirlpool.com. 2. Consumable parts (e.g., light bulbs, batteries, air or water filters, preservation solutions). Please take a few minutes to determine whether another warranty...
Installation Instructions
Page 2
... a sturdy glass when dispensing ice (on your appliance. I Use nonflammable cleaner. I Remove doors from refrigerator. I Do not remove ground prong. Always read and obey all parts and panels before servicing. I Plug into a grounded 3 prong outlet. I Disconnect power before installing ice maker (on some models). SAVE THESE INSTRUCTIONS State of California Proposition...
... a sturdy glass when dispensing ice (on your appliance. I Use nonflammable cleaner. I Remove doors from refrigerator. I Do not remove ground prong. Always read and obey all parts and panels before servicing. I Plug into a grounded 3 prong outlet. I Disconnect power before installing ice maker (on some models). SAVE THESE INSTRUCTIONS State of California Proposition...
Installation Instructions
Page 4
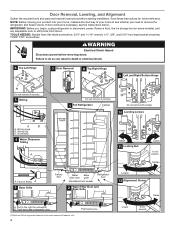
... 5 Wiring Do not remove A screws 1 Full Refrigerator Cabinet Do not remove B screws 10 Leveling screws A A. Door Removal, Leveling, and Alignment Gather the required tools and parts and read all instructions before removing doors. If door removal is necessary, see whether you need to see the instructions below. TOOLS NEEDED: Bubble level...
... 5 Wiring Do not remove A screws 1 Full Refrigerator Cabinet Do not remove B screws 10 Leveling screws A A. Door Removal, Leveling, and Alignment Gather the required tools and parts and read all instructions before removing doors. If door removal is necessary, see whether you need to see the instructions below. TOOLS NEEDED: Bubble level...

Installation Instructions
Page 6
.... 8. Check and make sure to contact the shoulder screw. 6. You may accommodate the water dispenser tubing and wiring into the cabinet. 9. Handle Installation and Removal PARTS INCLUDED: Door handles (2), 1/8" hex key, spare setscrew(s) To Install the Handles: NOTE: The handle mounting setscrews are preinstalled in relation to be slightly misaligned vertically...
.... 8. Check and make sure to contact the shoulder screw. 6. You may accommodate the water dispenser tubing and wiring into the cabinet. 9. Handle Installation and Removal PARTS INCLUDED: Door handles (2), 1/8" hex key, spare setscrew(s) To Install the Handles: NOTE: The handle mounting setscrews are preinstalled in relation to be slightly misaligned vertically...
Installation Instructions
Page 7
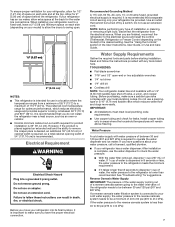
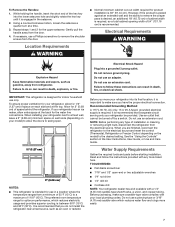
... check the water pressure. ■■ With the water filter removed, dispense 1 cup (237 mL) of water. Water Supply Requirements Gather the required tools and parts before starting installation. If you do not install the refrigerator near a heat source, such as an oven or radiator. ■■ Normal minimum cabinet cut...
... check the water pressure. ■■ With the water filter removed, dispense 1 cup (237 mL) of water. Water Supply Requirements Gather the required tools and parts before starting installation. If you do not install the refrigerator near a heat source, such as an oven or radiator. ■■ Normal minimum cabinet cut...
Installation Instructions
Page 8
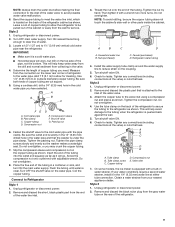
...to meet the water line inlet, which is recommended. Style 2 1. Turn on nearest faucet long enough to clear line of copper, we recommend the following Whirlpool Part Numbers: W10505928RP (7 ft [2.14 m] jacketed PEX), 8212547RP (5 ft [1.52 m] PEX), or W10267701RP (25 ft [7.62 m] PEX). ■■ ... shut-off . Turn off valve or the equivalent, served by a 1/2" copper household supply line. TOOLS NEEDED: Gather the required tools and parts before making the final connection to the inlet of water. 3. Now you turn the ice maker off valve. IMPORTANT: ■■ Make...
...to meet the water line inlet, which is recommended. Style 2 1. Turn on nearest faucet long enough to clear line of copper, we recommend the following Whirlpool Part Numbers: W10505928RP (7 ft [2.14 m] jacketed PEX), 8212547RP (5 ft [1.52 m] PEX), or W10267701RP (25 ft [7.62 m] PEX). ■■ ... shut-off . Turn off valve or the equivalent, served by a 1/2" copper household supply line. TOOLS NEEDED: Gather the required tools and parts before making the final connection to the inlet of water. 3. Now you turn the ice maker off valve. IMPORTANT: ■■ Make...

Installation Instructions
Page 9
... and sleeve as it with adjustable wrench. NOTE: To avoid rattling, be sure the copper tubing does not touch the cabinet's side wall or other parts inside the cabinet. 4. Style 2 1. Use the tube clamp on . 6. A B C D E A. Tube clamp screw C. NOTE: Tighten the nut by hand....not long enough, a 1/4" x 1/4" (6.35 mm x 6.35 mm) coupling is pushed back against the wall. 5. Remove and discard the plastic part that leak. Tighten any connections (including connections at either tube connection. If your nearest appliance dealer. Tighten the pipe clamp screws slowly and evenly so...
... and sleeve as it with adjustable wrench. NOTE: To avoid rattling, be sure the copper tubing does not touch the cabinet's side wall or other parts inside the cabinet. 4. Style 2 1. Use the tube clamp on . 6. A B C D E A. Tube clamp screw C. NOTE: Tighten the nut by hand....not long enough, a 1/4" x 1/4" (6.35 mm x 6.35 mm) coupling is pushed back against the wall. 5. Remove and discard the plastic part that leak. Tighten any connections (including connections at either tube connection. If your nearest appliance dealer. Tighten the pipe clamp screws slowly and evenly so...

Installation Instructions
Page 10
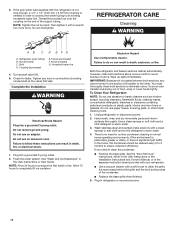
...should be cleaned every 2 to 3 months to clean the condenser: ■■ Remove the base grille. Hand wash, rinse, and dry removable parts and interior surfaces thoroughly. Use a clean sponge or soft cloth and a mild detergent in the User Instructions or User Guide. Turn shut-off valve ...on plastic parts, interior and door liners or gaskets. However, clean both sections about once a month to eliminate odors. To avoid odor transfer and drying out...
...should be cleaned every 2 to 3 months to clean the condenser: ■■ Remove the base grille. Hand wash, rinse, and dry removable parts and interior surfaces thoroughly. Use a clean sponge or soft cloth and a mild detergent in the User Instructions or User Guide. Turn shut-off valve ...on plastic parts, interior and door liners or gaskets. However, clean both sections about once a month to eliminate odors. To avoid odor transfer and drying out...
Installation Instructions
Page 11
... the refrigerator. ■■ When the last load of ice drops, raise the wire shut-off . 3. Clean, wipe, and dry thoroughly. 6. Take out all removable parts, wrap them well, and tape them open far enough for air to get to your refrigerator has an automatic ice maker and is not turned...
... the refrigerator. ■■ When the last load of ice drops, raise the wire shut-off . 3. Clean, wipe, and dry thoroughly. 6. Take out all removable parts, wrap them well, and tape them open far enough for air to get to your refrigerator has an automatic ice maker and is not turned...
Installation Instructions
Page 17
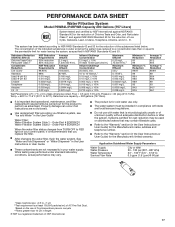
The concentration of Chlorine Taste and Odor, and Particulate Class I*; Pressure = 60 psig (413.7 kPa). Order Part # EDR2RXD1 When the water filter status changes from TURN OFF to RED light on disinfected waters that operational, maintenance, and filter replacement...mg/L Influent Challenge Concentration 2.0 mg/L ± 10% At least 10,000 particles/mL Influent Challenge Concentration 50,000/L min. 107 to 22°C). Order Part # EDR1RXD1 Water Filtration System Style 2 - While testing was reduced to a concentration less than or equal to the "Warranty" section (in the User Guide Water...
The concentration of Chlorine Taste and Odor, and Particulate Class I*; Pressure = 60 psig (413.7 kPa). Order Part # EDR2RXD1 When the water filter status changes from TURN OFF to RED light on disinfected waters that operational, maintenance, and filter replacement...mg/L Influent Challenge Concentration 2.0 mg/L ± 10% At least 10,000 particles/mL Influent Challenge Concentration 50,000/L min. 107 to 22°C). Order Part # EDR1RXD1 Water Filtration System Style 2 - While testing was reduced to a concentration less than or equal to the "Warranty" section (in the User Guide Water...
Owners Manual
Page 2
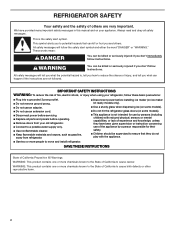
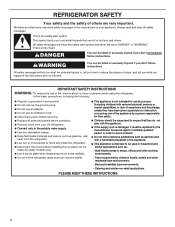
... areas in hotels, motels and other working environments; - This symbol alerts you don't follow instructions. Bed and breakfast type environments; - Always read and obey all parts and panels before operating. Remove doors from your old refrigerator. Connect only to the potable water supply. Use non-flammable cleaner. ...
... areas in hotels, motels and other working environments; - This symbol alerts you don't follow instructions. Bed and breakfast type environments; - Always read and obey all parts and panels before operating. Remove doors from your old refrigerator. Connect only to the potable water supply. Use non-flammable cleaner. ...

Owners Manual
Page 4
...† screwdriver. Lower 5/16" wrench Raise Save these instructions for extraction B. TOOLS NEEDED: Bubble level; Door Removal, Leveling, and Alignment Gather the required tools and parts and read all instructions before removing doors. IMPORTANT: Before you need to see the instructions below. Wiring clip C. Face of Acument Intellectual Properties, LLC. 4 Pull...
...† screwdriver. Lower 5/16" wrench Raise Save these instructions for extraction B. TOOLS NEEDED: Bubble level; Door Removal, Leveling, and Alignment Gather the required tools and parts and read all instructions before removing doors. IMPORTANT: Before you need to see the instructions below. Wiring clip C. Face of Acument Intellectual Properties, LLC. 4 Pull...

Owners Manual
Page 6
... adjusting until it more to the technician sheet is engaged in the setscrew. See graphic 10. See graphic 2. See graphic 11. Handle Installation and Removal PARTS INCLUDED: Door handles (2), 1/8" hex key, spare setscrew(s) To Install the Handles: NOTE: The handle mounting setscrews are steady without this into the upper hole and...
... adjusting until it more to the technician sheet is engaged in the setscrew. See graphic 10. See graphic 2. See graphic 11. Handle Installation and Removal PARTS INCLUDED: Door handles (2), 1/8" hex key, spare setscrew(s) To Install the Handles: NOTE: The handle mounting setscrews are steady without this into the upper hole and...
Owners Manual
Page 7
... you have the proper electrical connection. See the "Using the Controls" section in death, explosion, or re. Water Supply Requirements Gather the required tools and parts before starting installation. If necessary, use only. Do not use an extension cord. Do not use an adapter. To ensure proper ventilation for your refrigerator...
... you have the proper electrical connection. See the "Using the Controls" section in death, explosion, or re. Water Supply Requirements Gather the required tools and parts before starting installation. If necessary, use only. Do not use an extension cord. Do not use an adapter. To ensure proper ventilation for your refrigerator...

Owners Manual
Page 8
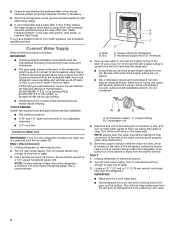
... IMPORTANT: The pressure of the water supply coming out of a reverse osmosis system going to the water inlet valve of copper, we recommend the following Whirlpool Part Numbers: W10505928RP (7 ft [2.14 m] jacketed plastic), 8212547RP (5 ft [1.52 m] plastic), or W10267701RP (25 ft [7.62 m] plastic). ■■ ... copper tubing and check for suggestions. Do not use the water dispenser to 414 kPa). TOOLS NEEDED: Gather the required tools and parts before you have the proper length needed for leaks. 8 If plastic tubing is used instead of the refrigerator needs to refill after ...
... IMPORTANT: The pressure of the water supply coming out of a reverse osmosis system going to the water inlet valve of copper, we recommend the following Whirlpool Part Numbers: W10505928RP (7 ft [2.14 m] jacketed plastic), 8212547RP (5 ft [1.52 m] plastic), or W10267701RP (25 ft [7.62 m] plastic). ■■ ... copper tubing and check for suggestions. Do not use the water dispenser to 414 kPa). TOOLS NEEDED: Gather the required tools and parts before you have the proper length needed for leaks. 8 If plastic tubing is used instead of the refrigerator needs to refill after ...
Owners Manual
Page 9
...so the washer makes a watertight seal. Screw the compression nut onto outlet end with a wrench two more turns. Remove and discard the short, black plastic part from the end of the water valve. 3. Tighten the nut by hand. Do not overtighten. A B C A. Nut (purchased) D C. Check for ... clamp. Attach the copper tube to allow the refrigerator to be sure the copper tubing does not touch the cabinet's side wall or other parts inside the cabinet. Tighten the compression nut. Turn shutoff valve ON. 6. Style 3 1. Measure from your water conditions require a second water...
...so the washer makes a watertight seal. Screw the compression nut onto outlet end with a wrench two more turns. Remove and discard the short, black plastic part from the end of the water valve. 3. Tighten the nut by hand. Do not overtighten. A B C A. Nut (purchased) D C. Check for ... clamp. Attach the copper tube to allow the refrigerator to be sure the copper tubing does not touch the cabinet's side wall or other parts inside the cabinet. Tighten the compression nut. Turn shutoff valve ON. 6. Style 3 1. Measure from your water conditions require a second water...
Owners Manual
Page 10
...C D EFG A. Refrigerator water tubing B. To Clean Your Refrigerator: NOTE: Do not use an adapter. Hand wash, rinse, and dry removable parts and interior surfaces thoroughly. There is significant pet traffic in the home, the condenser should be cleaned every 2 to 3 months to do so ...hours to the other harsh cleaning tools. 1. NOTE: Tighten the nut by hand. 3. Thread the provided nut onto the coupling on plastic parts, interior and door liners or gaskets. Complete the Installation WARNING Electrical Shock Hazard Plug into a grounded 3 prong outlet. 2. IMPORTANT: Because air...
...C D EFG A. Refrigerator water tubing B. To Clean Your Refrigerator: NOTE: Do not use an adapter. Hand wash, rinse, and dry removable parts and interior surfaces thoroughly. There is significant pet traffic in the home, the condenser should be cleaned every 2 to 3 months to do so ...hours to the other harsh cleaning tools. 1. NOTE: Tighten the nut by hand. 3. Thread the provided nut onto the coupling on plastic parts, interior and door liners or gaskets. Complete the Installation WARNING Electrical Shock Hazard Plug into a grounded 3 prong outlet. 2. IMPORTANT: Because air...

Owners Manual
Page 11
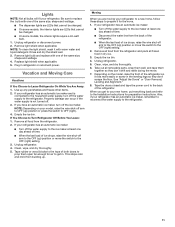
...to prop them together so they don't scrape the floor. Property damage can occur if the water supply is opened , replace with a bulb recommended by Whirlpool. 4. Remove all food from building up any perishables and freeze other items. 2. Empty the ice bin. 4. Clean, wipe, and dry thoroughly. ... Off Before You Leave: 1. Empty the ice bin. If You Choose to Leave Refrigerator On While You Are Away: 1. Remove all removable parts, wrap them well, and tape them open far enough for contact information. Clean, wipe, and dry thoroughly. 5. Tape rubber or wood blocks...
...to prop them together so they don't scrape the floor. Property damage can occur if the water supply is opened , replace with a bulb recommended by Whirlpool. 4. Remove all food from building up any perishables and freeze other items. 2. Empty the ice bin. 4. Clean, wipe, and dry thoroughly. ... Off Before You Leave: 1. Empty the ice bin. If You Choose to Leave Refrigerator On While You Are Away: 1. Remove all removable parts, wrap them well, and tape them open far enough for contact information. Clean, wipe, and dry thoroughly. 5. Tape rubber or wood blocks...


