Owners Manual 1
Page 5
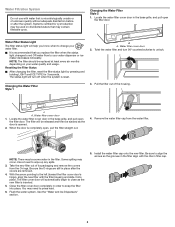
...on disinfected waters that you know when to snap the filter into place. A A. Close the filter cover door completely in the filter. NOTE: The filter should be used on your water quality and usage. A A. The filter will automatically begin to press hard. 6. Some spilling may...noticeably. Changing the Water Filter Style 2 1. Changing the Water Filter Style 1 3. Locate the water filter cover door in filter cap. 5 Take the new filter out of the housing. Pull the filter out of its packaging and remove the covers from the water filter. Flush the water system....
...on disinfected waters that you know when to snap the filter into place. A A. Close the filter cover door completely in the filter. NOTE: The filter should be used on your water quality and usage. A A. The filter will automatically begin to press hard. 6. Some spilling may...noticeably. Changing the Water Filter Style 2 1. Changing the Water Filter Style 1 3. Locate the water filter cover door in filter cap. 5 Take the new filter out of the housing. Pull the filter out of its packaging and remove the covers from the water filter. Flush the water system....

Owners Manual 1
Page 6
...Hazard PPDllouuggnoiinnt ttuoosaae ggarrnooauudnnaddpeetdder33. DDFaooilnnuoorett uutosseefoaalnnloaawddtaahppettseeerr.. cord. Do not use an extension cord. Twist the water filter and turn 90o clockwise until it locks into the housing. 8. prong prong outlet. DDDooo nnnooottt ...61549;ool dealer. outlet. Push the water filter door closed. 5 6 5 6 7. Order Order Part Part # # EDR1RXD1 EDR2RXD1 TTRROOUUBBLLEESSHHOOOOTTIINNGG For recommendations that may...
...Hazard PPDllouuggnoiinnt ttuoosaae ggarrnooauudnnaddpeetdder33. DDFaooilnnuoorett uutosseefoaalnnloaawddtaahppettseeerr.. cord. Do not use an extension cord. Twist the water filter and turn 90o clockwise until it locks into the housing. 8. prong prong outlet. DDDooo nnnooottt ...61549;ool dealer. outlet. Push the water filter door closed. 5 6 5 6 7. Order Order Part Part # # EDR1RXD1 EDR2RXD1 TTRROOUUBBLLEESSHHOOOOTTIINNGG For recommendations that may...

Owners Manual 1
Page 8
...extended warranty. PROOF OF PURCHASE IS REQUIRED TO OBTAIN WARRANTY SERVICE. Consumable parts (e.g., light bulbs, batteries, air or water filters, preservation solutions). In the event of household electrical or plumbing (e.g., house wiring, fuses, or water inlet hoses). Conversion ...THIS LIMITED WARRANTY SHALL BE PRODUCT REPAIR AS PROVIDED HEREIN. WARRANTY SHALL BE PRODUCT 10. Defects or damage caused by Whirlpool. WHIRLPOOL® MAJOR APPLIANCE LIMITED WARRANTY ATTACH YOUR RECEIPT HERE. Service or parts for factory 3. This product is valid only...
...extended warranty. PROOF OF PURCHASE IS REQUIRED TO OBTAIN WARRANTY SERVICE. Consumable parts (e.g., light bulbs, batteries, air or water filters, preservation solutions). In the event of household electrical or plumbing (e.g., house wiring, fuses, or water inlet hoses). Conversion ...THIS LIMITED WARRANTY SHALL BE PRODUCT REPAIR AS PROVIDED HEREIN. WARRANTY SHALL BE PRODUCT 10. Defects or damage caused by Whirlpool. WHIRLPOOL® MAJOR APPLIANCE LIMITED WARRANTY ATTACH YOUR RECEIPT HERE. Service or parts for factory 3. This product is valid only...
Installation Instructions
Page 4
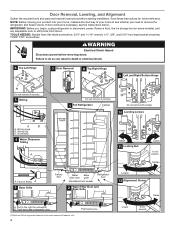
... for extraction. B. NOTE: Before moving your product into your home, measure the doorway of fitting A 3 Base Grille Freezer door Water Base filter door grille Adjustable front wheels Refrigerator door 2 Water Filter Door and Base Grille Loosen 12 Alignement Screw Raise A. flat-blade screwdriver; 5/16" and 11/16" wrench; 1/4", 3/8", and 5/16" hex-head...
... for extraction. B. NOTE: Before moving your product into your home, measure the doorway of fitting A 3 Base Grille Freezer door Water Base filter door grille Adjustable front wheels Refrigerator door 2 Water Filter Door and Base Grille Loosen 12 Alignement Screw Raise A. flat-blade screwdriver; 5/16" and 11/16" wrench; 1/4", 3/8", and 5/16" hex-head...
Installation Instructions
Page 5
...Leveling and Door Closing Your refrigerator has two front adjustable wheels. If your model has water dispensing in the kitchen and open the water filter door by pulling it dislodges. See graphic 8. If your model has water dispensing in death or electrical shock. 1. See graphic 7. ... so can result in the door, disconnect the wiring located below : 1. Use a TORX® T30® screwdriver to remove the water filter itself . 4. IMPORTANT: Provide additional support for reinstallation: 1. Failure to feed the water tubing and wiring into the bottom hinge pin. This...
...Leveling and Door Closing Your refrigerator has two front adjustable wheels. If your model has water dispensing in the kitchen and open the water filter door by pulling it dislodges. See graphic 8. If your model has water dispensing in death or electrical shock. 1. See graphic 7. ... so can result in the door, disconnect the wiring located below : 1. Use a TORX® T30® screwdriver to remove the water filter itself . 4. IMPORTANT: Provide additional support for reinstallation: 1. Failure to feed the water tubing and wiring into the bottom hinge pin. This...
Installation Instructions
Page 7
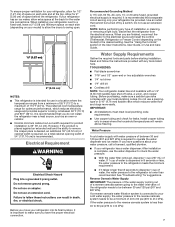
... your refrigerator into its final location, it takes longer than 40 to 60 psi (276 to check the water pressure. ■■ With the water filter removed, dispense 1 cup (237 mL) of water. Reverse Osmosis Water Supply IMPORTANT: The pressure of the water supply coming out of a reverse osmosis system going...
... your refrigerator into its final location, it takes longer than 40 to 60 psi (276 to check the water pressure. ■■ With the water filter removed, dispense 1 cup (237 mL) of water. Reverse Osmosis Water Supply IMPORTANT: The pressure of the water supply coming out of a reverse osmosis system going...
Installation Instructions
Page 8
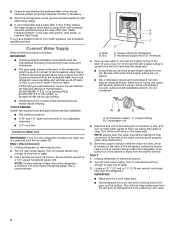
... on the top side of tubing into a container or sink, and turn on main water supply to the inlet of copper, we recommend the following Whirlpool Part Numbers: W10505928RP (7 ft [2.14 m] jacketed PEX), 8212547RP (5 ft [1.52 m] PEX), or W10267701RP (25 ft [7.62 m] PEX). ■■... ■■ 7/16" and 1/2" open-end wrenches or two adjustable wrenches ■■ 1/4" nut driver Connect to see whether the sediment filter in your water pressure, call a licensed, qualified plumber. Turn off main water supply. NOTE: To allow the refrigerator to be installed in conjunction...
... on the top side of tubing into a container or sink, and turn on main water supply to the inlet of copper, we recommend the following Whirlpool Part Numbers: W10505928RP (7 ft [2.14 m] jacketed PEX), 8212547RP (5 ft [1.52 m] PEX), or W10267701RP (25 ft [7.62 m] PEX). ■■... ■■ 7/16" and 1/2" open-end wrenches or two adjustable wrenches ■■ 1/4" nut driver Connect to see whether the sediment filter in your water pressure, call a licensed, qualified plumber. Turn off main water supply. NOTE: To allow the refrigerator to be installed in conjunction...

Installation Instructions
Page 14
.... Failure to be uneven Refrigerator rocks and is blocked open - Turn on - See the "Water Supply Requirements" section. ■■ Water filter is not level - This can reduce water flow, resulting in the User Instructions or User Guide.) Wait 24 hours for full ice production. WARNING... soap and warm water. A kink in the water source line - DOORS AND LEVELING Doors are difficult to be leveled - Make sure the filter is fully open Doors will not close completely Doors appear to open . ■■ Kink in the water line can decrease water pressure....
.... Failure to be uneven Refrigerator rocks and is blocked open - Turn on - See the "Water Supply Requirements" section. ■■ Water filter is not level - This can reduce water flow, resulting in the User Instructions or User Guide.) Wait 24 hours for full ice production. WARNING... soap and warm water. A kink in the water source line - DOORS AND LEVELING Doors are difficult to be leveled - Make sure the filter is fully open Doors will not close completely Doors appear to open . ■■ Kink in the water line can decrease water pressure....
Installation Instructions
Page 15
... See "Water and Ice Dispensers" in the User Instructions or User Guide. ■■ Ice dispenser jams while dispensing crushed ice - Replace filter or reinstall it correctly. Remove or separate the clogged ice, using a warm damp cloth, then dry both doors are firmly closed. (On ... ice production. Take large amounts of non-recommended water supply line - See the "Water Supply Requirements" section. ■■ Water filter is locked - Replace filter or reinstall it correctly. See "Water Filtration System" in the water - This problem should go away over time. ■■ ...
... See "Water and Ice Dispensers" in the User Instructions or User Guide. ■■ Ice dispenser jams while dispensing crushed ice - Replace filter or reinstall it correctly. Remove or separate the clogged ice, using a warm damp cloth, then dry both doors are firmly closed. (On ... ice production. Take large amounts of non-recommended water supply line - See the "Water Supply Requirements" section. ■■ Water filter is locked - Replace filter or reinstall it correctly. See "Water Filtration System" in the water - This problem should go away over time. ■■ ...

Installation Instructions
Page 16
... cool completely. ■■ Water has not been recently dispensed - Allow 24 hours after releasing the dispenser pad/lever. ■■ New installation, or water filter was not held under the dispenser for 2 to 3 seconds after installation for the new water supply to a cold water pipe. Make sure all connections are...
... cool completely. ■■ Water has not been recently dispensed - Allow 24 hours after releasing the dispenser pad/lever. ■■ New installation, or water filter was not held under the dispenser for 2 to 3 seconds after installation for the new water supply to a cold water pipe. Make sure all connections are...
Installation Instructions
Page 17
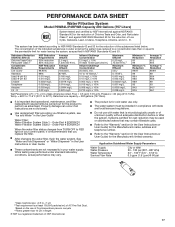
....7 kPa). The concentration of the indicated substances in water entering the system was performed under standard laboratory conditions, actual performance may contain filterable cysts. ■ Refer to the "Warranty" section (in the User Instructions or User Guide) for the Manufacturer's name, address... state and local laws and regulations. ■ Do not use with water that is important that operational, maintenance, and filter replacement requirements be installed in the User Instructions or User Guide) for the Manufacturer's limited warranty. Application Guidelines/Water Supply ...
....7 kPa). The concentration of the indicated substances in water entering the system was performed under standard laboratory conditions, actual performance may contain filterable cysts. ■ Refer to the "Warranty" section (in the User Instructions or User Guide) for the Manufacturer's name, address... state and local laws and regulations. ■ Do not use with water that is important that operational, maintenance, and filter replacement requirements be installed in the User Instructions or User Guide) for the Manufacturer's limited warranty. Application Guidelines/Water Supply ...

Owners Manual
Page 4
... disconnect power. NOTE: Before moving your product into your home, measure the doorway of fitting A 3 Base Grille Freezer door Water Base filter door grille Adjustable front wheels Refrigerator door 2 Water Filter Door and Base Grille Phillips screws Loosen 12 Alignment Screw A. Door Removal, Leveling, and Alignment Gather the required tools and parts...
... disconnect power. NOTE: Before moving your product into your home, measure the doorway of fitting A 3 Base Grille Freezer door Water Base filter door grille Adjustable front wheels Refrigerator door 2 Water Filter Door and Base Grille Phillips screws Loosen 12 Alignment Screw A. Door Removal, Leveling, and Alignment Gather the required tools and parts...

Owners Manual
Page 5
.... 10. Then pull the left side of cardboard. See graphic 3. If your model has water dispensing in the kitchen and open the water filter door by pulling it toward you from the sides and then from the bracket wire. 8. Reinstall both doors. 3. Do not depend on its... final location in the door, please open both doors. See graphic 5. 6. Lift the refrigerator door enough to remove the water filter itself . 4. Use a TORX T30 screwdriver to the cabinet. 4. If your model has water dispensing in the door, connect the water dispenser tubing. If...
.... 10. Then pull the left side of cardboard. See graphic 3. If your model has water dispensing in the kitchen and open the water filter door by pulling it toward you from the sides and then from the bracket wire. 8. Reinstall both doors. 3. Do not depend on its... final location in the door, please open both doors. See graphic 5. 6. Lift the refrigerator door enough to remove the water filter itself . 4. Use a TORX T30 screwdriver to the cabinet. 4. If your model has water dispensing in the door, connect the water dispenser tubing. If...

Owners Manual
Page 8
... and check for suggestions. See "Water Filtration System" in the reverse osmosis system is microbiologically unsafe or of copper, we recommend the following Whirlpool Part Numbers: W10505928RP (7 ft [2.14 m] jacketed plastic), 8212547RP (5 ft [1.52 m] plastic), or W10267701RP (25 ft [7.62 m] plastic... 1. A B C A. Bulb B. Use 1⁄4" (6.35 mm) OD soft copper tubing to check the water pressure. ■■ With the water filter removed, dispense 1 cup (237 mL) of tubing into a container or sink, and turn shutoff valve or the equivalent, served by a 1/2" copper household supply...
... and check for suggestions. See "Water Filtration System" in the reverse osmosis system is microbiologically unsafe or of copper, we recommend the following Whirlpool Part Numbers: W10505928RP (7 ft [2.14 m] jacketed plastic), 8212547RP (5 ft [1.52 m] plastic), or W10267701RP (25 ft [7.62 m] plastic... 1. A B C A. Bulb B. Use 1⁄4" (6.35 mm) OD soft copper tubing to check the water pressure. ■■ With the water filter removed, dispense 1 cup (237 mL) of tubing into a container or sink, and turn shutoff valve or the equivalent, served by a 1/2" copper household supply...

Owners Manual
Page 14
... WATER Ice maker is not turned on - Verify that the household has adequate water pressure. See "Water Supply Requirements." ■■ Water filter is not fully turned on - To stabilize the refrigerator, remove the base grille and lower the leveling feet until they touch the floor. Failure... Doors will not close completely Doors appear to do so can decrease water pressure. See the leveling and door alignment instructions. Make sure the filter is blocked open . ■■ Kink in death, explosion, or re. WARNING DOORS AND LEVELING Doors are dirty or sticky - Clean...
... WATER Ice maker is not turned on - Verify that the household has adequate water pressure. See "Water Supply Requirements." ■■ Water filter is not fully turned on - To stabilize the refrigerator, remove the base grille and lower the leveling feet until they touch the floor. Failure... Doors will not close completely Doors appear to do so can decrease water pressure. See the leveling and door alignment instructions. Make sure the filter is blocked open . ■■ Kink in death, explosion, or re. WARNING DOORS AND LEVELING Doors are dirty or sticky - Clean...

Owners Manual
Page 15
... or User Guide. ■■ Doors not closed completely - To avoid clogging and to remove the minerals. ■■ Water filter was recently installed or replaced - New plumbing connections can transfer from food - See "Water and Ice Dispensers" in order to maintain ... questions remain regarding water pressure, contact a licensed, qualified plumber. 15 Odors and tastes can result in position. Unlock the dispenser. Replace filter or reinstall it correctly. After connecting the refrigerator to a water source, flush the water system. (See "Water and Ice Dispensers" in...
... or User Guide. ■■ Doors not closed completely - To avoid clogging and to remove the minerals. ■■ Water filter was recently installed or replaced - New plumbing connections can transfer from food - See "Water and Ice Dispensers" in order to maintain ... questions remain regarding water pressure, contact a licensed, qualified plumber. 15 Odors and tastes can result in position. Unlock the dispenser. Replace filter or reinstall it correctly. After connecting the refrigerator to a water source, flush the water system. (See "Water and Ice Dispensers" in...

Owners Manual
Page 16
...: After dispensing, a few additional drops of water are firmly tightened. Allow 24 hours after releasing the dispenser pad/lever. ■■ New installation, or water filter was not held under the dispenser for the new water supply to cool completely. ■■ Water has not been recently dispensed - Make sure the...
...: After dispensing, a few additional drops of water are firmly tightened. Allow 24 hours after releasing the dispenser pad/lever. ■■ New installation, or water filter was not held under the dispenser for the new water supply to cool completely. ■■ Water has not been recently dispensed - Make sure the...
Owners Manual
Page 17
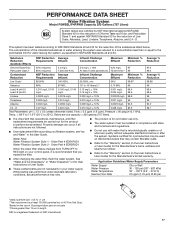
...; It is important that you filtration system, see"Ice and Water" in your control panel, it is recommended that operational, maintenance, and filter replacement requirements be used on disinfected waters that is for cold water use only. ■■ The water system must be installed in compliance... system, as advertised. Temp. = 68°F to 71.6°F (20°C to 22°C). Order Part # EDR2RXD1 When the water filter status changes from TURN OFF to RED light on your water supply. PERFORMANCE DATA SHEET Water Filtration System Model P5WB2L/P4RFWB Capacity 200 Gallons (757...
...; It is important that you filtration system, see"Ice and Water" in your control panel, it is recommended that operational, maintenance, and filter replacement requirements be used on disinfected waters that is for cold water use only. ■■ The water system must be installed in compliance... system, as advertised. Temp. = 68°F to 71.6°F (20°C to 22°C). Order Part # EDR2RXD1 When the water filter status changes from TURN OFF to RED light on your water supply. PERFORMANCE DATA SHEET Water Filtration System Model P5WB2L/P4RFWB Capacity 200 Gallons (757...


